(Damn
Vulnerable Web App (DVWA):
Lesson 1)
{ How to Install DVWA in
Fedora 14 }
|
Section 0. Background
Information |
- What is Damn Vulnerable Web App (DVWA)?
- Damn Vulnerable Web App (DVWA) is a PHP/MySQL
web application that is damn vulnerable.
- Its main goals are to be an aid for security
professionals to test their skills and tools in a legal environment, help
web developers better understand the processes of securing web applications
and aid teachers/students to teach/learn web application security in a class
room environment.
- Pre-Requisite Lab
-
Lab
Notes
- In this lab we will do the following:
- Install Apache Webserver
- Install Mysql Server
- Install PHP
- Install and Configure DVWA
- Legal Disclaimer
- As a condition of your use of this Web
site, you warrant to computersecuritystudent.com that you will not use
this Web site for any purpose that is unlawful or
that is prohibited by these terms, conditions, and notices.
- In accordance with UCC § 2-316, this
product is provided with "no warranties, either express or implied." The
information contained is provided "as-is", with "no guarantee of
merchantability."
- In addition, this is a teaching website
that does not condone malicious behavior of
any kind.
- You are on notice, that continuing
and/or using this lab outside your "own" test environment
is considered
malicious and is against the law.
|
Section 1:
Configure Fedora14 Virtual Machine Settings |
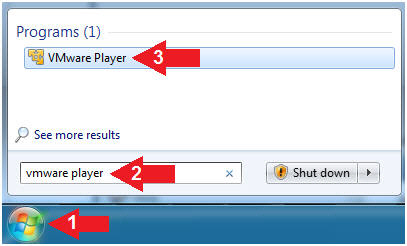
- Start VMware Player
- Instructions
- For Windows 7
- Click Start Button
- Search for "vmware player"
- Click VMware Player
- For Windows XP
- Starts --> Programs --> VMware
Player
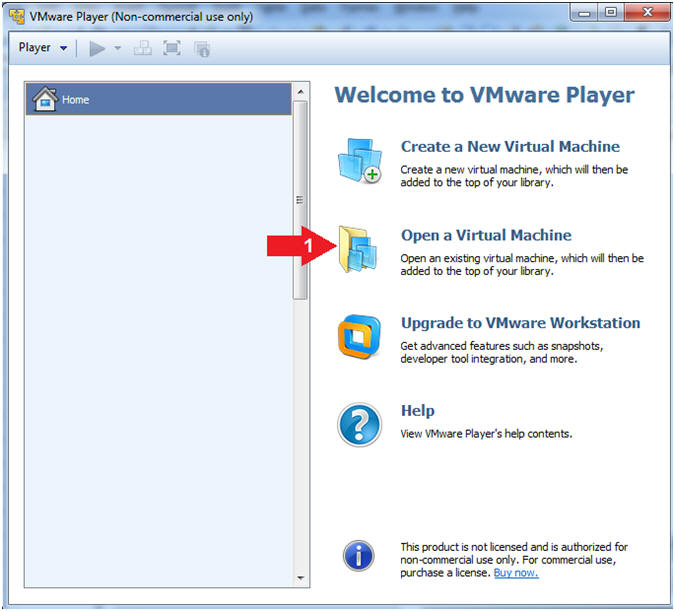
- Open a Virtual Machine (Part 1)
- Instructions:
- Click on Open a Virtual Machine
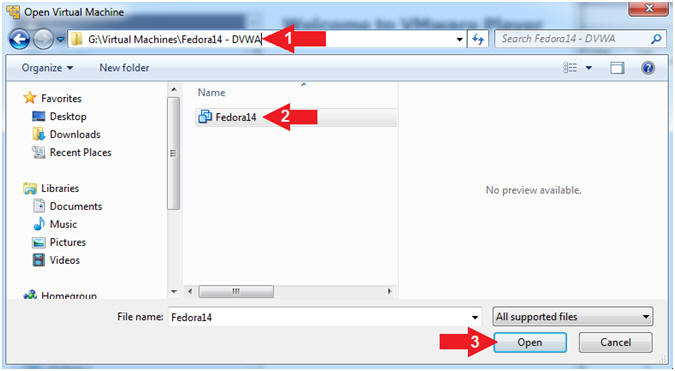
- Open a Virtual Machine (Part 2)
- Instructions:
- Navigate to Virtual Machine location
- In my case, it is
G:\Virtual
Machines\Fedora14 - DVWA
- Click on the Fedora14 Virtual Machine
- Click on the Open Button
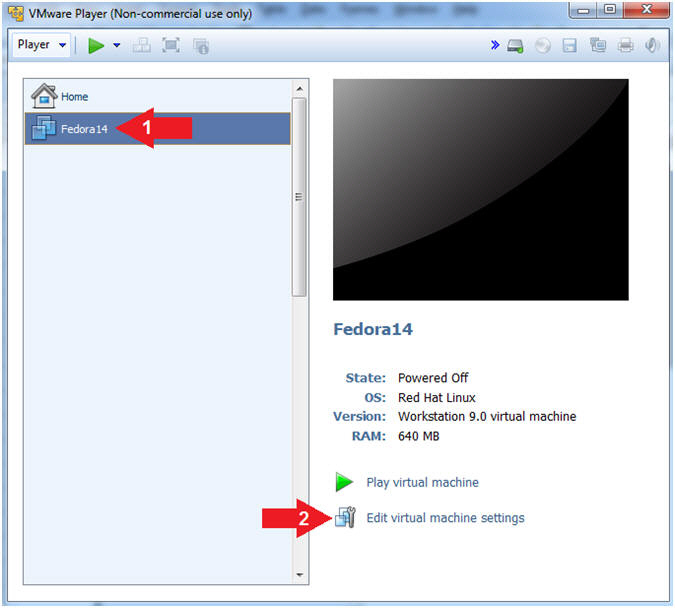
- Edit the virtual machine settings
- Instructions:
- Highlight the Fedora14 VM
- Click on Edit virtual machine settings.
- Edit Network Adapter
- Instructions:
- Click the Hardware Tab
- Highlight Network Adapter
- Select Bridged: Connected directly to
the physical network
- Select the OK Button

|
Section 2:
Login to Fedora14 |
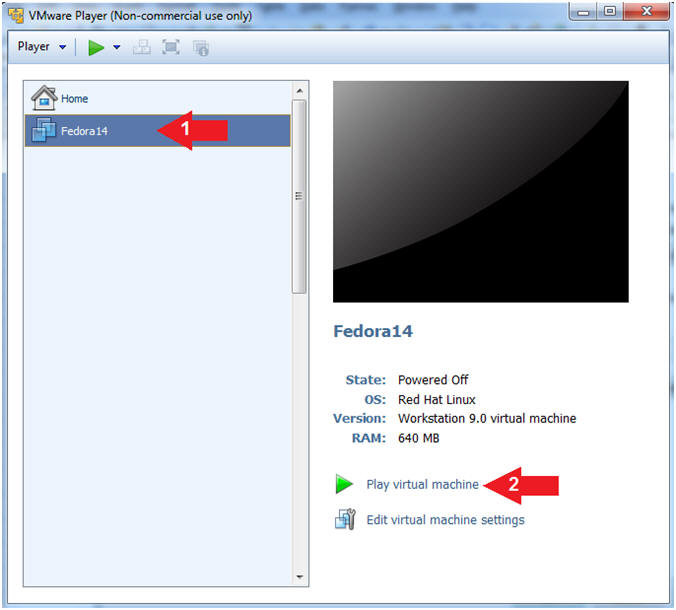
- Start the Fedora14 VM Instance
- Instructions:
- Select Fedora14
- Play virtual machine
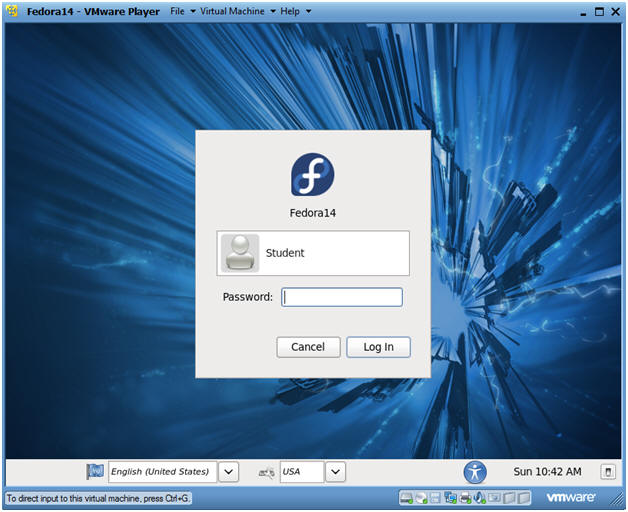
- Login to Fedora14
- Instructions:
- Login: student
- Password: <whatever you set
it to>.
-
|
Section 3:
Open Console Terminal and Retrieve IP Address |
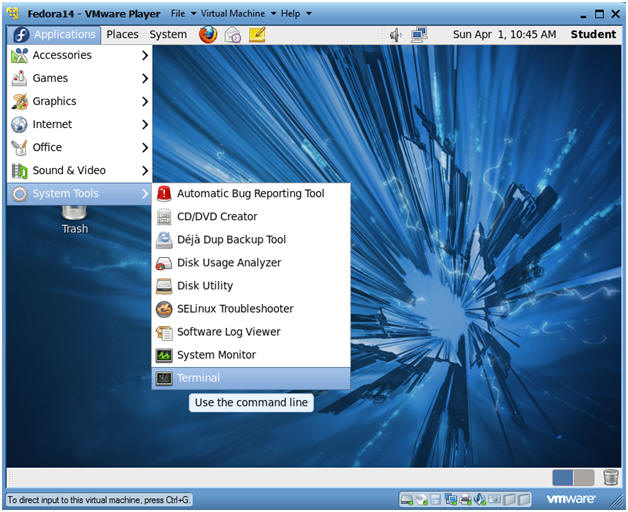
- Start a Terminal Console
- Instructions:
- Applications --> Terminal
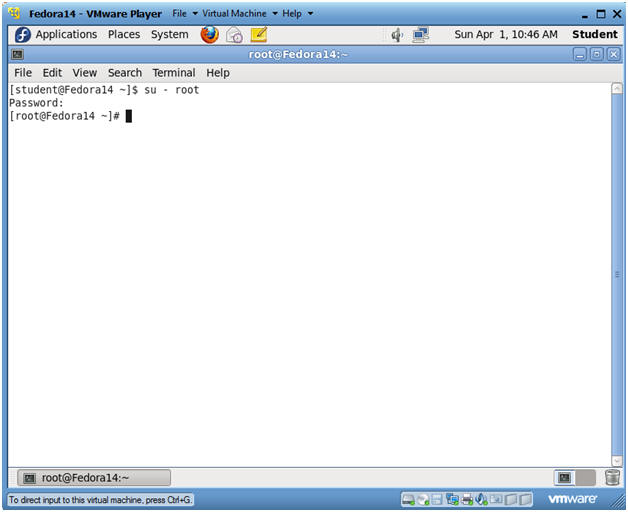
- Switch user to root
- Instructions:
- su - root
- <Whatever you set the root password to>
-
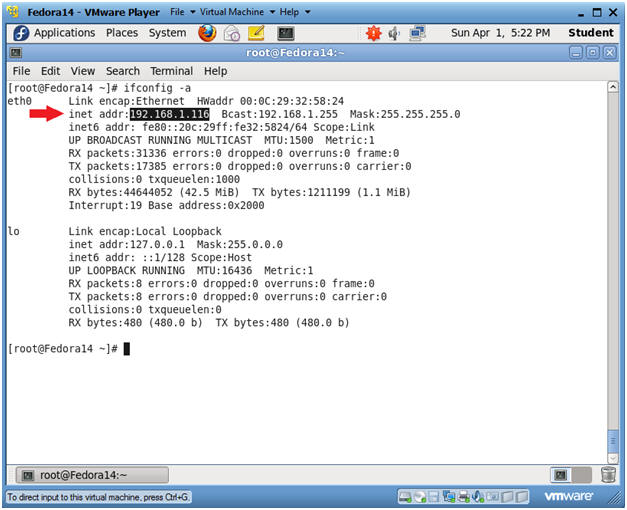
- Get IP Address
- Instructions:
- ifconfig -a
- Notes:
- As indicated below, my IP address is
192.168.1.116.
- Please record your IP address.
|
Section 4: Disable SELinux |
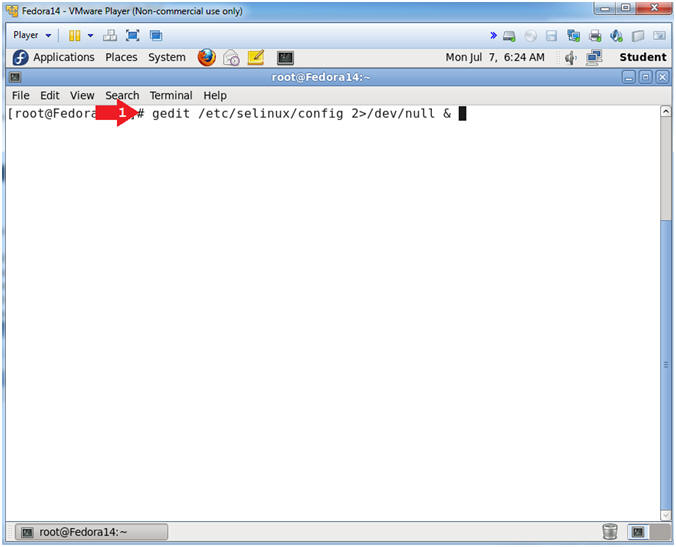
- Open the SELinux config file with gedit
- Instructions:
- gedit /etc/selinux/config 2>/dev/null &
- Notes (FYI):
- gedit, is a text editor for the GNOME
Desktop.
- /etc/selinux/config, is the file name
that gedit will open.
- 2>/dev/null, sends standard error
messages to a black hole (/dev/null).
- The "&" is used to open gedit in the
background.
- If you are the Linux Guru feel free to
use the VI editor instead.
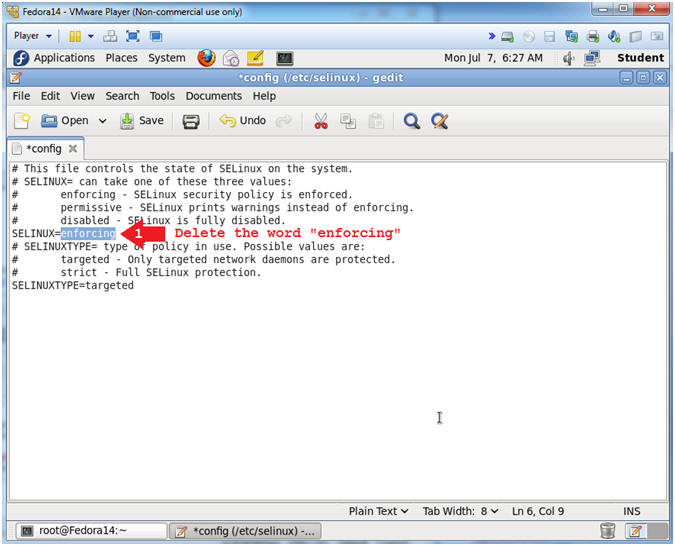
- Delete enforcing
- Instructions:
- Arrow down to
SELINUX=enforcing
- Highlight the word "enforcing"
and press the delete button
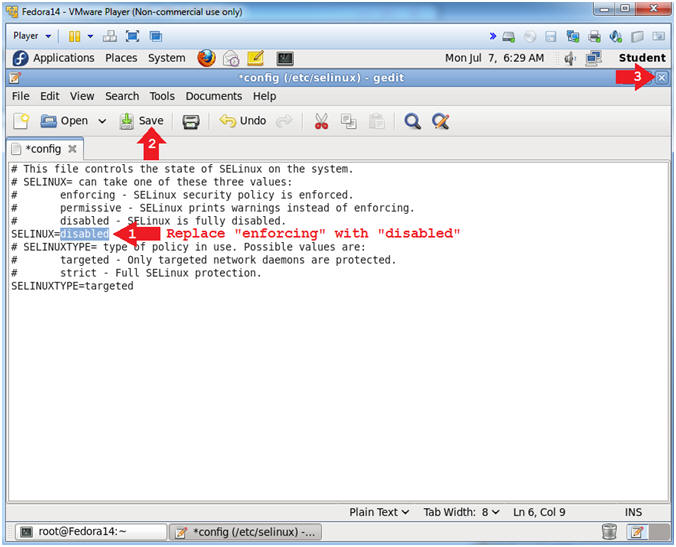
- Replace enforcing with disabled
- Instructions:
- Replace "enforcing" with the word
"disabled"
- Click Save
- Click the "X" to Close
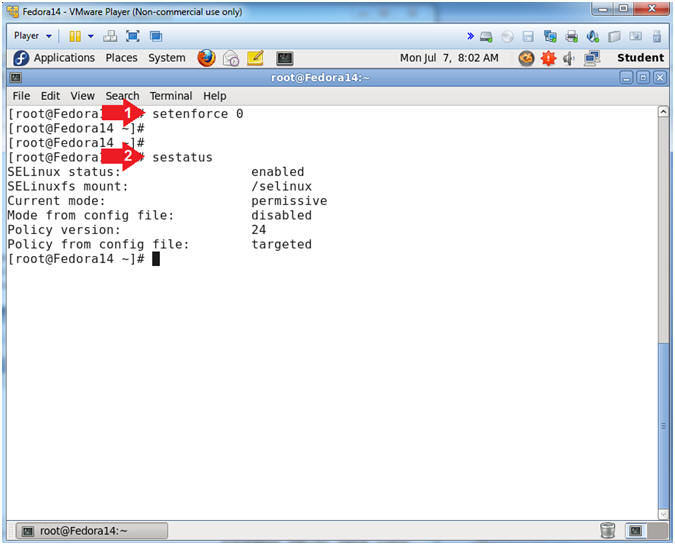
- Open the SELINUX config file with gedit
- Instructions:
- setenforce 0
- sestatus
- Notes (FYI):
- setenforce - is used to modify the mode
SELinux is running in.
- Generally, I do not support disabling
SELinux. However, we are going to turn this server into a
vulnerable machine by later installing Mutillidae.
|
Section 5: Disable Firewall |
- Disable the Firewall
- Instructions:
- service iptables stop
- chkconfig iptables off
- Notes (FYI):
- Again, I do not support disabling the
firewall. However, we are going to turn this server into a
vulnerable machine by later installing Mutillidae.

|
Section 6: Install
Apache httpd Server |
- Download httpd
- Instructions:
- yum install httpd.i686
- y
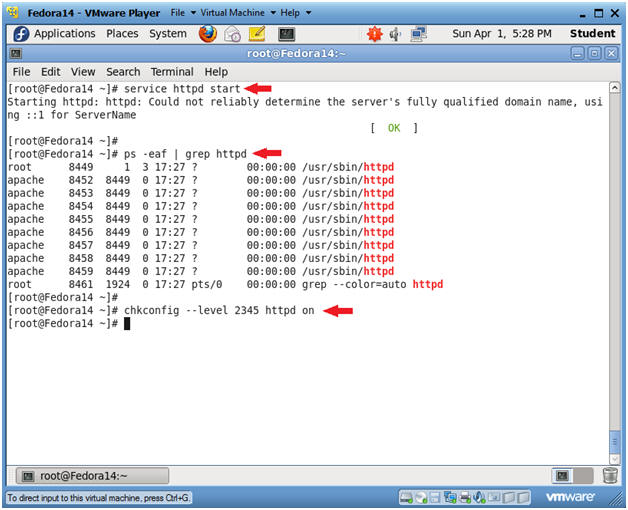
- Start Apache
- Instructions:
- service httpd start
- This starts up the Apache Listening
Daemon
- ps -eaf | grep httpd
- Check to make sure Apache is
running.
- chkconfig --level 2345 httpd on
- Create Start up script for run
levels 2, 3, 4 and 5.
|
Section 7: Install mysql and mysql-server |
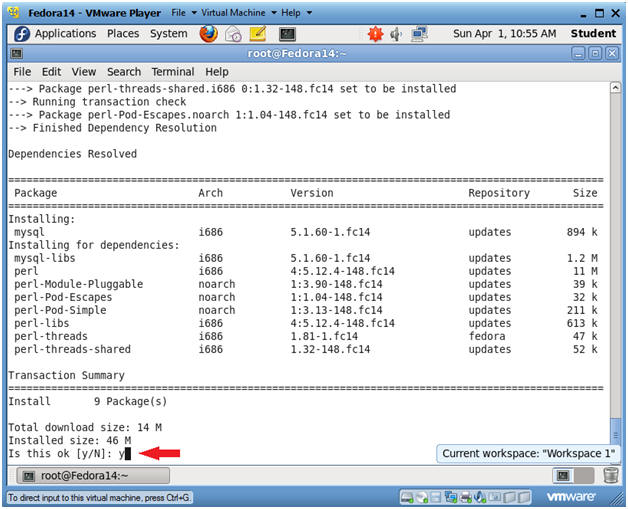
- Install mysql
- Instructions:
- yum install mysql.i686
- Continue to next step

- Install mysql
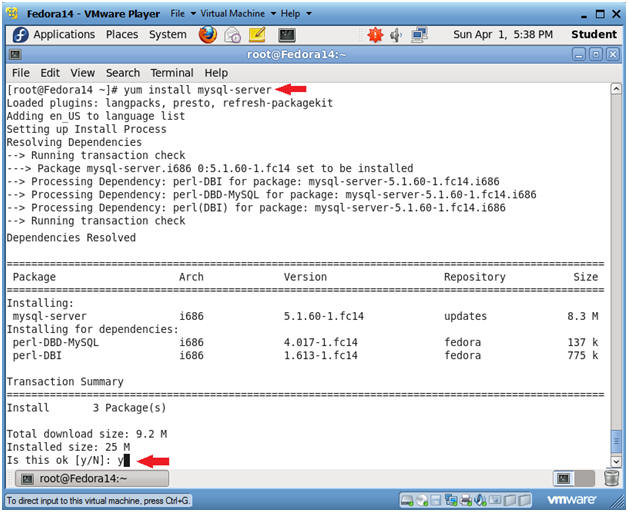
- Install mysql-server
- Instructions:
- yum install mysql-server
- y
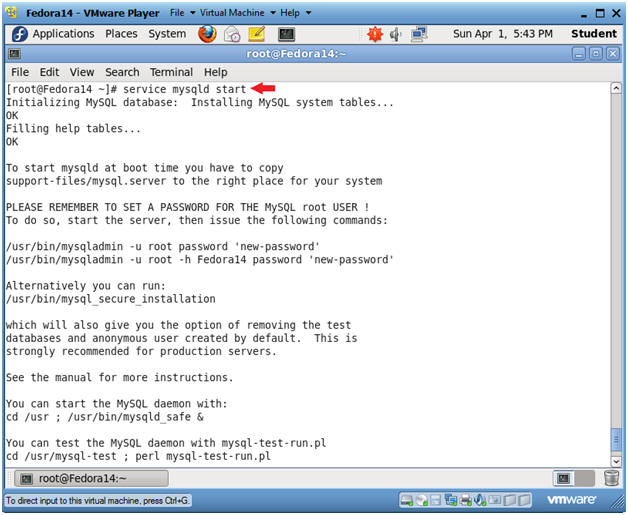
- Start Up mysqld
- Instructions:
- service mysqld start
- Start Up mysqld
- Instructions:
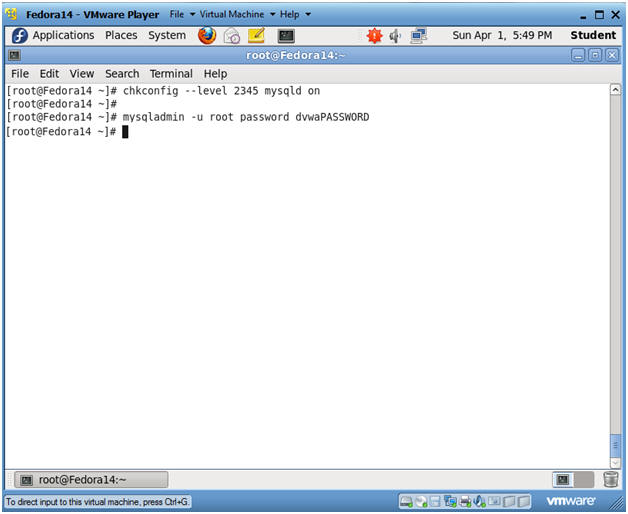
- chkconfig --level 2345 mysqld on
- Creates the start up scripts for
run level 2, 3, 4 and 5.
- mysqladmin -u root password
dvwaPASSWORD
- Sets the mysql root password to "dvwaPASSWORD"
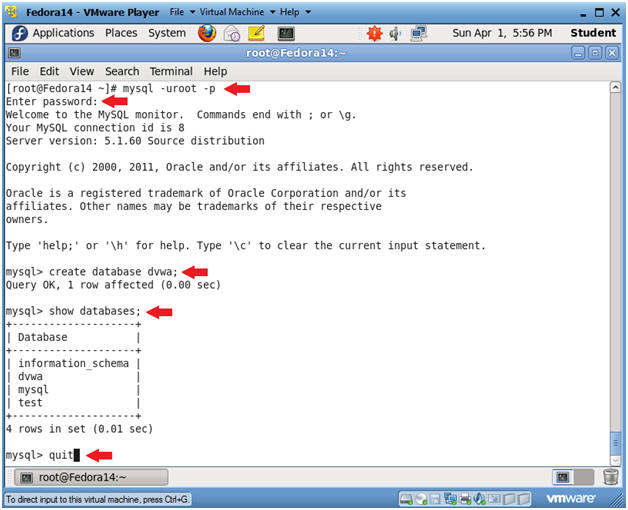
- Login to mysql and create dvwa database
- Instructions:
- mysql -uroot -p
- dvwaPASSWORD
- create database dvwa;
- quit
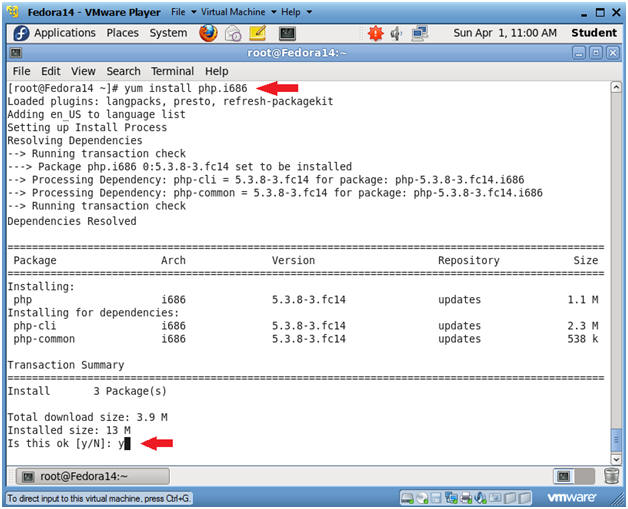
- Install PHP
- Instructions:
- yum install php.i686
- y
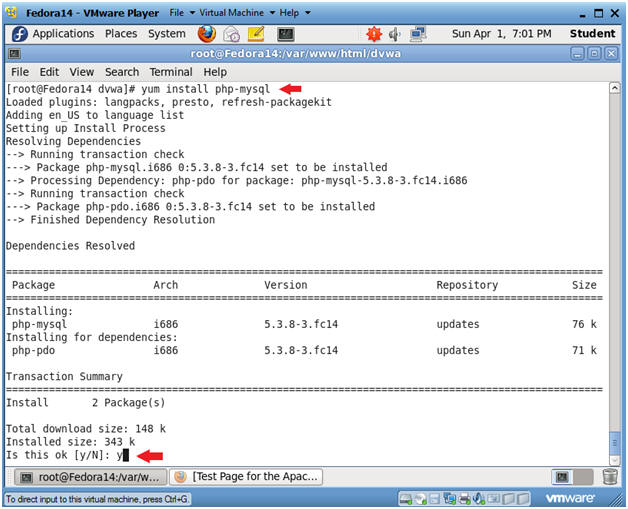
- Install php-mysql
- Instructions:
- yum install php-mysql
- y
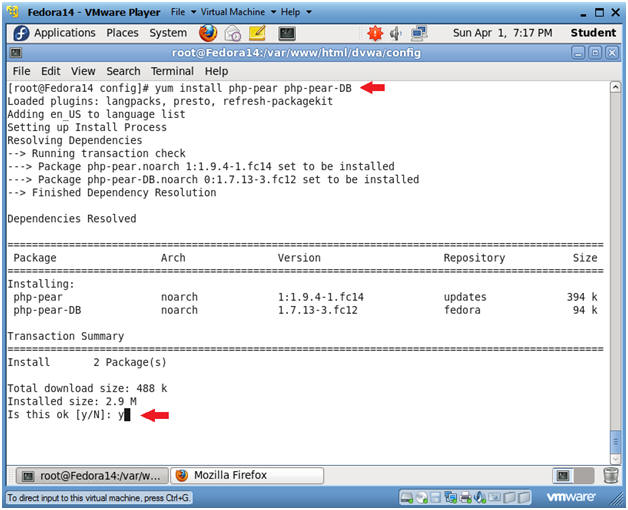
- Install php-pear
- Instructions:
- yum install php-pear php-pear-DB
- y
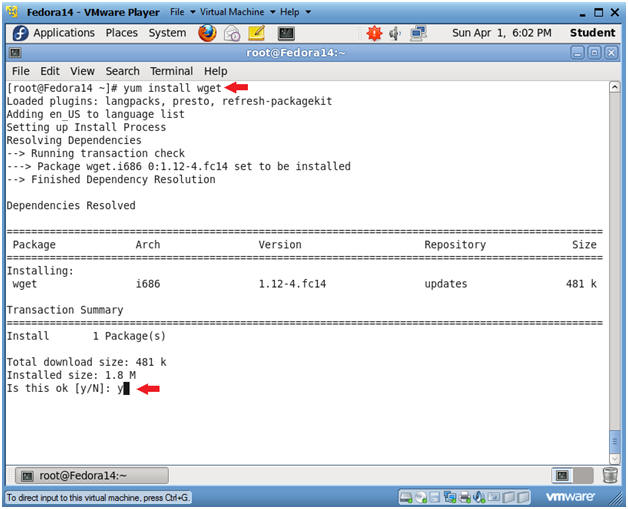
- Install wget
- Instructions:
- yum install wget
- y
|
Section 10: Install
Damn Vulnerable Web App (DVWA) |
- Download DVWA
- Note(FYI):
- DVWA-1.0.7.zip is an older version.
ComputerSecurityStudent provides this zip file, since it is no longer
available at google source.
- The most recent version can be found at
http://www.dvwa.co.uk/
- Instructions:
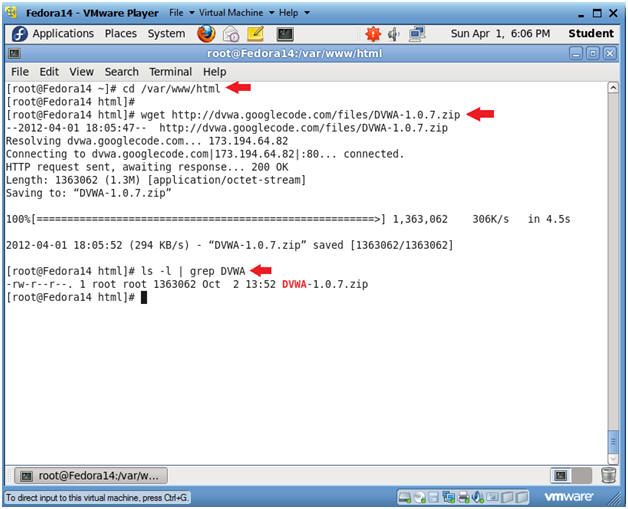
- cd /var/www/html
- wget http://www.computersecuritystudent.com/SECURITY_TOOLS/DVWA/DVWAv107/lesson1/DVWA-1.0.7.zip
- Grab the DVWA-1.0.7 application.
- Remember to down the zip file from
computersecuritystudent and not googlecode.
- ls -l | grep DVWA
- Confirm DVWA-1.0.7.zip was
downloaded
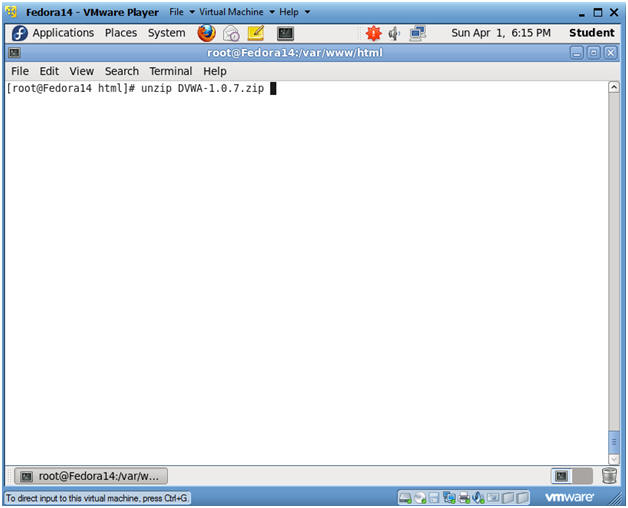
- Unzip Package
- Instructions:
- unzip DVWA-1.0.7.zip
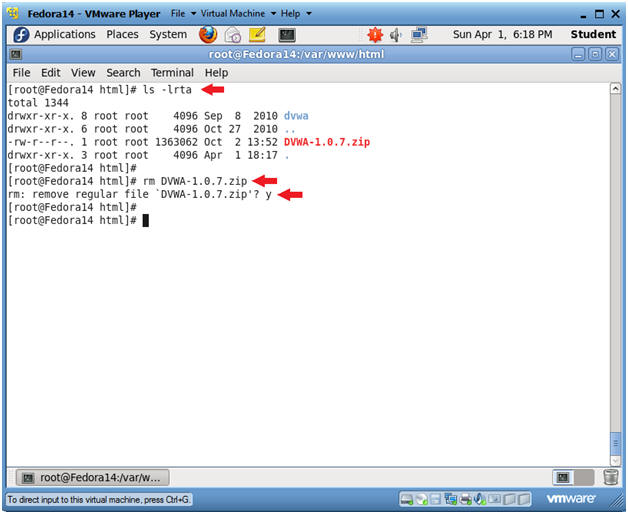
- Remove Zip File
- Instructions:
- ls -lrta
- rm DVWA-1.0.7.zip
- y
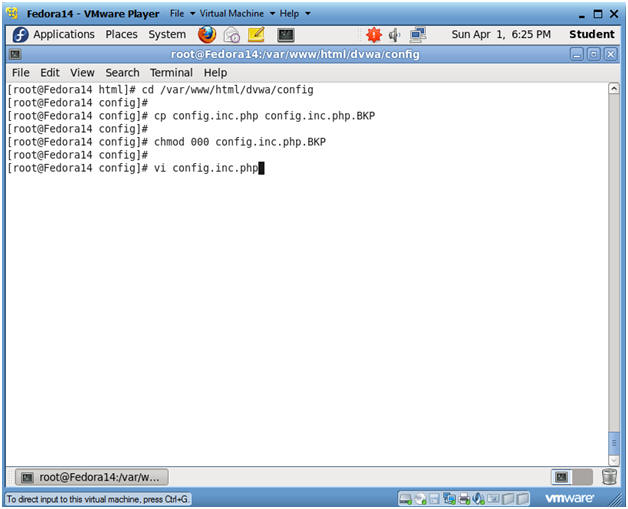
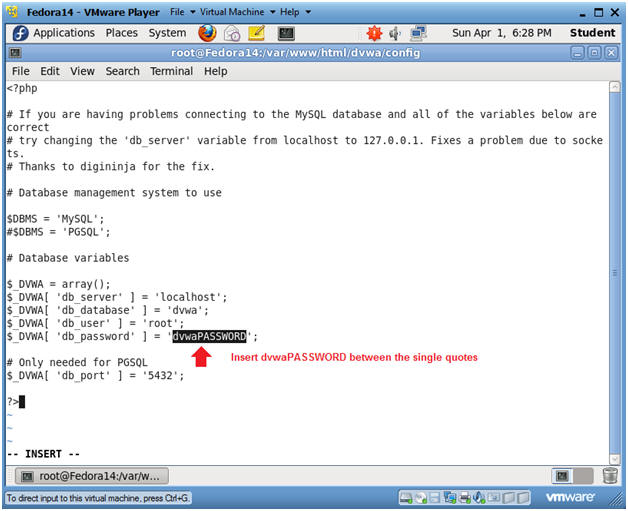
- Configure config.inc.php
- Instructions:
- cd /var/www/html/dvwa/config
- This is the configuration directory
for DVWA.
- cp config.inc.php config.inc.php.BKP
- chmod 000 config.inc.php.BKP
- Remove Permissions to the Backup
Copy
- vi config.inc.php
- This is the configuration file for
DVWA that handles the database communication from the Web App.
- Configure config.inc.php
- Instructions:
- Arrow down to the line that contains
db_password
- Arrow right and place your cursor on
the second single quote
- Press "i"
- This puts the vi editor into INSERT
mode.
- Type "dvwaPASSWORD"
- Press <Esc>
- This takes the vi editor out of
INSERT mode.
- Type ":wq!"
- This save the config.inc.php file.
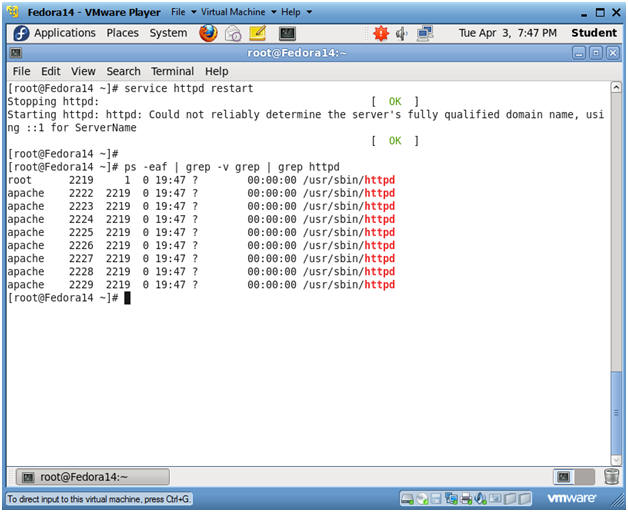
- Restart Apache
- Instructions:
- service httpd restart
- ps -eaf | grep -v grep | grep httpd
- Make sure Apache is running.
- Start up a Web Browser
- Instructions:
- Applications --> Internet --> Firefox
- Notes(FYI):
- At this point, you can start up a web
browser on any computer on your network (Windows, Mac, Whatever you
want).
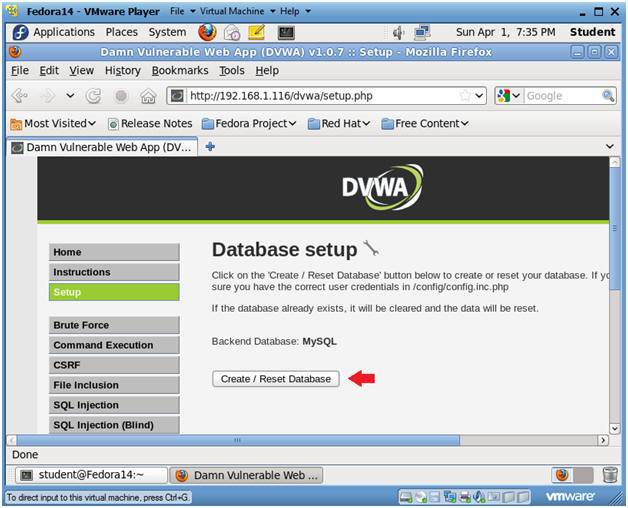
- DVWA Database setup
- Instructions:
- http://192.168.1.116/dvwa/setup.php
- Replace 192.168.1.116 with the IP
Address obtained from Section 3, Step 3.
- Click the Create / Reset Database
button
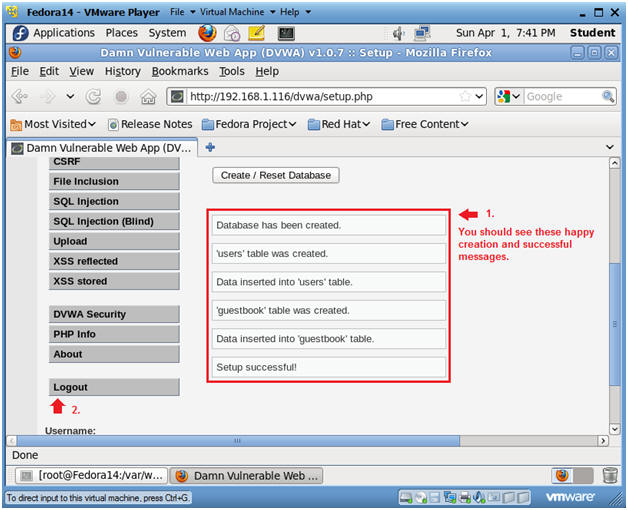
- DVWA Creation Messages
- Instructions:
- You should see the below database
created, data inserted, and setup successful messages.
- Click on Logout
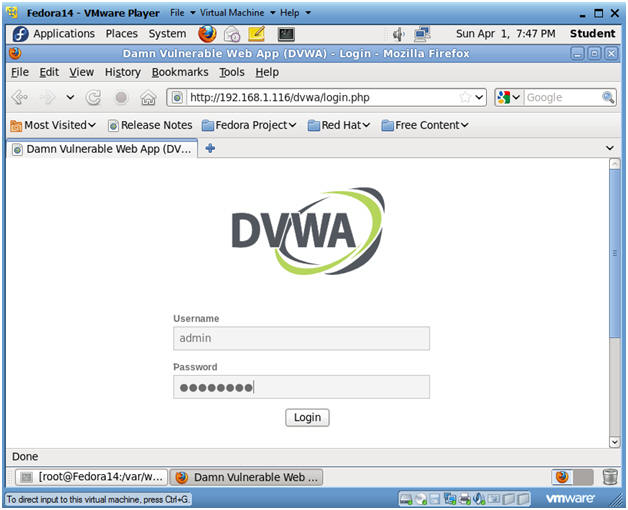
- Login to DVWA
- Instructions:
- Username: admin
- Password: password
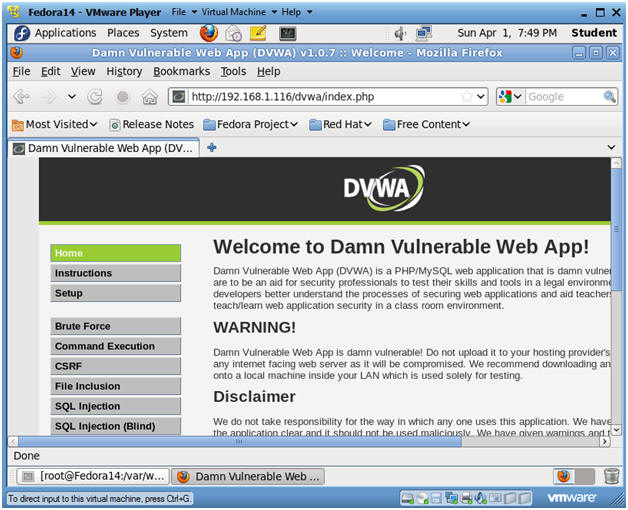
- Welcome to DVWA
- Note(FYI):
- Click
Here for subsequent lessons.
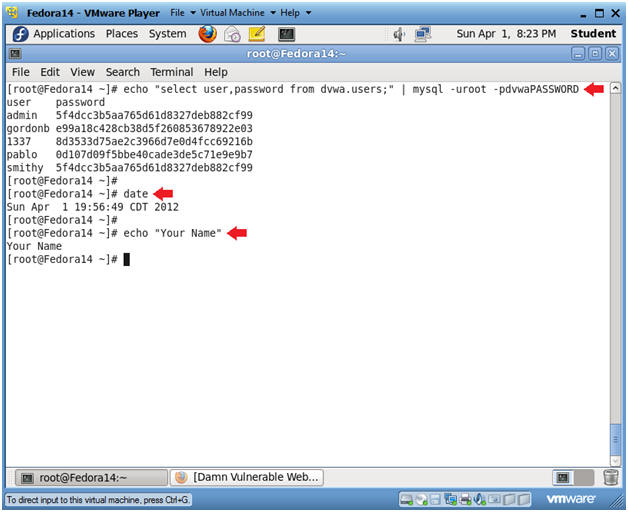
- Proof of Lab
- Instructions:
- echo "select user,password
from dvwa.users;" | mysql -uroot -pdvwaPASSWORD
- date
- echo "Your Name"
- Replace the string "Your Name" with
your actual name.
- e.g., echo "John Gray"
-
Proof of Lab Instructions:
- Do a PrtScn
- Paste into a word document
- Upload to Moodle
-
|
 
|