(FTK Imager: Lesson 3)
{ Create Disk Image after Deleting a Picture }
| Section 0. Background Information |
- What is FTK Imager?
- The FTK toolkit includes a standalone disk imaging program called FTK Imager. The FTK Imager has the ability to save an image of a hard disk in one file or in segments that may be later reconstructed.
- It calculates MD5 hash values and confirms the integrity of the data before closing the files.
- In addition to the FTK Imager tool can mount devices (e.g., drives) and recover deleted files.
- Pre-Requisite
- FTK Imager: Lesson 1: Install FTK Imager
-
FTK Imager: Lesson 2: Create Virtual Hard Drive, Delete File, Recover
File
- Note: This lab is necessary, because you will need to create a Virtual Hard Drive.
-
Lab Notes
- In this lab we will do the following:
- Download a Picture to the Virtual Hard Drive
- Delete a Picture from the Virtual Hard Drive
- Delete the Picture from the Recycle Bin
- Create an image of the Virtual Hard Drive with FTK Imager
- In this lab we will do the following:
- Legal Disclaimer
- As a condition of your use of this Web site, you warrant to computersecuritystudent.com that you will not use this Web site for any purpose that is unlawful or that is prohibited by these terms, conditions, and notices.
- In accordance with UCC § 2-316, this product is provided with "no warranties, either express or implied." The information contained is provided "as-is", with "no guarantee of merchantability."
- In addition, this is a teaching website that does not condone malicious behavior of any kind.
- Your are on notice, that continuing and/or using this lab outside your "own" test environment is considered malicious and is against the law.
- © 2012 No content replication of any kind is allowed without express written permission.
| Section 1: Log into Damn Vulnerable WXP-SP2 |
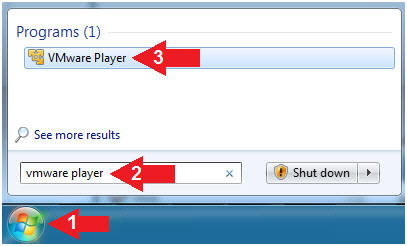
- Start VMware Player
- Instructions
- For Windows 7
- Click Start Button
- Search for "vmware player"
- Click VMware Player
- For Windows XP
- Starts --> Programs --> VMware Player
- For Windows 7
- Instructions
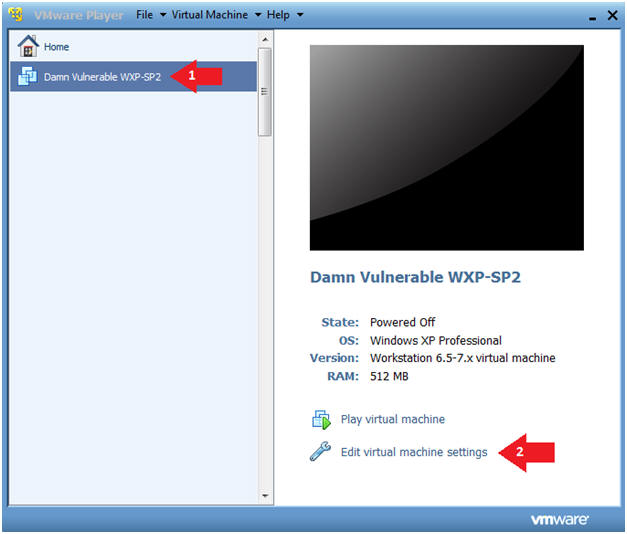
- Start Up Damn Vulnerable WXP-SP2.
- Instructions:
- Click on Damn Vulnerable WXP-SP2
- Click on Edit virtual machine Settings
- Note(FYI):
- For those of you not part of my class, this is a Windows XP machine running SP2.
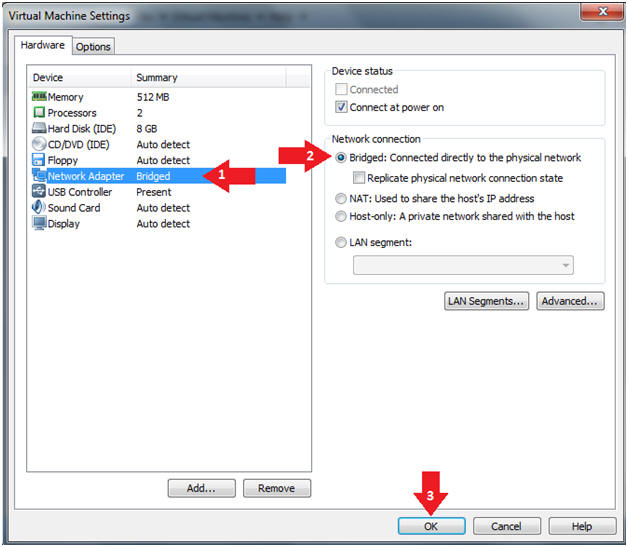
- Instructions:
- Edit Virtual Machine Settings
- Instructions:
- Click on Network Adapter
- Click on the Bridged Radio button
- Click on the OK Button
- Instructions:
- Play Virtual Machine
- Instructions:
- Click on Damn Vulnerable WXP-SP2
- Click on Play virtual machine

- Instructions:
- Logging into Damn Vulnerable WXP-SP2.
- Instructions:
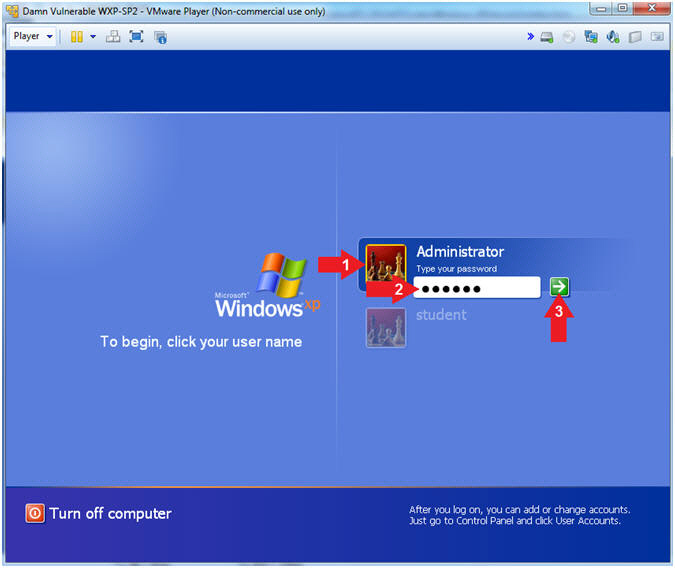
- Click on Administrator
- Password: Supply Password
- Press <Enter> or Click the Arrow
- Instructions:
- Open a Command Prompt
- Instructions:
- Start --> All Programs --> Accessories --> Command Prompt
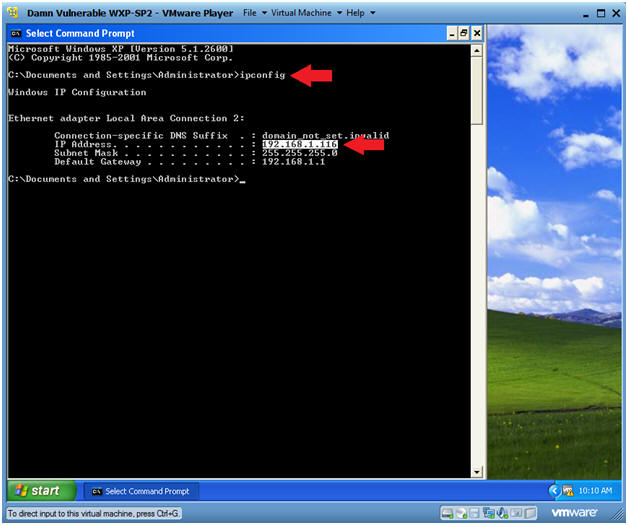
- Instructions:
- Obtain Damn Vulnerable WXP-SP2's IP Address
- Instructions:
- ipconfig
- Note(FYI):
- In my case, Damn Vulnerable WXP-SP2's IP Address 192.168.1.116.
- This is the IP Address of the Victim Machine that will be attacked by Metasploit.
- Record your Damn Vulnerable WXP-SP2's IP Address.
 .
.
- Instructions:
| Section 2: Download Test Picture |
- Start Firefox
- Instructions:
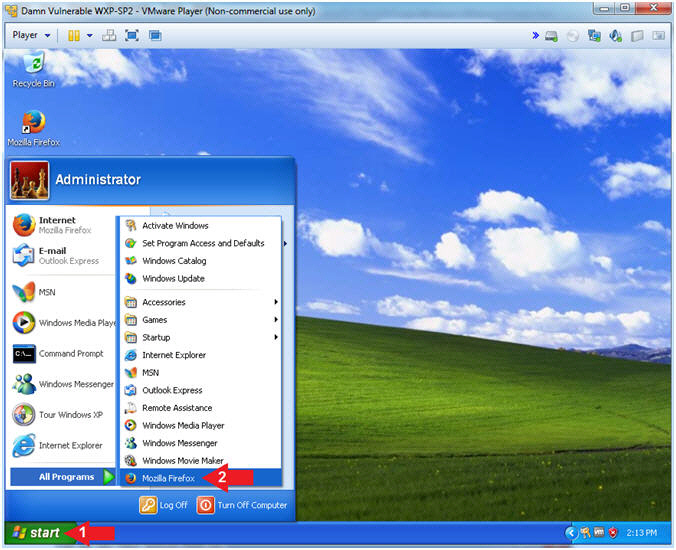
- Click the Start Button
- All Programs --> Mozilla Firefox
- Instructions:
- Start Test Picture Download
- Instructions:
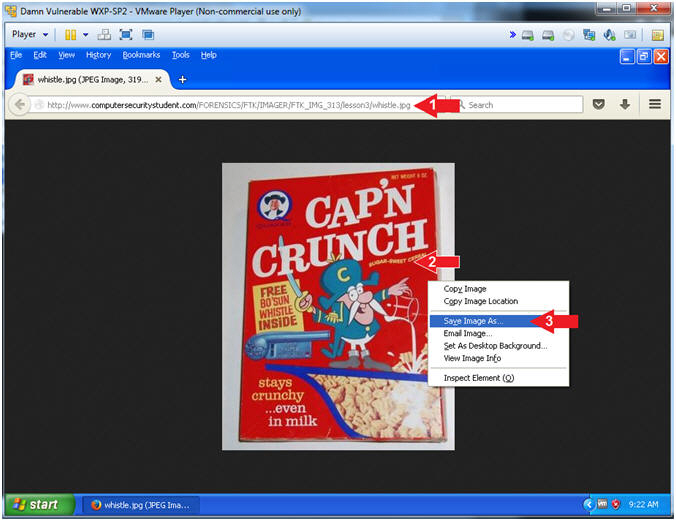
- Place the following URL in the Firefox
Address Textbox
- http://www.computersecuritystudent.com/FORENSICS/FTK/IMAGER/FTK_IMG_313/lesson3/whistle.jpg
- Right Click on the image
- Click on "Save Image As..."
- Place the following URL in the Firefox
Address Textbox
- Instructions:
- Save Test Picture Download
- Instructions:
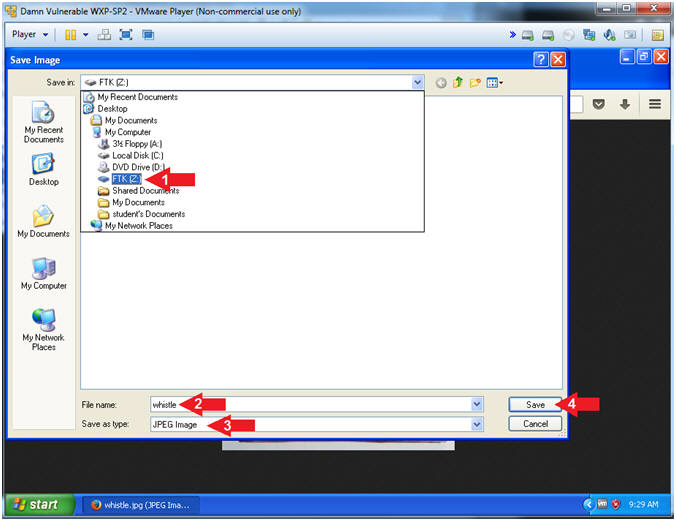
- Save in: Select the FTK (Z:) Drive
- Filename: whistle
- Save as type: JPEG Image
- Click the Save Button
- Instructions:
- Open My Computer
- Instructions:
- Click the Start Button
- All Programs --> My Computer
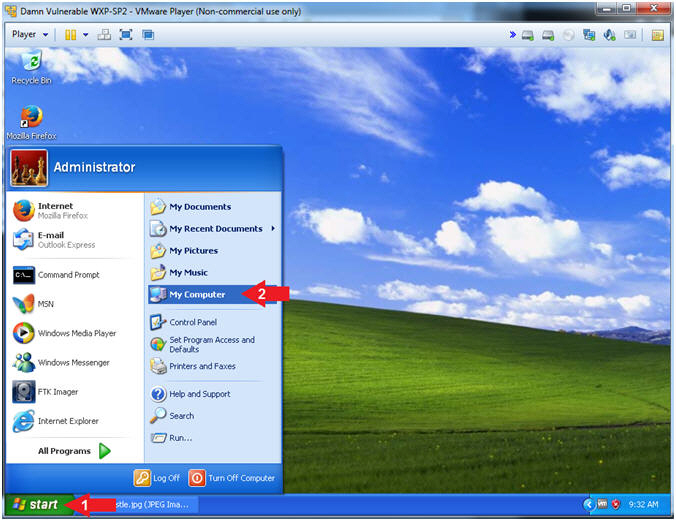
- Instructions:
- Open your FTK(Z:) Drive
- Instructions:
- Navigate to your FTK(Z:) Drive
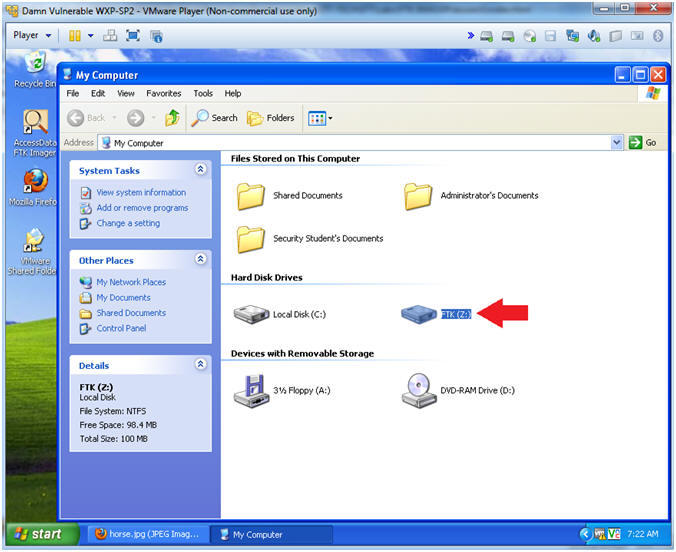
- Instructions:
- Delete the Test Image
- Instructions:
- Right Click on whistle.jpg
- Click Delete
- Click the OK Button in the "Confirm Deletion" warning window.
- Instructions:
- Open the Recycle Bin
- Instructions:
- Double Click on the Recycle Bin
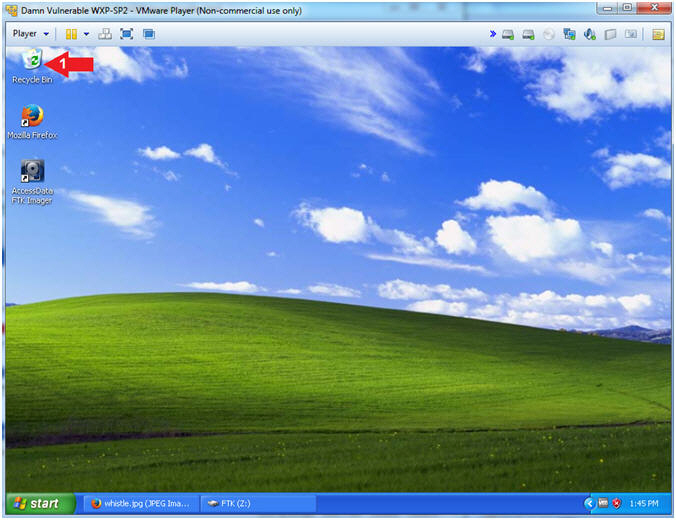
- Instructions:
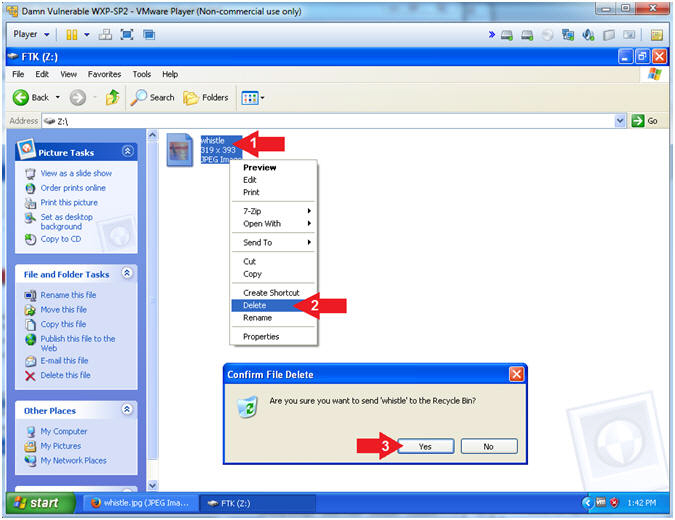
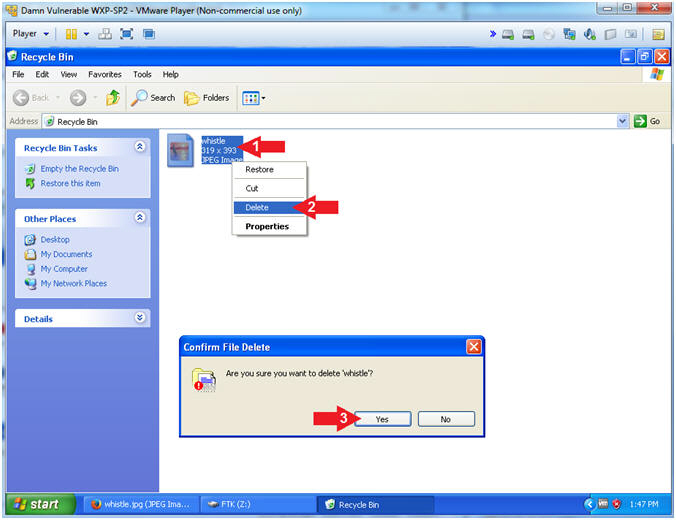
- Delete Test Picture From the Recycle Bin
- Instructions:
- Right Click on whistle.jpg
- Click Delete
- Confirm File Delete Windows: Click the Yes Button.
- Instructions:
| Section 3: Forensics Directory |
- Open a Command Prompt
- Instructions:
- Start --> All Programs --> Accessories --> Command Prompt
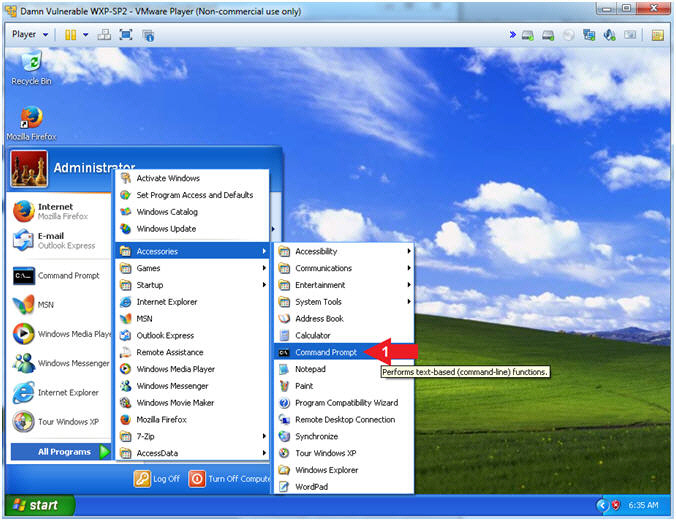
- Instructions:
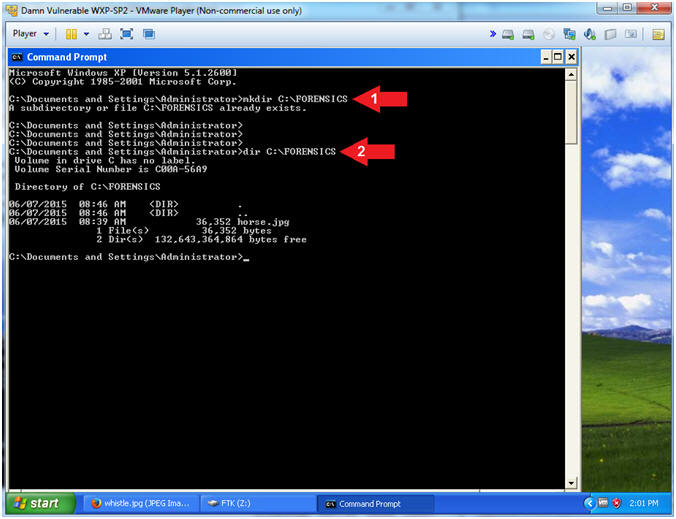
- Create a Forensics Directory
- Instructions:
- mkdir C:\FORENSICS
- dir C:\FORENSICS
- Note(FYI):
- If you completed the previously lab you will receive an error that states "A subdirectory or file C:\FORENSICS already exists."
- In Addition, the directory listing might list remnant files (eg., horse.jpg) from the previous lab.
- Instructions:
| Section 4: Start FTK Imager |
- Start FTK Imager
- Instructions:
- Click on the Start Button
- All Programs --> AccessData --> FTK Imager --> FTK Imager
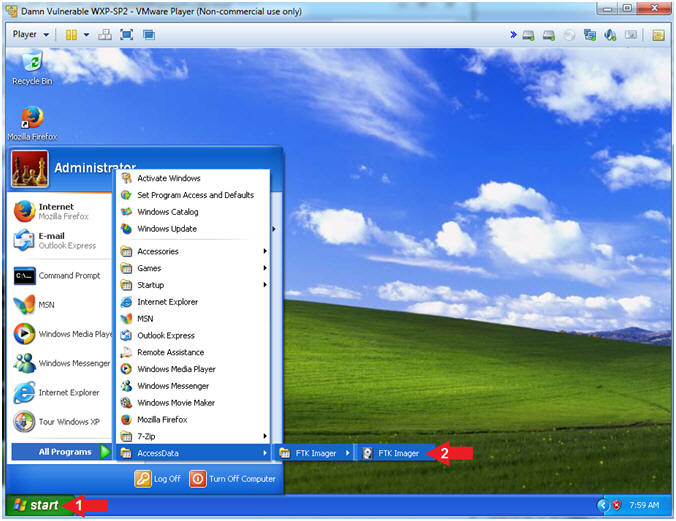
- Instructions:
| Section 5: FTK Imager: Create Disk Image... |
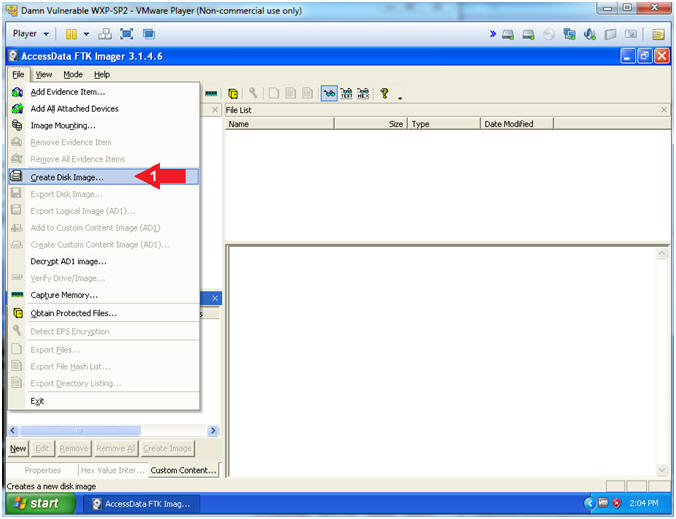
- Add Evidence
- Instructions:
- File --> Create Desk Image...
- Instructions:
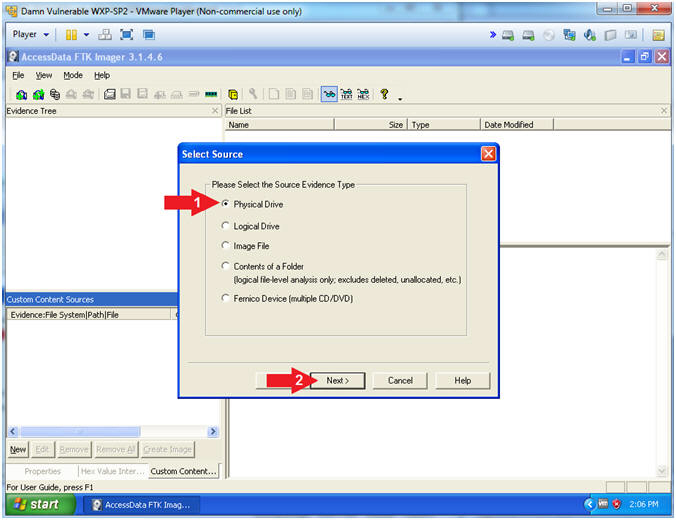
- Select Source
- Instructions:
- Select the "Physical Drive" Radio Button
- Click the Next Button
- Instructions:
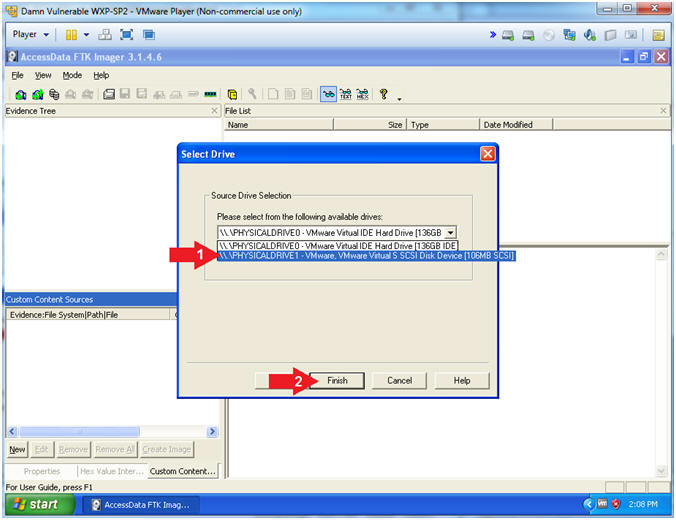
- Select Drive
- Instructions:
- Select \\PHYSICAL DRIVE1 ... (106MB SCSI)
- Click the Finish Button
- Instructions:
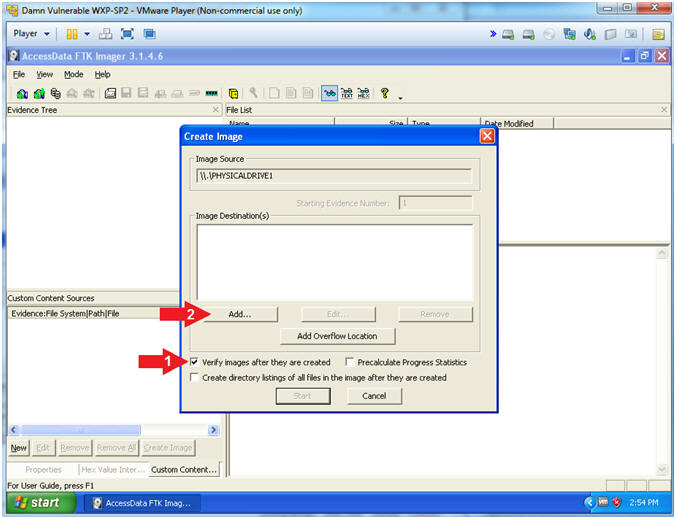
- Create Image
- Instructions:
- Check the "Verify images after they are created" checkbox
- Click the Add... Button
- Instructions:
- Select Image Type
- Instructions:
- Select the Raw(dd) Radio Button
- Click the Next Button

- Instructions:
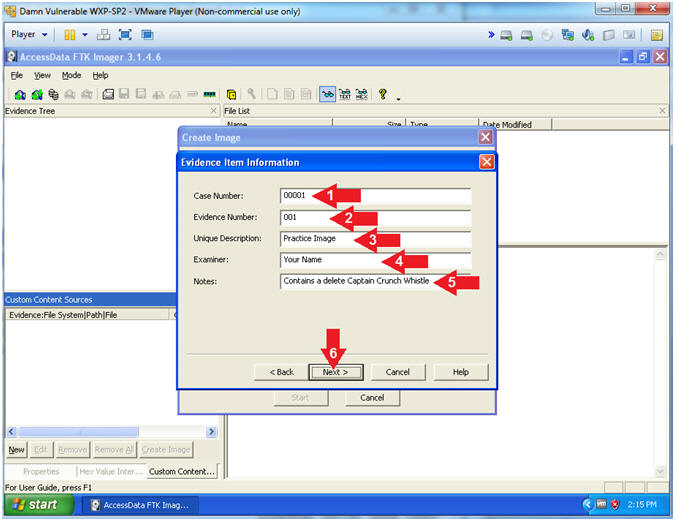
- Evidence Item Information
- Instructions:
- Case Number: 00001
- Evidence Number: 001
- Unique Description: Practice Image
- Examiner:
Your Name
- For Proof of Lab purposes, replace the string "Your Name" with your actual name.
- Contains a delete Captain Crunch Whistle
- Click the Next Button
- Instructions:
- Select Image Destination
- Instructions:
- Image Destination Folder: C:\FORENSICS
- Image Filename (Excluding Extension): practice-01
- Image Fragment Size(MB): 1500
- Click the Finish Button
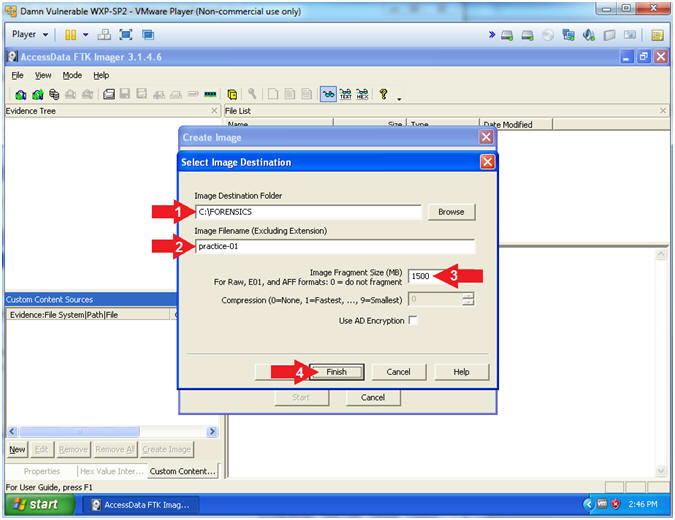
- Instructions:
- Create Image
- Instructions:
- Check "Verify images after they are created"
- Click the Start Button
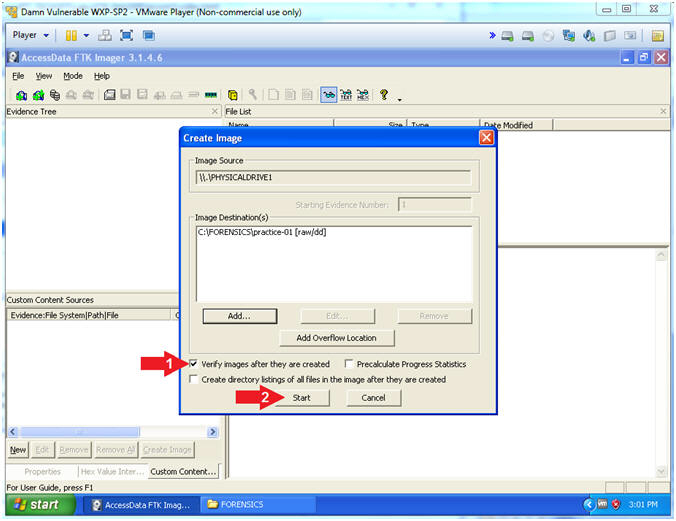
- Instructions:
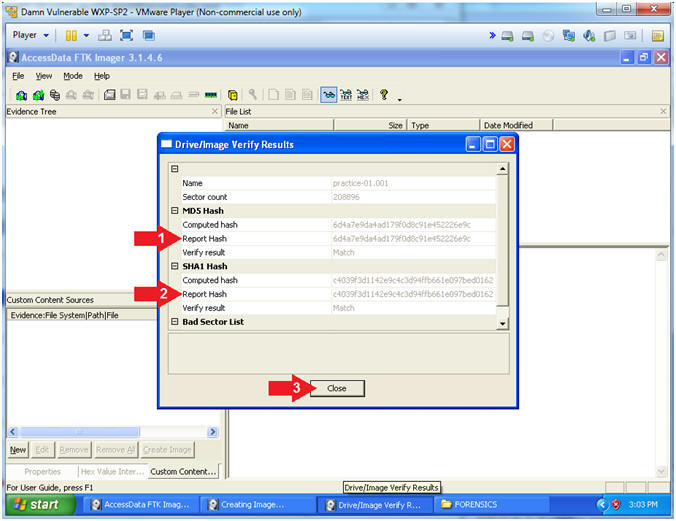
- Drive/Image Verify Results
- Instructions:
- View MD5 Matching Hashes
- View MD5 Matching Hashes
- Click the Close Button
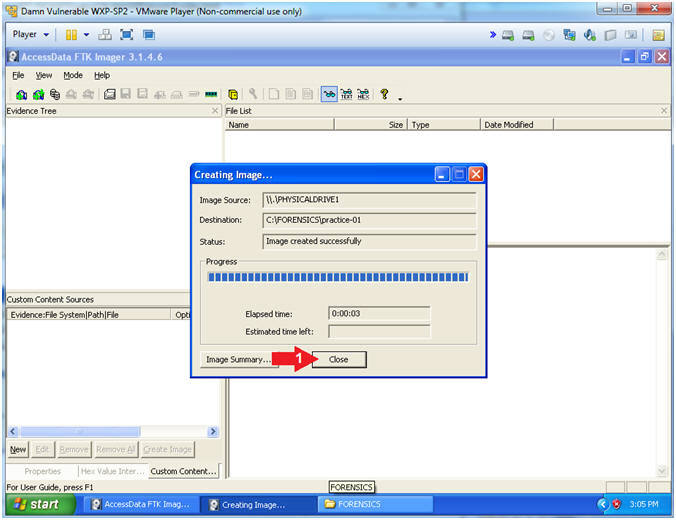
- Instructions:
- Image created successfully
- Instructions:
- Click the Close Button
- Instructions:
| Section 6: Proof of Lab |
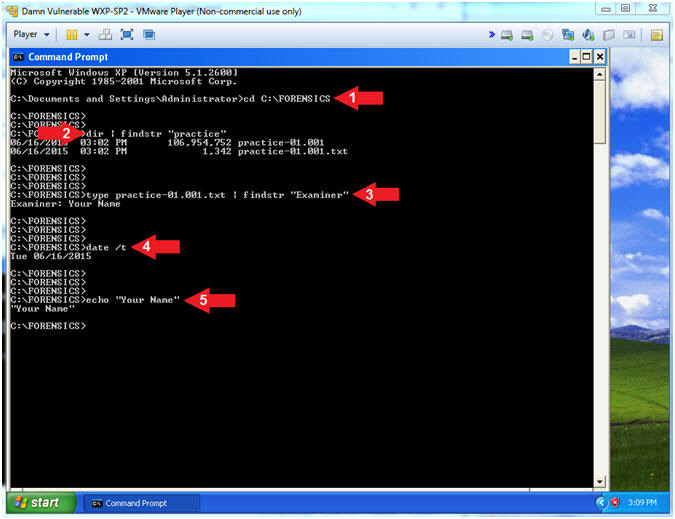
-
Proof of Lab
- Instructions:
- cd C:\FORENSICS
- dir | findstr "practice"
- type practice-01.001.txt | findstr "Examiner"
- date /t
- echo "Your Name"
- This should be your actual name.
- e.g., echo "John Gray"
-
Proof of Lab
Instructions
- Press both the <Ctrl> and <Alt> keys at the same time.
- Do a <PrtScn>
- Paste into a word document
- Upload to Moodle
- Instructions: