(Data Hiding: Lesson 1)
{ Hiding Data in Slack Space using bmap }
| Section 0. Background Information |
- What is the scenario?
- Have you ever heard of Cyber Espionage where a spy was able to hide data and go virtually un-noticed? The following lesson demonstrates how easy it is for a person to hide data in a file's slack space.
- bmap
- Bmap is a data hiding tool that can utilize slack space in blocks to hide data.
- It can perform lots of functions interesting to the computer forensics community and the computer security community.
- Slack Space
- Blocks are specific sized containers used by file system to store data. Blocks can also be defined as the smallest pieces of data that a file system can use to store information. Files can consist of a single or multiple blocks/clusters in order to fulfill the size requirements of the file. When data is stored in these blocks two mutually exclusive conditions can occur; The block is completely full, or the block is partially full. If the block is completely full then the most optimal situation for the file system has occurred. If the block is only partially full then the area between the end of the file the end of the container is referred to as slack space.
-
Lab Notes
- In this lab we will do the following:
- Download bmap
- Compile bmap
- Hide a secret message into a file that contains slack space
- In this lab we will do the following:
- Legal Disclaimer
- As a condition of your use of this Web site, you warrant to computersecuritystudent.com that you will not use this Web site for any purpose that is unlawful or that is prohibited by these terms, conditions, and notices.
- In accordance with UCC § 2-316, this product is provided with "no warranties, either express or implied." The information contained is provided "as-is", with "no guarantee of merchantability."
- In addition, this is a teaching website that does not condone malicious behavior of any kind.
- You are on notice, that continuing and/or using this lab outside your "own" test environment is considered malicious and is against the law.
- © 2013 No content replication of any kind is allowed without express written permission.
| Section 1: Start Up the BackTrack5R1 VM |
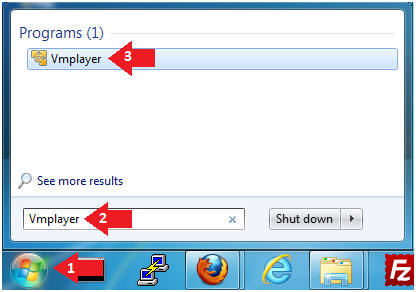
- Start Up VMWare Player
- Instructions:
- Click the Start Button
- Type Vmplayer in the search box
- Click on Vmplayer
- Instructions:
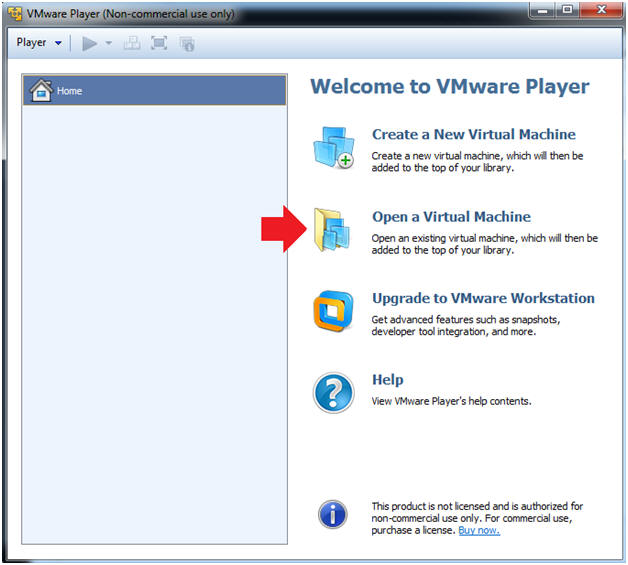
- Open a Virtual Machine
- Instructions:
- Click on Open a Virtual Machine
- Instructions:
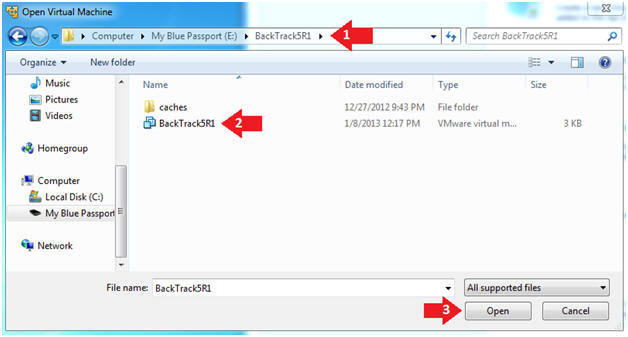
- Open the BackTrack5R1 VM
- Instructions:
- Navigate to where the BackTrack5R1 VM is located
- Click on on the BackTrack5R1 VM
- Click on the Open Button
- Instructions:
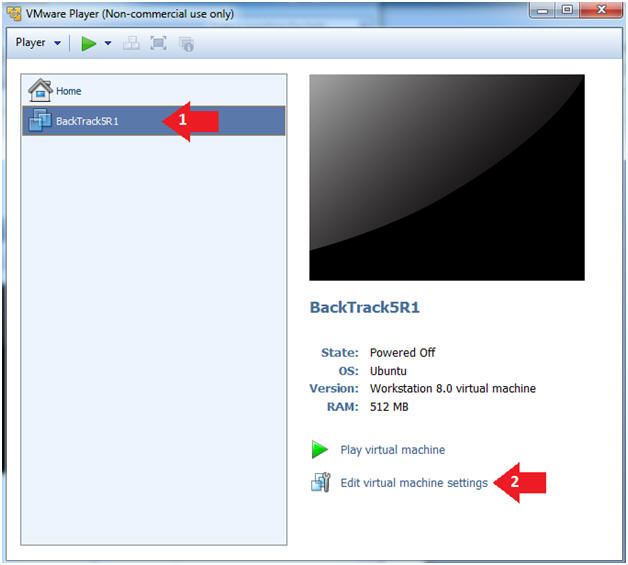
- Edit the BackTrack5R1 VM
- Instructions:
- Select BackTrack5R1 VM
- Click Edit virtual machine settings
- Instructions:
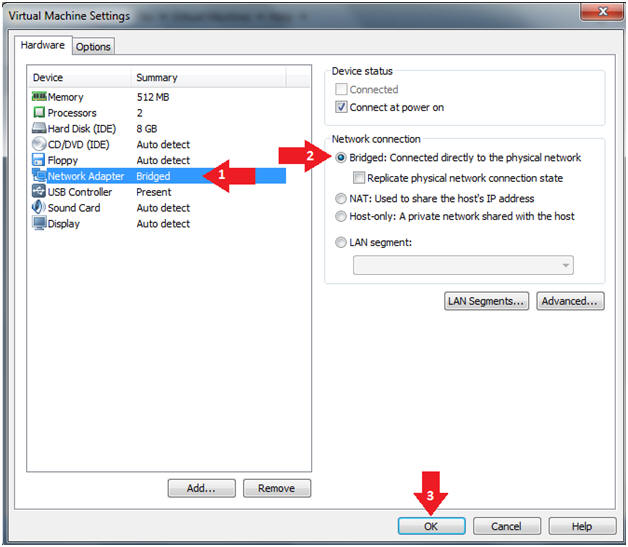
- Edit Virtual Machine Settings
- Instructions:
- Click on Network Adapter
- Click on the Bridged Radio button
- Click on the OK Button
- Instructions:
- Play the BackTrack5R1 VM
- Instructions:
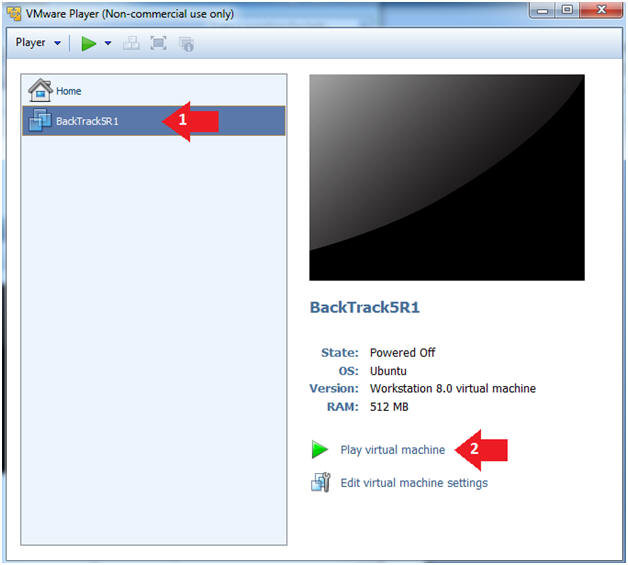
- Click on the BackTrack5R1 VM
- Click on Play virtual machine
- Instructions:
- Login to BackTrack
- Instructions:
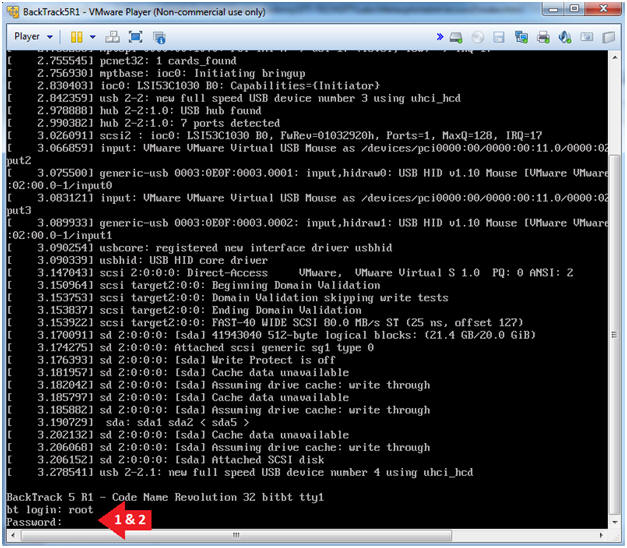
- Login: root
- Password: toor or <whatever you changed it to>.
- Instructions:
- Bring up the GNOME
- Instructions:
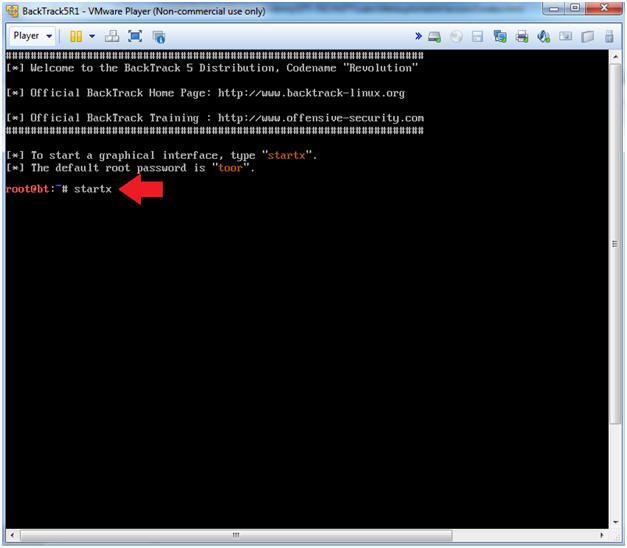
- Type startx
- Instructions:
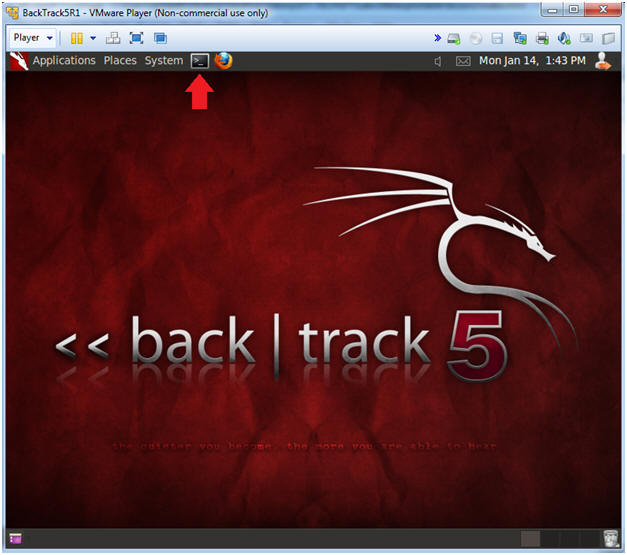
- Start up a terminal window
- Instructions:
- Click on the Terminal Window
- Instructions:
- Obtain the IP Address
- Instructions:
- ifconfig -a
- Record your IP Address (See Picture)
- Note(FYI):
- My IP address 192.168.1.139.
- In your case, it will probably be different.
- This is the machine that will be use to attack the victim machine (Metasploitable).
- Instructions:
| Section 2: Download bmap |
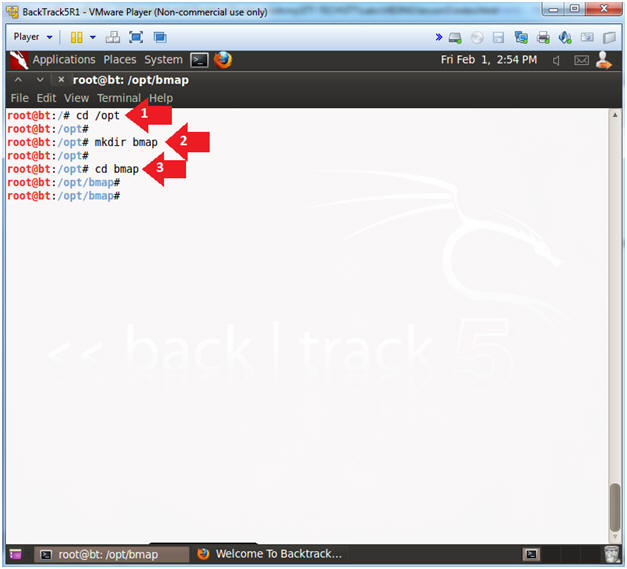
- Create bmp folder
- Instructions:
- cd /opt
- mkdir bmap
- cd bmap
- Instructions:
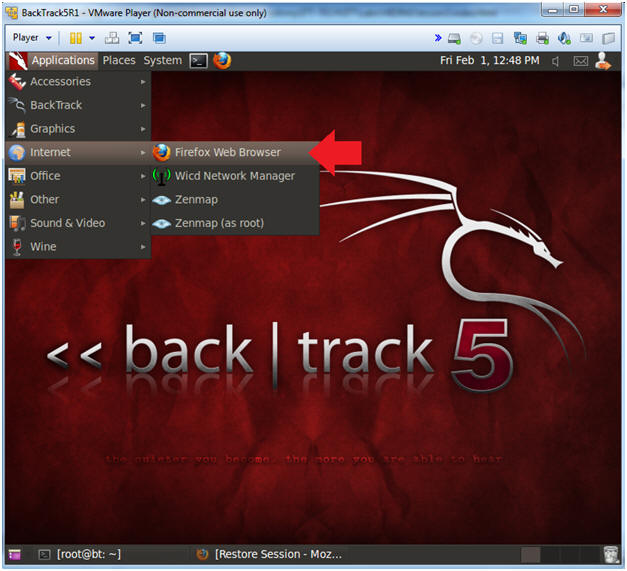
- Open Firefox Web Browser
- Instructions:
- Applications --> Internet --> Firefox Web Browser
- Instructions:
- Navigate to bmap
- Instructions:
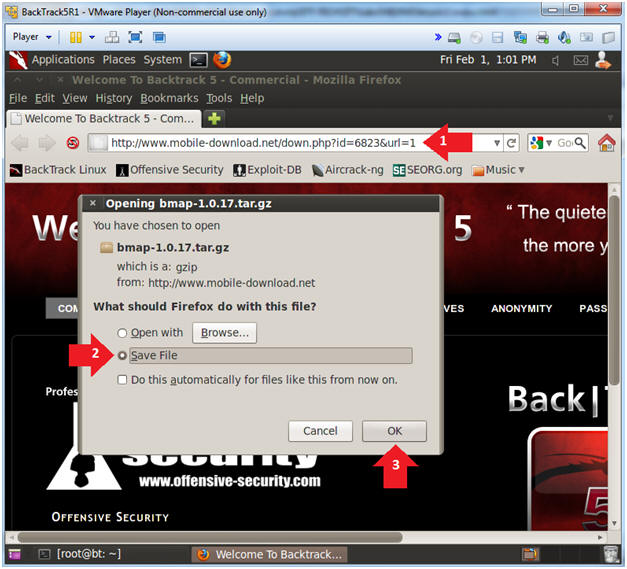
- In your Firefox browser navigate to the following address
- Select the Save File Radio Button
- Click the OK Button
- Instructions:
- Save bmap
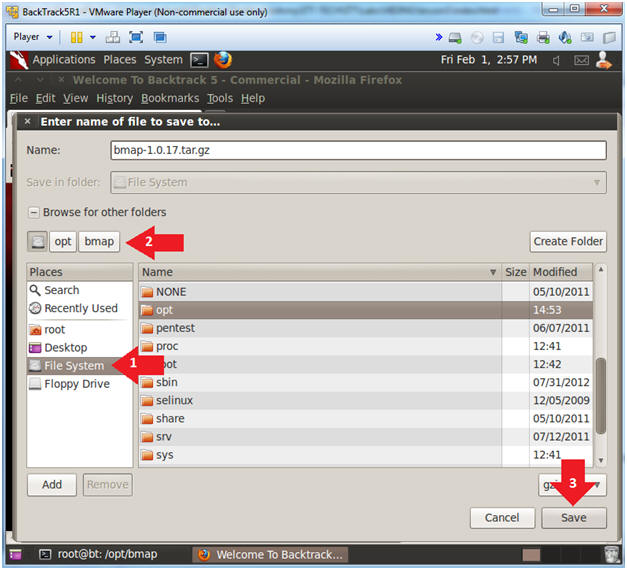
- Instructions:
- Click on File System
- Navigate to /opt/bmap
- Click Save
- Instructions:
- Unzip and Untar bmap
- Instructions:
- cd /opt/bmap
- ls -l
- gunzip bmap-1.0.17.tar.gz
- tar xovf bmap-1.0.17.tar

- Instructions:
- make bmap
- Instructions:
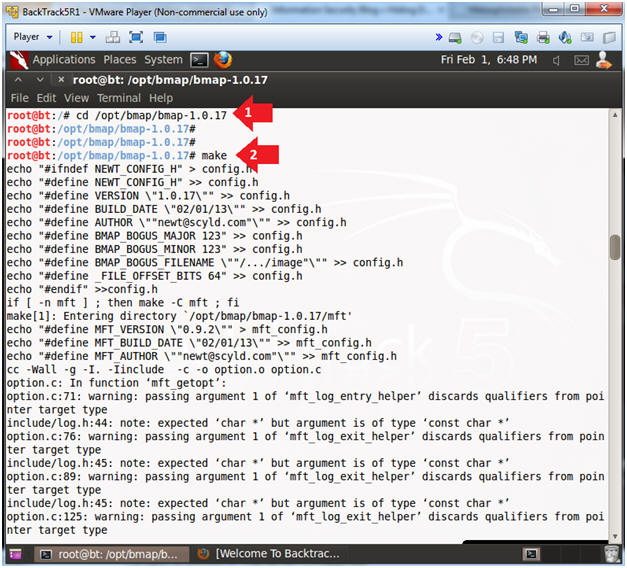
- cd /opt/bmap/bmap-1.0.17
- make
- The purpose of the make utility is to determine automatically which pieces of a large program need to be recompiled, and issue the commands to recompile them.
- Note(FYI):
- You will see a lot of warnings. However, make will compile bmap.
- Instructions:
- make bmap
- Instructions:
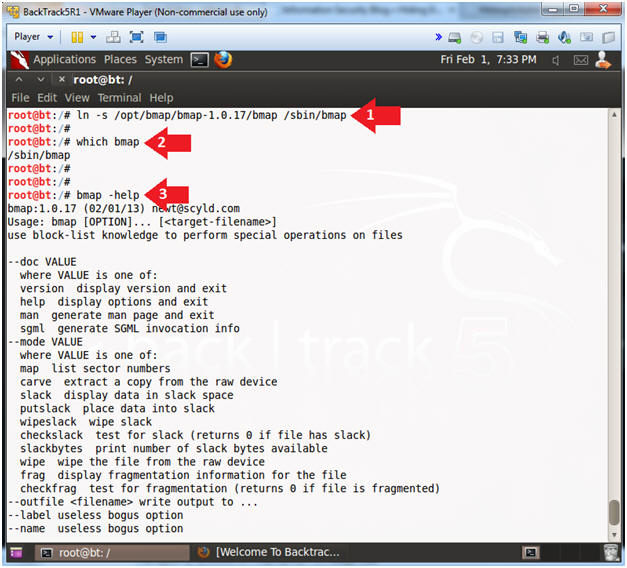
- ln -s /opt/bmap/bmap-1.0.17/bmap /sbin/bmap
- "ln -s", makes a link to the bmap command in the /sbin.
- /sbin is typically a default directory found in the $PATH variable.
- which bmap
- bmap -help
- ln -s /opt/bmap/bmap-1.0.17/bmap /sbin/bmap
- Instructions:
| Section 3: Create Test File |
- Create Test File
- Instructions:
- cd /var/tmp
- echo "This is a test file" > test.txt
- cat test.txt
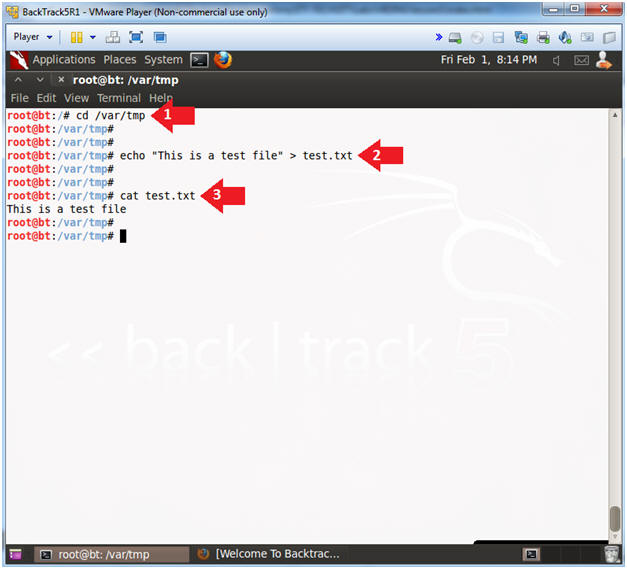
- Instructions:
| Section 4: Using bmap to hide text in slack space |
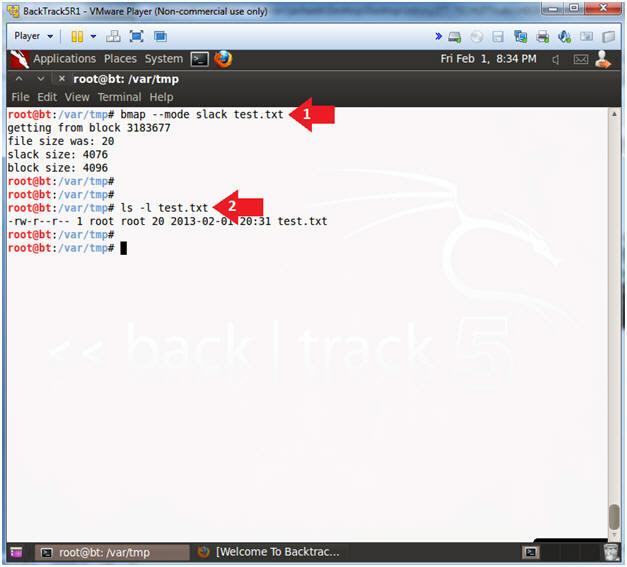
- Show Slack Space
- Instructions:
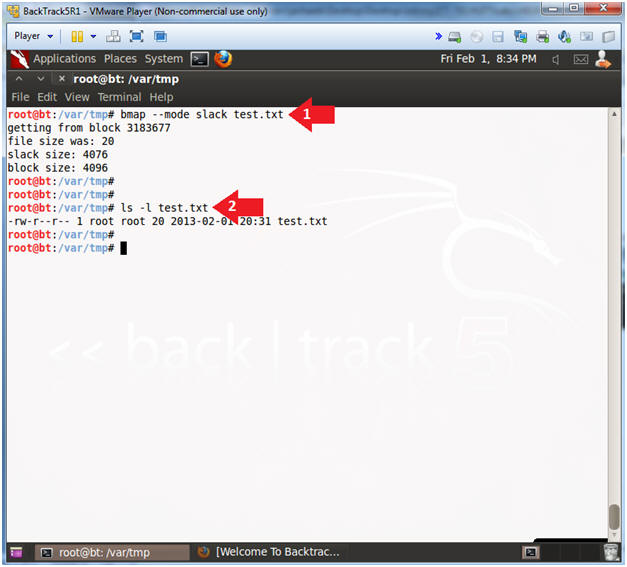
- bmap --mode slack test.txt
- ls -l test.txt
- Note(FYI):
- The test.txt file is using 20 bytes of disk space.
- The test.txt file has 4076 bytes of "unused" slack space.
- Instructions:
- Hide Data in Slack Space
- Instructions:
- echo "Top Secret Data Goes Here" | bmap --mode putslack test.txt
- ls -l test
- Notice the 20 byte size did not change after test was added to its slack space.
- cat test.txt
- Notice the secret message is not present.
- strings test.txt
- Not even strings can reach into the slack space of test.txt.

- Instructions:
| Section 5: Proof of Lab |
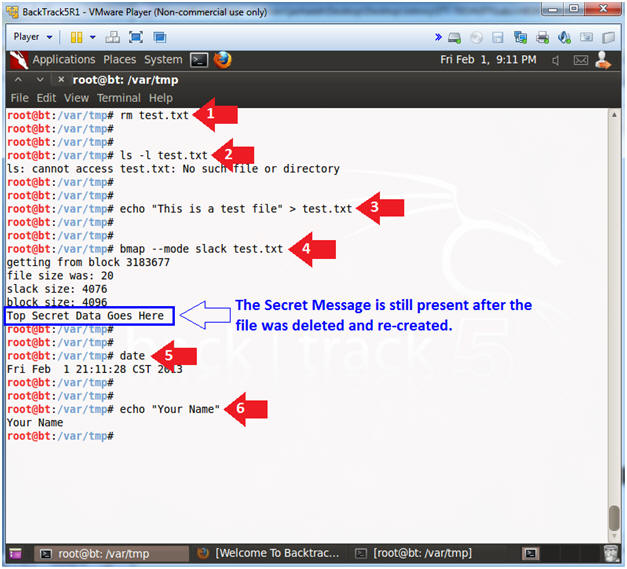
- Proof of Lab
- Note(FYI):
- The following commands will be placed in the lower terminal window.
- Instructions
- rm test.txt
- ls -l test.txt
- echo "This is a test file" > test.txt
- bmap --mode slack test.txt
- Notice the secret message was still present after the file was deleted and re-created.
- echo "Your Name"
- Replace the string "Your Name" with your actual name.
- e.g., echo "John Gray"
-
Proof Of Lab Instructions:
- Do a PrtScn of the below commands
- Paste into a word document
- Upload to Moodle
- Note(FYI):