(Password Clearing: Lesson 3)
{ Use a Windows Recovery CD to Replace sethc.exe with cmd.exe }
| Section 0. Background Information |
- What is sethc.exe
- sethc.exe is a program that controls some the accessibility options for disabled people to read the login prompt.
- The accessibility option is invoked by clicking in the Windows Password Box and pressing the shift key 5 times.
- From the windows login screen, winlogon.exe launches sethc.exe that provides the aforementioned accessibilities options.
- Consequently, sethc.exe can be compromised, since the winlogin.exe does not exactly check what is launched when pressing the shift key 5 times in the password text box.
-
Lab Notes
- In this lab we will do the following:
- Boot the Windows 7 VM from a Windows 7 Recovery CD
- Select the Recovery Option
- We will use the recovery cmd prompt to compromise sethc.exe by replacing it with cmd.exe
- We implement the exploit by pressing shift 5 times.
- We will active and reset the administrative account.
- In this lab we will do the following:
- Prerequisites
- Instructions:
- Legal Disclaimer
- As a condition of your use of this Web site, you warrant to computersecuritystudent.com that you will not use this Web site for any purpose that is unlawful or that is prohibited by these terms, conditions, and notices.
- In accordance with UCC § 2-316, this product is provided with "no warranties, either express or implied." The information contained is provided "as-is", with "no guarantee of merchantability."
- In addition, this is a teaching website that does not condone malicious behavior of any kind.
- Your are on notice, that continuing and/or using this lab outside your "own" test environment is considered malicious and is against the law.
- © 2012 No content replication of any kind is allowed without express written permission.
| Section 1. Start your Windows 7 VM |
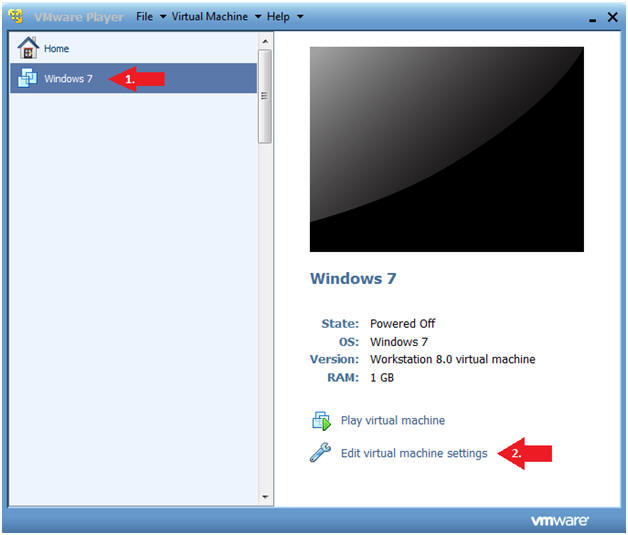
- Edit Virtual Machine Settings
- Instructions:
- Click on Windows 7
- Click on Edit virtual machine
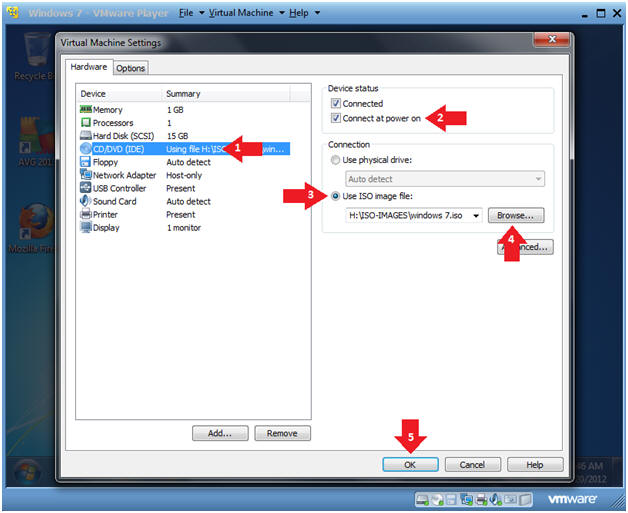
- Instructions:
- Configure CD/DVD (IDE)
- Instructions
- Configure CD/DVD (IDE)
- Check the Connect at power on checkbox
- Click the radio button "Use ISO image file:"
- Click the Browse button and Navigate to the location of the windows 7.iso
- Click the Okay button
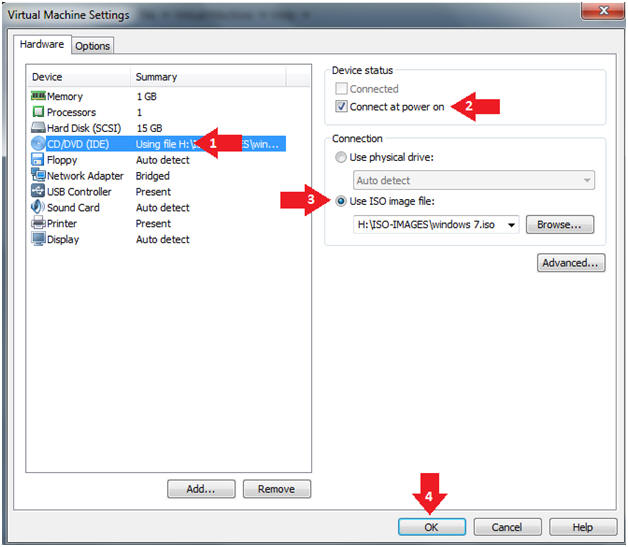
- Instructions
- Start Windows 7
- Instructions:
- Click on Windows 7
- Click on Play virtual machine
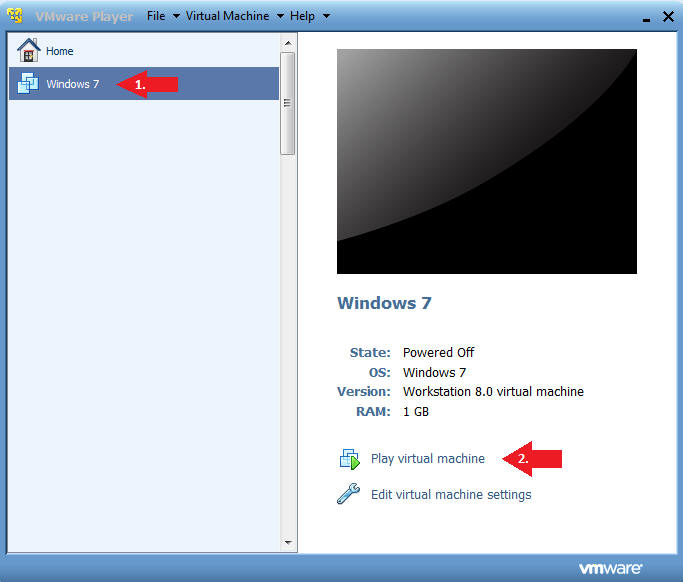
- Instructions:
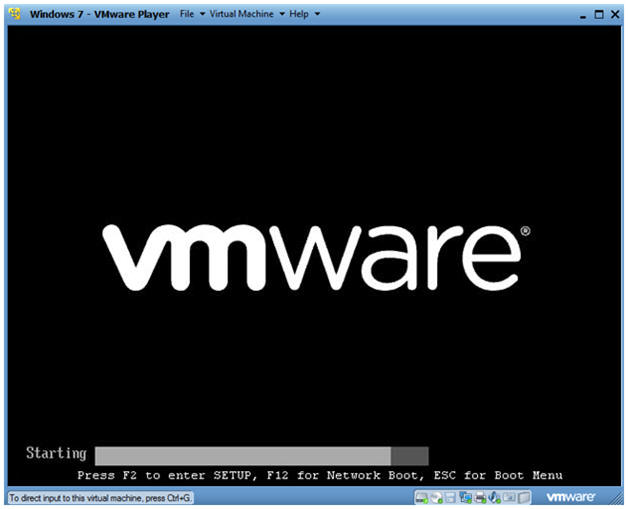
- Access the Boot Menu
- Instructions
- Once you see the below vmware screen, (1) Left Click in the screen and (2) press the <Esc> key.
- Instructions
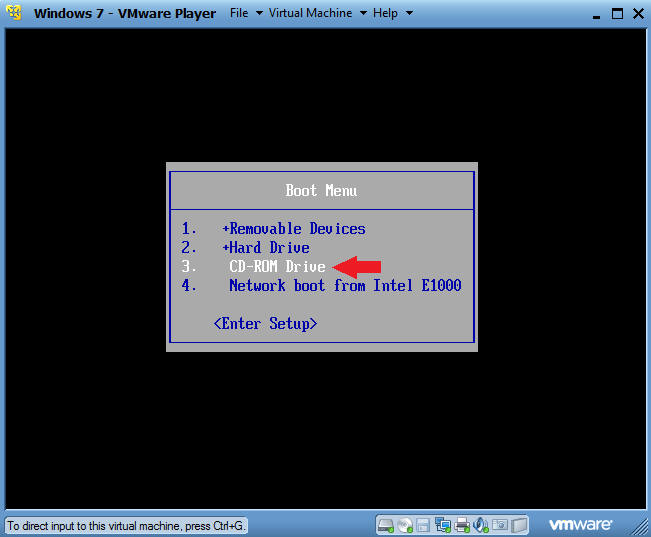
- Boot from CD-ROM Drive
- Instructions
- Arrow Down to where CD-ROM Drive is highlighted
- Press <Enter>
- Instructions
| Section 2. Using the Windows Recovery CD |
- Press any key to continue
- Instructions
- Press <Enter>
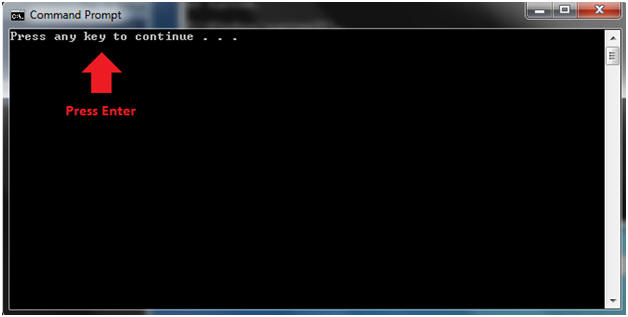
- Instructions
- Install Windows
- Instructions
- Language to install: English
- Time and currency format: English (United States)
- Keyboard or input method: US
- Click Next
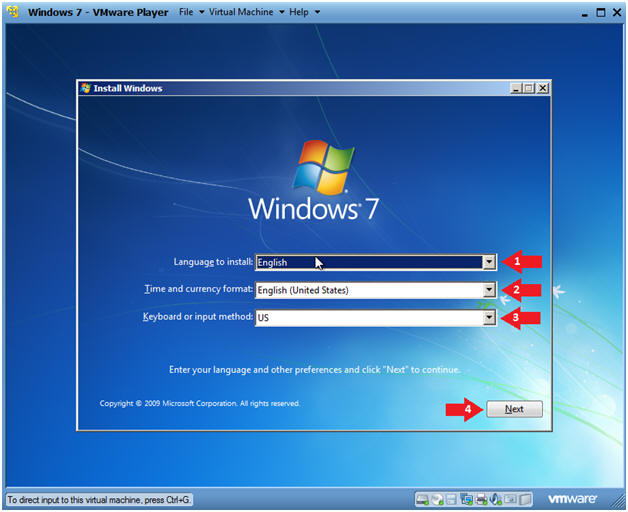
- Instructions
- Repair Your Computer
- Instructions
- Click Repair your computer
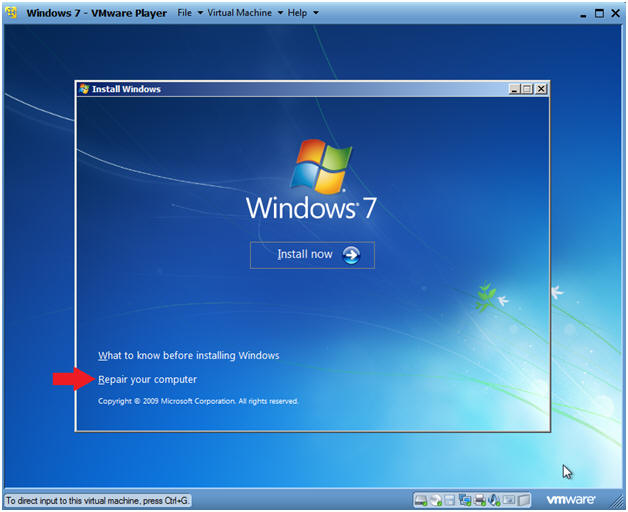
- Instructions
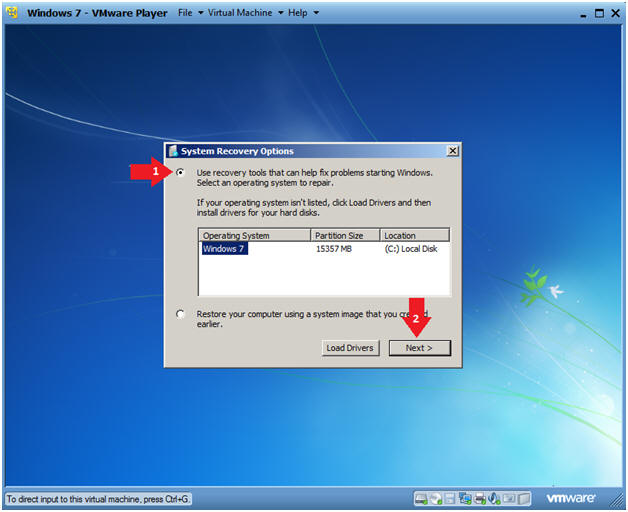
- System Recover Options
- Instructions
- Select the Use recover tools radio button.
- Click the Next Button
-
- Instructions
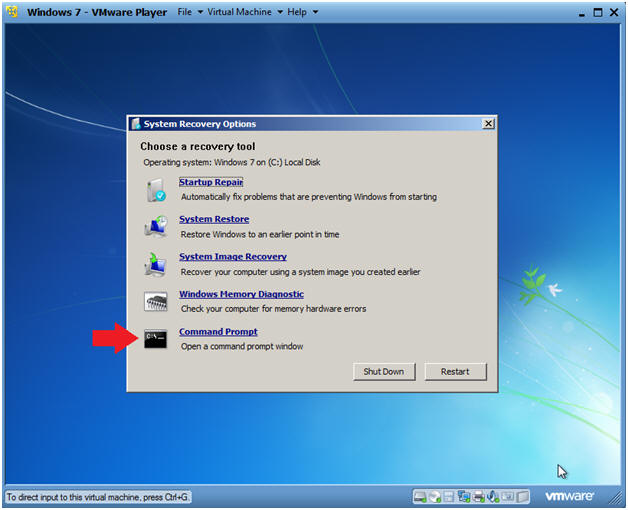
- System Recovery Command Prompt
- Instructions
- Click the Command Prompt
-
- Instructions
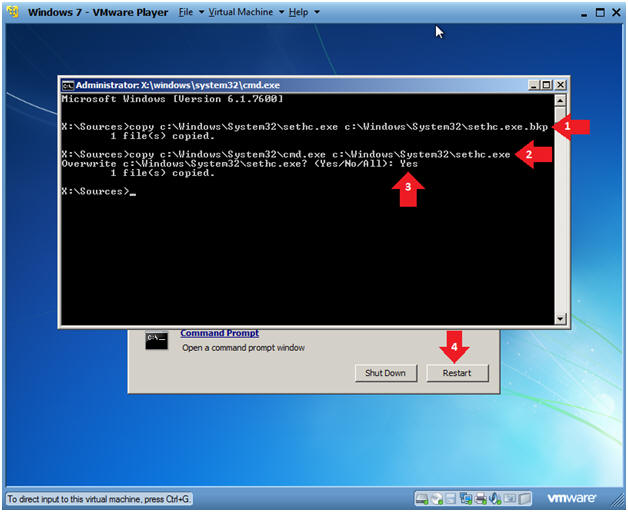
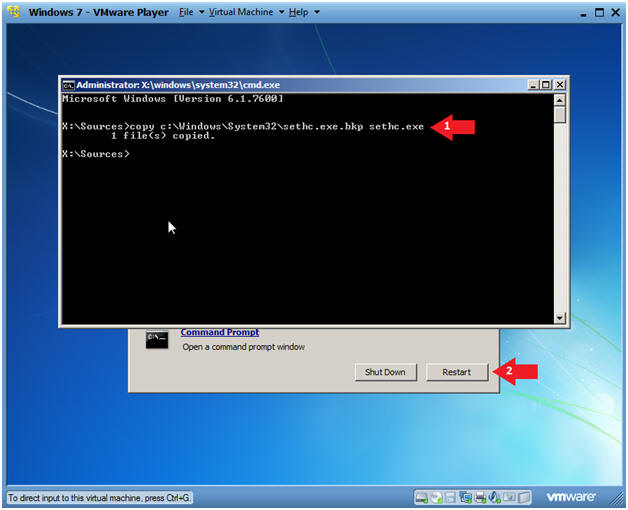
- Replace sethc.exe with cmd.exe
- Instructions
- copy c:\Windows\System32\sethc.exe c:\Windows\System32\sethc.exe.bkp
- copy c:\Windows\System32\cmd.exe c:\Windows\System32\sethc.exe
- Yes
- Click the Restart Button
-
- Instructions
| Section 3. Implement the Accessibility Option |
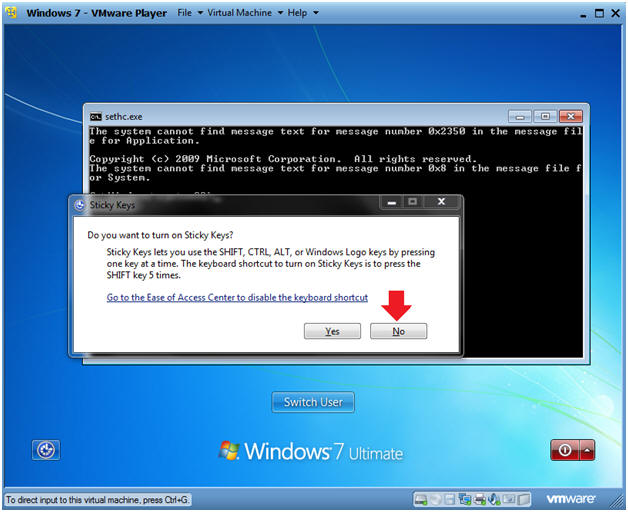
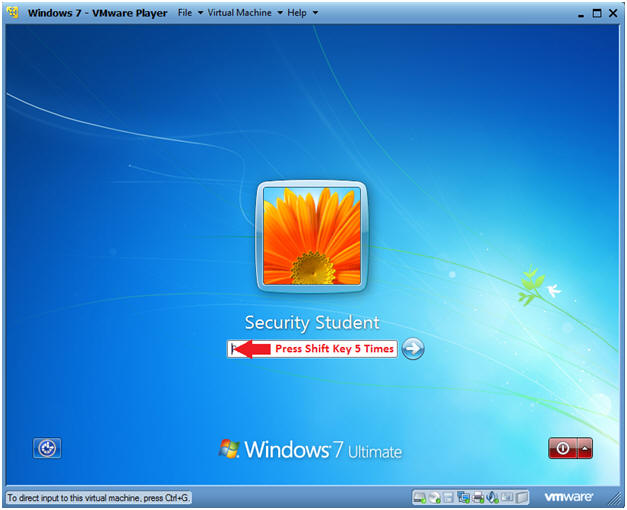
- Implement the Accessibility Option
- Instructions
- In the password box, Press the Shift Key 5 Times
- Instructions
- Do you want to turn on Sticky Keys?
- Instructions:
- Click No
- Instructions:
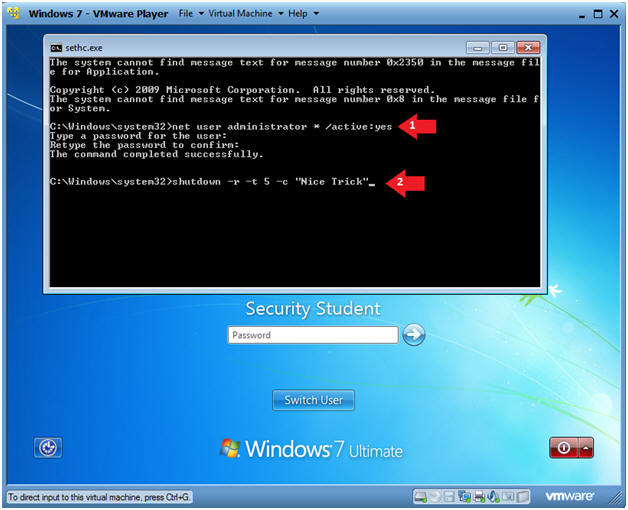
- Administrative Command Prompt
- Note(FYI):
- Now you will see an administrative command prompt.
- Instructions:
- net user administrator * /active:yes
- shutdown -r -t 5 -c "Nice Trick"
- Note(FYI):
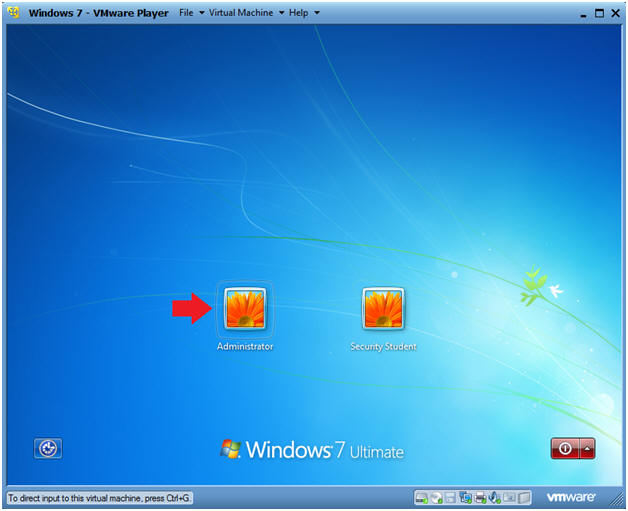
- Login as Administrator
- Instructions
- Click the Administrator account
- Note(FYI)
- Previously, only Security Student was the active account.
- Instructions
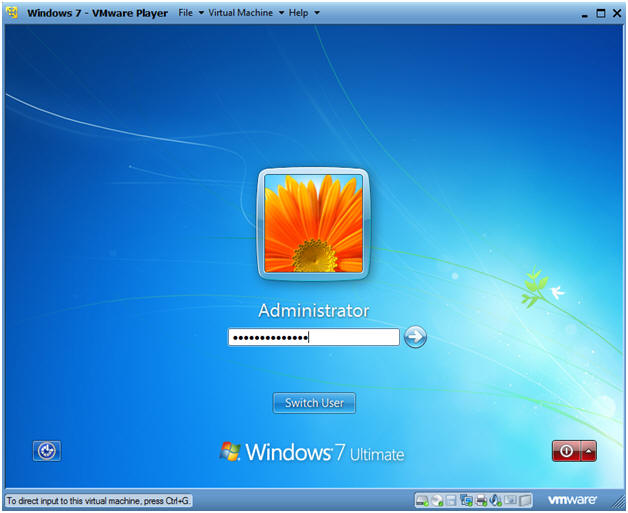
- Administrator Password
- Instructions
- Provide the password created in (Section 4, Step 3).
- Instructions
| Section 4. Proof of Lab |
- Open A Command Prompt
- Instructions
- Click on the Start Button
- Type "cmd" in the search box
- Click on cmd
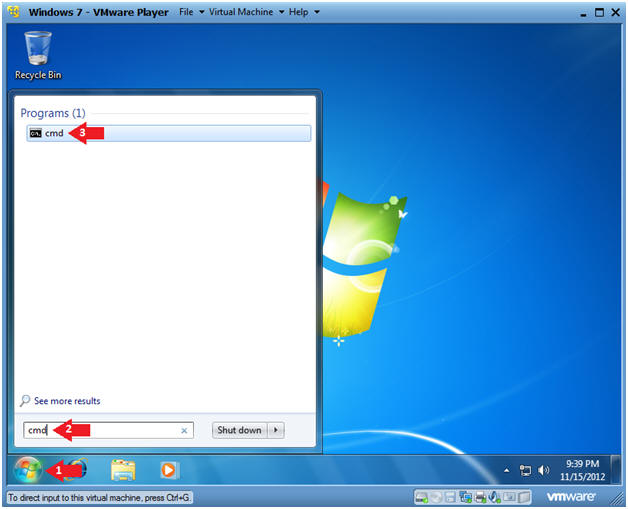
- Instructions
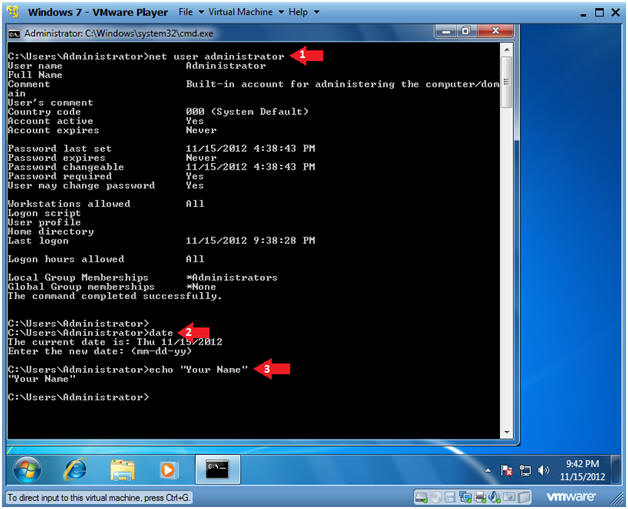
- Proof of Lab Instructions
- Instructions:
- net user administrator
- date
- Press <Enter>
- echo "Your Name"
- Replace the string "Your Name" with your actual name.
- e.g., echo "John Gray"
- Do a PrtScn
- Paste into a word document
- Upload to Moodle
- Instructions:
| Section 5. Post Lab Restore Work |
- Access Virtual Machine Settings
- Instructions:
- Virtual Machine --> Virtual Machine Settings...
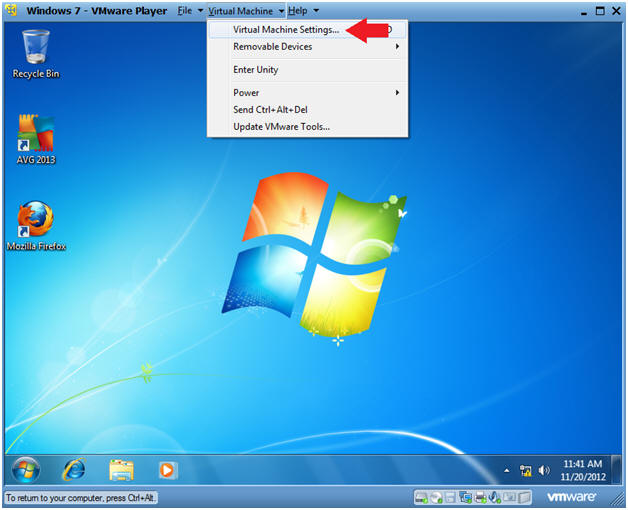
- Instructions:
- Configure CD/DVD (IDE)
- Instructions
- Configure CD/DVD (IDE)
- Check the Connect at power on checkbox
- Click the radio button "Use ISO image file:"
- Click the Browse button and Navigate to the location of the windows 7.iso
- Click the Okay button
- Instructions
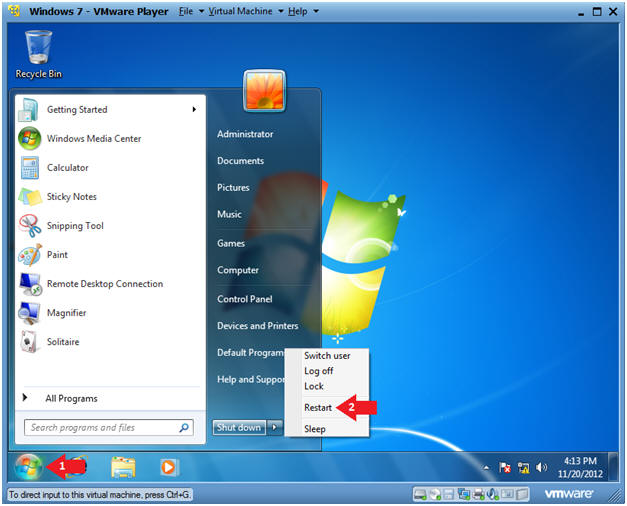
- Restart Windows
- Instructions
- Click Start Button
- Click Restart
- Instructions
- Access the Boot Menu
- Instructions
- Once you see the below vmware screen, (1) Left Click in the screen and (2) press the <Esc> key.
- Instructions
- Boot from CD-ROM Drive
- Instructions
- Arrow Down to where CD-ROM Drive is highlighted
- Press <Enter>
- Instructions
- Press any key to continue
- Instructions
- Press <Enter>
- Instructions
- Install Windows
- Instructions
- Language to install: English
- Time and currency format: English (United States)
- Keyboard or input method: US
- Click Next
- Instructions
- Repair Your Computer
- Instructions
- Click Repair your computer
- Instructions
- System Recover Options
- Instructions
- Select the Use recover tools radio button.
- Click the Next Button
-
- Instructions
- System Recovery Command Prompt
- Instructions
- Click the Command Prompt
-
- Instructions
- Restore sethc.exe
- Instructions
- copy c:\Windows\System32\sethc.exe.bkp sethc.exe
- Click Restart
- Instructions