(NESSUS: Lesson 5)
{ Scan with Nessus using Kali }
| Section 0. Background Information |
- What is the purpose of this lesson?
- In the previous lessons you use NMAP to determine which services were running, using a methodology known as port scanning. This lesson will teach you how use Nessus to conduct a vulnerability assessment.
- What is NESSUS?
- Tenable Network Security provides enterprise-class solutions for continuous monitoring and visibility of vulnerabilities, configurations, user activity and system events that impact security and compliance.
- Nessus features high-speed discovery, configuration auditing, asset profiling, sensitive data discovery and vulnerability analysis of your security posture
- Pre-Requisite
- Kali Rolling Edition: Lesson 1: Installing Kali Rolling Edition - 2023
- NESSUS: Lesson 4: Install Nessus on Kali Rolling Edition
-
Lab Notes
- In this lab we will do the following:
- Scan Damn Vulnerable WXP-SP2 with nmap
- Scan Damn Vulnerable WXP-SP2 with Nessus
- Product Nessus Report
- Save Nessus Report
- In this lab we will do the following:
- Legal Disclaimer
- As a condition of your use of this Web site, you warrant to computersecuritystudent.com that you will not use this Web site for any purpose that is unlawful or that is prohibited by these terms, conditions, and notices.
- In accordance with UCC § 2-316, this product is provided with "no warranties, either express or implied." The information contained is provided "as-is", with "no guarantee of merchantability."
- In addition, this is a teaching website that does not condone malicious behavior of any kind.
- You are on notice, that continuing and/or using this lab outside your "own" test environment is considered malicious and is against the law.
- © 2024 No content replication of any kind is allowed without express written permission.
| Section 1: Login to Kali |
- Start Up VMWare Player
- Instructions:
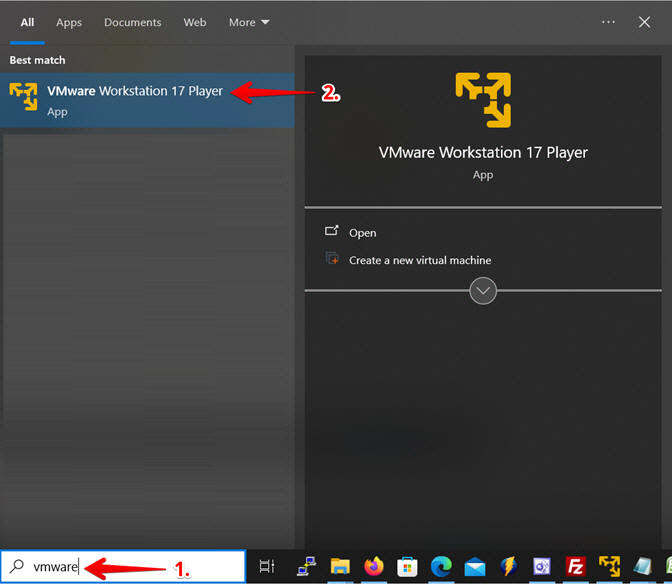
- Click the Start Button
- Type Vmplayer in the search box
- Click on Vmplayer
- Instructions:
- Start Up VMWare Player
- Instructions:
- Click the Start Button
- Type Vmplayer in the search box
- Click on Vmplayer
- Instructions:
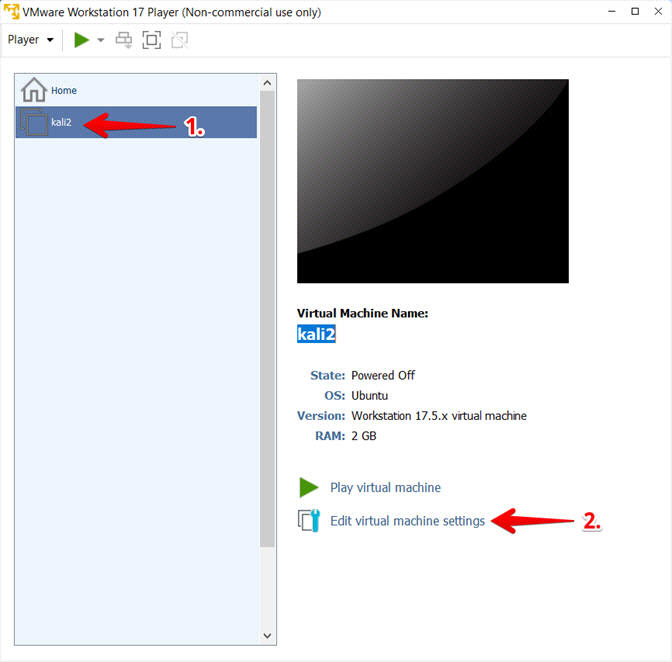
- Edit Virtual Machine Settings
- Instructions:
- Click on Network Adapter
- Click on the Bridged Radio button
- Click on the OK Button
- Instructions:
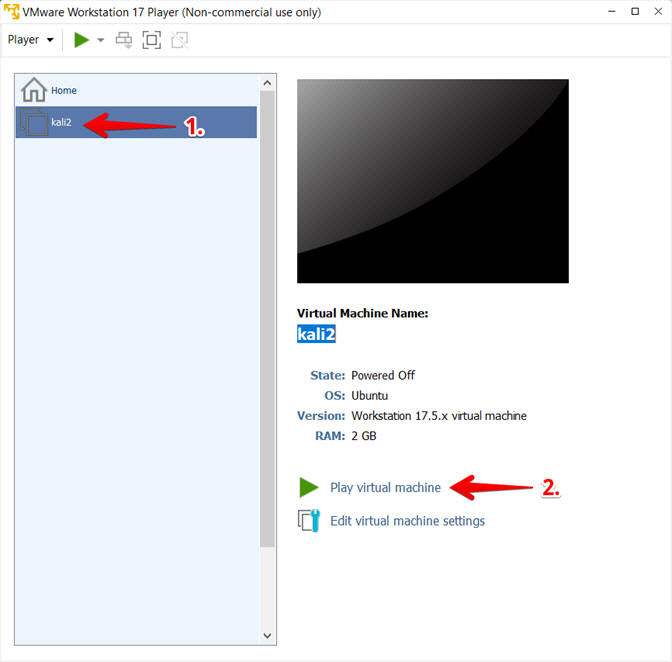
- Play the kali2 VM
- Instructions:
- Click on the kali2 VM
- Click on Play virtual machine
- Instructions:
- Supply Username and Password
- Instructions:
- Provide username
- Provide password
- Click the Log In Button

- Instructions:

| Section 2: Login to Damn Vulnerable WXP-SP2 (Victim Machine) |
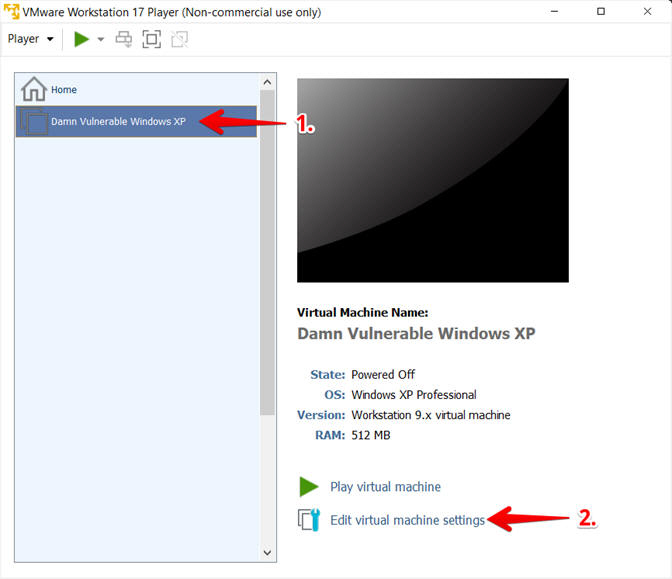
- Edit Virtual Machine Settings
- Instructions:
- Click on Damn Vulnerable WXP-SP2
- Edit Virtual Machine Settings
- Note:
- This VM is running Windows XP.
- This is the Victim Machine that we will be scanning with Nessus.
-
- Instructions:
- Set Network Adapter
- Instructions:
- Click on Network Adapter
- Click on the radio button "Bridged: Connected directly to the physical network".
- Click the OK button

- Instructions:
- Start Up Damn Vulnerable WXP-SP2
- Instructions:
- Start Up your VMware Player
- Play virtual machine
- Instructions:
- Logging into Damn Vulnerable WXP-SP2
- Instructions:
- Click Administrator
- Supply Your Password
- Click On

- Instructions:
- Open a Command Prompt
- Instructions:
- Start --> All Programs --> Accessories --> Command Prompt
- Instructions:
- Obtain the IP Address
- Instructions:
- ipconfig
- Record Your IP Address
- Note(FYI):
- #1, (ipconfig) displays all current TCP/IP network configuration values.
- #2, In my case, Damn Vulnerable WXP-SP2's IP Address 192.168.1.96.
-

- Instructions:


| Section 3: Bring up a console terminal |
- Open a Terminal Emulator
- Instructions:
- Click the Kali Icon in the upper left corner
- Search for the string root terminal
- Click on the Root Terminal Emulator Icon

- Instructions:
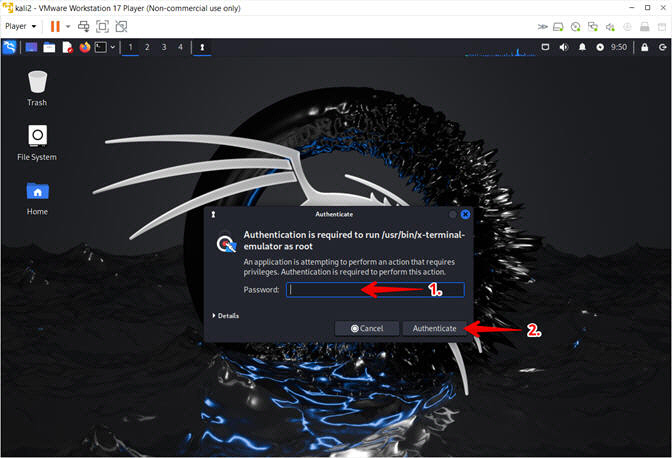
- Authentication
- Instructions:
- Supply Password
- Click the Authenticate Button
- Instructions:
- Obtain the IP Address
- Instructions:
- ifconfig -a
- Record your IP Address
- Note(FYI):
- My IP address 192.168.1.94.
- In your case, it will probably be different.
- Run "dhclient -v" if you do not have an IP address.

- Instructions:
| Section 4: Basic nmap testing |
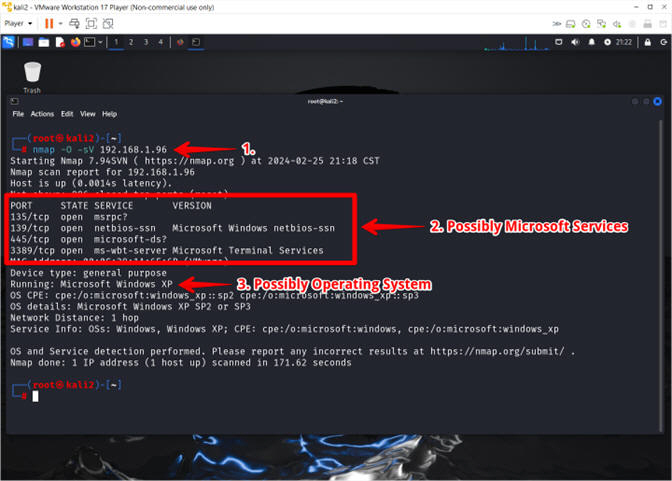
- NMAP OS Detection and Service Discovery
- Instructions:
- nmap -O -sV 192.168.1.96
- Observe the detected ports and their services
- Observe the detected Operating System
- Note(FYI):
- Arrow #1: (nmap) is a network mapping tool, that is using the (-O) flag to detect the operating system and (-sV) to detect the service associated with the particular port on the vulnerable device (e.g., 192.168.1.96).
- Replace (192.168.1.96) with the IP of your Damn Vulnerable WXP machine found in (Section 2, Step 6).
- Instructions:
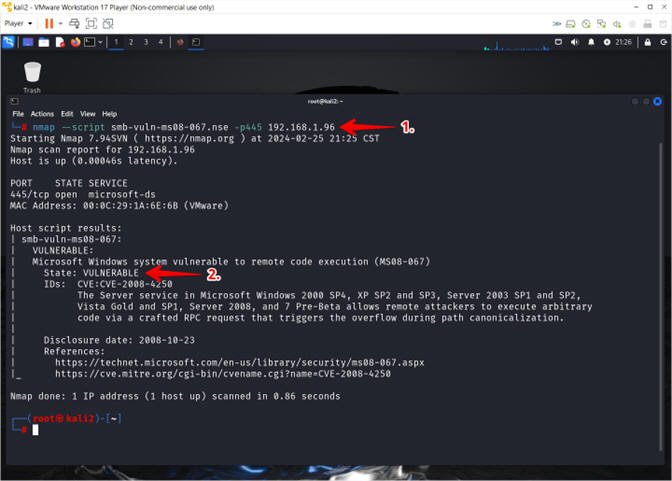
- Using smb-vuln-ms08-067.nse
- Instructions:
- nmap --script smb-vuln-ms08-067.nse -p445 192.168.1.96
- nmap believes this machine is vulnerable
- Note(FYI):
- Arrow #1: (nmap) is using a NSE script (e.g., smb-vuln-ms08-067.nse)over port (-p445) to determine if the device (e.g., 192.168.1.96) is vulnerable to MS08-067.
- Replace (192.168.1.96) with the IP of your Damn Vulnerable WXP machine found in (Section 2, Step 6).
- The Nmap Scripting Engine (NSE) is one of Nmap's most powerful and flexible features. It allows users to write (and share) simple scripts (using the Lua programming language ) to automate a wide variety of networking tasks.
- Instructions:
| Section 5: Start the Nessus Service |
- Start Nessus Service
- Instructions:
- systemctl start nessusd
- ps -eaf | grep nessus | grep -v grep
- netstat -naop | grep nessus
- Note(FYI):
- Arrow #1: Use (systemctl) to control the systemd system and service manager. In this case, we are using (systemctl) to start the nessus daemon (e.g., nessusd).
- Arrow #2: Use (ps -eaf)to show me all the processes. Use (| grep nessus) to search for all nessus processes. Use (| grep -v grep) to no display the actual grep process.
- Instructions:

| Section 6: Configure Firefox Downloads |
- Start Firefox Instance
- Instructions:
- Click the Kali Icon
- Search for firefox
- Click the FireFox ESR Icon

- Instructions:
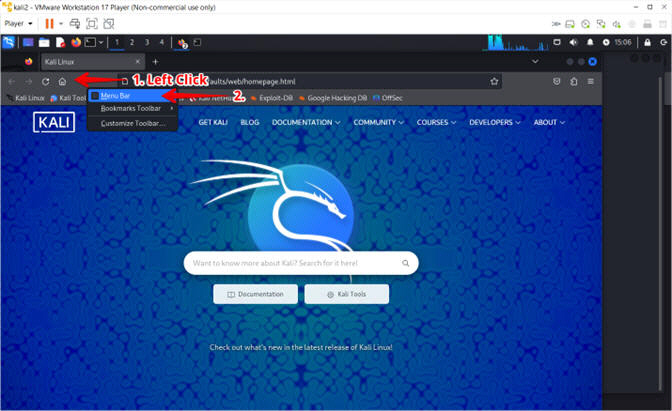
- Enable Menu Bar
- Instructions:
- Left Click by the Home Icon
- Select the Menu Bar
- Instructions:
- Enter Setting
- Instructions:
- Select Edit
- Select Settings
- Instructions:
- Configure Downloads
- Instructions:
- Search for downloads
- Select Always ask you where to save files
- Instructions:


| Section 7: Login To Nessus |
- Invalid Certificate Warning
- Instructions:
- Navigate to https://127.0.0.1:8834/
- Click the Advanced button
- Click the Accept the Risk and Continue button

- Instructions:
- Login To Nessus
- Instructions:
- Login: student
- Password: Supply Password
- Click the Sign In Button
-
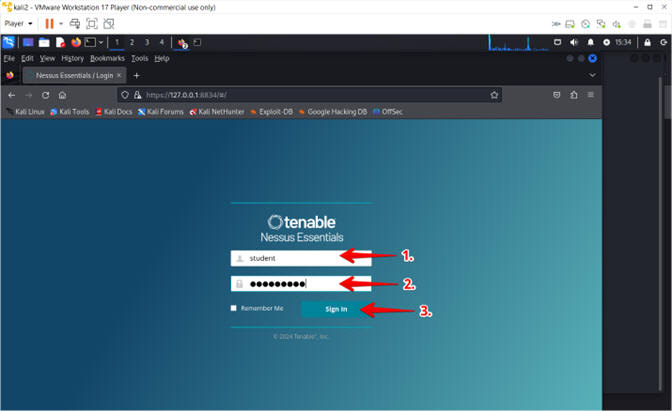
- Instructions:
| Section 8: Scan with Nessus |
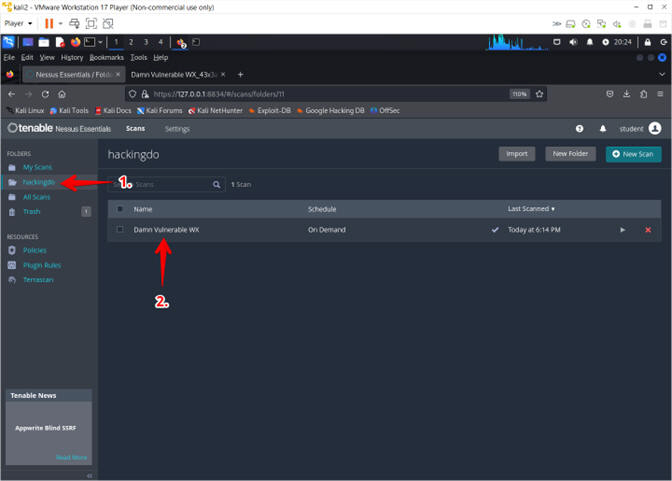
- Create Folder
- Instructions:
- Click the New Folder button
- Name: hackingdo
- Click the Create button
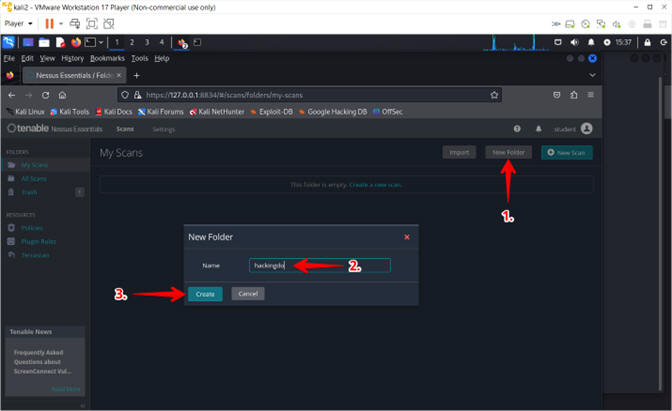
- Instructions:
- Create New Scan
- Instructions:
- Click on the hackingdo folder
- Click the New Scan button

- Instructions:
- Select Scan Template
- Instructions:
- Click on Advanced Scan

- Instructions:
- New Basic Network Scan Policy
- Instructions:
- Name: Damn Vulnerable WXP
- Folder: hackingdo
- Targets: 192.168.1.96
- Note(FYI):
- The IP for my Damn Vulnerable WXP machine is 192.168.1.96. Your IP address will most likely be different and can be retrieved from (Section 2, Step 6).

- Instructions:
- Assessment
- Instructions:
- Click Assessment
- Select Windows
- Check Request information about the SMB Domain
- Click the Save Button
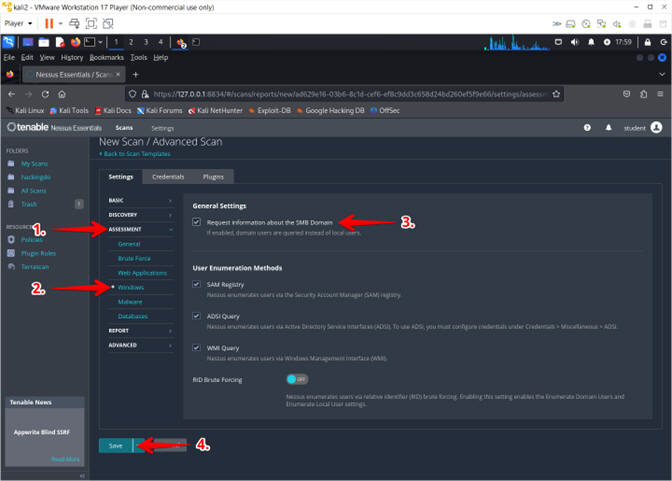
- Instructions:
- Run Scan
- Instructions:
- Click on the hackingdo folder
- Click on the Arrow Assessment
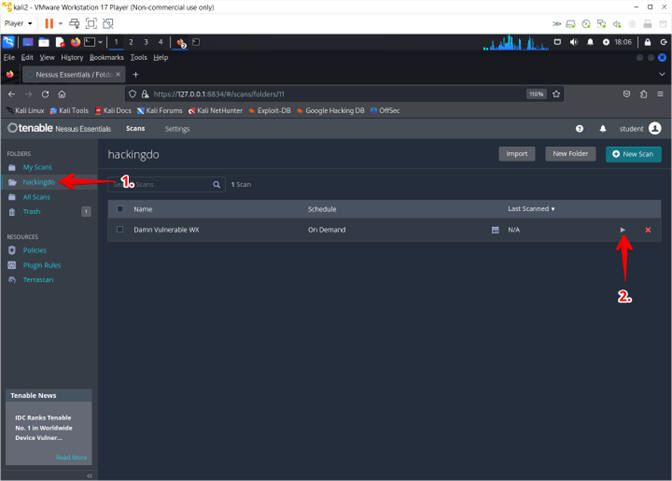
- Instructions:
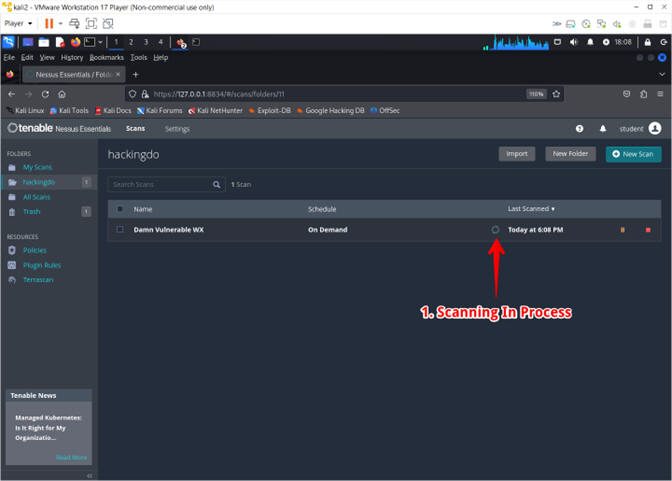
- Scan in Progress
- Instructions:
- The Arrow changing to a Pinwheel signifies that the scan is running
- Note(FYI):
- The scan will take between 5 to 10 minutes to run.
- Instructions:
- Scan Completed
- Instructions:
- The Arrow will change from a Pinwheel to a Checkmark once complete.
- Click on the "Damn Vulnerable WX" Scan name.
- Instructions:
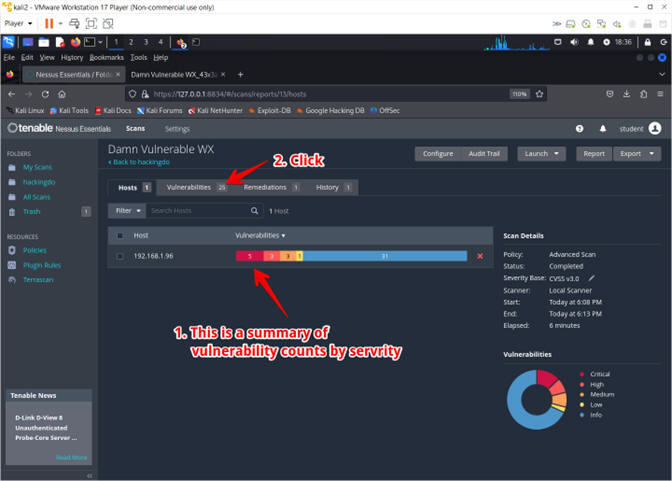
- View Vulnerabilities
- Instructions:
- Notice the Severity summary of vulnerability counts
- Click on number in the Vulnerability tab
- Instructions:
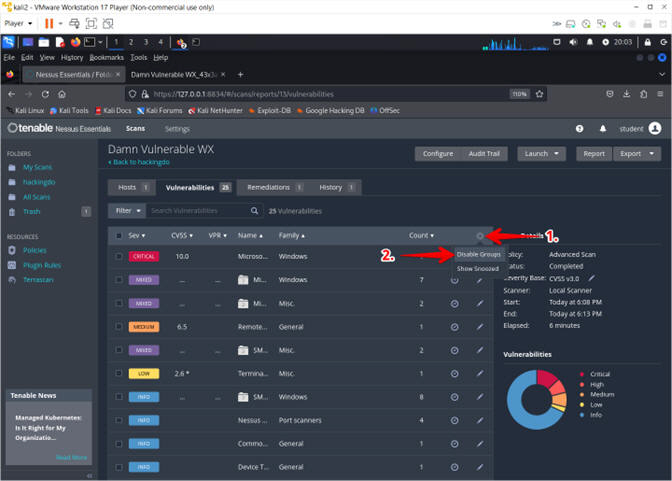
- Expand Vulnerability List
- Instructions:
- Click on the Gear Icon
- Select Disable Groups
- Instructions:
- Select MS08-067
- Instructions:
- Click on MS08-067

- Instructions:
- View MS08-067 Vulnerability
- Instructions:
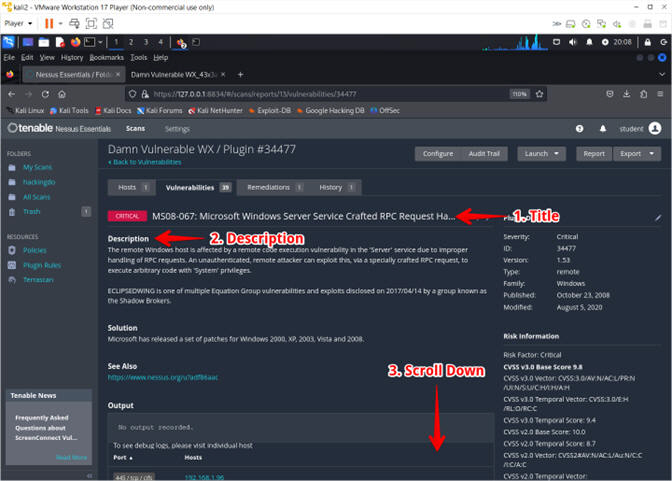
- Observe the Title
- Read the Description
- Scroll Down
- Instructions:
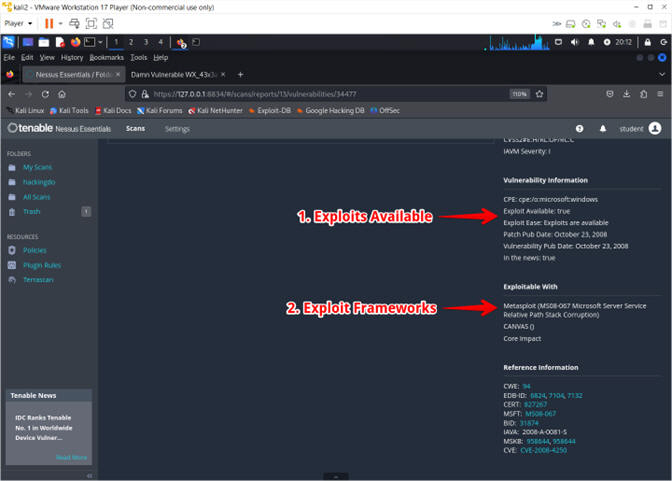
- Exploit Information
- Instructions:
- Exploits are confirmed to exist
- A Metasploit module exists for this vulnerability
- Note(FYI):
- Naturally, the next step as a penetration tester would be to attempt the Metasploit exploit module for this vulnerabilty.
- Instructions:
- Access Report
- Instructions:
- Click on the hackingdo folder
- Click on the Damn Vulnerable WX scan
- Instructions:
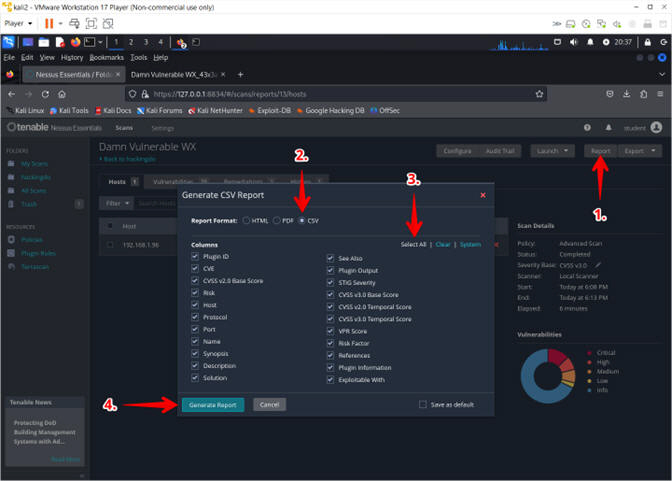
- Export and Create Report
- Instructions:
- Click on the Report button
- Click on CSV radio button
- Click on Select All
- Click on the Generate Report button
- Instructions:
- Name and Save Report
- Instructions:
- Name: DVWXP_1.csv
- Click on the Save button
- Instructions:
- Export and Create Report
- Instructions:
- Click on the Report button
- Click on CSV radio button
- Click on Select All
- Click on the Generate Report button
- Instructions:


| Section 9: Proof of Lab |
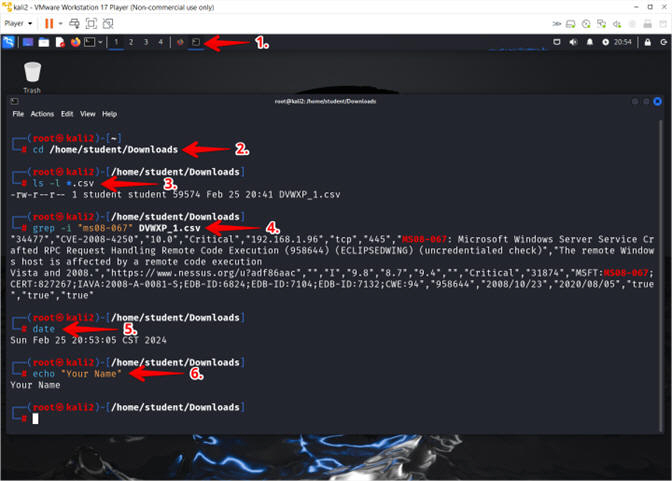
- Proof of Lab
- Instructions
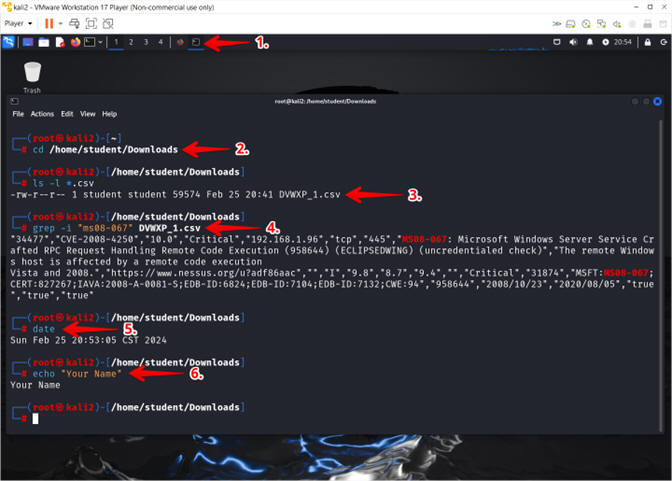
- Click on the in use Terminal Icon
- cd /home/student/Downloads
- ls -l *.csv
- grep -i "ms08-067" DVWXP_1.csv
- date
- echo "Your Name"
- Put in your actual name in place of "Your Name"
- e.g., echo "John Gray"
-
Proof Of Lab Instructions:
- Press the PrtScn key
- Paste into a word document
- Upload to Moodle
- Instructions