(CentOS
6.6:
Lesson 1)
{ Installing CentOS 6.6 }
|
Section 0. Background
Information |
- What is CentOS?
- CentOS (abbreviated from Community
Enterprise Operating System) is a Linux distribution that attempts to
provide a free, enterprise-class, community-supported computing platform
which aims to be functionally compatible with its upstream source, Red
Hat Enterprise Linux (RHEL).
-
Lab Notes
- In this lab we will do the following:
- Download CentOS-6.6
- Install CentOS-6.6
- Customize File System Layout to use
both fixed and Linux Volume Management (LVM) Partitions.
- Install and Test VMware Tools
- Install GCC (C++ Compiler)
- Legal Disclaimer
- As a condition of your use of this Web
site, you warrant to computersecuritystudent.com that you will not use
this Web site for any purpose that is unlawful or
that is prohibited by these terms, conditions, and notices.
- In accordance with UCC § 2-316, this
product is provided with "no warranties, either express or implied." The
information contained is provided "as-is", with "no guarantee of
merchantability."
- In addition, this is a teaching website
that does not condone malicious behavior of
any kind.
- You are on notice, that continuing
and/or using this lab outside your "own" test environment
is considered malicious and is against the law.
- © 2014 No content replication of any
kind is allowed without express written permission.
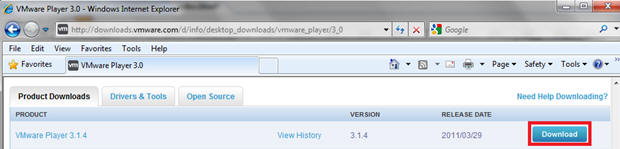
- On any Window's machine, download and install VMware
Player, if you have not already done so.
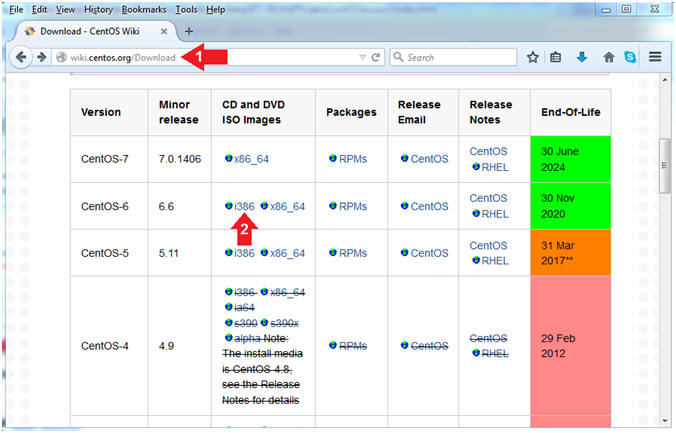
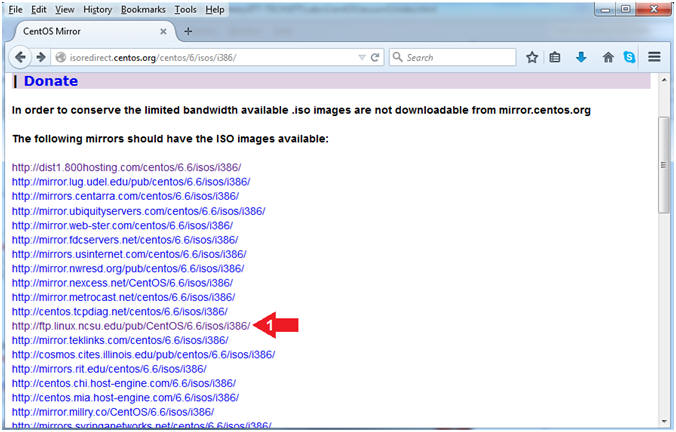
- Locate CentOS Mirror Download
- Choose a CentOS Mirror
- Instructions:
- Choose a Mirror
- Download CentOS-6.6 ISO
- Instructions:
- Click on CentOS-6.6-i386-bin-DVD1.iso
- Click the Save File radio button
- Click the OK button
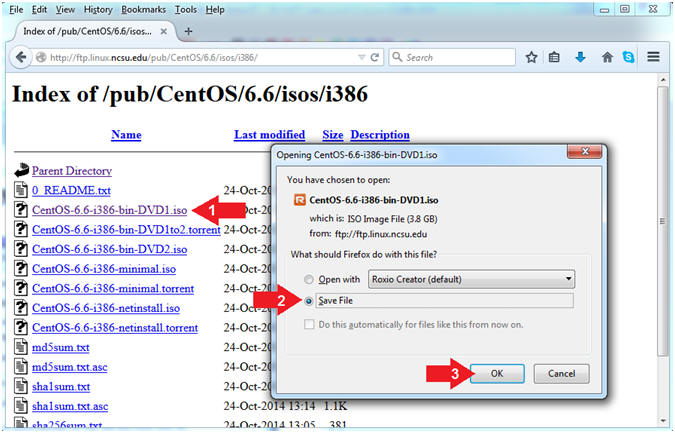
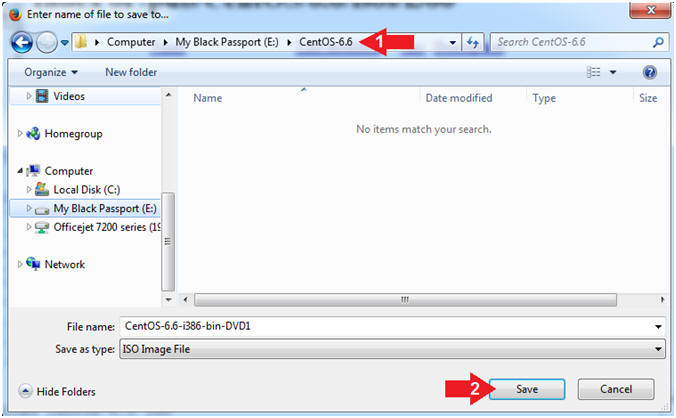
- Save CentOS-6.6 ISO
- Instructions:
- Navigate to wherever you want to save
the CentOS-6.6 ISO.
- In my case, I am saving the ISO to
my external USB E: Drive.
- E.g., E:\CentOS-6.6\
- Click the Save Button
|
Section 2. Create a
New Virtual Machine |
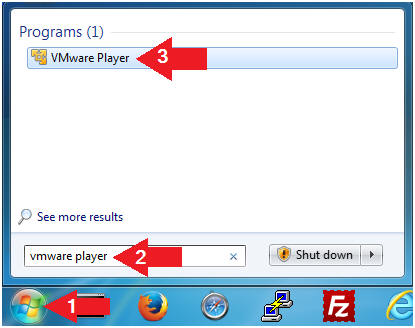
- Open VMware Player on your windows machine.
- Instructions:
- Click the Start Button
- Type "vmware player" in the search box
- Click on VMware Player
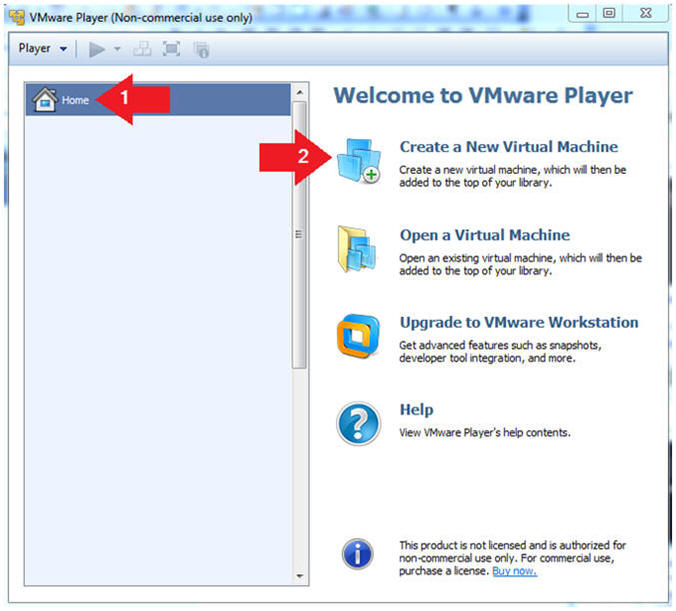
- Create a New Virtual Machine. (See Below)
- Instructions:
- Click on Home
- Click on Create a New Virtual Machine
- Installation Media
- Instructions:
- Select the radio button "I will install
the operating system later"
- Click Next
- Note(FYI):
- Normally, you would select "Install
disc image file (iso)", but unfortunately VMware Player will attempt
to do an easy install.

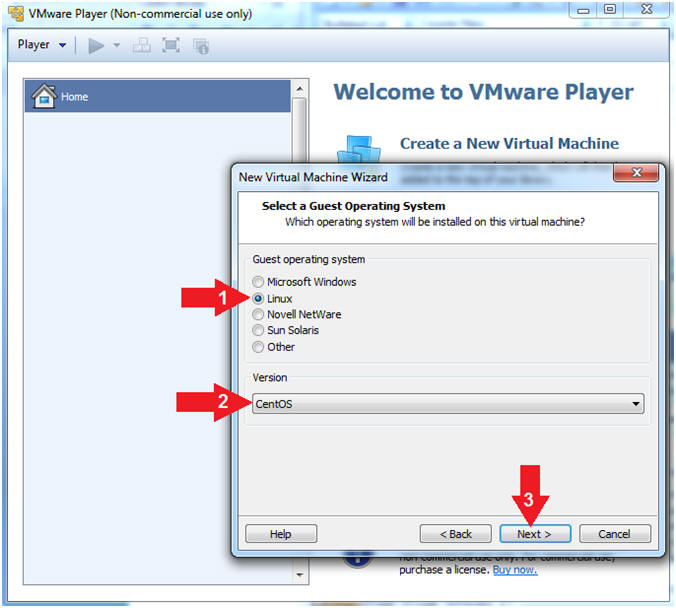
- Select a Guest Operating System
- Instructions:
- Guest operating system: Linux
- Version: CentOS
- Select Next
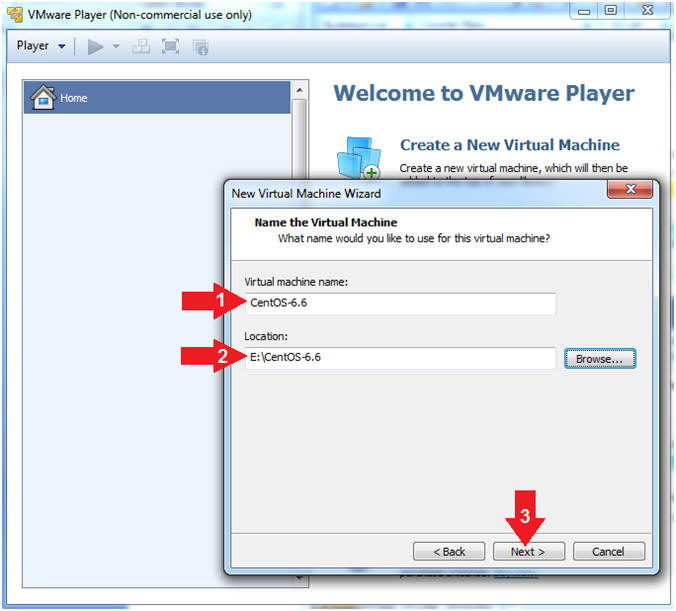
- Name the Virtual Machine
- Instructions:
- Virtual machine name: CentOS-6.6
- Location: E:\CentOS-6.6
- In my case,
I
saved it to my USB drive.
- Click the Next Button
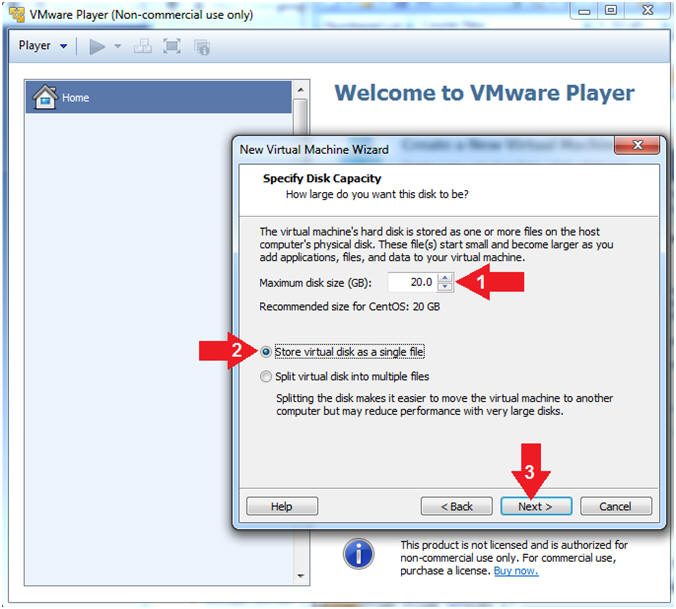
- Specify Disk Capacity.
- Instructions:
- Make the disk size to 20 GB.
- Select the radio button name Store virtual
disk as a single file.
- Select Next.
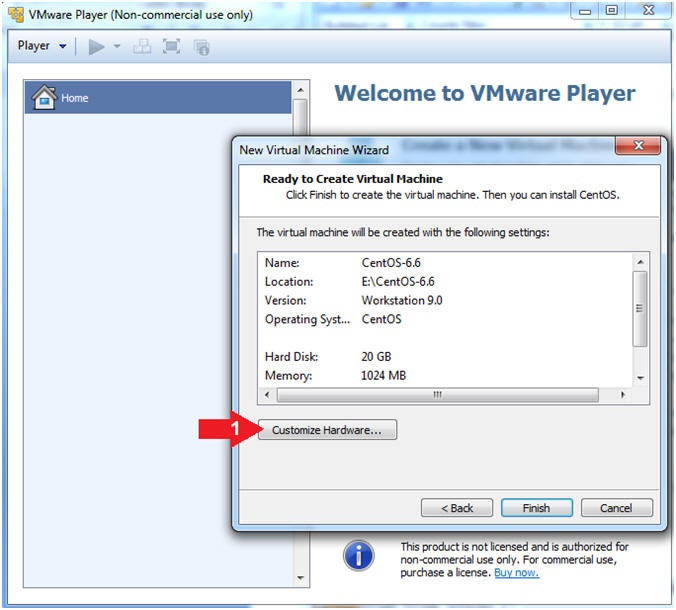
- Customize the Hardware.
- Instructions:
- Select the Customize Hardware Button.
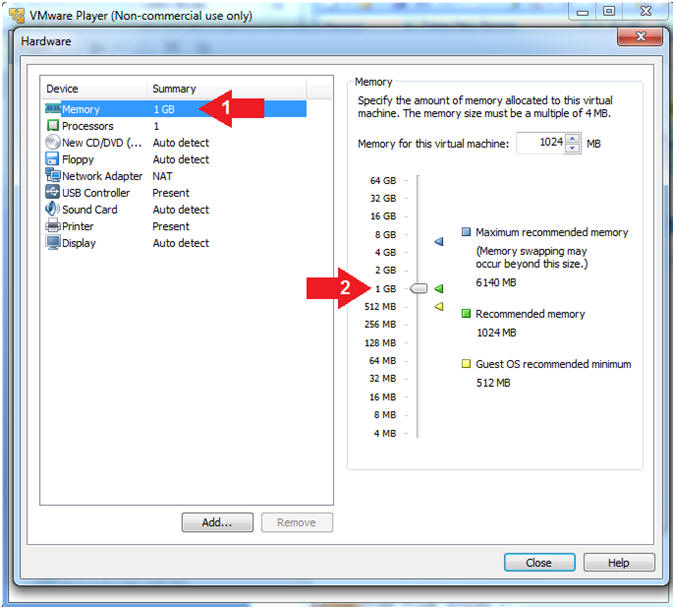
- Configure Memory
- Instructions:
- Click on Memory.
- Up the memory to 1 GB
-
Do NOT Click
the Close Button,
we still have more to configure.
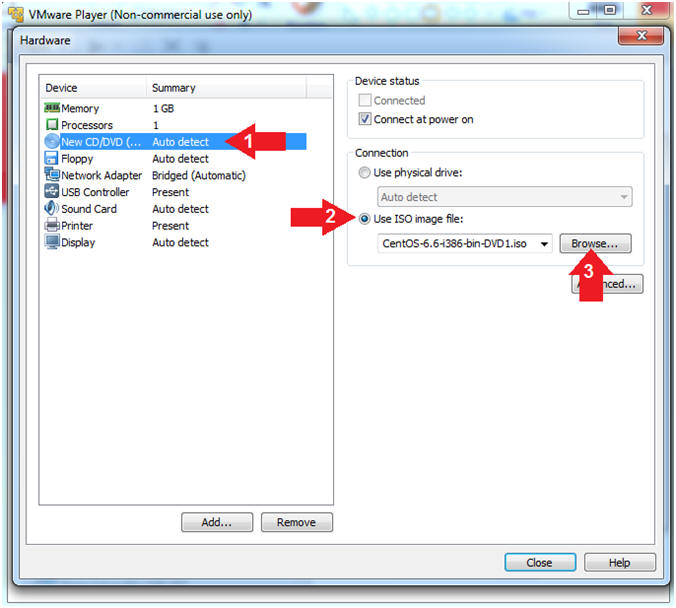
- Configure CD/DVD
- Instructions:
- Click on CD/DVD.
- Select the radio button "Use ISO image
file:"
- Click the Browse Button, and navigate
to the CentOS-6.6-i386-bin-DVD1.iso and double click on it.
- Note(FYI):
-
Do NOT Click
the Close Button,
we still have more to configure.
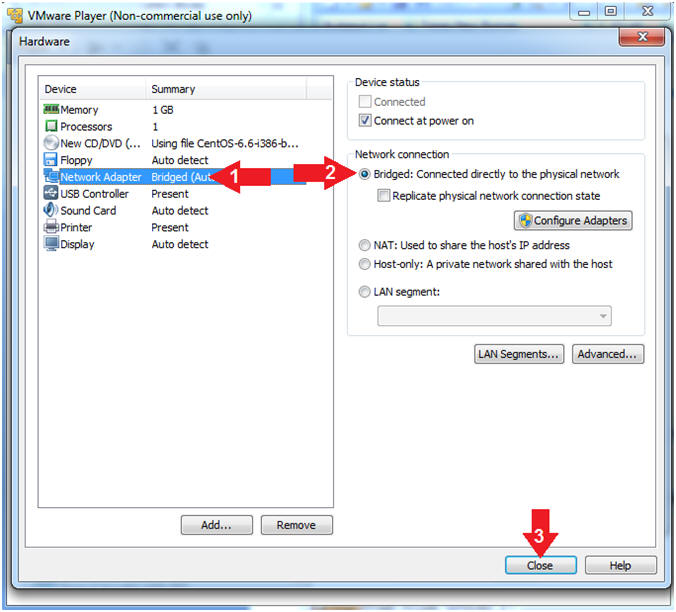
- Configure the Network Adapter
- Instructions:
- Click on Network Adapter
- Selected the Bridged radio button.
- Now, you can click the Close button.
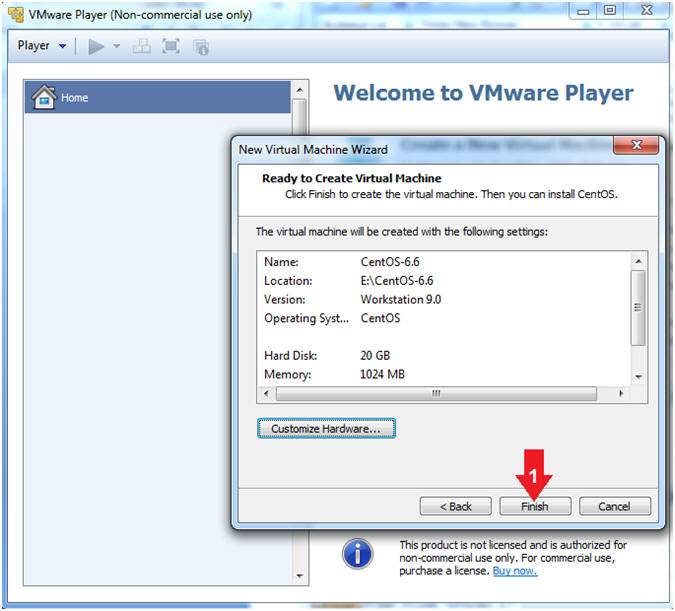
- Click Finish (See Below)
- Instructions:
- Click the Finish Button
|
Section 3. Install
CentOS-6.6 to Hard Drive |
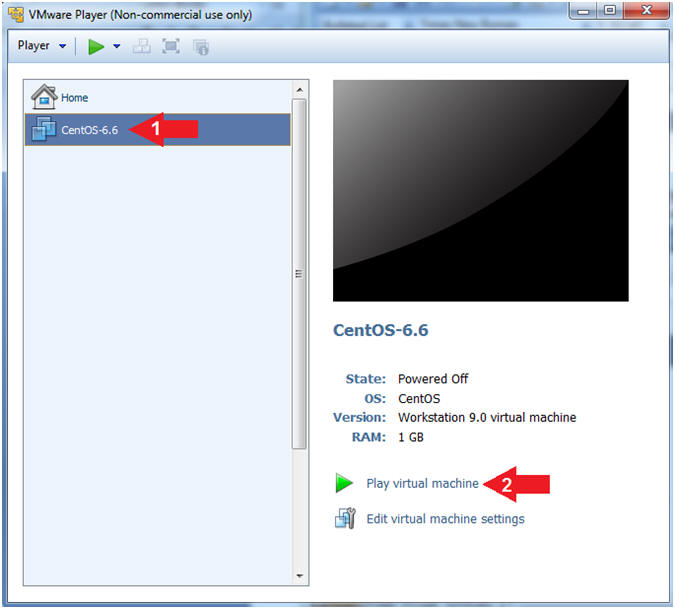
- Start the CentOS-6.6 VM
- Instructions:
- Click on the CentOS-6.6 VM
- Click on Play virtual machine
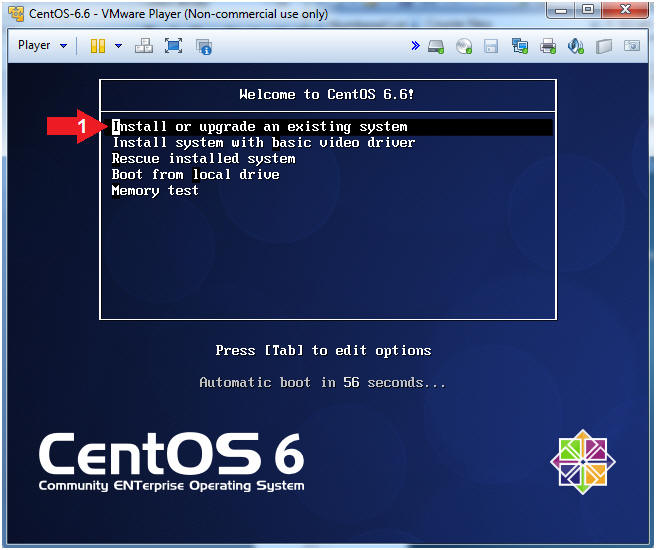
- Install CentOS-6.6
- Instructions:
- Scroll up to "Install or upgrade an
existing system" and press <Enter>
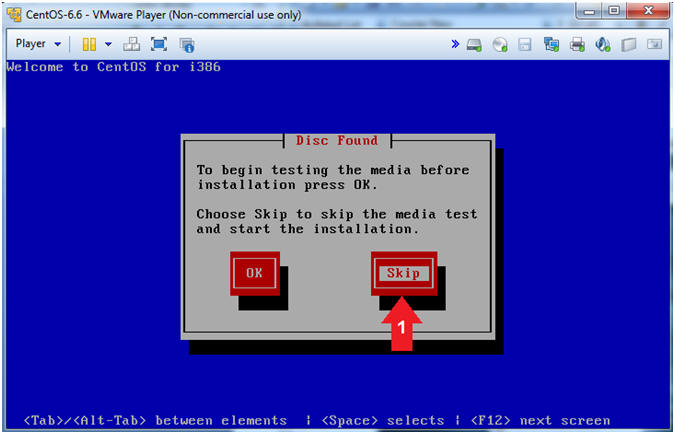
- Disc Found
- Instructions:
- Right Arrow to the Skip Box and press
<Enter>
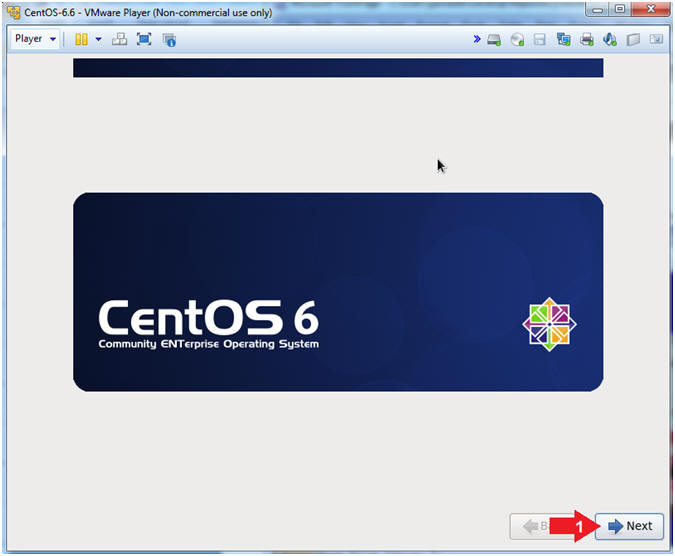
- Select Next
- Instructions:
- Click the Next Button
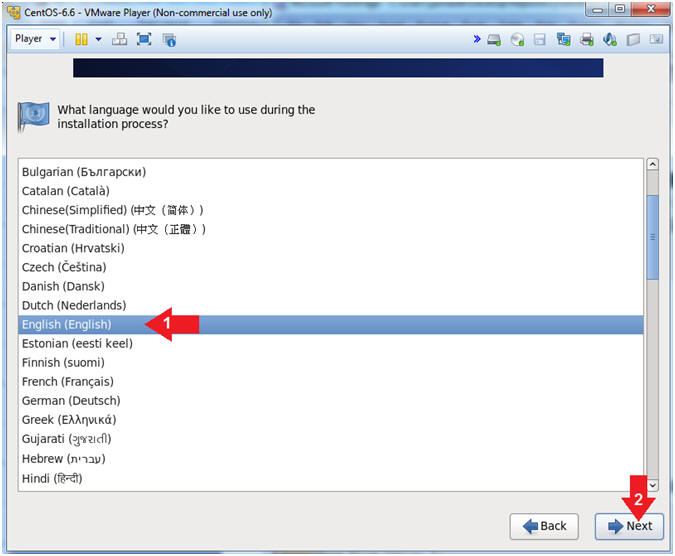
- Select Language
- Instructions:
- Select English (English)
- Click Next
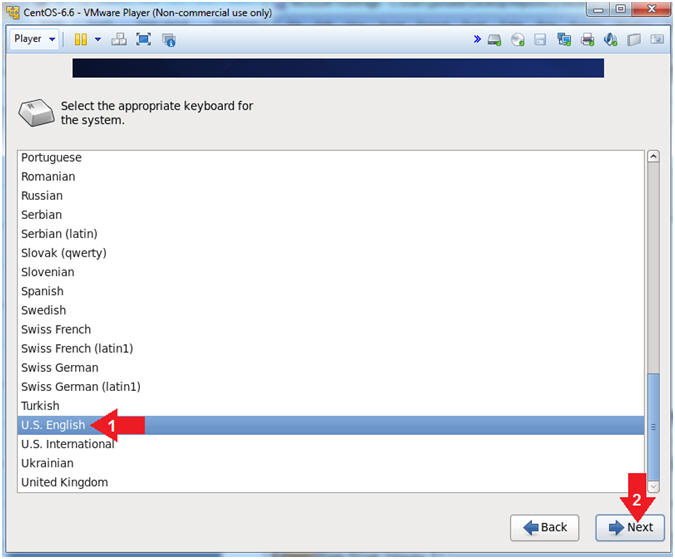
- Select Keyboard
- Instructions:
- Select English.
- Click Next
- Select Storage Device
- Instructions:
- Select Basic Storage Devices
- Select Next

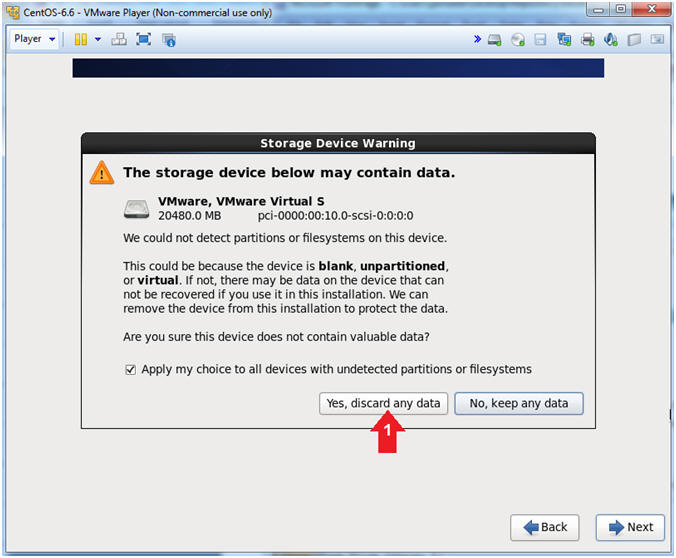
- Storage Device Warning
- Instructions:
- Click the "Yes, discard any data"
Button
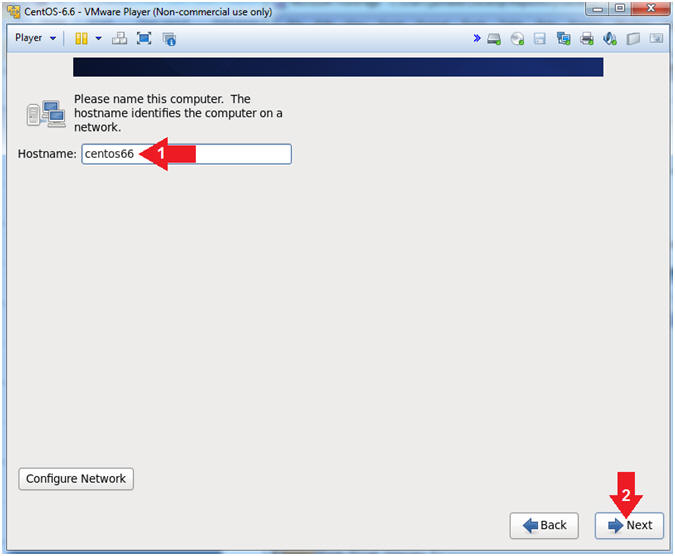
- Name the server
- Instructions:
- Hostname:
centos66
- Click the Next Button.
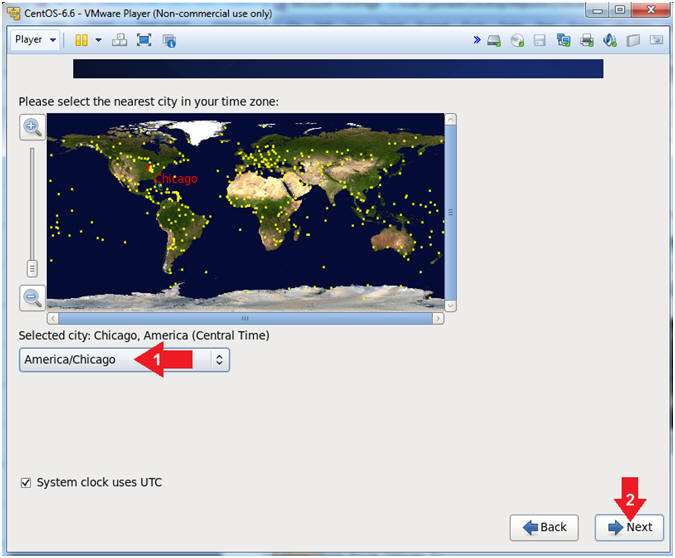
- Select Time Zone
- Instructions:
- Select the time zone of your choice.
- Select Next.
- Select a root password.
- Instructions:
- Root Password: <Supply A Strong
Root Password>
- Confirm: <Re-Enter the previous Root
Password>
- Click the Next Button
- Note(FYI):
- At least 8 characters
- Alpha-Numeric
- Uppercase and Lowercase
- Symbols (!@#$%^&*, etc)

|
Section 4. Creation
Partitions |
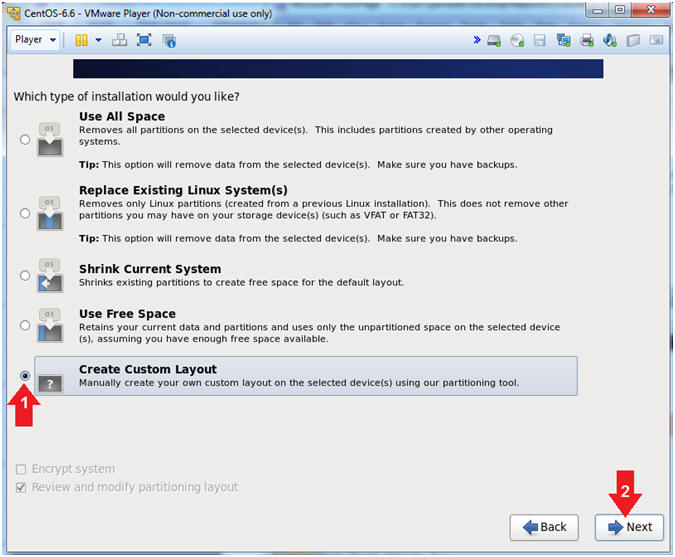
- Create Custom Layout.
- Instructions:
- Select Create Custom Layout
- Click the Next Button
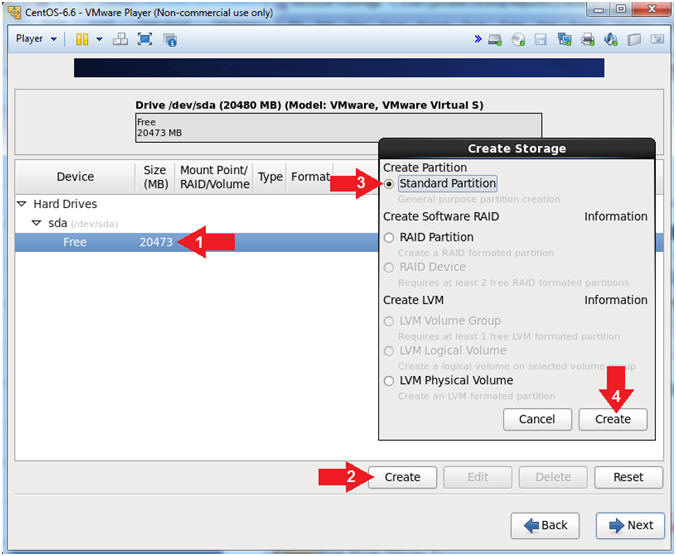
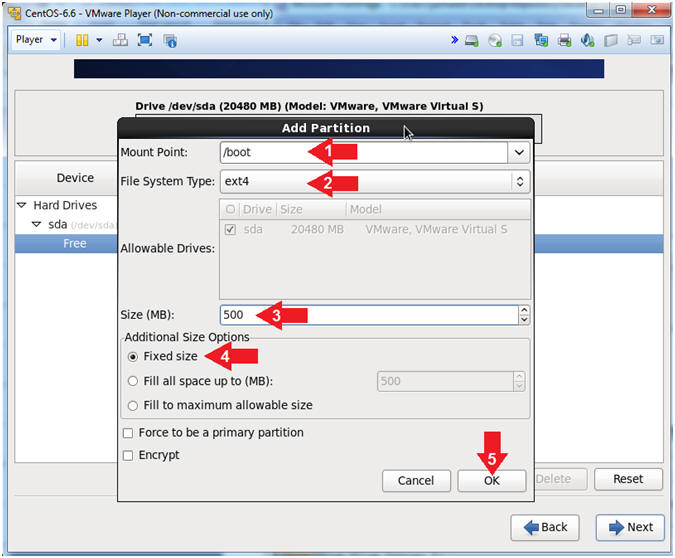
- Create /boot (Part 1)
- Instructions:
- Click on the Free Space under the SDA
Hard Drive
- Click the Create Button
- This will pop up a Create Storage
window
- Click on the Radio Button "Standard
Partition"
- Click on the Create Button
-
- Create /boot (Part 2)
- Instructions:
- Mount: /boot
- File System Type: ext4 or ext2
- ext2 is sufficient if you do not think
your /boot file system will change. For class purposes use
ext4.
- Size: 500 (300 MB minimum)
- Addition Size Options: Select the Fixed
size radio button
- Click OK
- Note(FYI):
- The /boot partition holds the kernel and other data the system needs
when it boots; it cannot be under the control of LVM.
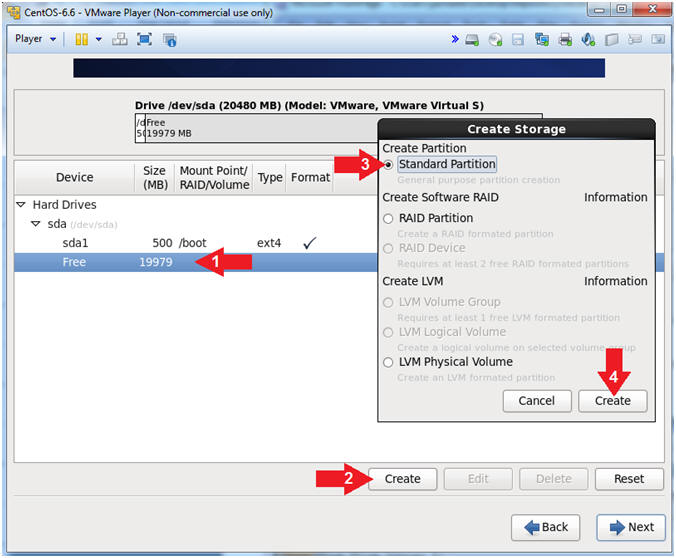
- Create / (Part 1)
- Instructions:
- Click on the Free Space under the SDA
Hard Drive
- Click the Create Button
- This will pop up a Create Storage
window
- Click on the Radio Button "Standard
Partition"
- Click on the Create Button
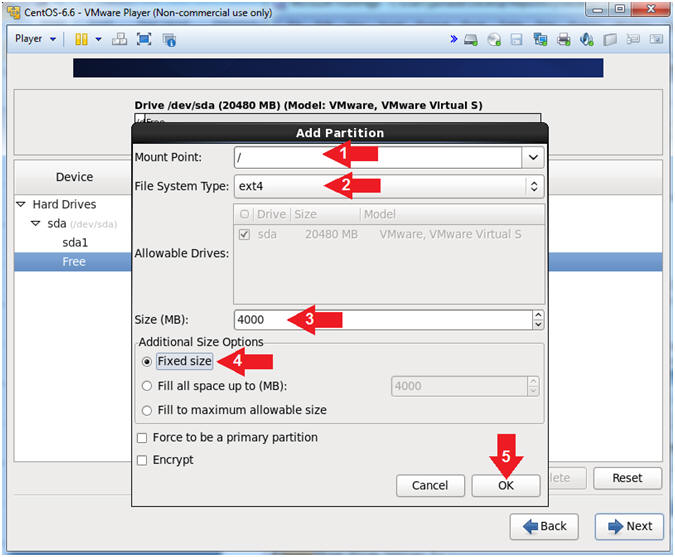
- Create / (Part 2)
- Instructions:
- Mount: /
- File System Type: ext4
- Size: 4000 (Recommend: (3.0 GB - 5.0
GB)
- Additional Size Options: Select the
Fixed size radio button
- Click OK
- Note(FYI):
- Any file systems that are not created as a separate partition will
become automatically part of the root(/) filesystem.
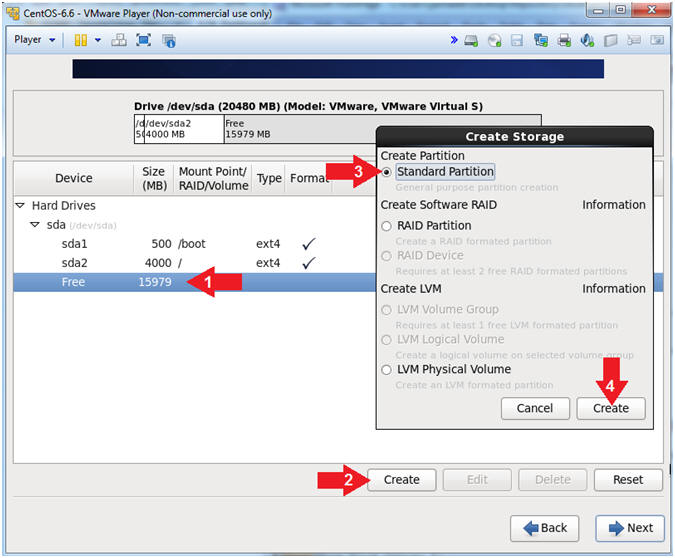
- Create swap (Part 1)
- Instructions:
- Click on the Free Space under the SDA
Hard Drive
- Click the Create Button
- This will pop up a Create Storage
window
- Click on the Radio Button "Standard
Partition"
- Click on the Create Button
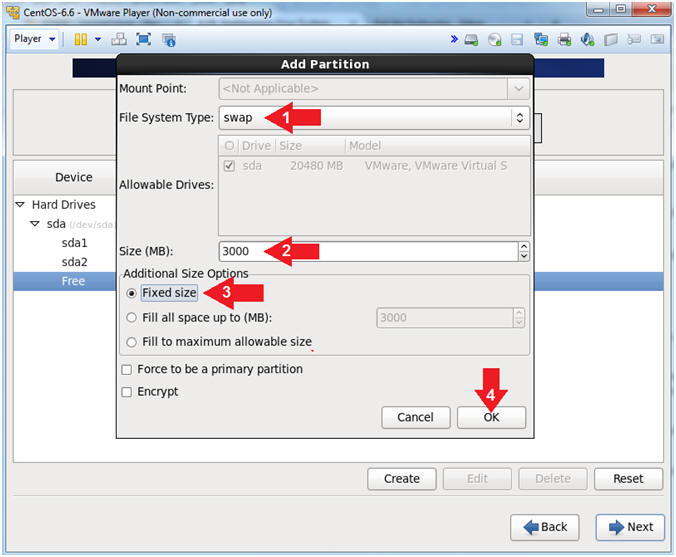
- Create swap (Part 2)
- Instructions:
- File System Type: swap
- Size: 3000 (Swap should double memory).
- Currently, 1 GB is allocated to
memory. Only a maximum of 1.5 GB can be allocated to
memory, since swap is 3000 MB or 3 GB
- Additional Size Options: Select the
Fixed size radio button
- Click OK.
- Note(FYI):
- Linux temporarily stores programs and data on a swap partition when it
does not have enough RAM to hold all the information during processing.
Also, swap is used when your hibernate the system.
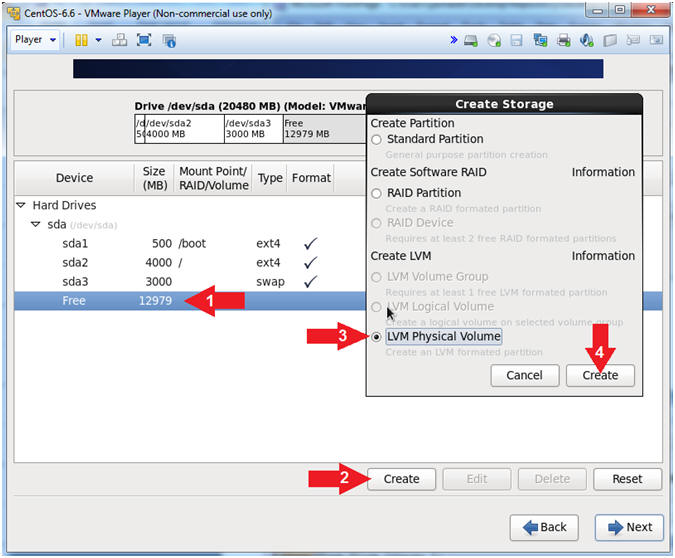
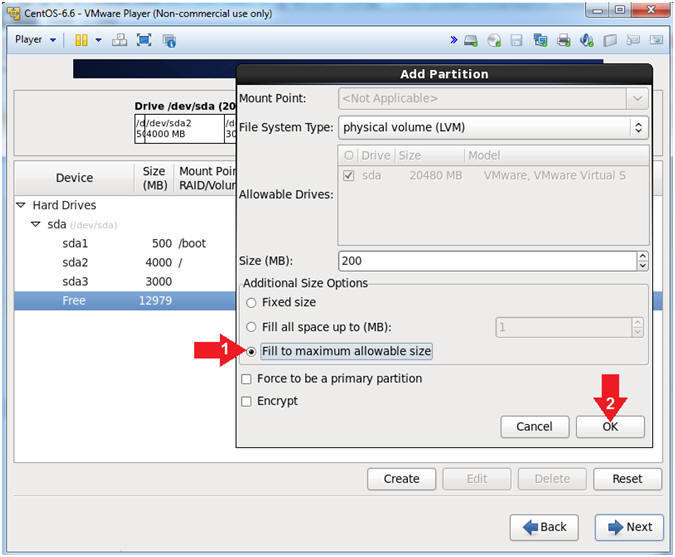
- Create a Physical Volume (Part 1)
- Instructions:
- Click on the Free Space under the SDA
Hard Drive
- Click the Create Button
- This will pop up a Create Storage
window
- Click on the Radio Button "LVM Physical
Volume"
- Click on the Create Button
- Create a Physical Volume (Part 2)
- Instructions:
- Additional Size Options: "Fill to
maximum allowable size" radio button
- Click OK
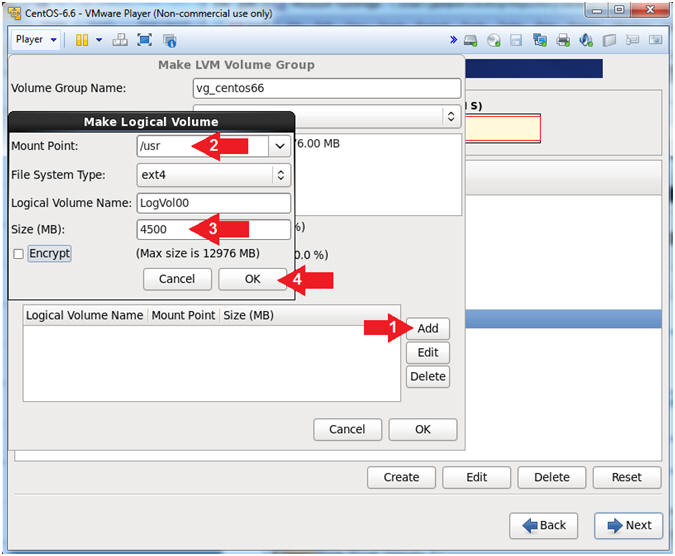
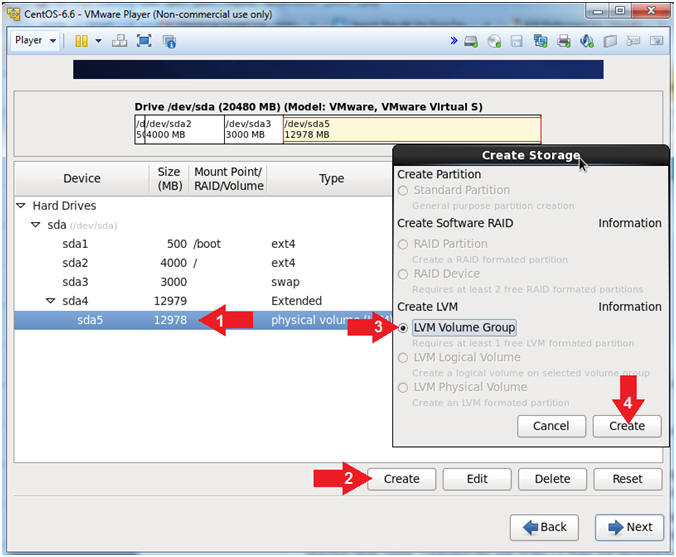
- Create a Logical Volume Group
- Instructions:
- Click on the sda5 physical volume
- Click the Create Button
- This will pop up a Create Storage
window
- Click on the Radio Button "LVM Volume
Group"
- Click on the Create Button
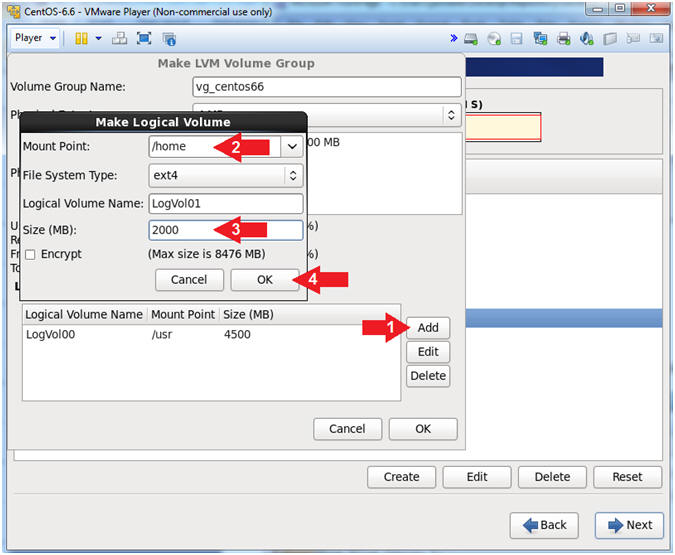
- Create /usr
- Instructions:
- Click the Add Button
- Mount: /usr
- Size: 4500 (4 to 16 GB)
- Click OK
- Note(FYI):
- The size of /usr depends on the number
of software packages you install
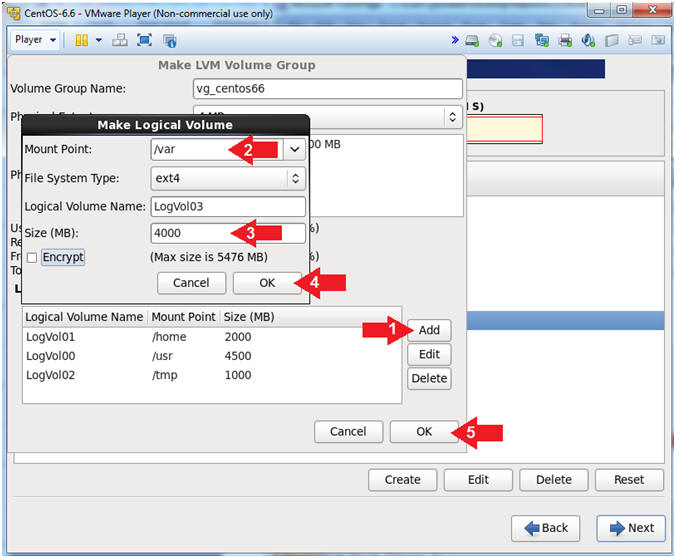
- Create /home
- Instructions:
- Click the Add Button
- Mount: /home
- Size: 2000
- Click OK
- Note(FYI):
- Size depends on the number of users on the machine and the type of work
they do.
- Create the /tmp filesystem.
- Instructions:
- Click the Add Button
- Mount: /tmp
- Size: 1000 (Minimum 500 MB)
- Click OK
- Note(FYI):
- Temporary files such as *.pid files reside here. For most Linux
and Unix operating systems, data is not preserved between reboots.

- Create the /var filesystem
- Instructions:
- Click the Add Button
- Mount: /var
- Size: 4000 (Required minimum is 500 MB;
however, Apache and MySQL is typically installed under /var).
- Click OK, in the Make Logical Volume
- Click OK, in the Make Logical Volume
Group
- Note(FYI):
- /var
is short for variable. Data in this partition changes frequently.
- /var/www/html - Where Apache Web
Pages are stored.
- /var/log - Where the system log
messages are stored.
- /var/mail - Where mail is stored
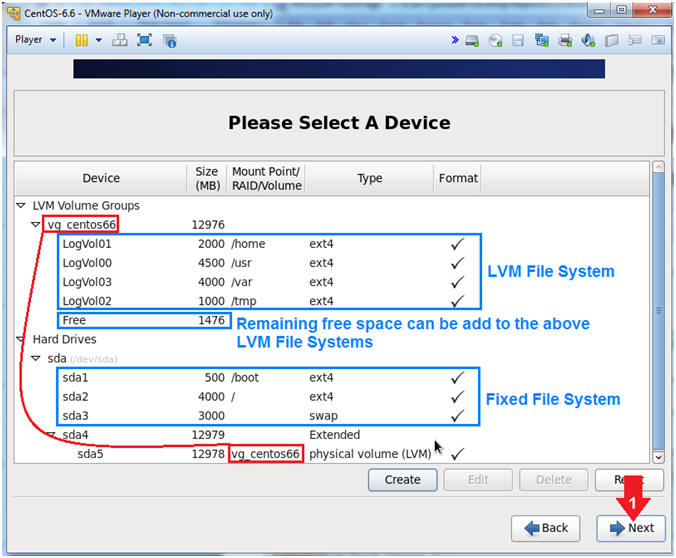
- Review Your Work
- Note(FYI):
- Both /boot and / are fixed file systems
which cannot be changed.
- /home, /usr, /tmp, and /var are LVM
file systems which can be increased or decreased in size.
- Instructions:
- Click the Next Button
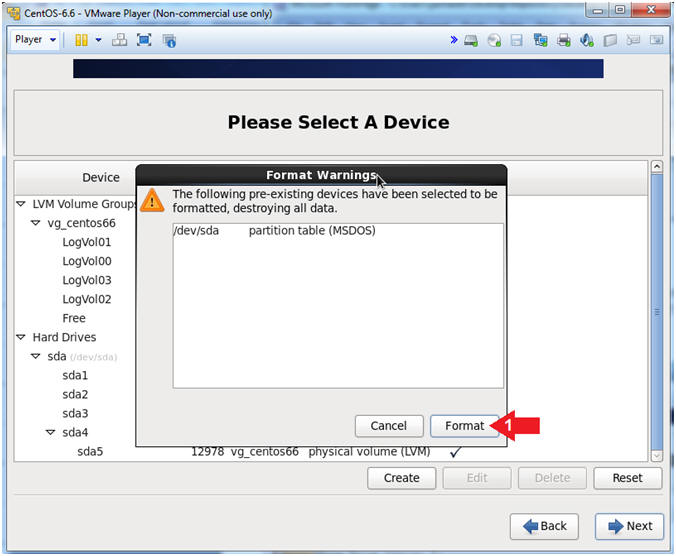
- Format Warning
- Instructions:
- Click the Format Button
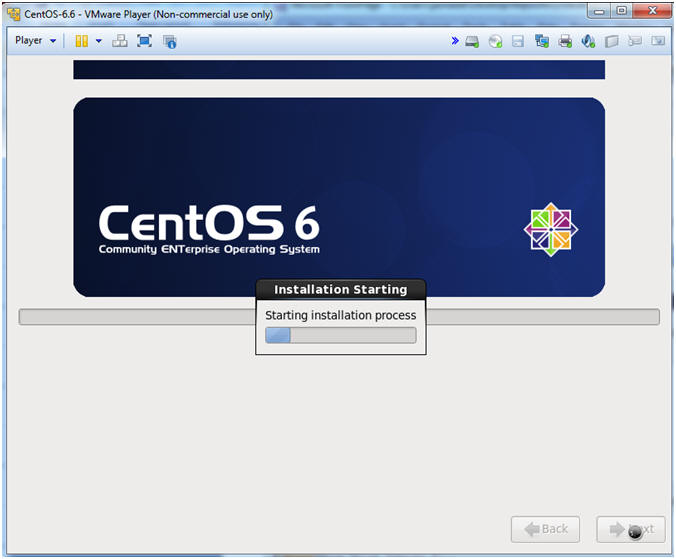
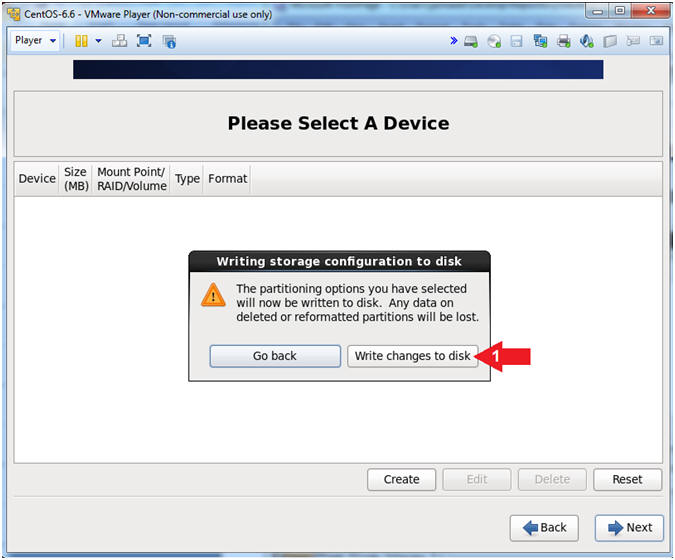
- Writing storage configuration to disk
- Instructions:
- Click the Write changes to disk Button
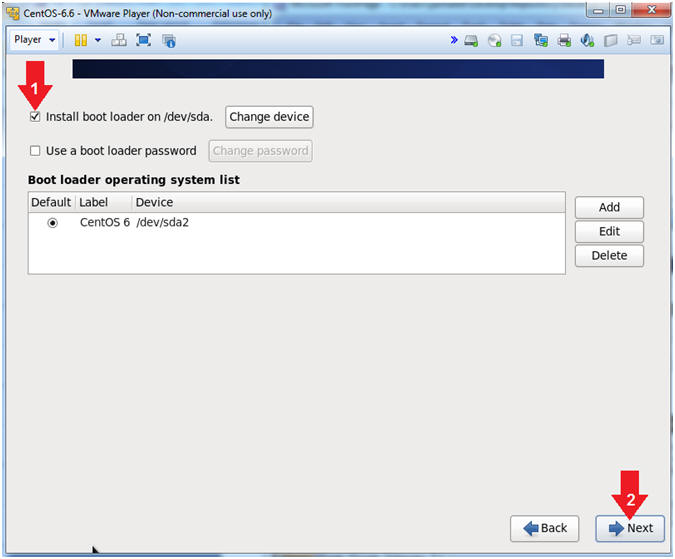
- Install the boot loader
- Instructions:
- Check the Install boot loader checkbox
- Click the Next Button
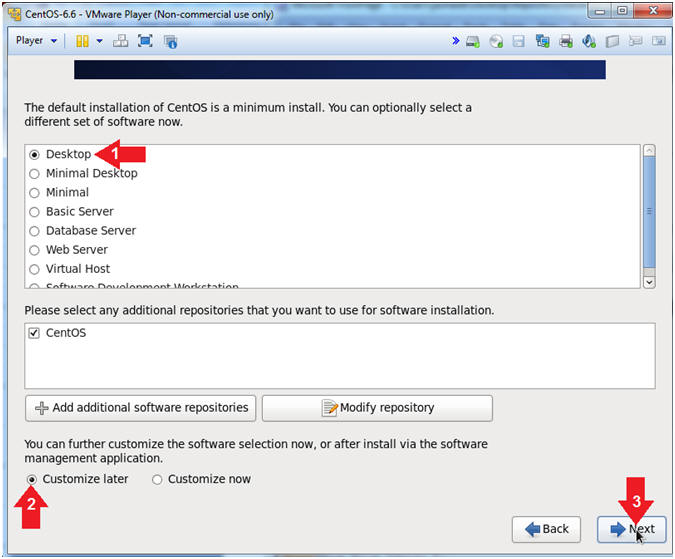
- Install Software
- Instructions:
- Click the Desktop radio button
- Click the Customize later radio button
- Click the Next Button
- Install Software
- Instructions:
- Click the Desktop radio button
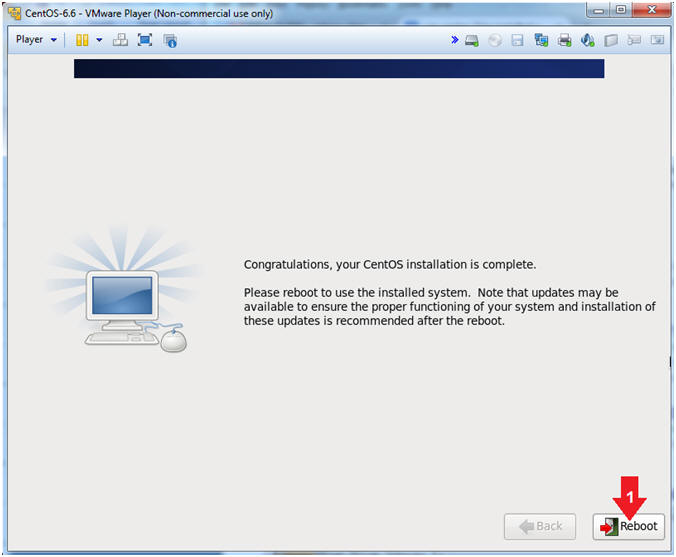
- Reboot System
- Instructions:
- Click the Reboot button
|
Section 5. Post
CentOS Configuration |
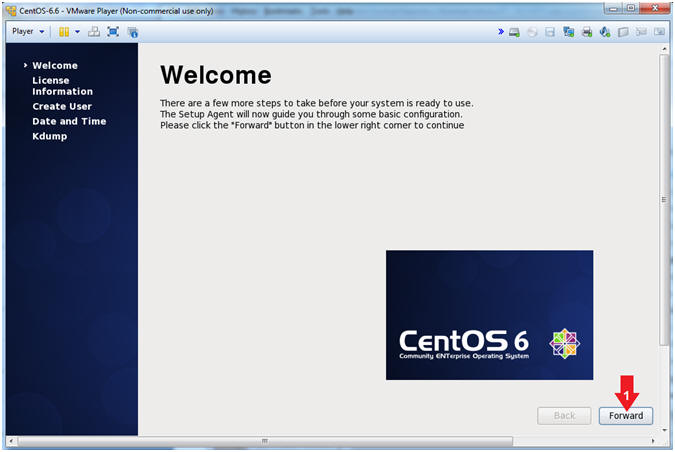
- Welcome
- Instructions:
- Click the Forward Button
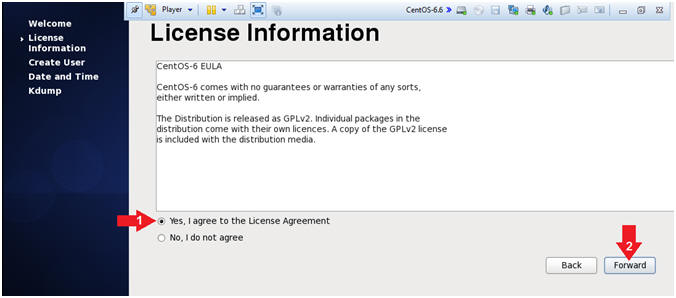
- License Information
- Instructions:
- Click "Yes, I agree to the License
Agreement"
- Click the Forward Button
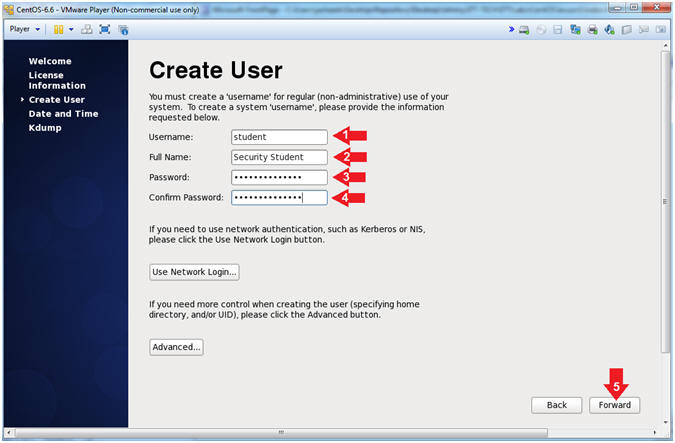
- Create User
- Instructions:
- Username: student
- Do not change "student", since this
account is required for future labs.
- Full Name:
Security
Student
- Replace Security Student
with your actual full name.
- e.g., John Gray
- Password: <Supply A Strong
Password>
- Confirm: <Re-Enter the previous Password>
- Click the Forward Button
- Note(FYI):
- At least 8 characters
- Alpha-Numeric
- Uppercase and Lowercase
- Symbols (!@#$%^&*, etc)
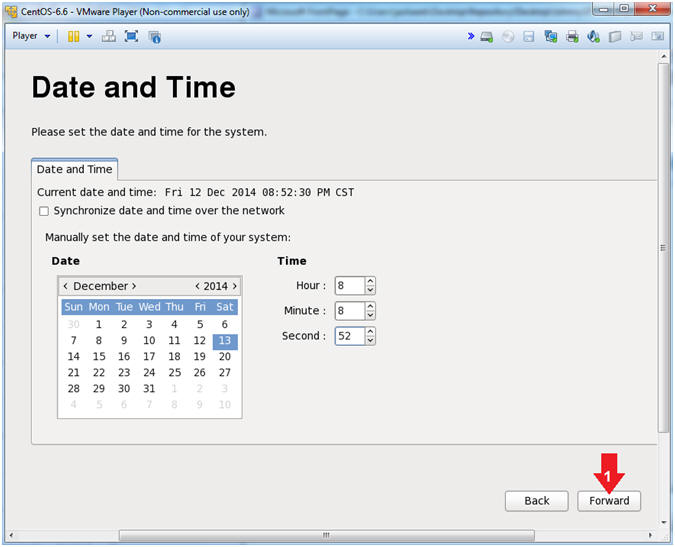
- Date and Time
- Instructions:
- Adjust the Date and Time and click the
Forward Button
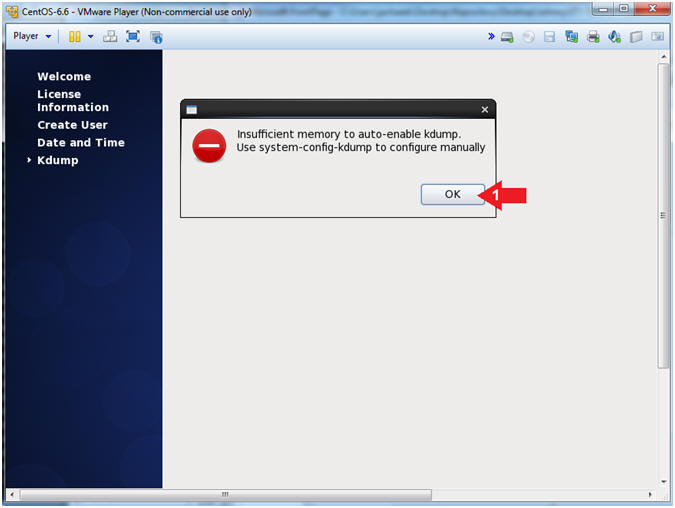
- Kdump (Part 1)
- Note(FYI):
- CentOS 6 requires 4 GB of RAM.
Since, we only reserved 1 GB of memory for this virtual machine, you
will receive and error message "Insufficient memory to auto-enable
kdump".
- Instructions:
- Click the OK Button in the Insufficient
memory warning window.
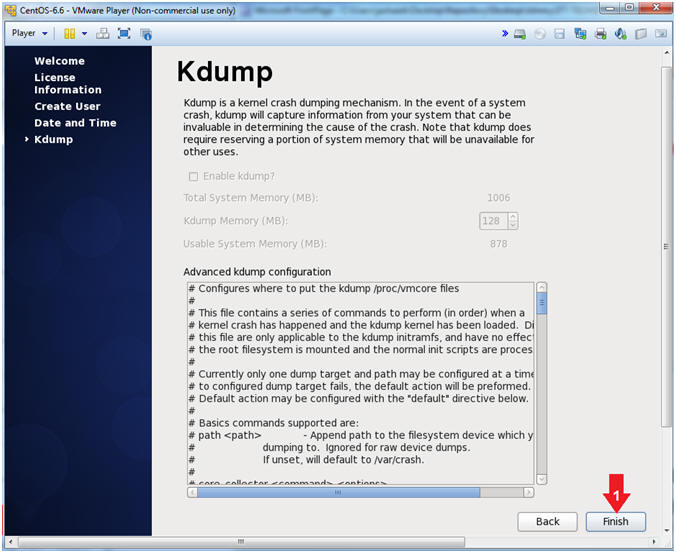
- Kdump (Part 2)
- Note(FYI):
- After clicking the Finish Button your
machine will immediately reboot
- Instructions:
- Click the Finish Button
|
Section 6. Install
VMware Tools |
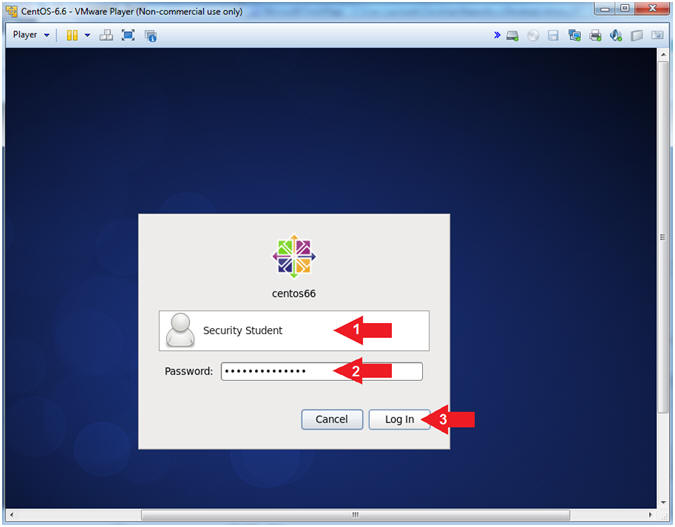
- Login to CentOS
- Note(FYI):
- Until you click the user, in this case
Security Student, the Password field will not be displayed.
- Instructions:
- Click on Security Student
- This will display the password text
box.
- Supply its' password
- Click the Log In Button
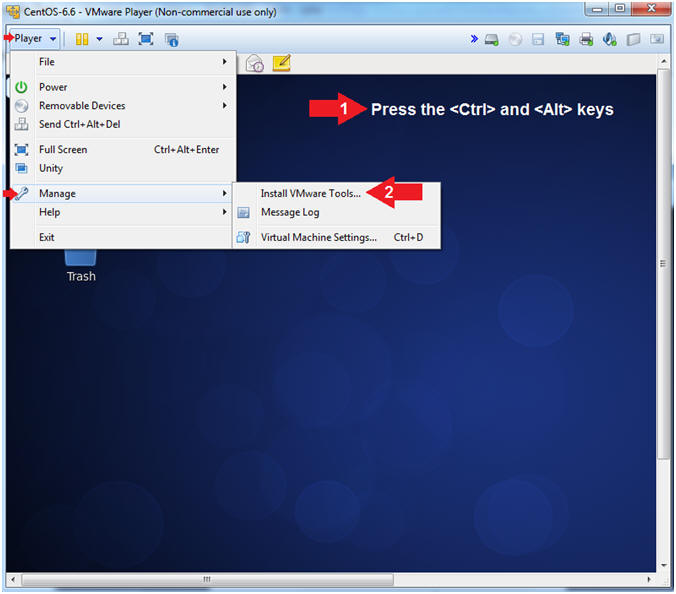
- Launch Install VMware Tools...
- Instructions:
- Press the <Ctrl> and <Alt> keys
- The will bring mouse focus back to
your host machine
- Click on Player --> Manage --> Install
VMware Tools...
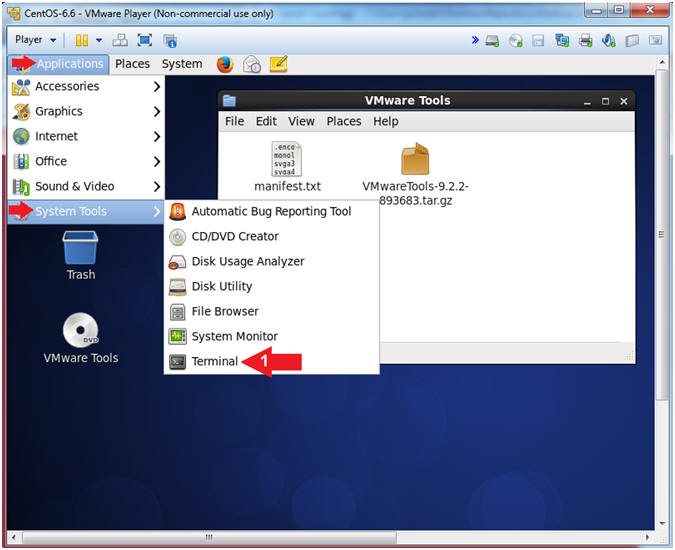
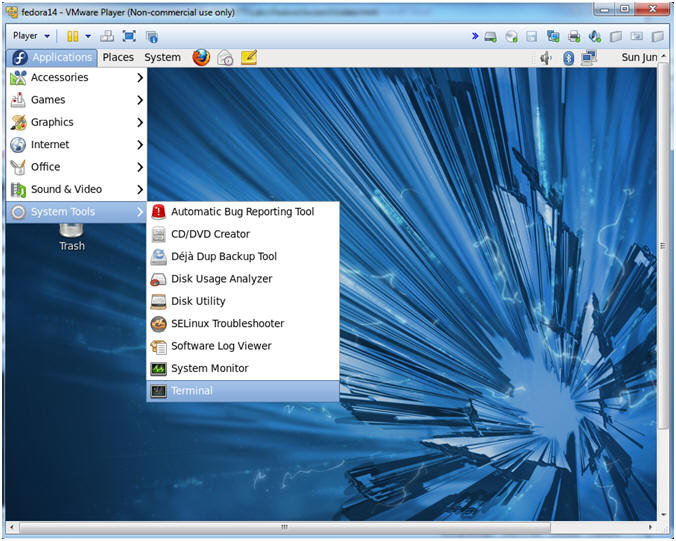
- Open a Terminal
- Instructions:
- Applications --> System Tools -->
Terminal
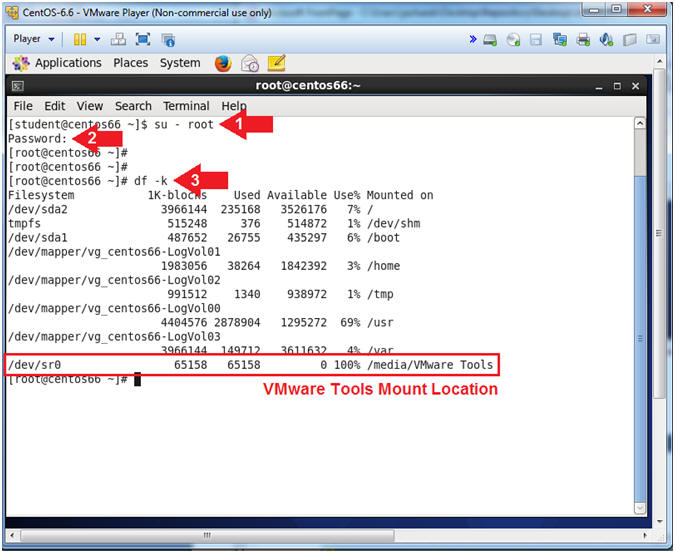
- View VMware Tools Mount Location
- Instructions:
- su - root
- Password: <Supply the root password>
- df -k
- Note(FYI):
- su - root, means switch user to root.
- df -k, means to view file system disk
space in the block size.
- Notice, VMware Tools was mounted to
/dev/sr0 and is accessible in the directory /media/VMware Tools.
- Uncompress VMWare Tools Bundle
- Instructions:
- cd /media/VMware\ Tools/
- ls -lrta
- cp VMwareTools*gz /var/tmp/
- cd /var/tmp
- tar zoxvf VMwareTools*gz
- Note(FYI):
- cd, means to change directory.
- ls, means to list the directory
contents.
- -lrta,
(l)
long listing, (r)
in reverse order by (t)
time, and show (a)
invisible files.
- cp, means to copy the VMWare Tools
bundle to the /var/tmp directory.
- cd, means to change directory to the /var/tmp
directory
- tar, means to uncompress or compress
files or directories. In our case we are going to uncompress
the VMware Tools Bundle.
-
zoxvf,
(x)
means to extract and (z)
unzip the (f)
file in (v)
verbose mode while keeping the same (o)
ownerships.

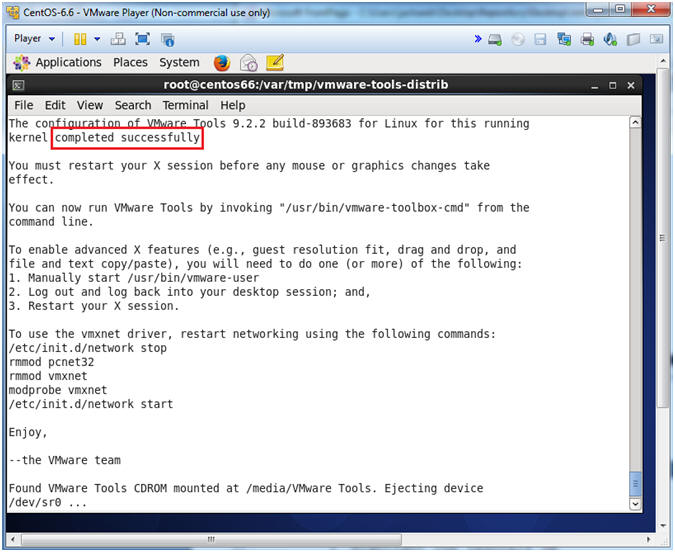
- Install VMware tools
- Instructions:
- cd vmware-tools-distrib/
- perl vmware-install.pl default

- Review Installation Output
- Note(FYI):
- Scroll towards the bottom of the output
for a completion message.
- In order for "all" of the vmware tool
features to be invoked we will later reboot the machine in a later
step.
|
Section 7. Post
Virtual Machine Settings Configuration |
- Open Virtual Machine Settings
- Instructions:
- Press the <Ctrl> and <Alt> keys to
bring mouse focus back to the host machine.
- Player --> Manage --> Virtual Machine
Settings...
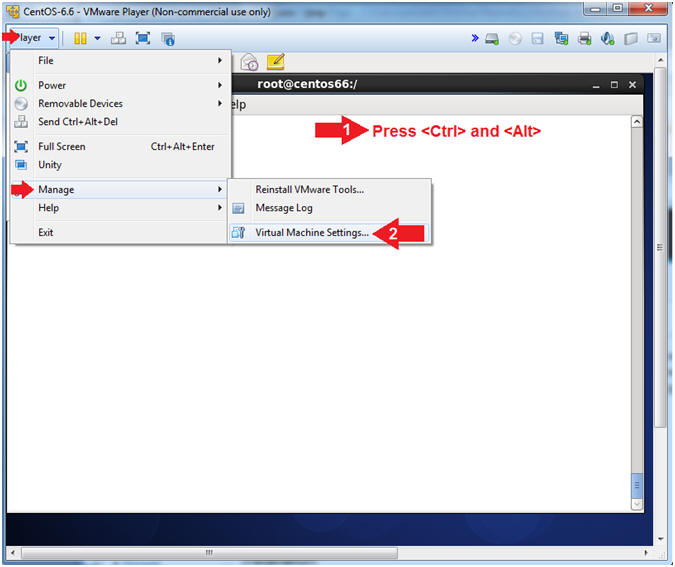
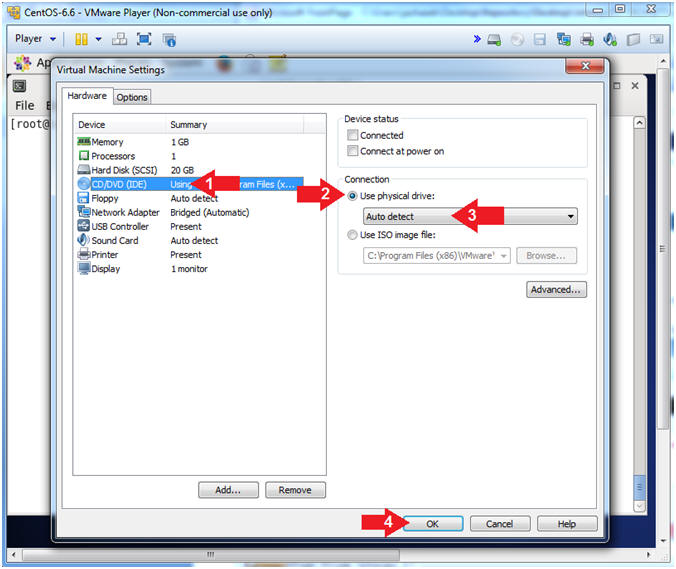
- Change CD/DVD Settings
- Note(FYI):
- Below we want the Virtual Machine to
boot from its' hard drive instead of the CentOS ISO.
- Instructions:
- Click on CD/DVD (IDE)
- Click on the radio button "Use physical
drive:"
- Select "Auto detect"
- Click the OK Button
|
Section 8. Reboot
Machine |
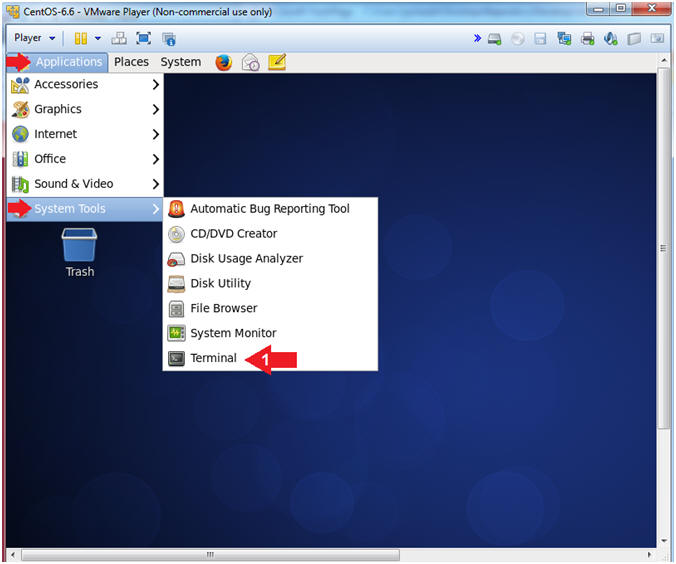
- Open a Terminal
- Instructions:
- Applications --> System Tools -->
Terminal
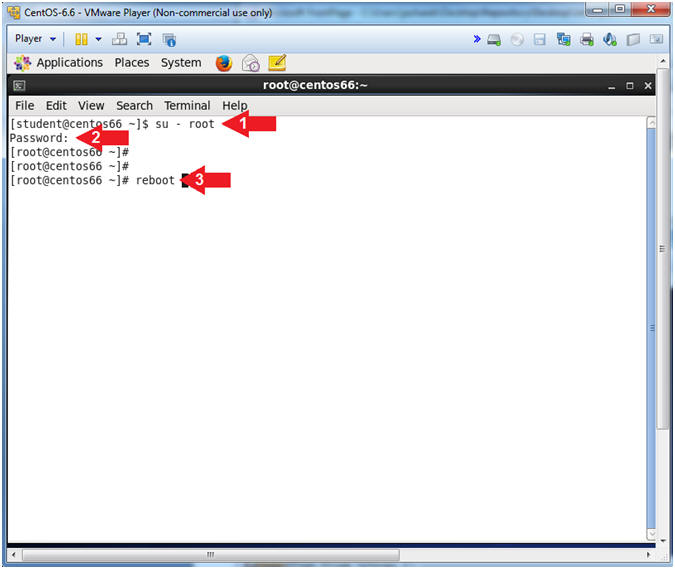
- Reboot Server
-
Instructions:
- su - root
- Password: <Supply the root password>
- reboot
-
|
Section 9. Verify
VMware Tools is working |
- Login to CentOS
- Note(FYI):
- Until you click the user, in this case
Security Student, the Password field will not be displayed.
- Instructions:
- Click on Security Student
- This will display the password text
box.
- Supply its' password
- Click the Log In Button
- Resize Window
- Instructions:
- Try to resize the Window, by dragging
the bottom right corner of the window. If scroll bar
disappear, then you have verified VMware Tools is now installed.
- Note(FYI):
- If scroll bar disappear, then you have
verified VMware Tools is now installed.
- Open a Terminal
- Instructions:
- Applications --> System Tools -->
Terminal
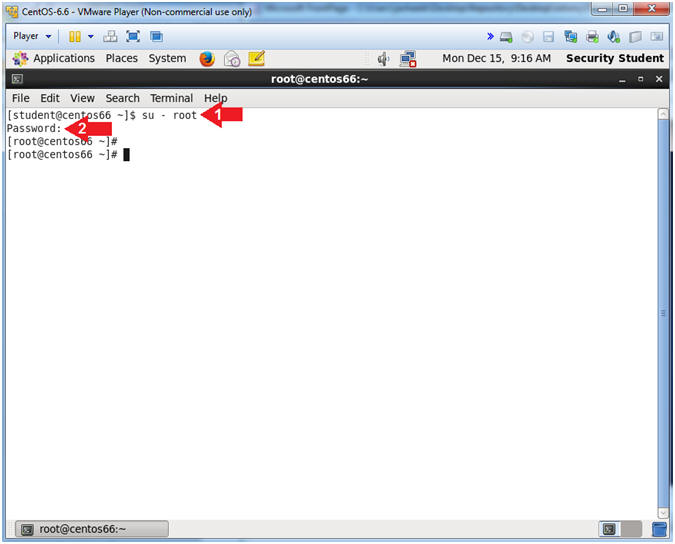
- Switch User to Root
- Instructions:
- su - root
- Provide the Root Password
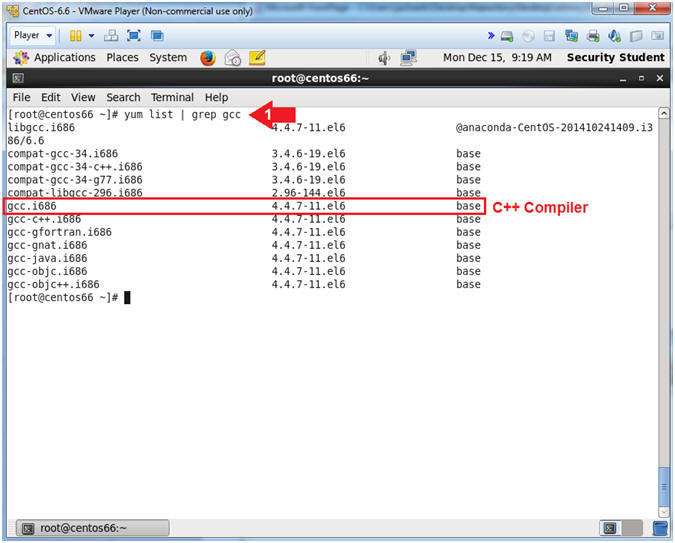
- Finding the GCC Compiler
- Instructions:
- yum list | grep gcc
- Note(FYI):
- Yum, is the package manager for Fedora,
CentOS and RedHat.
- yum list, displays all the repository
packages to the screen
- | grep gcc, filters the output to only
display lines that contains the string gcc.
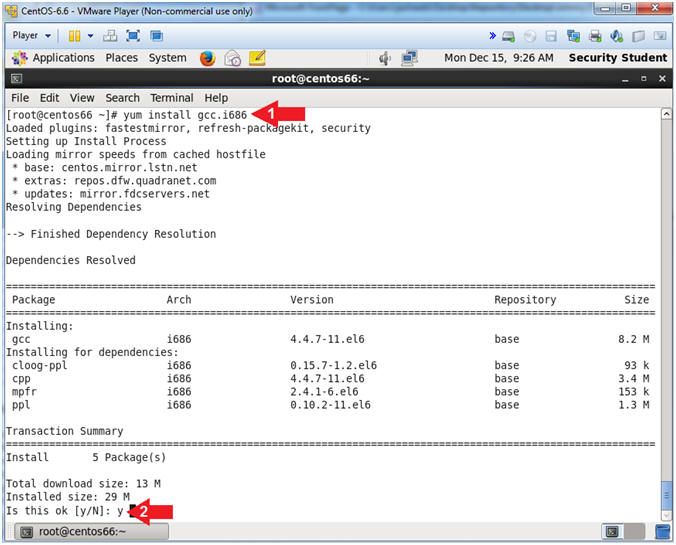
- Install GCC
- Instructions:
- yum install gcc.i686
- Is this ok [y/N]: y
- You will see this question "Is this ok
[y/N]:" four more times, please answer "y" to all questions.
- Start Up a Terminal Window
- Instructions:
- Applications --> Terminal
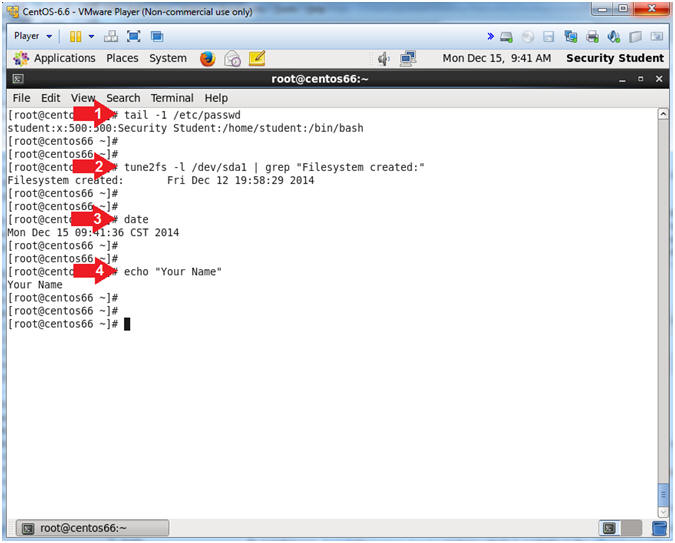
- Proof of Lab
- Instructions:
- tail -1 /etc/passwd
- tune2fs -l /dev/sda1 | grep "Filesystem
created:"
- date
- echo "Your Name"
- Put in your actual name in place of
"Your Name"
- e.g., echo "John Gray"
-
Proof of Lab
Instructions
- Press the <Ctrl> and <Alt> key at the
same time.
- Press the <PrtScn> key.
- Paste into a word document
- Upload to Moodle
-
|
 
|