(Fedora:
Lesson 12)
{ Basic NFS
Configuration }
|
Section 0. Background
Information |
- What is NFS?
- NFS stands for Network Filesystem. This a
protocol that was developed by Sun Microsystems.
- NFS was developed to allow a computer system to
access directories on remote computers by mounting them on a local
filesystem as if they were a local disk. The systems administrator on the
NFS server has to define the directories that need to be activated, or
exported, for access by the NFS clients, and administrators on the clients
need to define both the NFS server and the subset of its exported
directories to use.
|
Section 1. Play
the TargetUbuntu02 Virtual Machine (NFS Client) |
- Note:
- TargetUbuntu02 can be any Unix or Linux
server(s) on the same network as your NFS server.
- Here we are simply discovering the IP
Address of the Client machine that will eventually connect and mount to
the NFS share.
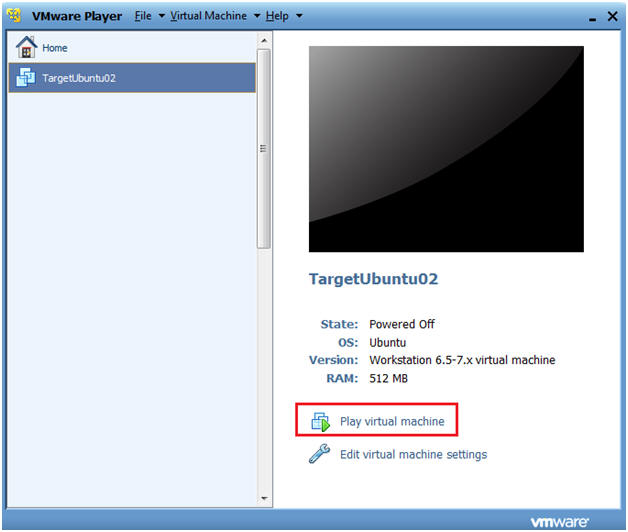
- Play TargetUbuntu02 virtual machine. (See Below)
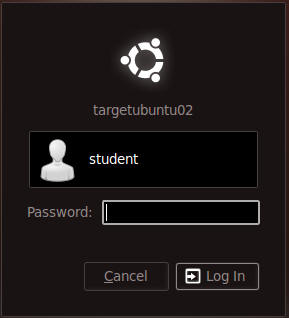
- Login as username "student"
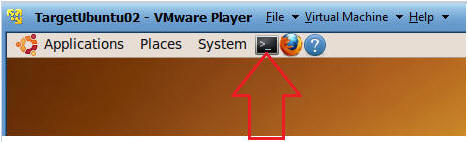
- Click on the terminal console
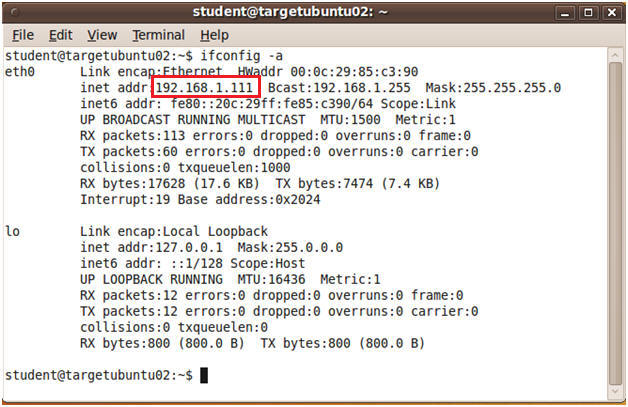
- Discover the network address
- Command:
ifconfig -a
- Note:
You will use the IP address obtained when specifying what host cannot
connect to the read/write share of the NFS server.
|
Section 2. Play the
Fedora Virtual Machine (NFS Server) |
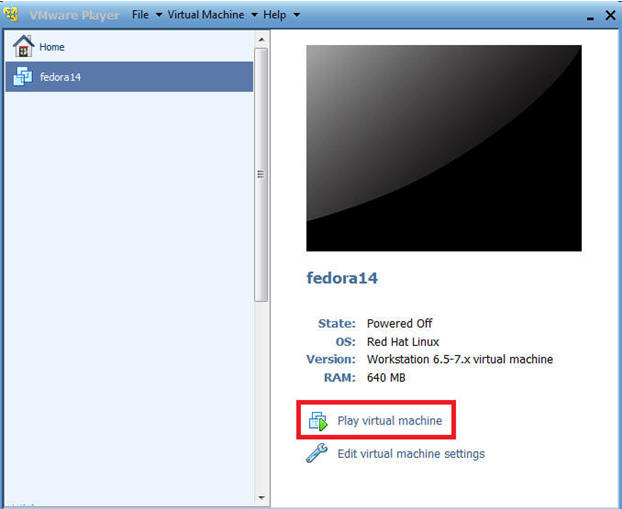
- Note: This will be your NFS Server.
- Play virtual machine. (See Below)
|
Section 3. Login to
your Fedora14 server. |
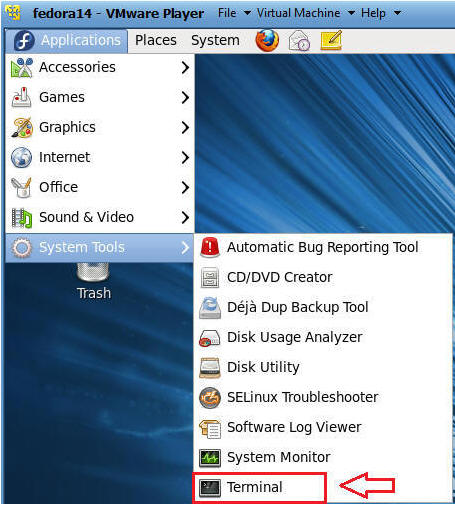
- Login As student
- Start Up A Terminal.
- Applications --> System Tools --> Terminal
- Switch User to root
- Command:
su - root

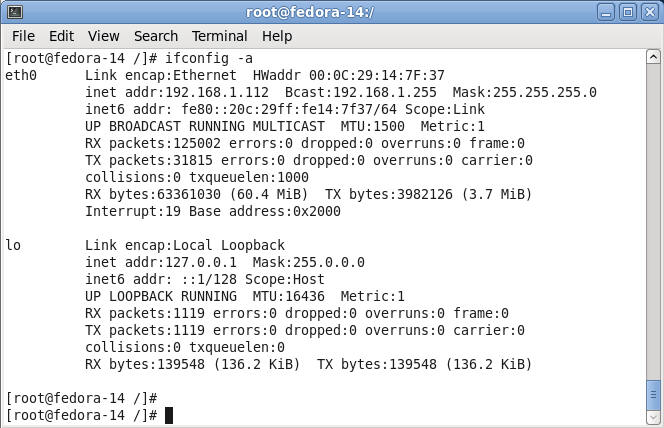
- Determine IP Address
- Command:
ifconfig -a
- Note:
In my case, the IP Address is 192.168.1.112.
|
Section 4.
Installing Prerequisite NFS RPMs on Fedora14 |
- Note
- Fedora14 is a Fedora server. These
NFS server instructions are specific to Fedora.
- Prerequisite NFS RPMs
- Required:
- nfs-utils
- system-config-nfs
- rpcbind
- Note:
Although system-config-nfs is a GUI and not required to install NFS;
however, its dependencies are required by NFS.
- Command:
yum install "system-config-nfs"

- Install NFS rpm's
- Command:
Type "y", and hit enter
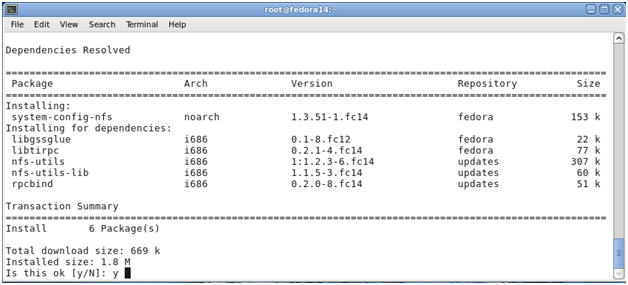
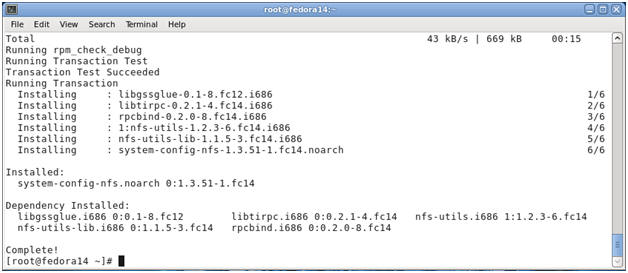
- Verify Installation Results
- Note:
Just take note of what is getting installed along with the completion
notice.
|
Section 5. Create
(Read Only) NFS Share |
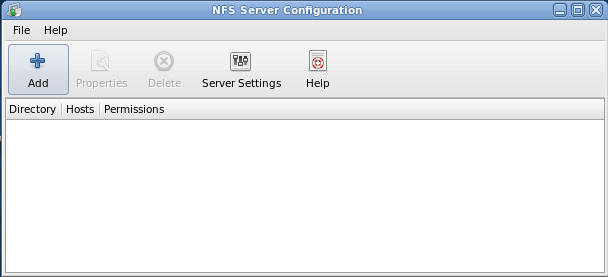
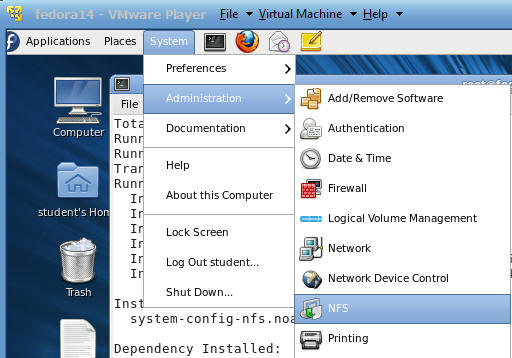
- Starting the NFS GUI
- Command:
System --> Administration --> NFS
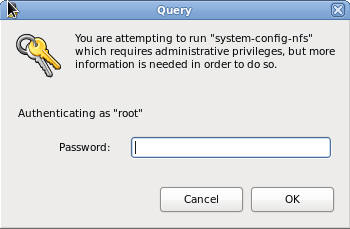
- Provide the root password
- Command:
Enter the root password.
- Adding a share
- Command:
Click the Add Button.
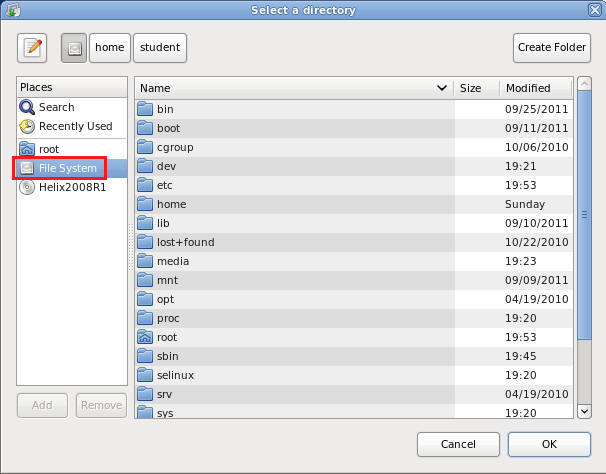
- Command:
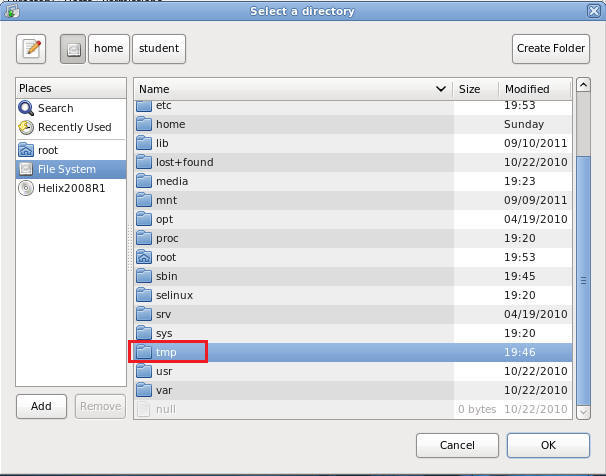
Click the Browse Button
- Command:
Click on File System
 . .
- Command:
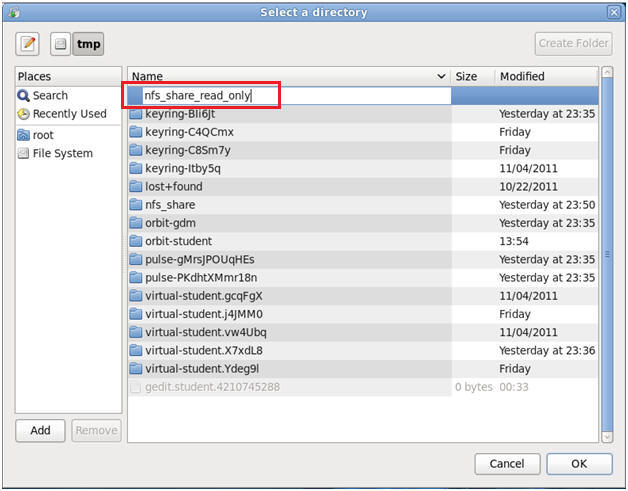
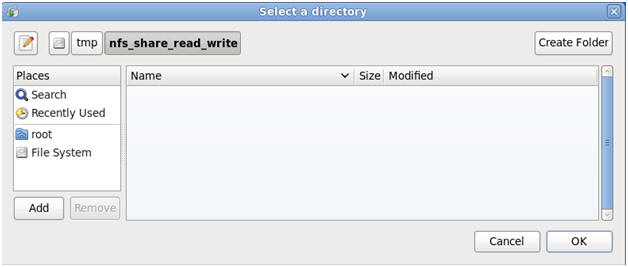
Double Click on the tmp directory
- Command:
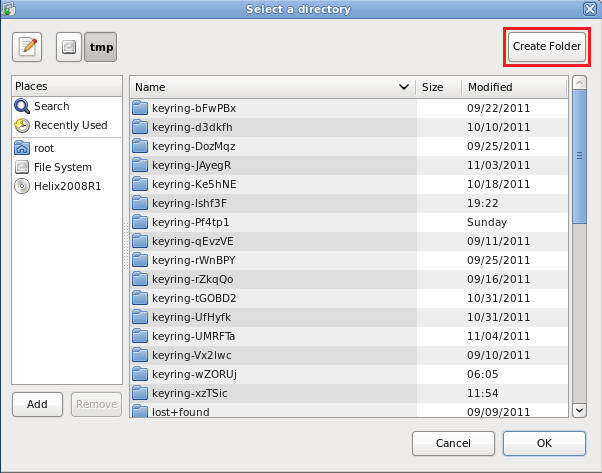
Click on the Create Folder Button
- Name the
NFS Share
- Command:
- Name it "nfs_share_read_only"
- Press enter.
- Note:
The equivalent terminal console command is as follows:
- mkdir -p /tmp/nfs_share_read_only
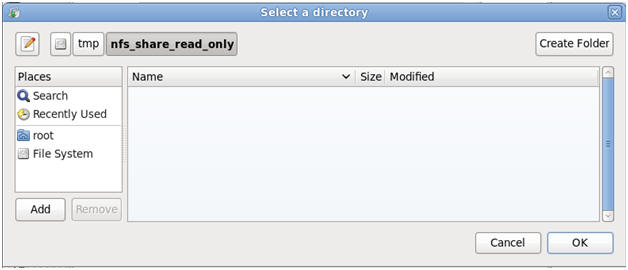
- Note:
You should see the below screen.
- Command:
Click the Okay Button
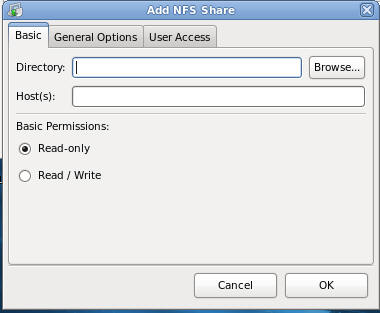
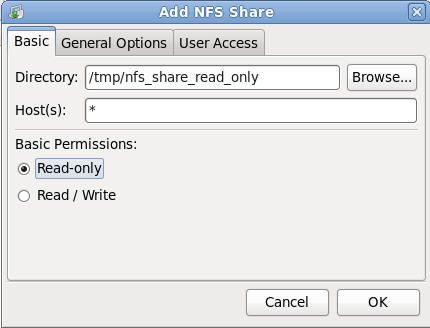
- Add the NFS Share
- Command:
Click the on the Basic Tab if not already selected.
- Directory: /tmp/nfs_share_read_only
- Hosts: "*", this is a wildcard which
means that any host on the network can have access to this NFS
share.
- (Keep in mind, that if this NFS
share contains sensitive data or is Read/Write, then you should
specify a host and even a user name using the User Access Tab.
- Basic Permissions: Select Read-only
- Click Okay
- Note:
If you prefer to use the terminal console equivalent commands, instead
of using the GUI, then you can do the following:
- vi /etc/exports
- Press the Shift Key and the "g" key to
go to the last line of the file.
- Press the Shift Key and the "a" key,
which places you append/insert mode.
- Press Enter once
- /tmp/nfs_share_read_only
*(ro,sync)
- Press the Esc key
- Type ":wq!" to save and quit
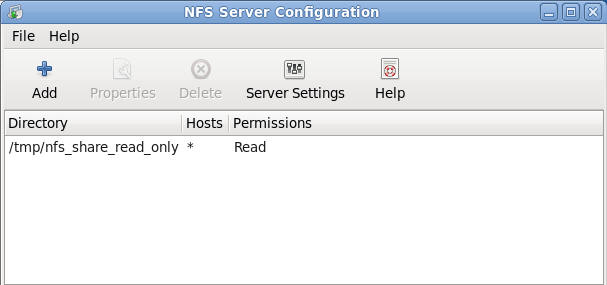
- Verifying your results
- Note: You should see the following
- NFS Share directory named: /tmp/nfs_share_read_only
- Hosts: *
- Permissions: Read
- Proceed to the next section to create a
read-write NFS share.
|
Section 6. Create
a (Read Write) NFS
Share |
- Starting the NFS GUI
- Command:
System --> Administration --> NFS
- Provide the root password
- Command:
Enter the root password.
- Adding a share
- Command:
Click the Add Button.
- Command:
Click the Browse Button
- Command:
Click on File System
- .
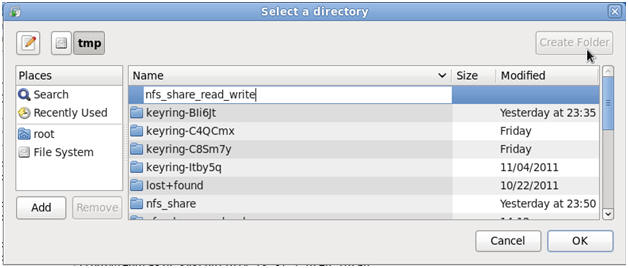
- Command:
Double Click on the tmp directory
- Command:
Click on the Create Folder Button
- Name the
NFS Share
- Command:
- Name it "nfs_share_read_write"
- Press enter.
- Note:
The equivalent terminal console command is as follows:
- mkdir -p /tmp/nfs_share_read_write
- Note:
You should see the below screen.
- Command:
Click the Okay Button
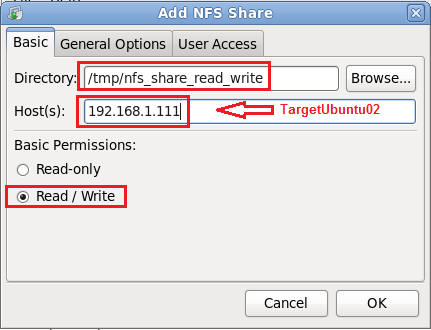
- Add the NFS Share
- Command:
Click the on the Basic Tab if not already selected.
- Directory: /tmp/nfs_share_read_write
- Hosts: 192.168.1.111
- Basic Permissions: Select Read/Write
- Click Okay
- Note:
If you prefer to use the terminal console equivalent commands, instead
of using the GUI, then you can do the following:
- vi /etc/exports
- Press the Shift Key and the "g" key to
go to the last line of the file.
- Press the Shift Key and the "a" key,
which places you append/insert mode.
- Press Enter once
- /tmp/nfs_share_read_write
192.168.1.111(rw,sync)
- Press the Esc key
- Type ":wq!" to save and quit
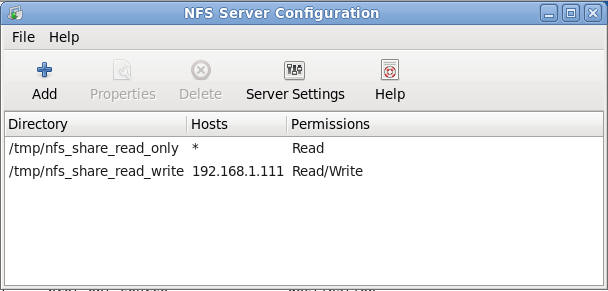
- Verifying your results using the NFS Server
Configuration GUI
- Note: You should see two entries (See
Below)
- Read Only NFS Share: /tmp/nfs_share_read_only
- Read Write NFS Share: /tmp/nfs_share_read_write
- Guarantee NFS shares are either READ or WRITE
- Command:
- chmod 775 /tmp/nfs_share_read_only
- chmod 777 /tmp/nfs_share_read_write

- Create a read.txt and write.txt file.
- Command:
- echo "Read Only" > /tmp/nfs_share_read_only/read.txt
- echo "Read Write" > /tmp/nfs_share_read_write/write.txt

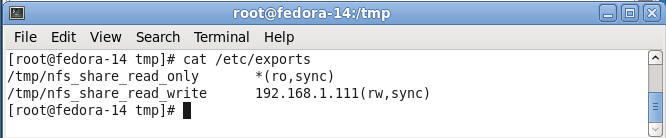
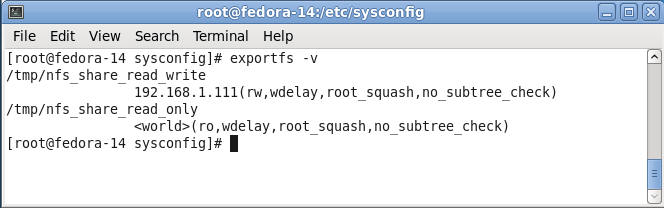
- Informational:
The contents from the above GUI is
stored in the /etc/exports file. This file contains the access control
list for exported directory hierarchies.
- Command:
cat /etc/exports
- Informational:
Verifying your results using the
terminal console command
- Command:
exportfs -v
|
Section 7.
Configuring /etc/sysconfig/nfs |
- Navigate to the nfs configuration file and make
a backup
- Command:
- cd /etc/sysconfig
- cp nfs nfs.BKP

- Open the /etc/sysconfig/nfs file
- Command:
vi nfs

- Search for MOUNTD_PORT
- Command:
- Press the "/"
- The type "MOUNTD_PORT"
- Press Enter
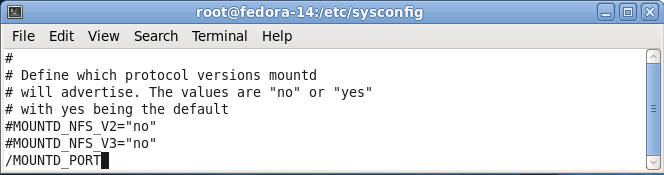
- Uncomment MOUNTD_PORT=892
- Command:
- Make sure the cursor is on the "#"
character in front of MOUNTD_PORT=892, if not, then press the left
arrow until the cursor is on the "#" character.
- Press the "x" key to delete the "#"
character.
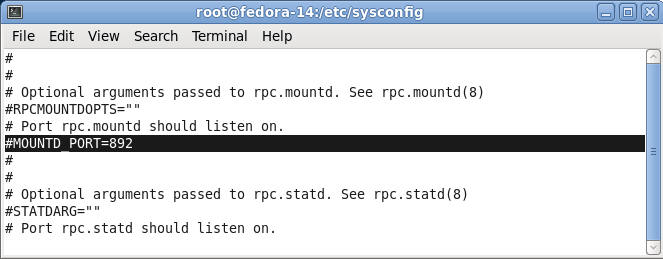
- Search for STATD_PORT
- Command:
- Press the "/"
- The type "STATD_PORT"
- Press Enter
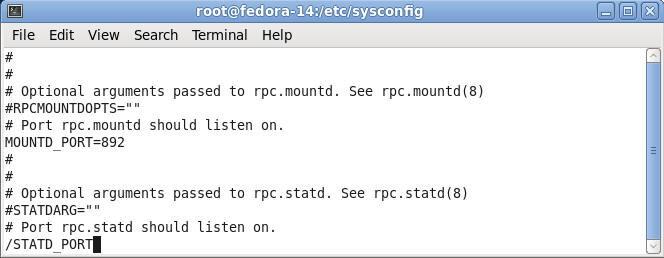
- Uncomment STATD_PORT=662
- Command:
- Make sure the cursor is on the "#"
character in front of STATD_PORT=662, if not, then press the left
arrow until the cursor is on the "#" character.
- Press the "x" key to delete the "#"
character.
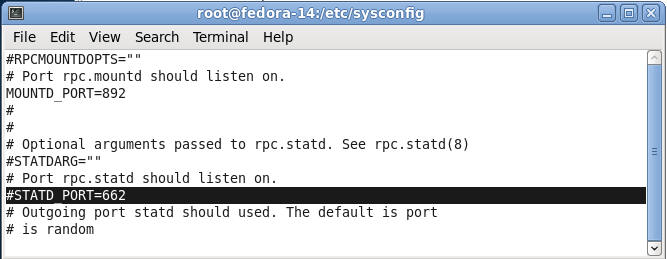
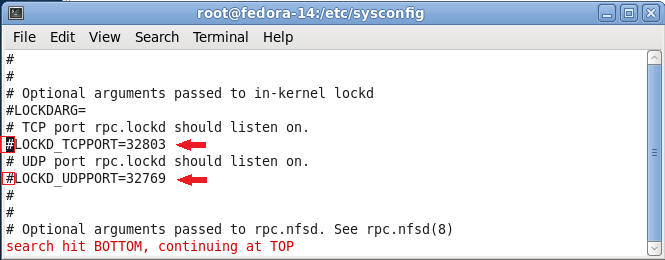
- Search for LOCKD_TCPPORT
- Command:
- Press the "/"
- The type "LOCKD_TCPPORT"
- Press Enter
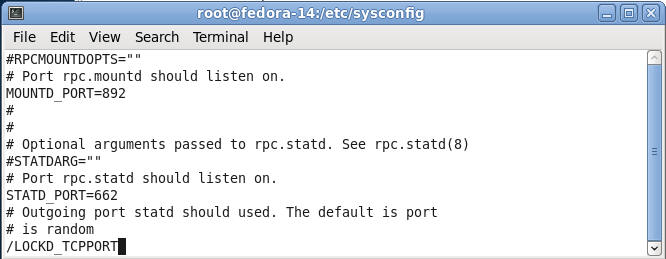
- Uncomment LOCKD_TCPPORT=32803 and LOCKD_UDPPORT=32769
- Command:
- Make sure the cursor is on the "#"
character in front of LOCKD_TCPPORT=32803, if not, then press the
left arrow until the cursor is on the "#" character.
- Press the "x" key to delete the "#"
character.
- Make sure the cursor is on the "#"
character in front of LOCKD_UDPPORT=32769, if not, then press the
left arrow until the cursor is on the "#" character.
- Press the "x" key to delete the "#"
character.
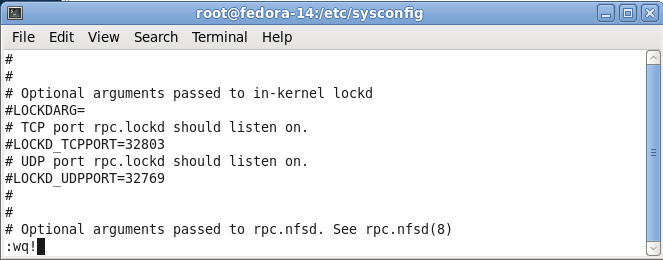
- Save the /etc/sysconfig/nfs file
- Command:
- Press the Esc key.
- Type ":wq!"
- Press Enter
|
Section 8.
Create NFS Start Up Scripts and Starting NFS |
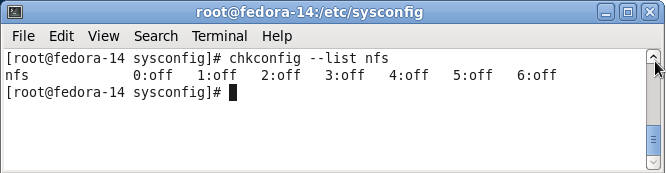
- Check to see if there are run level start up
scripts.
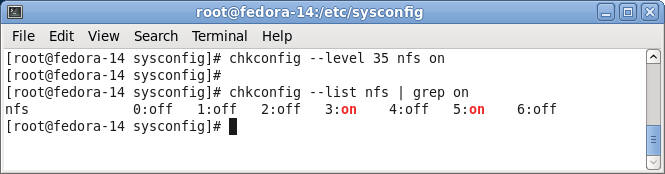
- Command:
chkconfig --list nfs
- Note:
All run levels are off.
- Turn on NFS start up scripts for run level 3
and 5.
- Command:
- chkconfig --level 35 nfs on
- chkconfig --list nfs | grep on
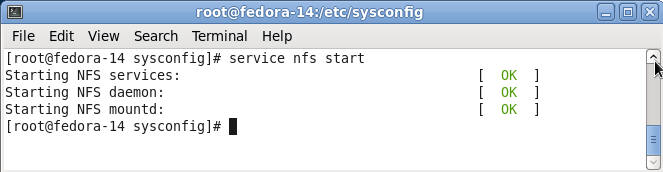
- Start up NFS
- Command:
service nfs start
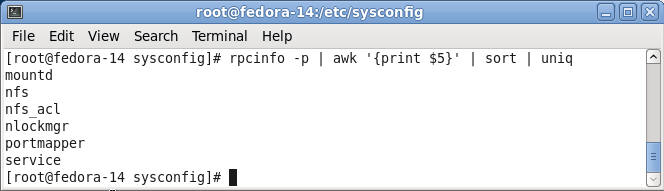
- Verify NFS Processes are running.
- Command:
rpcinfo -p | awk '{print $5}' | sort | uniq
|
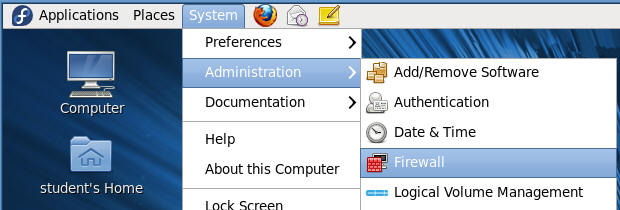
Section 9. Configure
the Firewall |
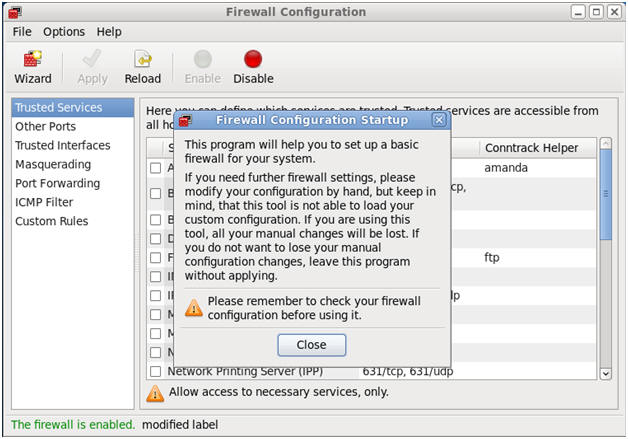
- Open the firewall GUI
- Command:
System --> Administration --> Firewall
- Firewall Configuration Startup Message
- Command:
Click the Close Button
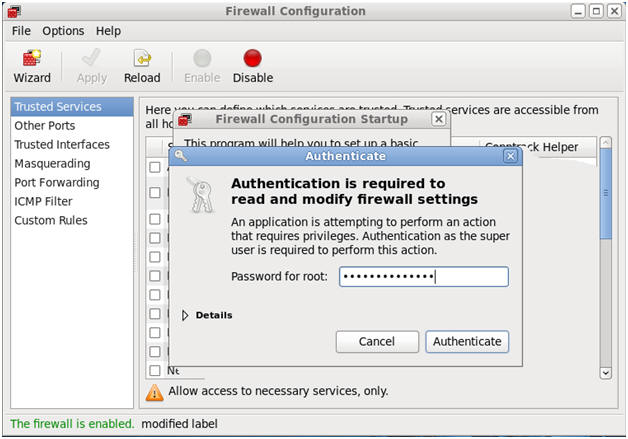
- Authenticate
- Command:
- Enter the root password
- Click Authenticate
- Open up 2049/tcp for NFS.
- Command:
- Make Sure Trusted Services is
Highlighted
- Click on the NFS4 Checkbox.
- Informational Command
Line Option:
- iptables -A INPUT -m state
--state NEW -m tcp -p tcp --dport 2049 -j ACCEPT

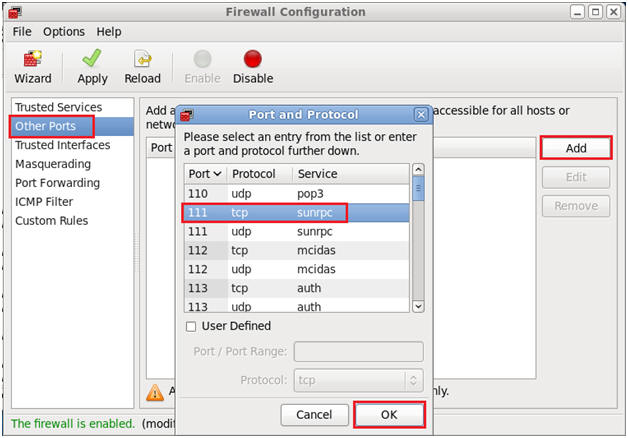
- Open up 111/tcp for sunrpc.
- Command:
- Make Sure Other Ports is Highlighted
- Click the Add Button
- Select "111 tcp sunrpc".
- Click OK.
- Informational Command
Line Option:
- iptables -A INPUT -m state
--state NEW -m tcp -p tcp --dport 111 -j ACCEPT
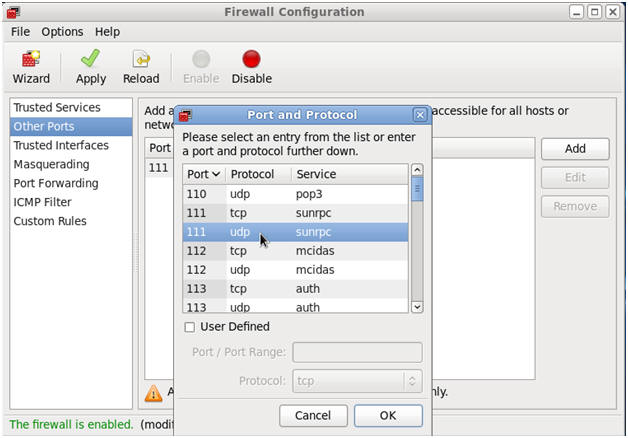
- Open up 111/udp for NFS.
- Command:
- Make Sure Other Ports is Highlighted
- Click the Add Button
- Select "111 udp sunrpc".
- Click OK.
- Informational Command
Line Option:
- iptables -A INPUT -m state
--state NEW -m udp -p udp --dport 111 -j ACCEPT
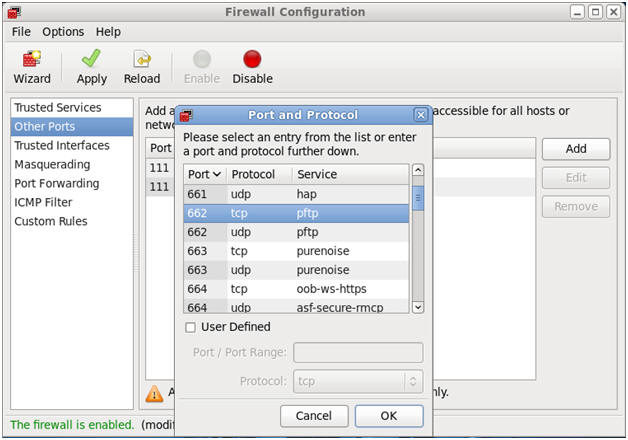
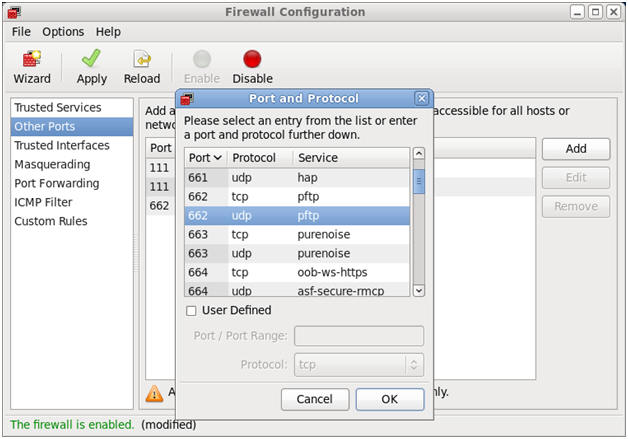
- Open up 662/tcp for STATD.
- Command:
- Make Sure Other Ports is Highlighted
- Click the Add Button
- Select "662 tcp pftp".
- Click OK.
- Informational Command
Line Option:
- iptables -A INPUT -m state
--state NEW -m tcp -p tcp --dport 662 -j ACCEPT
- Open up 662/udp for STATD.
- Command:
- Make Sure Other Ports is Highlighted
- Click the Add Button
- Select "662 udp pftp".
- Click OK.
- Informational Command
Line Option:
- iptables -A INPUT -m state
--state NEW -m udp -p udp --dport 662 -j ACCEPT
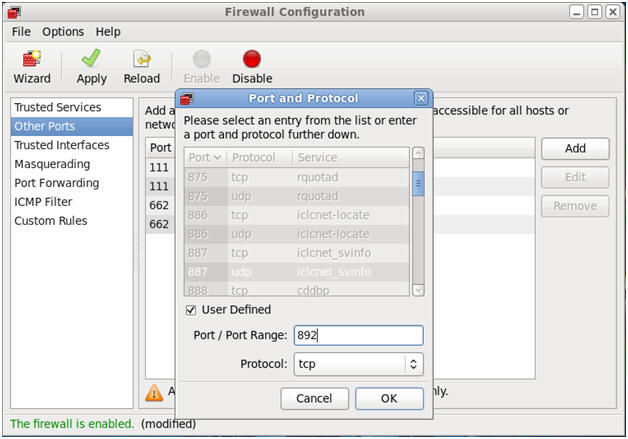
- Open up 892/tcp for MOUNTD.
- Command:
- Make Sure Other Ports is Highlighted
- Click the Add Button
- Click the User Defined CheckBox.
- Type "892" in the Port / Port Range.
- Select "tcp" in the protocol downdrop
box.
- Click OK.
- Informational Command
Line Option:
- iptables -A INPUT -m state
--state NEW -m tcp -p tcp --dport 892 -j ACCEPT
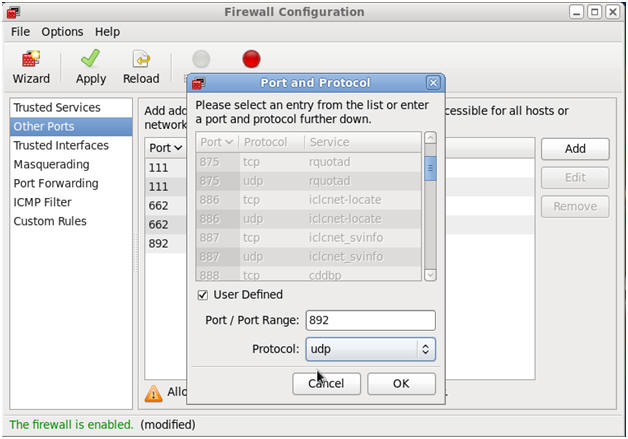
- Open up 892/udp for MOUNTD.
- Command:
- Make Sure Other Ports is Highlighted
- Click the Add Button
- Click the User Defined CheckBox.
- Type "892" in the Port / Port Range.
- Select "udp" in the protocol downdrop
box.
- Click OK.
- Informational Command
Line Option:
- iptables -A INPUT -m state
--state NEW -m udp -p udp --dport 892 -j ACCEPT
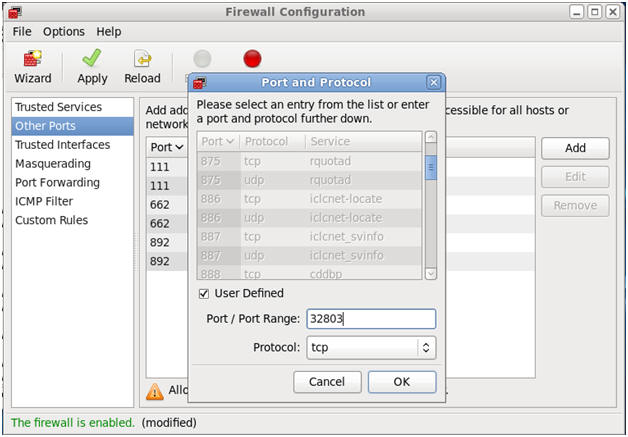
- Open up 32803/tcp for LOCKD_TCPPORT.
- Command:
- Make Sure Other Ports is Highlighted
- Click the Add Button
- Click the User Defined CheckBox.
- Type "32803" in the Port / Port Range.
- Select "tcp" in the protocol downdrop
box.
- Click OK.
- Informational Command
Line Option:
- iptables -A INPUT -m state
--state NEW -m tcp -p tcp --dport 32803 -j ACCEPT
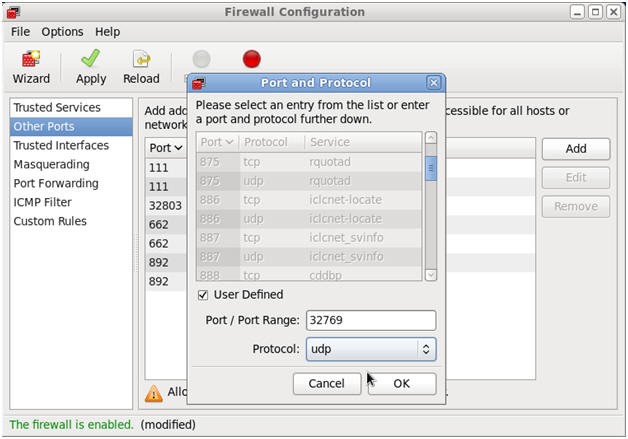
- Open up 32769/udp for LOCKD_TCPPORT.
- Command:
- Make Sure Other Ports is Highlighted
- Click the Add Button
- Click the User Defined CheckBox.
- Type "32769" in the Port / Port Range.
- Select "udp" in the protocol downdrop
box.
- Click OK.
- Informational Command
Line Option:
- iptables -A INPUT -m state
--state NEW -m udp -p udp --dport 32769 -j ACCEPT
- Open up 2049/udp for NFS.
- Command:
- Make Sure Other Ports is Highlighted
- Click the Add Button
- Click the User Defined CheckBox.
- Type "2049" in the Port / Port Range.
- Select "udp" in the protocol downdrop
box.
- Click OK.
- Informational Command
Line Option:
- iptables -A INPUT -m state
--state NEW -m udp -p udp --dport 2049 -j ACCEPT

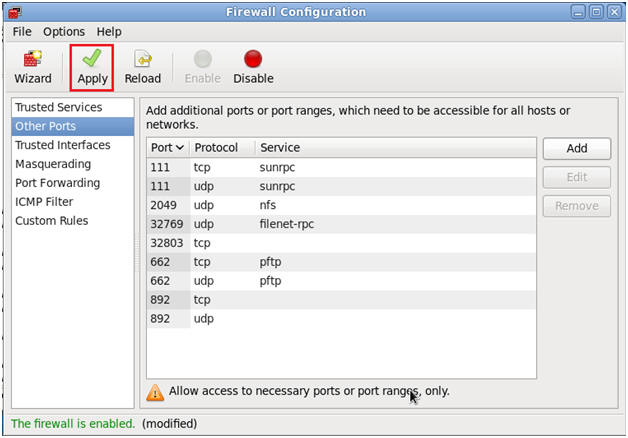
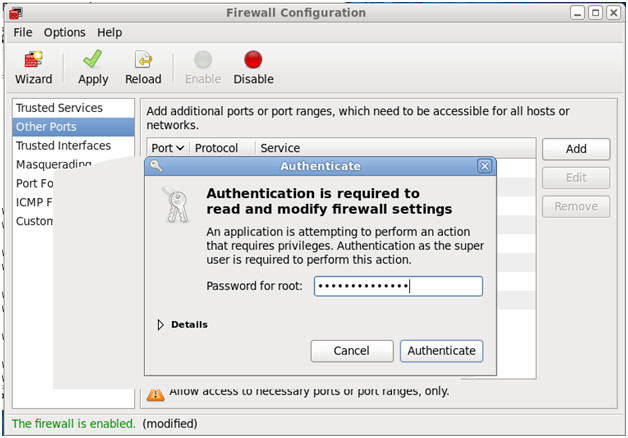
- Apply the Firewall Rules
- Command:
Click Apply
- Do you wish to override the existing firewall
configuration?
- Command:
Click Yes

- Authenticate
- Command:
- Provide the root password.
- Click Authenticate
- Viewing Firewall using the Firewall GUI
- Command:
- Click on Trusted Services
- Click on Other Ports
- File --> Quit.
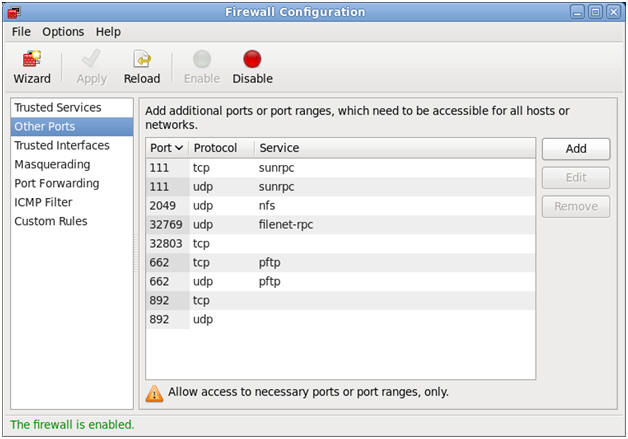
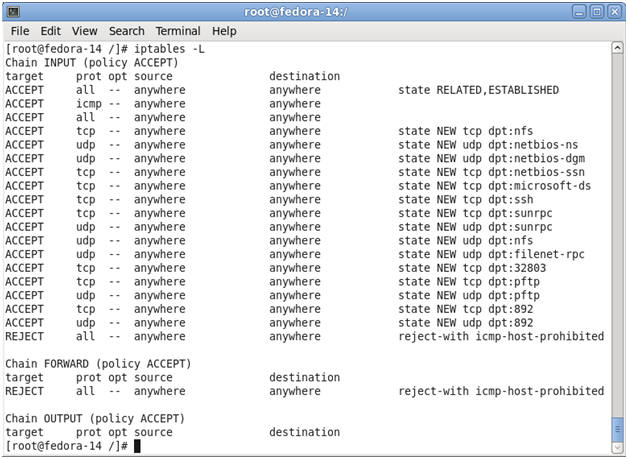
- View the Firewall Rules using the command line
- Command:
iptables -L
|
Section 10. Let's
mount up the NFS Share |
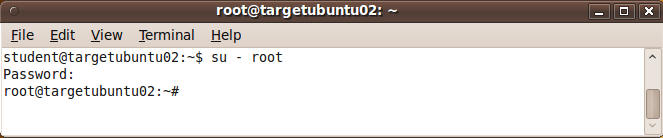
- On targetubuntu02, become the root user.
- Command:
su - root
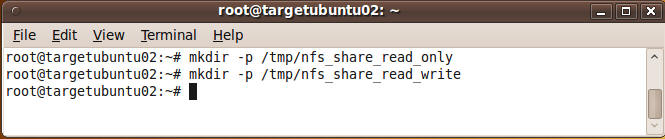
- On targetubuntu02, make two mount point
directories.
- Command:
- mkdir -p /tmp/nfs_share_read_only
- mkdir -p /tmp/nfs_share_read_write
- Check to see if you can see the mount points on
the fedora NFS server.
- Command:
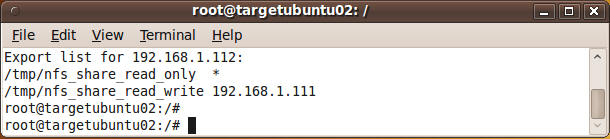
showmount -e 192.168.1.112
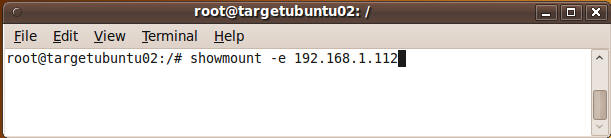
- Review showmount results.
- Note:
On the current ubuntu server (192.168.1.111), we can now see all the
available NFS mounts on the Fedora NFS server (192.168.1.112)
- On targetubuntu02, make two mount point
directories.
- Command:
- mount -t nfs 192.168.1.112:/tmp/nfs_share_read_only
/tmp/nfs_share_read_only
- Note:
Use the IP address of the Fedora14 Machine
- mount -t nfs 192.168.1.112:/tmp/nfs_share_read_write
/tmp/nfs_share_read_write
- Note:
Use the IP address of the Fedora14 Machine
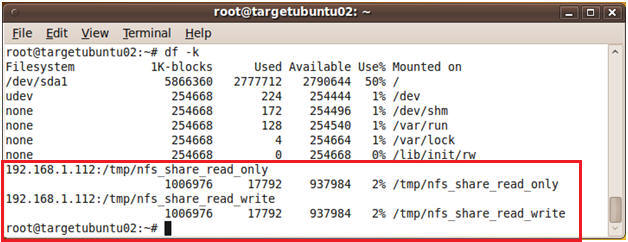
- On targetubuntu02, verify you can see the mount
points.
- Command:
df -k
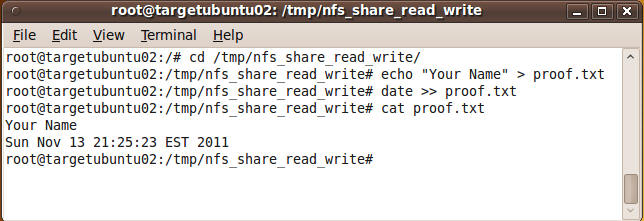
- On targetubuntu02, create a file on the
read/write NFS share
- Command:
Proof of Lab
- cd /tmp/nfs_share_read_write
- echo "Your Name" > proof.txt
- date >> proof.txt
- cat proof.txt
- Cut and Paste into a word document and
upload to Moodle.
- On targetubuntu02, create a file on the
read/write NFS share
- Command:
- cd /tmp/nfs_share_read_only
- touch filename.txt
- Note:
You cannot create a file in a read only NFS share.
- ls -l
- cat read.txt
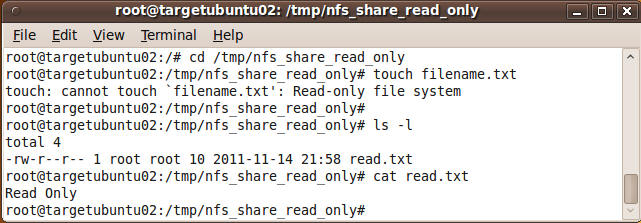
- Cut and Paste a screen shot of Section 10, Step
7 into a word document and upload to Moodle.
|
 
|