(Fedora: Lesson 5)
{ Using a Live CD to clear root's passwd in /etc/shadow }
| Section 0. Background Information |
- Background Information
- In this lesson, you will learn how to use a Fedora Live CD or any Linux live CD to (1) boot into single user mode, (2) mount the "/" directory which contains /etc, and (3) how to remove root's password from the /etc/shadow file.
- Pre-requisites
- Fedora: Lesson 1: Installing Fedora 14
- Fedora: Lesson 2: Use Fedora 14 Grub to boot into single user mode
- Fedora: Lesson 3: Hardening the Boat Loader, /boot/grub/grub.conf
- Fedora: Lesson 4: Using a Live CD to crack a password protected grub.conf file
-
Lab
Notes
- In this lab we will do the following:
- Boot the Operating System off a Fedora Live CD.
- We will mount the disk partition that contains /etc.
- We will delete root's encrypted password from /etc/shadow.
- We will test our handy work.
- In this lab we will do the following:
- Legal Disclaimer
- As a condition of your use of this Web site, you warrant to computersecuritystudent.com that you will not use this Web site for any purpose that is unlawful or that is prohibited by these terms, conditions, and notices.
- In accordance with UCC § 2-316, this product is provided with "no warranties, either express or implied." The information contained is provided "as-is", with "no guarantee of merchantability."
- In addition, this is a teaching website that does not condone malicious behavior of any kind.
- Your are on notice, that continuing and/or using this lab outside your "own" test environment is considered malicious and is against the law.
- © 2013 No content replication of any kind is allowed without express written permission.
| Section 1: Edit the Fedora14 Virtual Machine |
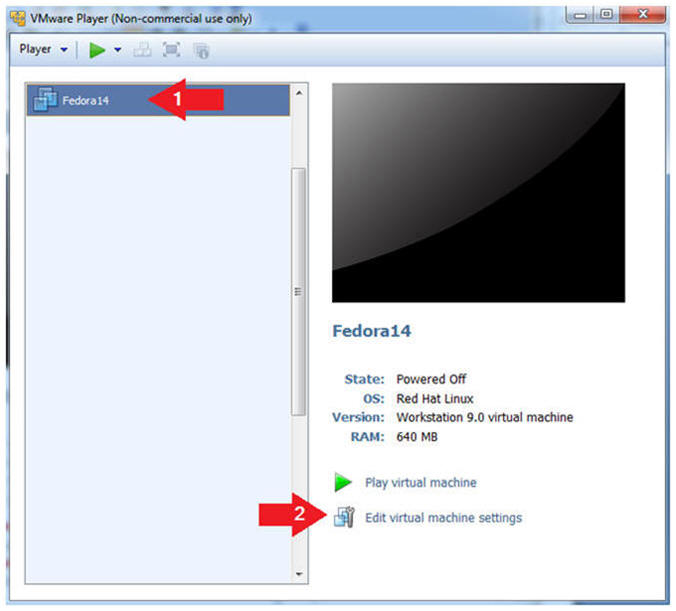
- Open Your VMware Player
- Instructions:
- On Your Host Computer, Go To
- Start --> All Program --> VMWare --> VMWare Player
- Instructions:
- Edit Fedora 14 Virtual Machine Settings
- Instructions:
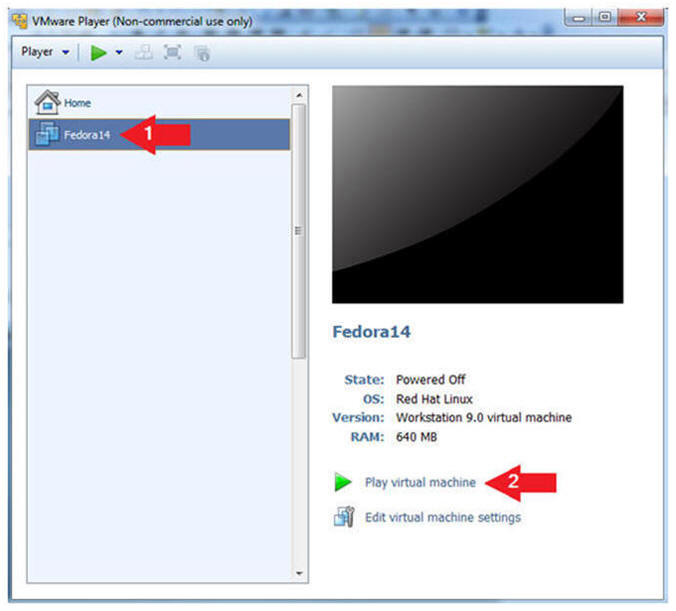
- Highlight Fedora14
- Click Edit virtual machine settings
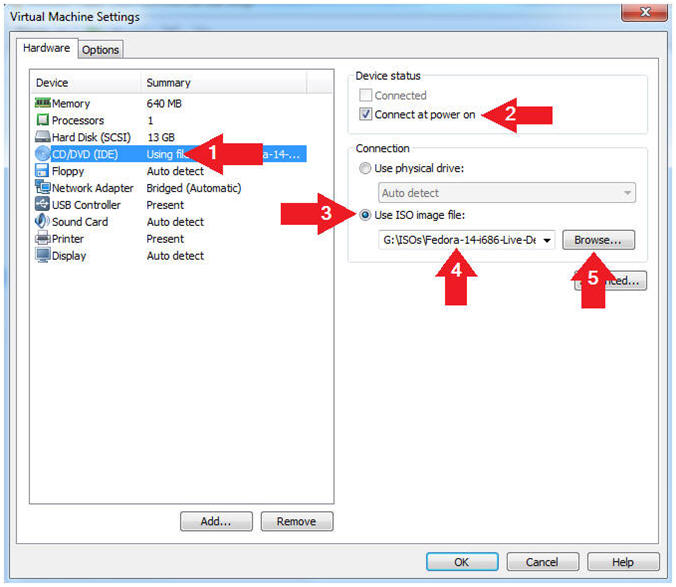
- Instructions:
- Set Machine to Boot From CD/DVD
- Instructions:
- Select CD/DVD (IDE)
- Device status: Check the Connect at power on checkbox.
- Select the "Use ISO image file" radio button.
- Click the Browse Button.
- Navigate to the location of your Fedora14.iso or other Live CD
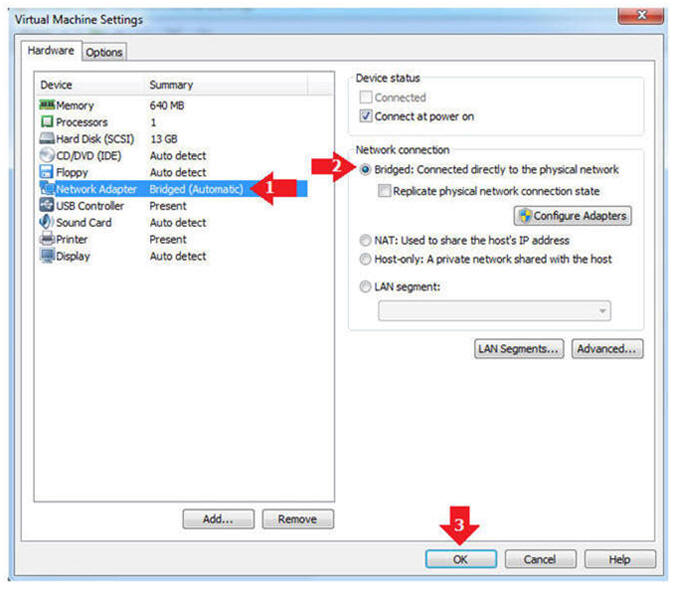
- Instructions:
- Edit Network Adapter
- Instructions:
- Highlight Network Adapter
- Select Bridged
- Click the OK Button
- Instructions:
| Section 2: Play Virtual Machine |
- Start the Fedora14 VM
- Instructions:
- Click on the Fedora14 VM
- Click on Play virtual machine
- Instructions:
- Obtain Boot Menu
- Instructions
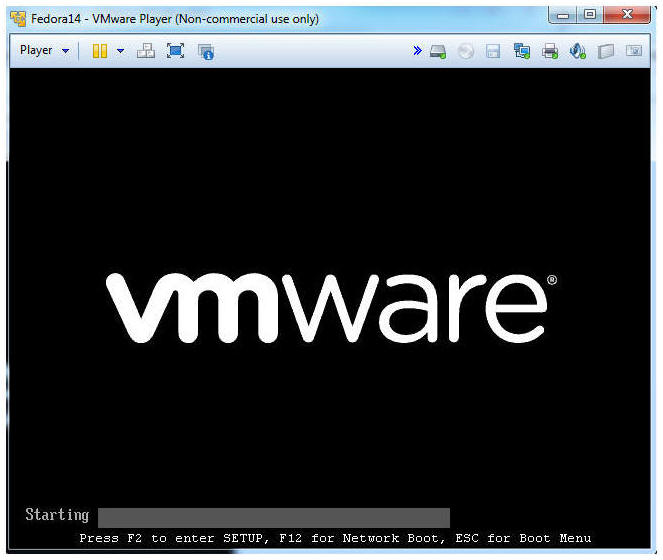
- Once you see the below vmware screen, (1) Left Click in the screen and (2) press the "<Esc>" key
- Note(FYI):
- This might take you a few times so be patient!!!
- Instructions
- Boot Menu Options
- Instructions:
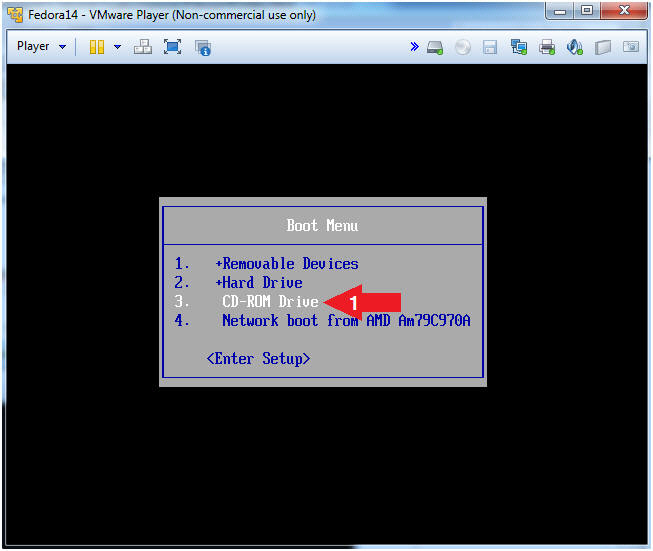
- Arrow Down to CD-ROM Drive
- Press <Enter>
-
- Instructions:
- Boot Notification
- Instructions:
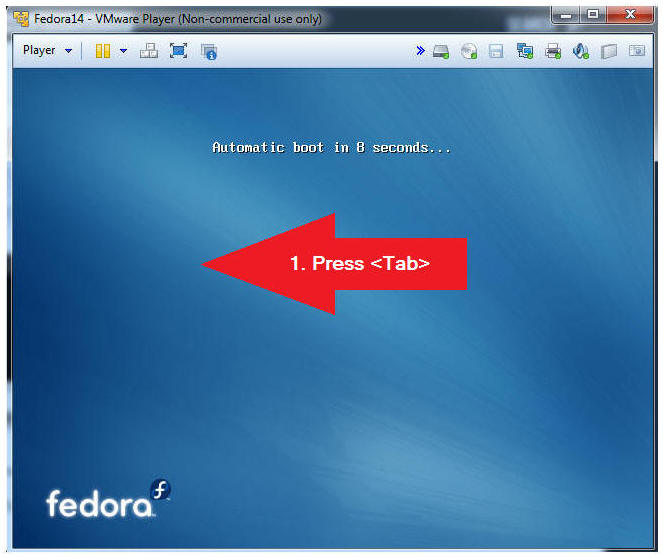
- Press the <Tab> key
- Instructions:
- Live Desktop
- Instructions:
- Arrow Down to Boot
- Press the <Tab> key
- Instructions:
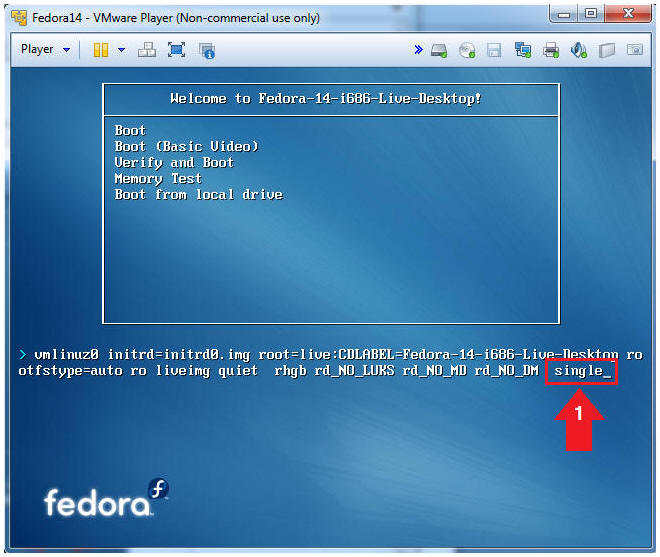
- Boot into Single User Mode
- Instructions:
- Type the word single and the end of the line.
- Press the <Enter> key
- Note(FYI):
- By adding "single" or "1" to the end of the line, you are telling the CD to boot into single user mode instead of the Graphical User Interface (init 5).
- Instructions:

| Section 3: Editing the grub.conf from single user mode. |
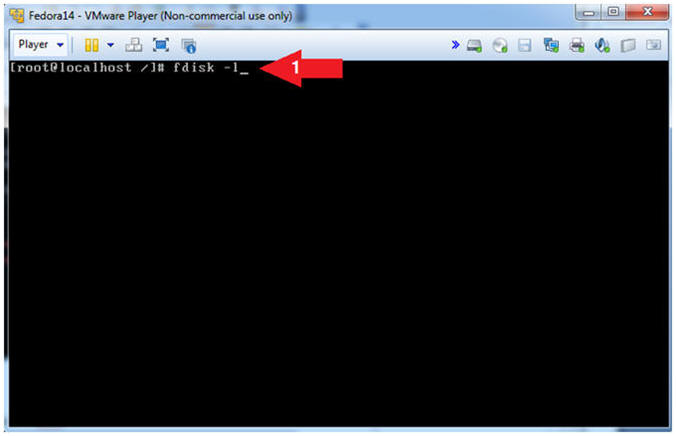
- Working in Single User Mode
- Note(FYI):
- In my case, you will notice the drive [sda]
- When booting off a CD into single user mode, you will automatically be the root user
- Note(FYI):
- View Partition Table
- Instructions:
- fdisk -l
- Where "-l" is the lower case letter L.
- fdisk -l
- Note(FYI):
- The fdisk command will allow you to see the partition table for one or many disk(s).
- Instructions:
- Notice the highlighted line below.
- Note(FYI):
- When we built this image, the mount point "/" was create on partition /dev/sda5.
- Typically, you would not know this information, but you can perform the below sequential steps to find the /etc/shadow file or in our case the /mnt/etc/shadow file.
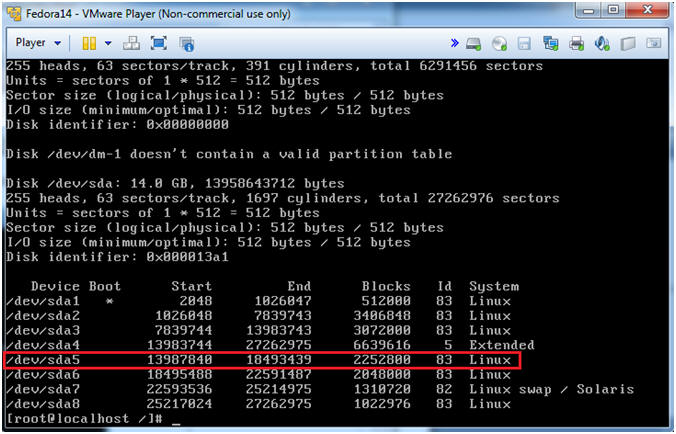
- Note(FYI):
- Let's mount the partition 1 and search
for the shadow file.
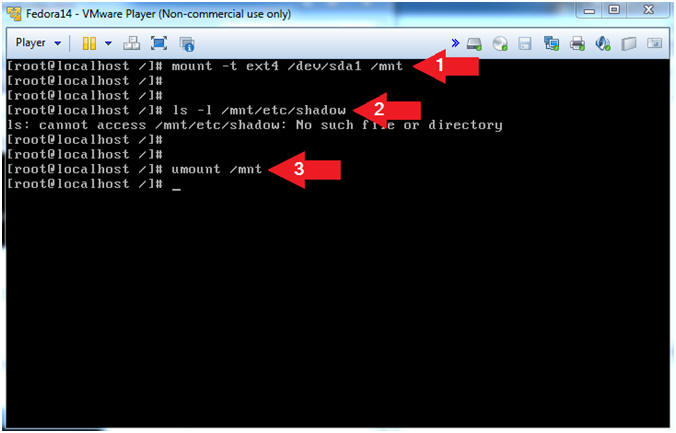
- Instructions:
- mount -t ext4 /dev/sda1 /mnt
- ls -l /mnt/etc/shadow
- Note: The OS says no such file, so let's try the next partition.
- umount /mnt
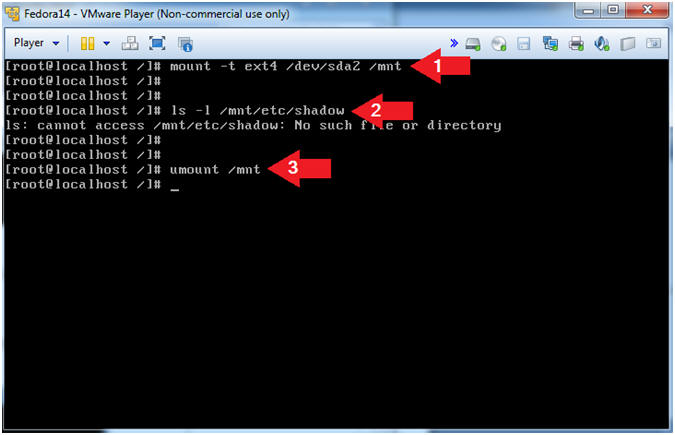
- Instructions:
- Let's mount the partition 2 and search
for the shadow file.
- Instruction:
- mount -t ext4 /dev/sda2 /mnt
- ls -l /mnt/etc/shadow
- Note: The OS says no such file, so let's try the next partition.
- umount /mnt
- Instruction:
- Let's mount the partition 3 and search
for the shadow file.
- Instruction
- mount -t ext4 /dev/sda3 /mnt
- ls -l /mnt/etc/shadow
- Note: The OS says no such file, so let's try the next partition.
- umount /mnt

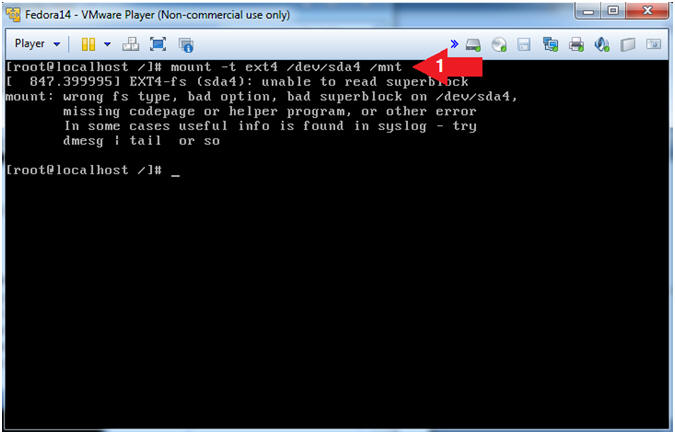
- Instruction
- Let's mount the partition 4 and search
for the shadow file.
- Instruction:
- mount -t ext4 /dev/sda4 /mnt
- Note(FYI):
- In step 3, the "fdisk -l" command shows that /dev/sda4 is an extended partition. Naturally, you are probably wonder what the hell is an extended partition. Well the partition table has room for only four partitions. One of these four partitions can be subdivided into many logical partitions. So, the extended partition is a place holder for the other logical partitions that it was used to create.
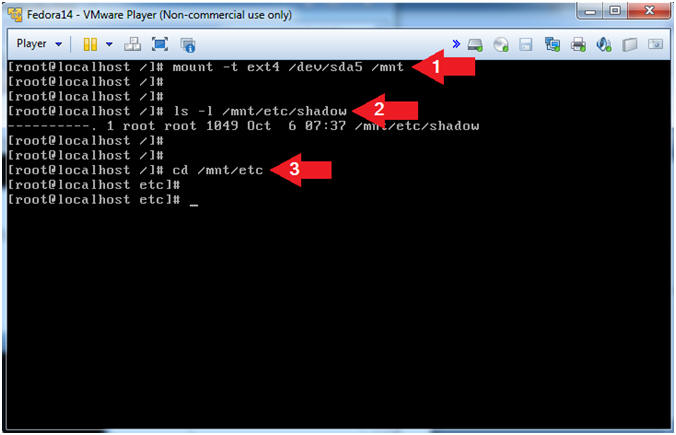
- Instruction:
- Let's mount the partition 5 and search
for the shadow file.
- Instruction:
- mount -t ext4 /dev/sda5 /mnt
- ls -l /mnt/etc/shadow
- Note: The /mnt/etc/shadow file exists.
- cd /mnt/etc
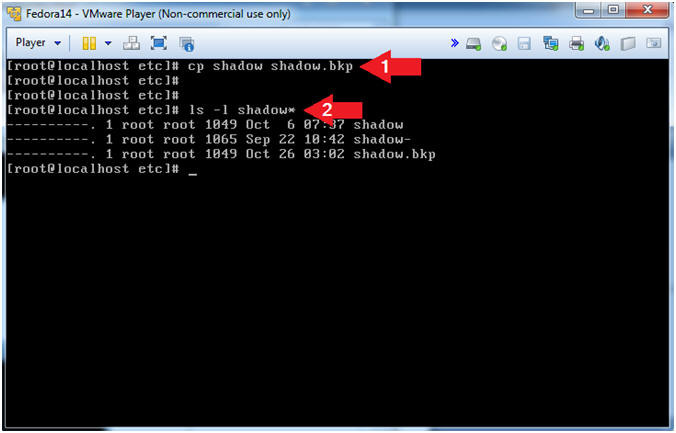
- Instruction:
- Make a backup of the shadow file.
- Instruction:
- cp shadow shadow.bkp
- ls -l shadow*
- Note(FYI):
- You should see the below 3 shadow files.
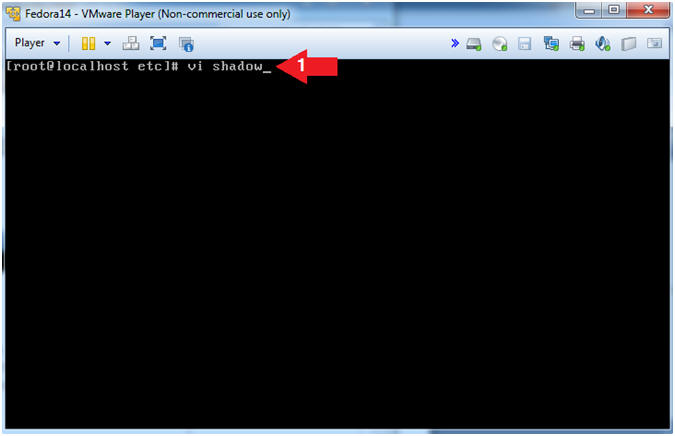
- Instruction:
- Open up the shadow file.
- Instruction:
- vi shadow
- Instruction:
- Remove the root password.
- Instruction:
- On the first line, arrow over to where your cursor is to the
right of
the first colon (:). Then press the "x" key to delete all the
characters until your reach the second colon (:).
DO NOT
DELETE THE SECOND COLON(:).
- (See Below the Before and After Pictures)
- Press the <Esc> key.
- Type ":wq!"
- Press the <Enter> key.
- On the first line, arrow over to where your cursor is to the
right of
the first colon (:). Then press the "x" key to delete all the
characters until your reach the second colon (:).
DO NOT
DELETE THE SECOND COLON(:).
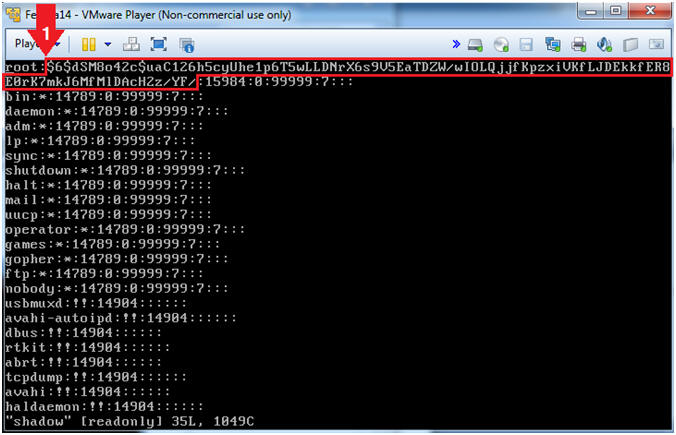
- Before Picture
- After Picture
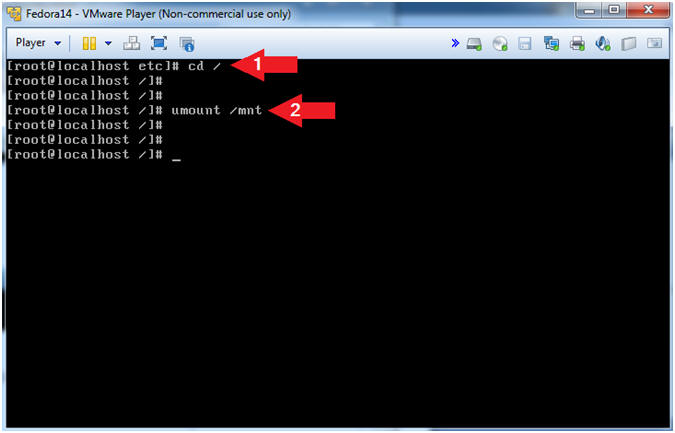
- Instruction:
- Un-Mount the /mnt directory
- Instruction:
- cd /
- umount /mnt
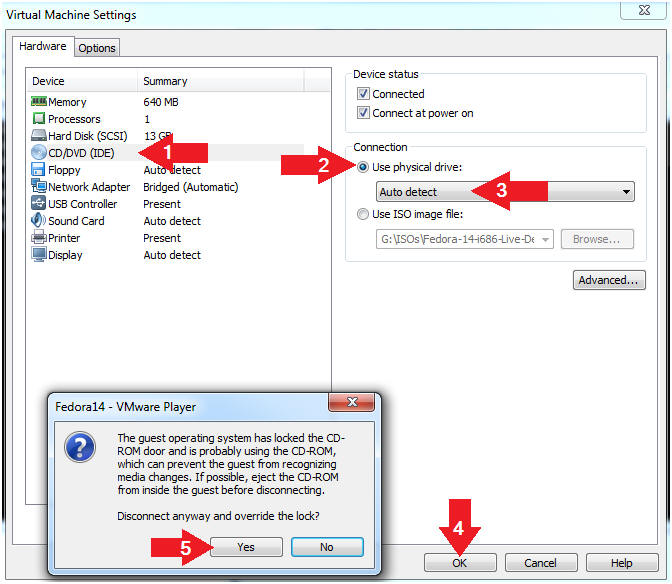
- Instruction:
- Before rebooting, we need to tell VMware to
boot from the hard drive instead of using the Fedora Live CD Image.
- Instructions:
- Player --> Manage --> Virtual Machine Settings...

- Instructions:
- Restore Physical Drive Settings
- Instructions:
- Click on CD/DVD(IDE)
- Click on the use physical drive: radio button
- Select Auto detect from the down drop menu.
- Click the OK Button
- Note: A Disconnect anyway and override the lock? popup window will be displayed.
- Click the Yes Button
- Note(FYI):
- This will tell VMware to essentially eject the CD/ISO.
- Instructions:

| Section 4: Configure the grub.conf to provide a root prompt at single user mode |
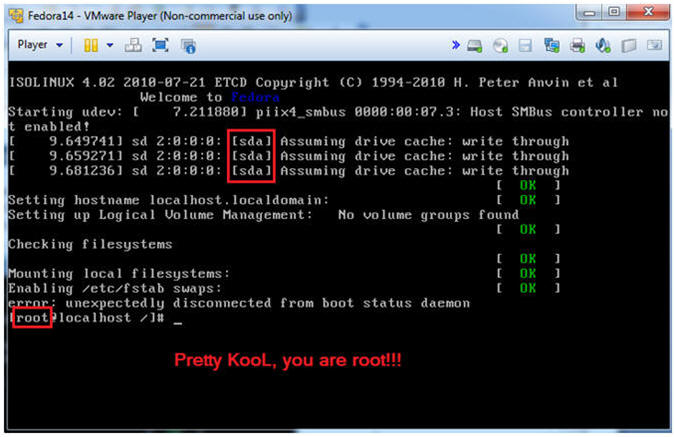
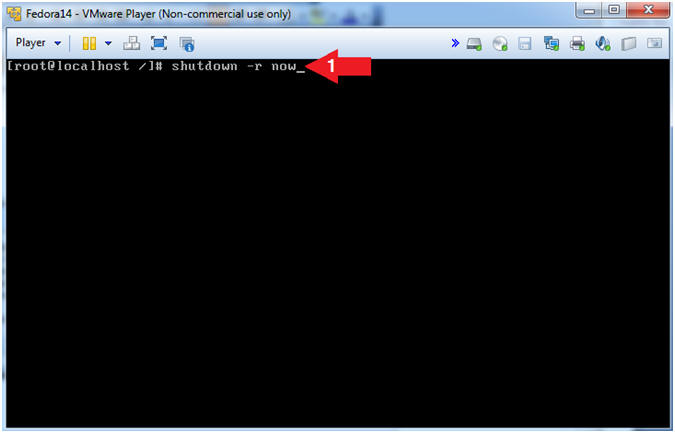
- Reboot Machine
- Instructions:
- shutdown -r now
- Instructions:
- Login As student
- Instructions:
- Click on student
- Provide student password
- Click the Login Button
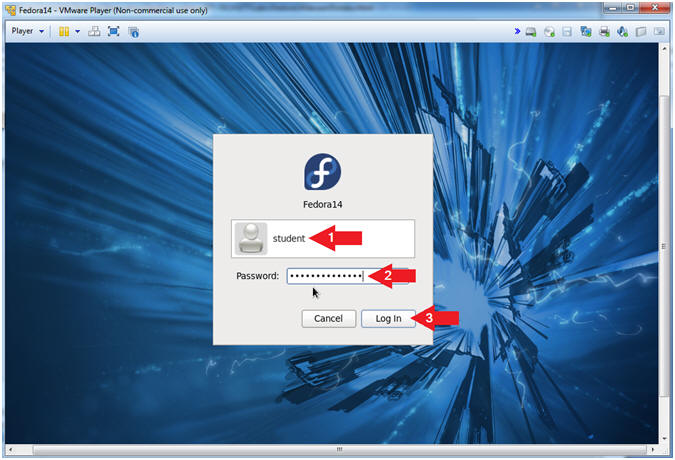
- Instructions:
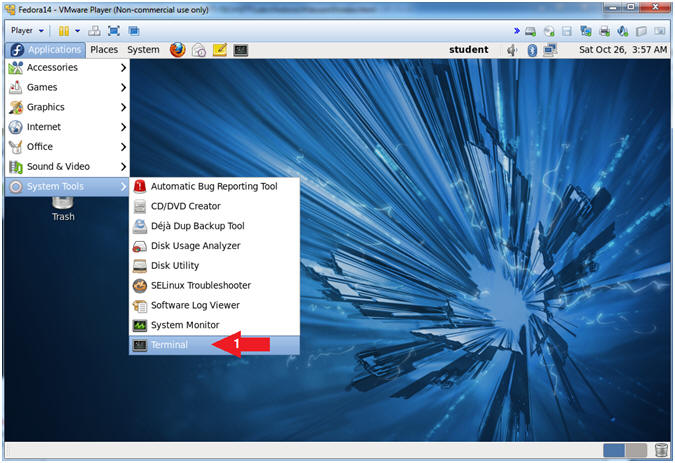
- Start Up A Terminal.
- Applications --> System Tools --> Terminal
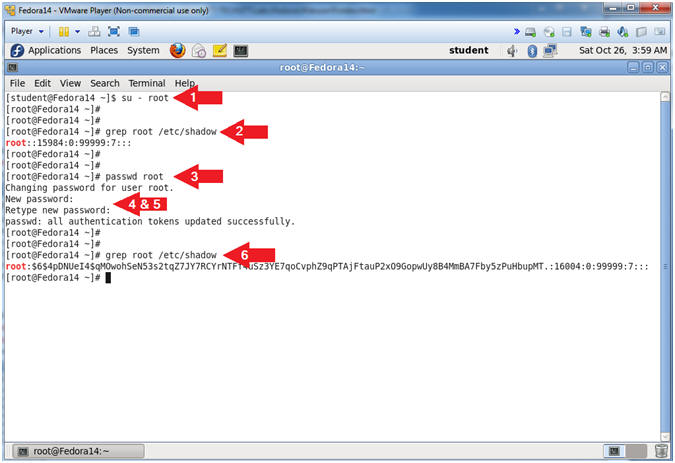
- Switch User to root
- Command: su - root
- Note: You were not prompted for a root password.

- Why were not your prompted for a password?
- Command: grep root /etc/shadow
- Note: Remember is section 4, step 11, you removed root's password from the /etc/shadow file.

- Become Root and Reset Password.
- Instructions:
- su - root
- Notice you were not prompted for a password!!!
- grep root /etc/shadow
- passwd root
- New password: <Provide Password>
- Retype new password: <Provide Password Again>
- grep root /etc/shadow
- su - root
- Instructions:
| Section 5: Proof of Lab |
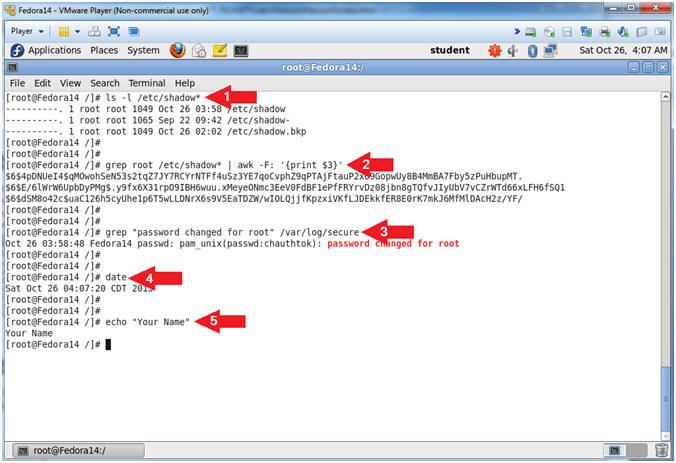
- Proof of Lab
- Instructions:
- ls -l /etc/shadow*
- grep root /etc/shadow* | awk -F: '{print $3}'
- grep "password changed for root" /var/log/secure
- date
- echo "Your Name"
- Put in your actual name in place of "Your Name"
- e.g., echo "John Gray"
-
Proof of Lab
Instructions
- Press the <Ctrl> and <Alt> key at the same time.
- Press the <PrtScn> key.
- Paste into a word document
- Upload to Moodle
- Instructions: