(Ubuntu: Lesson 4)
{ Using a Live CD to crack a password protected grub.cfg file }
| Section 0. Background Information |
- Background information.
- The following lab will show you how to circumvent a password protected grub file using a live CD/iso, assuming a power on password is not set.
- Prerequisite
-
Lab Notes
- In this lab we will how to do the following:
- We will show you how to use a live CD/iso to remove a password from the Grub.
- We will show you how to boot into single user mode using the grub menu.
- We will show you how to change the root password.
- In this lab we will how to do the following:
- Legal Disclaimer
- As a condition of your use of this Web site, you warrant to computersecuritystudent.com that you will not use this Web site for any purpose that is unlawful or that is prohibited by these terms, conditions, and notices.
- In accordance with UCC § 2-316, this product is provided with "no warranties, either express or implied." The information contained is provided "as-is", with "no guarantee of merchantability."
- In addition, this is a teaching website that does not condone malicious behavior of any kind.
- You are on notice, that continuing and/or using this lab outside your "own" test environment is considered malicious and is against the law.
- © 2012 No content replication of any kind is allowed without express written permission.
| Section 1: Start Ubuntu 12.04 |
- Start Ubuntu 12.04
- Instructions
- For Windows 7
- Start --> All Programs --> VMware Player
- For Windows XP
- Starts --> Programs --> VMware Player
- For Windows 7
- Instructions
- Verify Virtual Machine Settings.
- Instructions
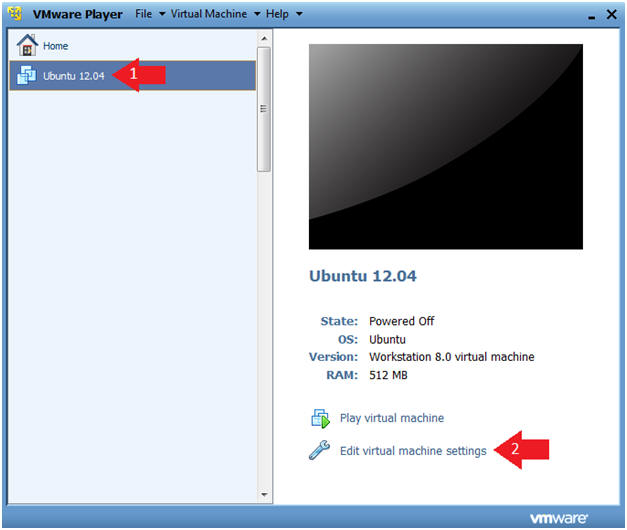
- Click on Ubuntu 12.04
- Click on Edit virtual machine settings
- Instructions
- Set CD/DVD(IDE)
- Instructions
- Click on CD/DVD(IDE)
- Check checkbox: Connect at power on
- Select radio button: Use ISO image file:
- Click the Browse Button.
- Navigate and Select the
ubuntu-12.04-desktop.iso file
- Note this can be any live linux iso.
- Click on the OK button.

- Instructions
- Start the Ubuntu 12.04 VM
- Instructions
- Click on Ubuntu 12.04
- Click on Play virtual machine

- Instructions
| Section 2: Boot From CD-ROM |
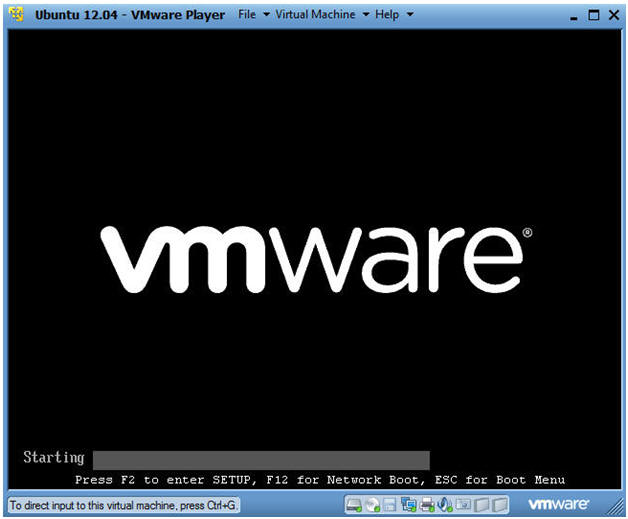
- Access the Boot Menu
- Instructions
- Once you see the below vmware screen, (1) Left Click in the screen and (2) press the <Esc> key.
- Instructions
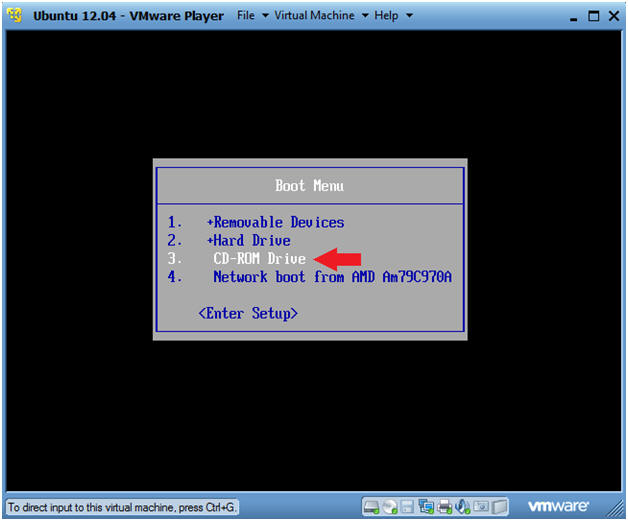
- Boot from CD-ROM Drive
- Instructions
- Arrow Down to where CD-ROM Drive is highlighted
- Press <Enter>
- Instructions
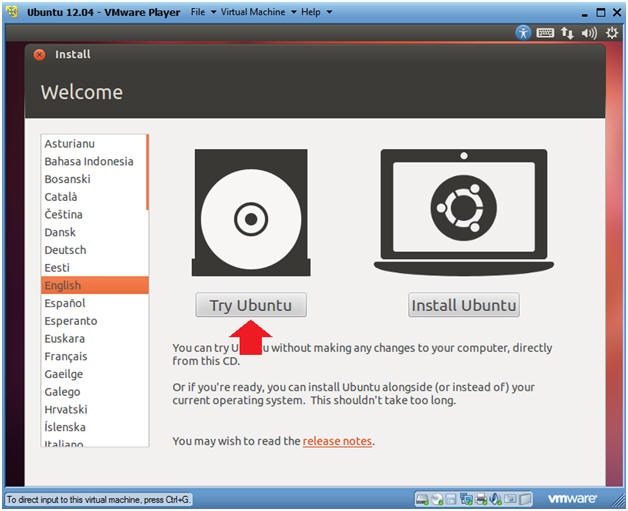
- Ubuntu CD
- Instructions
- Click on the Try Ubuntu button
- Instructions
| Section 3: Mount Hard Drive |
- Ubuntu Dash
- Instructions
- Click on the Ubuntu Dash
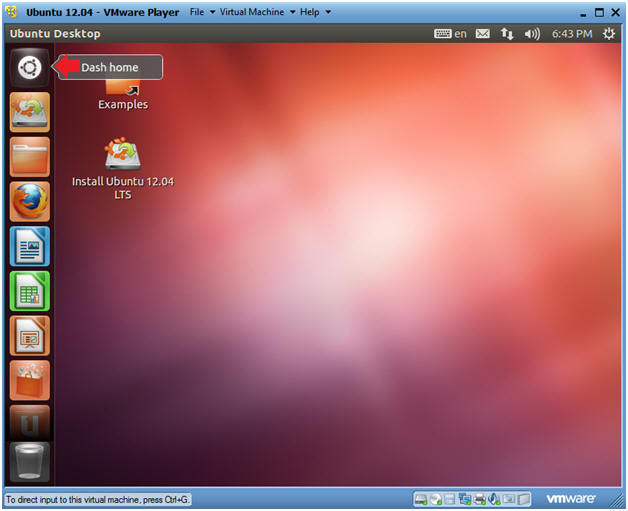
- Instructions
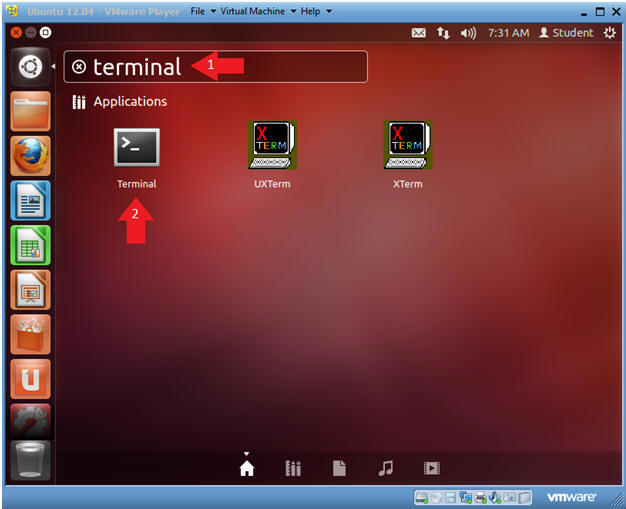
- Terminal Windows Search
- Instructions
- Type "terminal" in the search box.
- Click on the terminal.
- Instructions
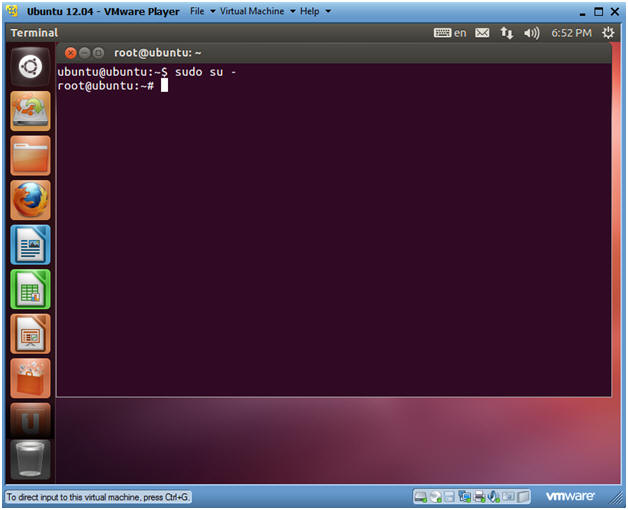
- Become Root
- Instructions
- sudo su -
- Instructions
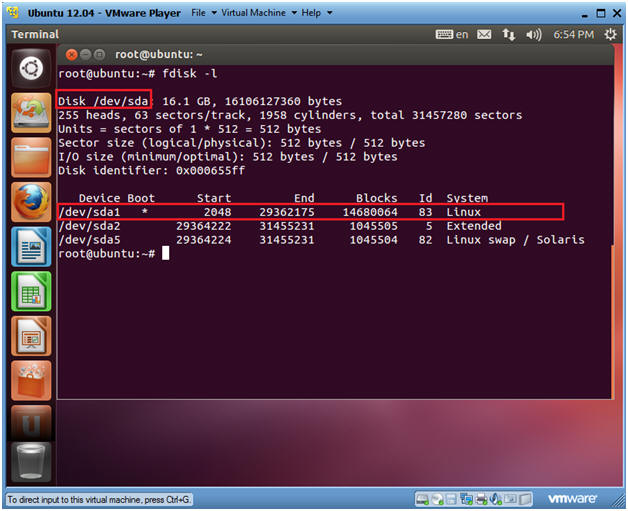
- Identify Hard drive name and root partition
- Instructions
- fdisk -l
- Notes(FYI):
- /dev/sda is the name of the hard drive
- /dev/sda1 is the boot partition which is notated with a "*" in the boot column.
- Instructions
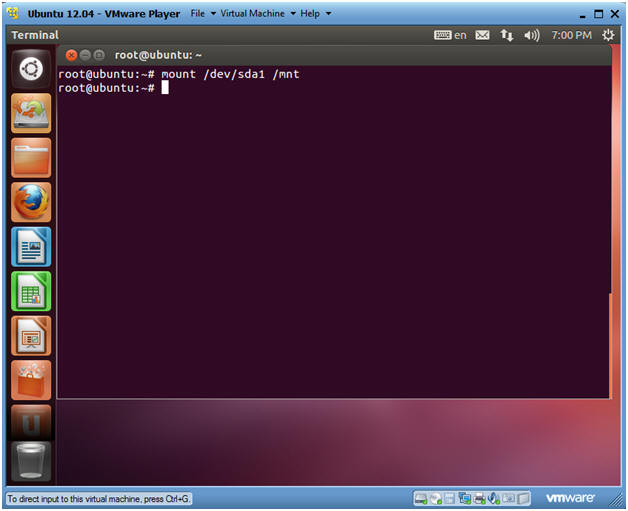
- Mount the root partition
- Instructions
- mount /dev/sda1 /mnt
- Notes(FYI):
- This command will mount the disk partition that contains the /boot directory.
- Instructions
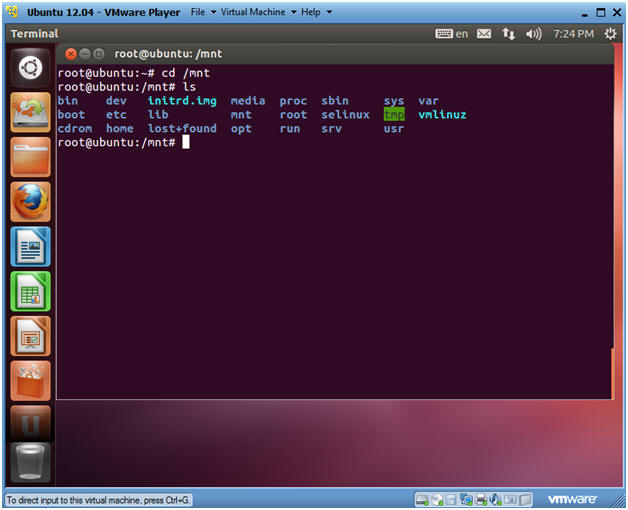
- Navigate to Hard Drive
- Instructions
- cd /mnt
- ls
- Note(FYI):
- Changing directory (cd'ing) to /mnt would be the same as changing directory (cd'ing) to / if we did not boot from the CD-ROM.
- Instructions
| Section 3: Editing the Grub Configuration Files |
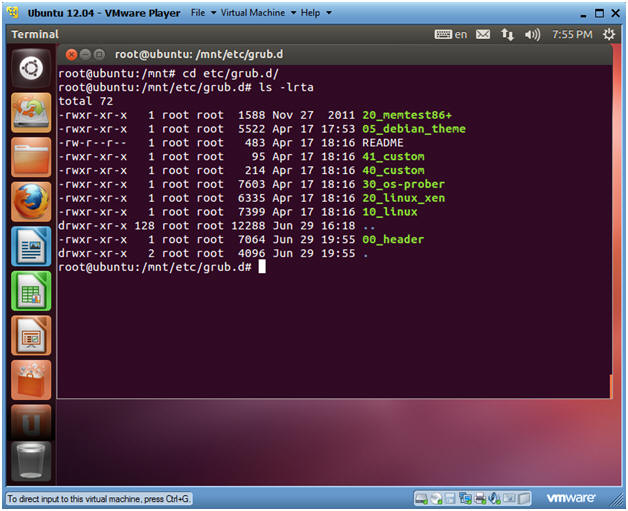
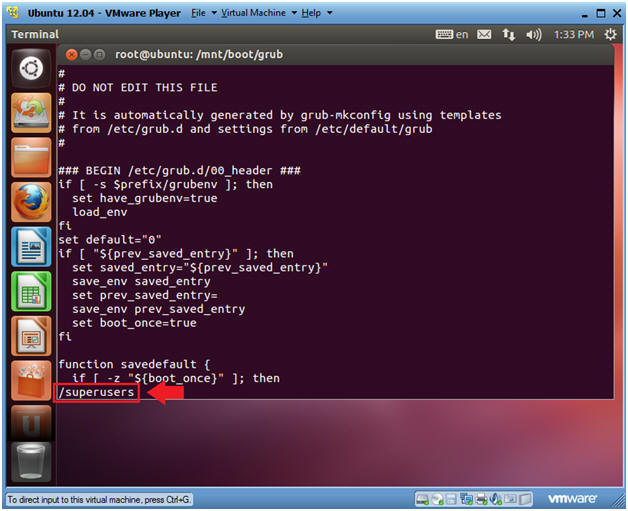
- Navigate to grub configuration directory
- Instructions
- cd etc/grub.d/
- ls -lrta
- Note(FYI):
- Change directory into etc/grub.d/
- List files and directories by long listing in reverse order by time.
- Instructions
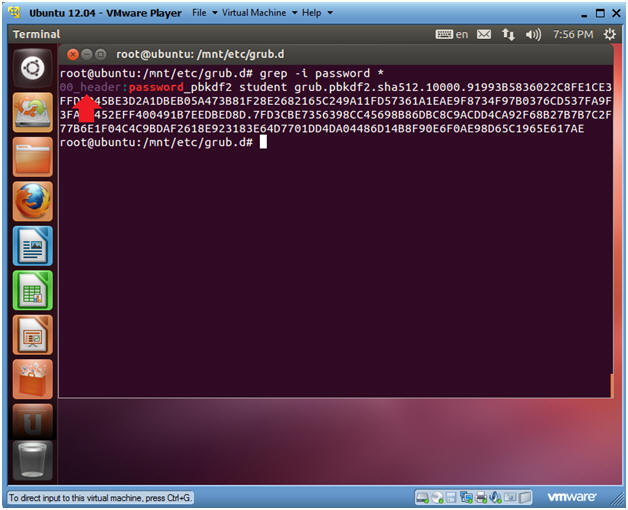
- Search for the password directive
- Instructions
- grep -i password *
- Note(FYI):
- The password directive can be placed in either the *0_customer files or the 00_header file.
- So, to prevent needless looking, we use a simple grep command to streamline our search.
- The password directive was found in the 00_header file.
- Instructions
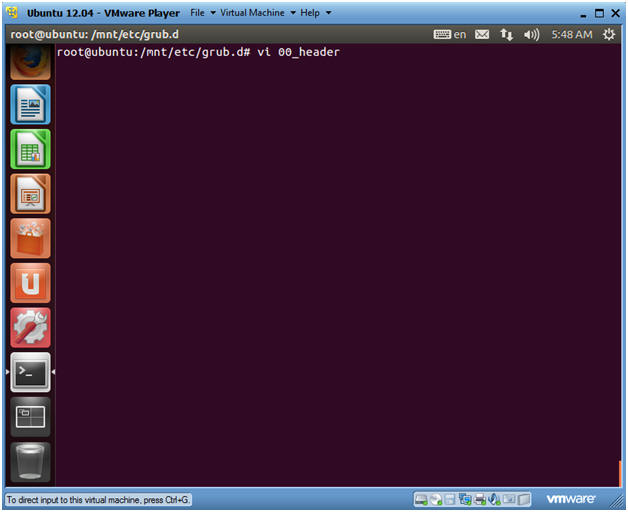
- Open the 00_header file
- Instructions
- vi 00_header
- Note(FYI):
- This command will open file 00_header
- Instructions
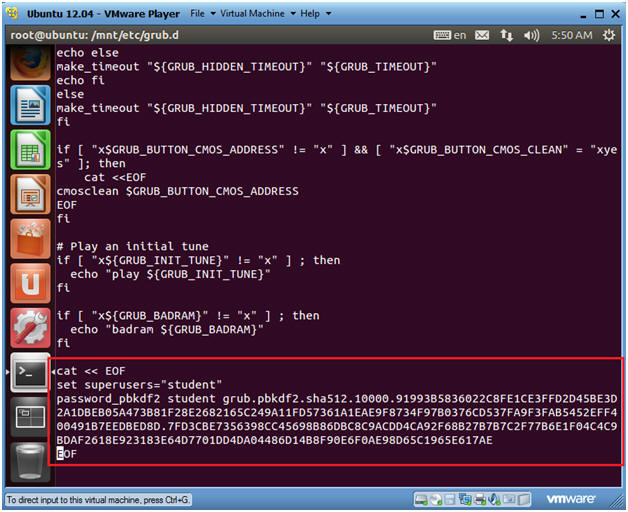
- Edit the 00_header file
- Instructions
- Press the <Shift> and "g" keys at the
same time
- This will take you to the bottom line of the file.
- dd
- This will delete the line that contains "EOF".
- dd
- This will delete the line that contains "password_pbkdf2"
- dd
- This will delete the line that contains "set superusers".
- dd
- This will delete the line that contains "cat << EOF".
- Press the <Esc> button
- Type ":wq!"
- This will save the file.
- Press the <Shift> and "g" keys at the
same time
- Instructions
- Navigate to boot loader directory
- Instructions
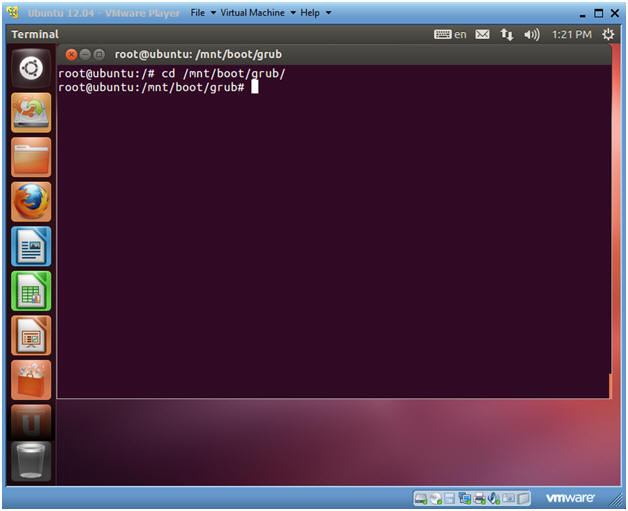
- cd /mnt/boot/grub
- Instructions
- Open the grub.cfg
- Instructions
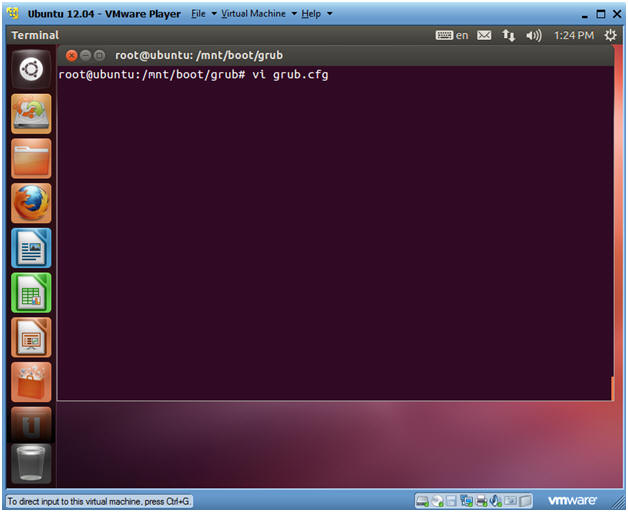
- vi grub.cfg
- Instructions
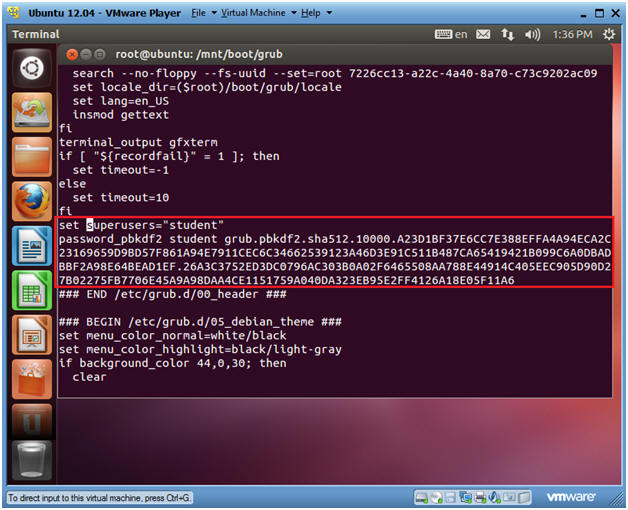
- Search for the password directive
- Instructions
- Press the "/" key to put the VI editor into search mode.
- Type "superusers"
- Press <Enter>
- Instructions
- Edit the grub.cfg file
- Instructions
- dd
- This will delete the line that contains "superusers"
- dd
- This will delete the line that contains "password_pbkdf2".
- <Esc>
- :wq!
- This will save the file
- dd
- Instructions
| Section 4: Reboot and Test Grub Password Removal |
- Reboot Machine
- Instructions
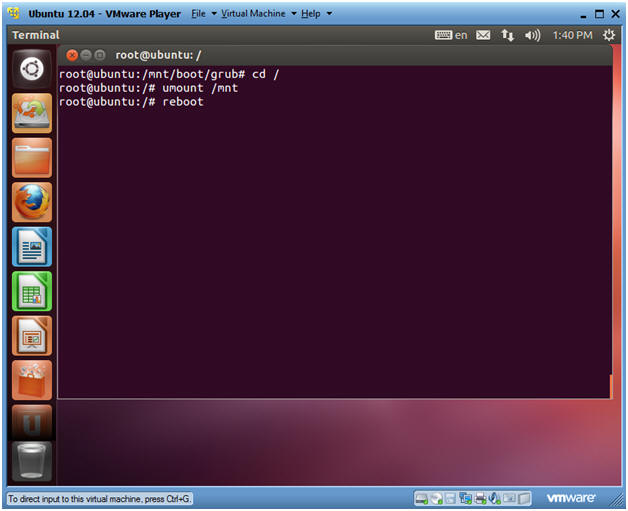
- cd /
- umount /mnt
- reboot
- Instructions
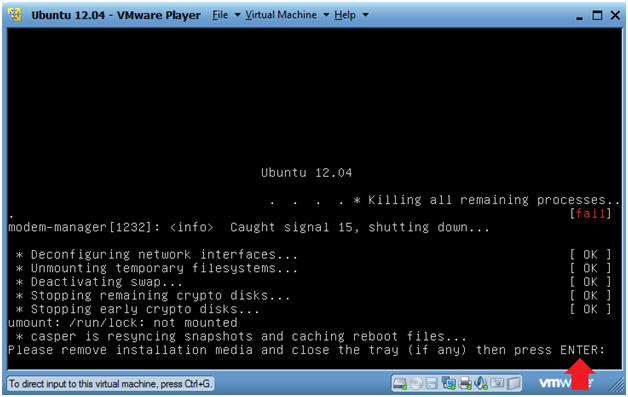
- Press Enter
- Instructions
- Press the <Enter> key
- Instructions
- Boot to Grub 2 Menu
- Instructions
- Once you see the below vmware screen, (1) Left Click in the screen and (2) press the <Shift> key.
- Instructions
- Edit the Grub Menu
- Instructions
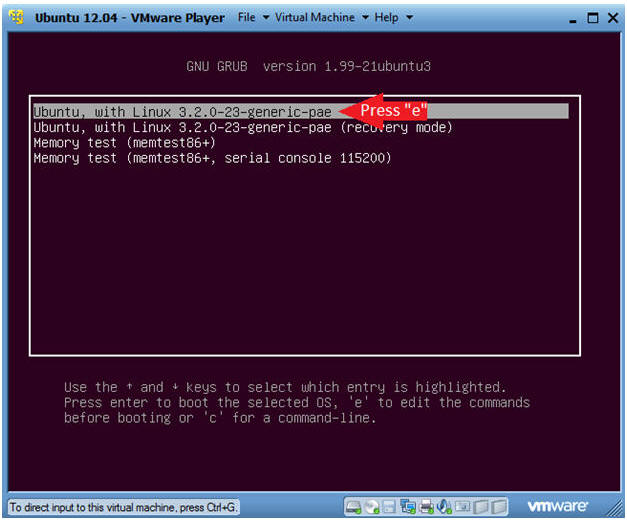
- Make sure Ubuntu, with Linux 3.2.0-23-generic-pae is highlighted.
- Press "e"
- Instructions
- Cursor Placement
- Instructions
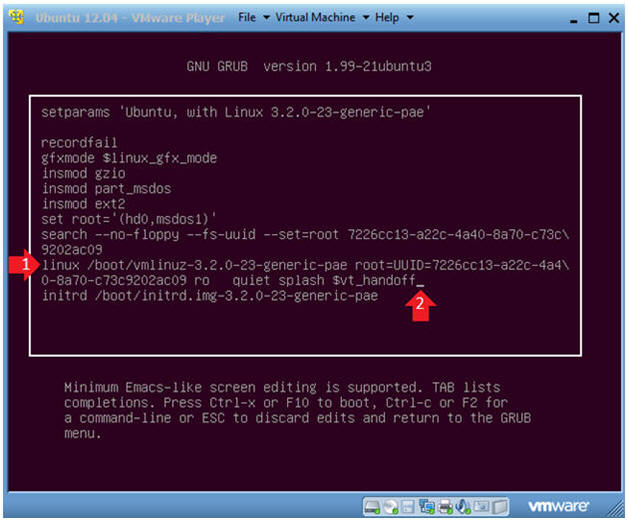
- Cursor down to the line that starts with "linux /boot/vmlinuz-3.2.0-23-generice-pae".
- Cursor right until your cursor is positioned directly after $vt_handoff.
- Continue to next step
- Note
- Notice you were not prompted for the password!!!
- Instructions
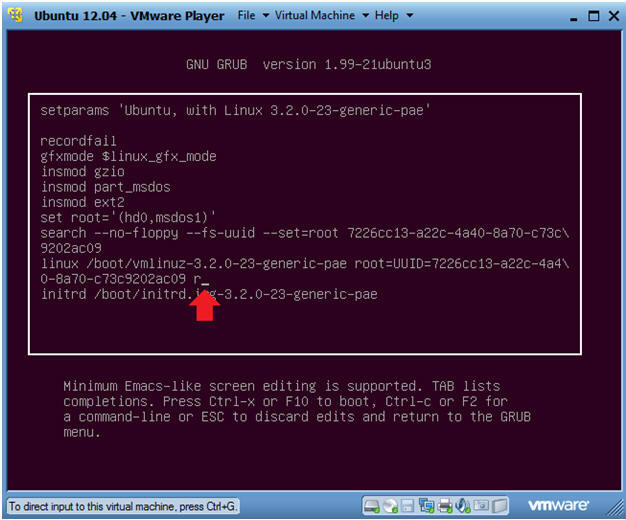
- Delete "o quite splash $vt_handoff"
- Instructions
- Use the backspace key to delete the
following characters:
- "o quiet splash $vt_handoff"
- Continue to next step.
- Use the backspace key to delete the
following characters:
- Instructions
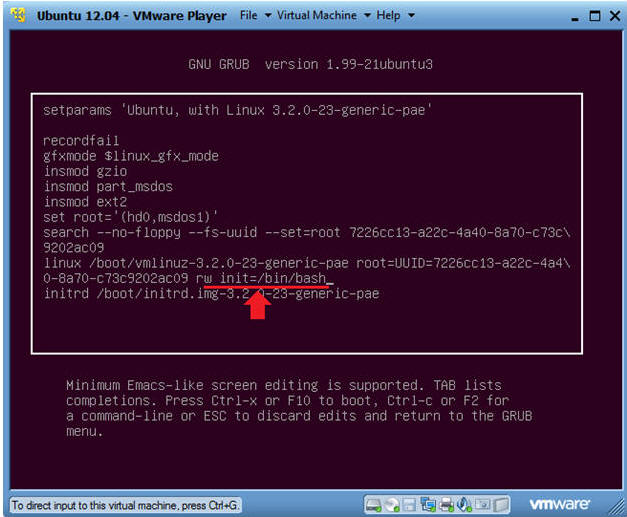
- Add the string "w init=/bin/bash"
- Instructions
- Type the follow string after the "r".
- w init=/bin/bash
- Press <Ctrl> and "x" to boot to single mode.
- Type the follow string after the "r".
- Instructions
| Section 5: Resetting the Root Password |
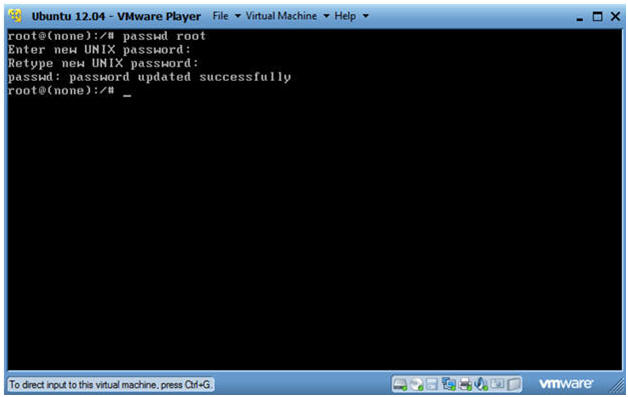
- Welcome to root
- Note(FYI):
- You are now the root user
- Continue to next step.

- Note(FYI):
- Reset root's password
- Instructions
- passwd root
- Supply the password of your choice
- Instructions
| Section 6: Reboot Machine and Test Root Password Reset |
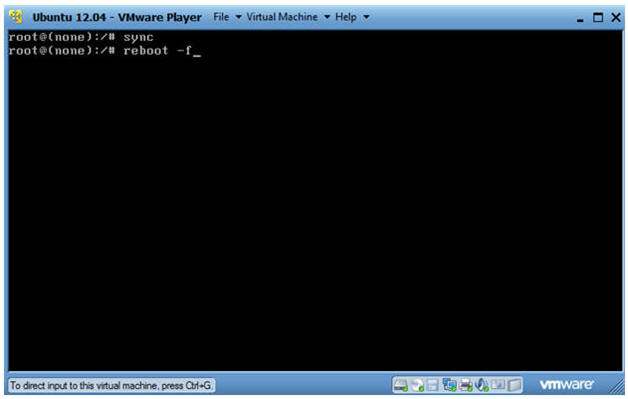
- Sync and Reboot
- Instructions
- sync
- reboot -f
- Instructions
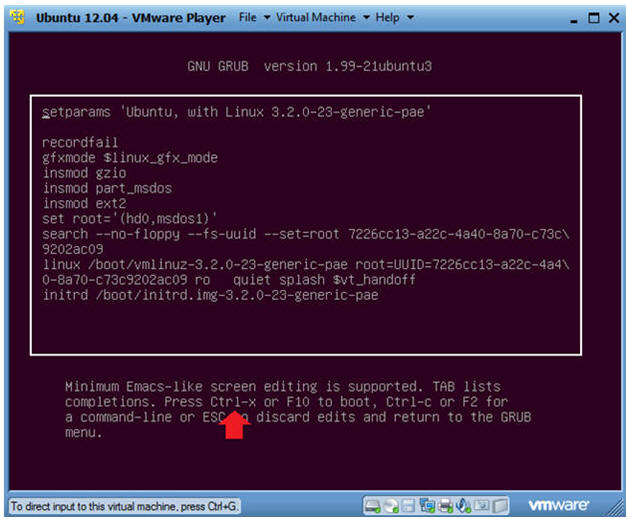
- Edit the Grub Menu
- Instructions
- Make sure Ubuntu, with Linux 3.2.0-23-generic-pae is highlighted.
- Press "e".
- Instructions
- Boot Machine
- Instructions
- Press <Ctrl> and "x" to boot the machine.
- Instructions
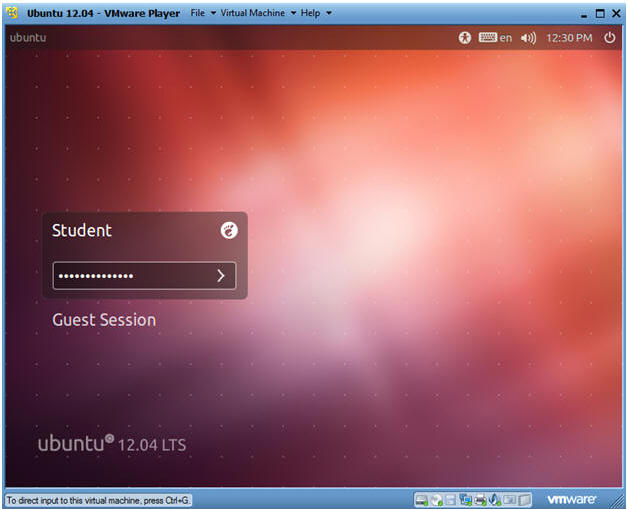
- Login to Server
- Instructions
- User: Student
- Password: Please supply the student password.
- Instructions
- Start up a Terminal
- Instructions
- Click on the Terminal
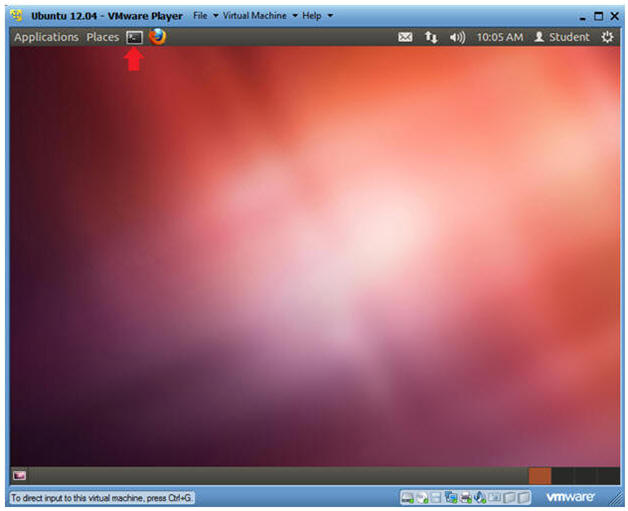
- Instructions
- Test the new root password
- Instructions
- su - root
- Enter your new root password that you
created in
- (Section 5, Step 2)
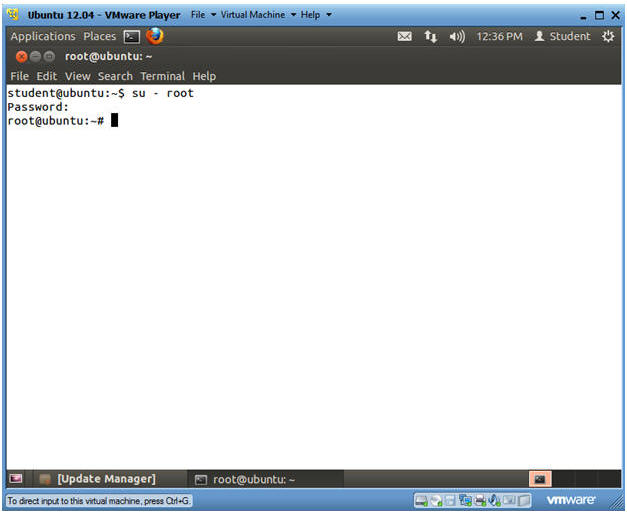
- Instructions
| Section 5: Proof of Lab |
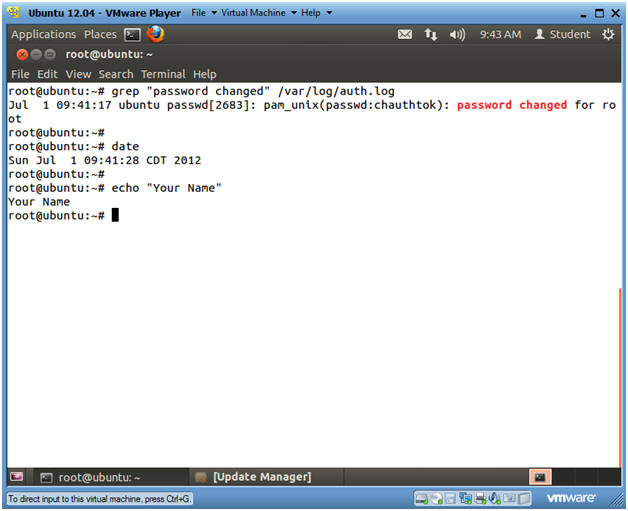
- Proof of Lab
- Instructions
- grep "password changed" /var/log/auth.log
- date
- echo "Your Name"
- Replace the string "Your Name" with your actual name.
- e.g., echo "John Gray"
-
Proof of Lab Instructions
- Press both the <Ctrl> and <Alt> keys at the same time.
- Do a <PrtScn>
- Paste into a word document
- Upload to Moodle
- Instructions
- Re-Harden Grub Menu
(Optional)
- Instructions
- Please re-establish a password protected Grub file by completing the below lab.
- Instructions