(CentOS 6.6: Lesson 6)
{ Basic whoami, ls, cat, more, mkdir, cp, mv, rm Commands Usage }
| Section 0. Background Information |
- Background Information
- In this lesson, you will be exposed to some very common and popular commands to help you navigate around in the Linux world via a command line.
- Pre-requisites
-
Lab
Notes
- In this lab we will do the following:
- Determine who the current user is after switching user.
- Determine who the current user was before switching user.
- Learning how to create, rename and delete files.
- Learning how to view files.
- In this lab we will do the following:
- Legal Disclaimer
- As a condition of your use of this Web site, you warrant to computersecuritystudent.com that you will not use this Web site for any purpose that is unlawful or that is prohibited by these terms, conditions, and notices.
- In accordance with UCC § 2-316, this product is provided with "no warranties, either express or implied." The information contained is provided "as-is", with "no guarantee of merchantability."
- In addition, this is a teaching website that does not condone malicious behavior of any kind.
- You are on notice, that continuing and/or using this lab outside your "own" test environment is considered malicious and is against the law.
- © 2015 No content replication of any kind is allowed without express written permission.
| Section 1. Configure CentOS-6.6 Virtual Machine Settings |
- Open Your VMware Player
- Instructions:
- On Your Host Computer, Go To
- Start --> All Program --> VMWare --> VMWare Player
- Instructions:
- Edit CentOS-6.6 Virtual Machine Settings
- Instructions:
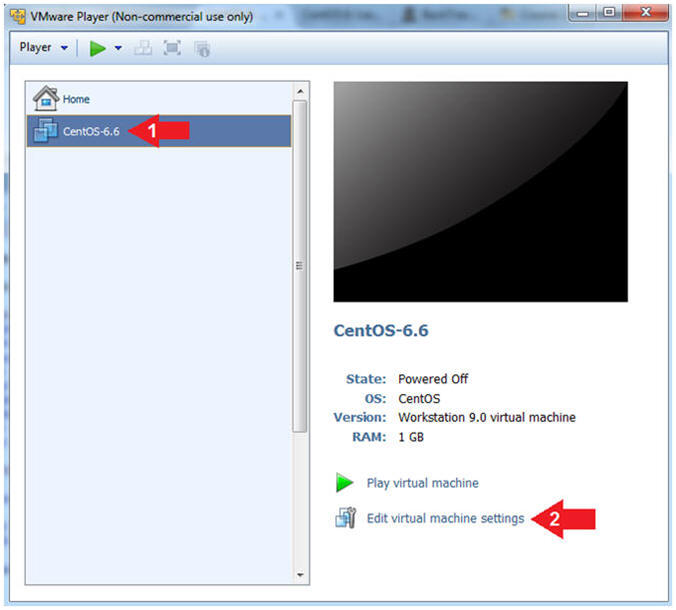
- Highlight CentOS-6.6
- Click Edit virtual machine settings
- Instructions:
- Auto Detect Hard Drive
- Instructions:
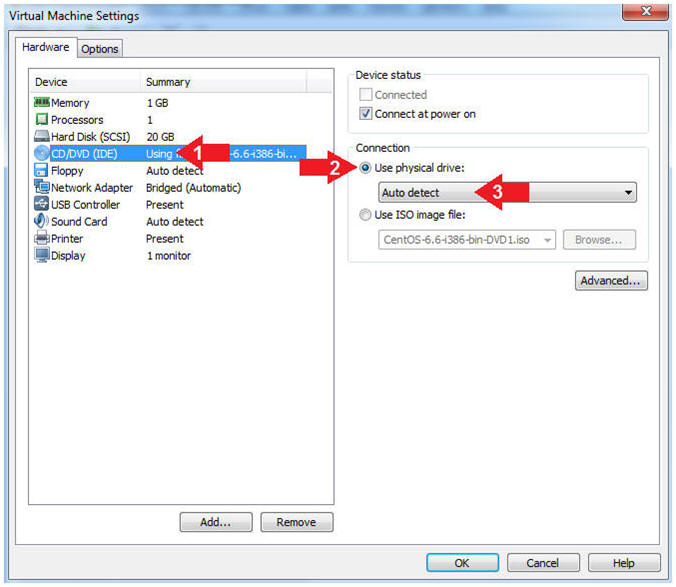
- Click on CD/DVD(IDE)
- Click the Use physical drive: radio button
- Make sure Auto detect is selected
- Instructions:
- Edit Network Adapter
- Instructions:
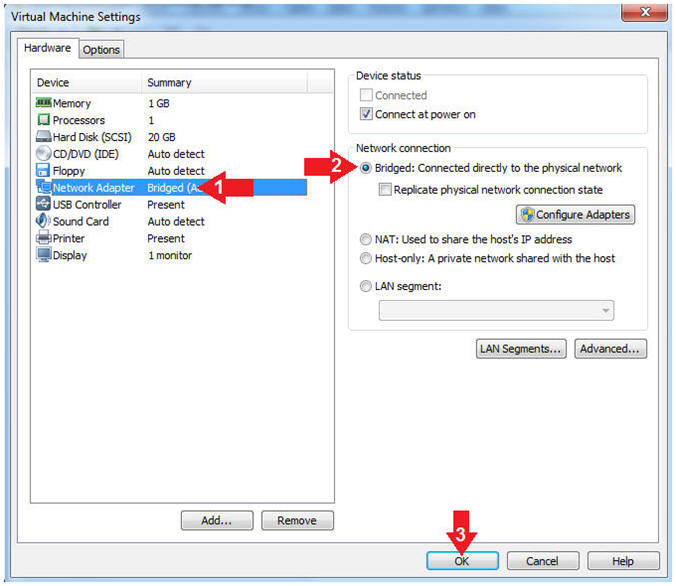
- Highlight Network Adapter
- Select Bridged
- Click the OK Button
- Instructions:
| Section 2. Play Virtual Machine |
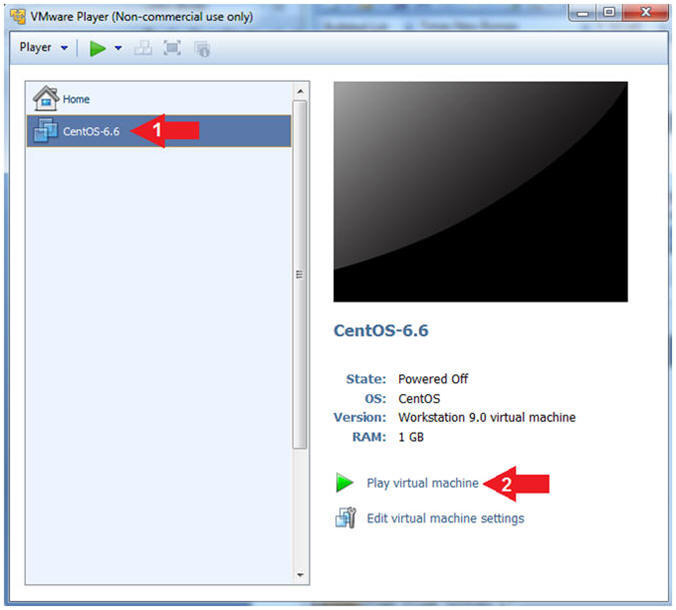
- Start the CentOS-6.6 VM
- Instructions:
- Click on the CentOS-6.6 VM
- Click on Play virtual machine
-
- Instructions:
| Section 3. Login to CentOS |
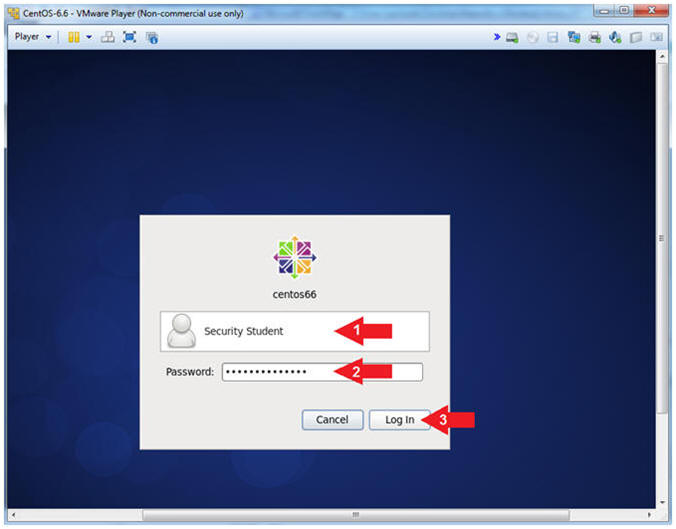
- Login to CentOS
- Note(FYI):
- Until you click the user, in this case Security Student, the Password field will not be displayed.
- Instructions:
- Click on Security Student
- This will display the password text box.
- Supply its' password
- Click the Log In Button
- Click on Security Student
- Note(FYI):
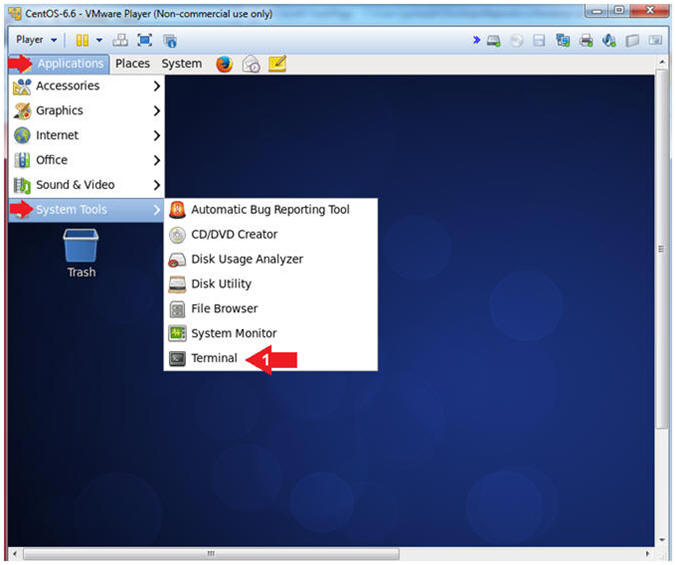
- Open a Terminal
- Instructions:
- Applications --> System Tools --> Terminal
- Instructions:
- Switch User to root
- Instruction:
- su - root
- Supply the Root Password
- Notes (FYI):
- su - root, this command allows the user student to switch user to user root, provided the root password can be supplied.

- Instruction:
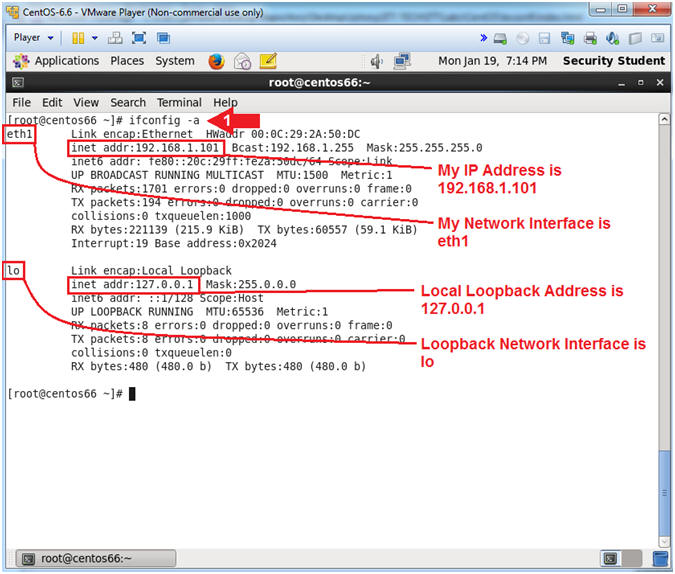
- Get IP Address
- Instructions:
- ifconfig -a
- Notes (FYI):
- As indicated below, my IP address is
192.168.1.101 for Network Interface eth1.
- Please record your IP address
- The Local Loopback Address is 127.0.0.1
for Network Interface lo.
- The loopback device is a special, virtual network interface that your computer uses to communicate with itself. When the network or wifi is disconnected the loopback exists so applications running on your computer can always connect to servers on the same machine.
- As indicated below, my IP address is
192.168.1.101 for Network Interface eth1.
- Instructions:
| Section 4. Who Am I and Who Was I? |
- Who Am I -and- Who Was I?
- Instructions:
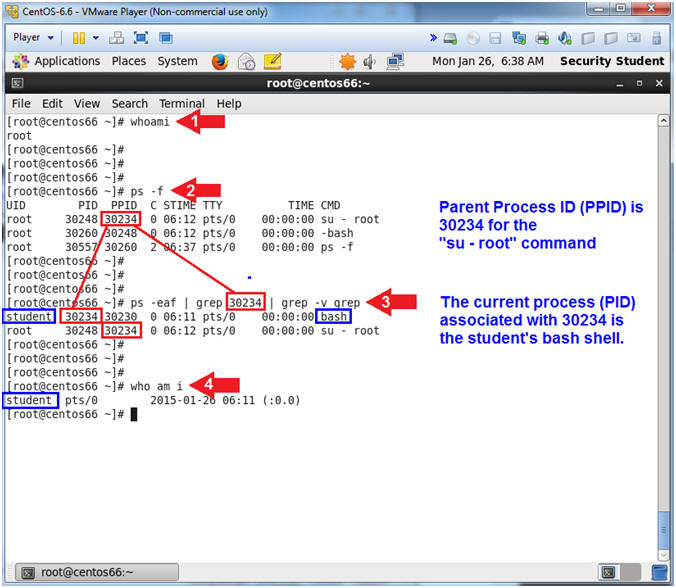
- whoami
- ps -f
- Obtain the PPID associated with the line that contains "su - root". My PPID is 30234. Record your PPID.
- ps -eaf | grep 30234 | grep -v grep
- who am i
- Note(FYI):
- whoami, this command displays the user name associated with the current effective user ID.
- ps -f, this command display processes. Using the ps command without using the all (-ea) option, will only display the process for the current effective user. The (-f) option will display a full listing.
- ps -eaf | grep
30234 | grep
-v grep
- ps -eaf, will display all the systems running processes.
- grep 30234, will search for only current PID and parent PPID processes that contain the string 30234.
- grep -v grep, use (-v) to ignore a process line with grep in it.
- Notice the current process (PID) associated with 30234 is the student's bash shell, which is created during the login process.
- who am i, will display the original logged in user. Notice the user is student.
- Instructions:
| Section 5. Directory Navigation |
- Moving Up and Down a Directory Tree
- Instructions:
- cd /etc/sysconfig/network-scripts
- pwd
- cd ../
- cd ../../
- pwd
- Note(FYI):
- Change directory to the /etc/sysconfig/network-scripts directory.
Notice network-scripts is three directories down.
- /etc - First level directory
- /etc/sysconfig - Second level directory
- /etc/sysconfig/network-scripts - Third level directory
- pwd, display current working directory.
- cd ../, change directory one level up from /etc/sysconfig/network-scripts to /etc/sysconfig.
- pwd, display current working directory.
- cd ../../, change directory two level up from /etc/sysconfig to /.
- pwd, display current working directory.
- Change directory to the /etc/sysconfig/network-scripts directory.
Notice network-scripts is three directories down.
-

- Instructions:
- Go Back To Previous Directory
- Instructions:
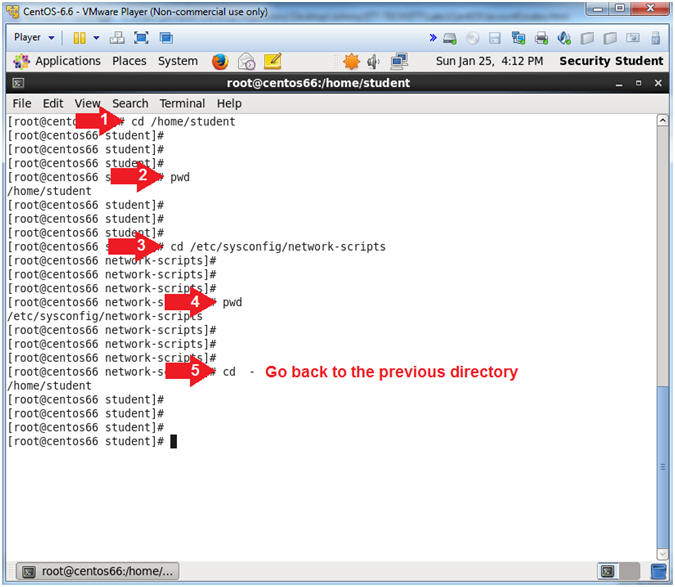
- cd /home/student
- pwd
- cd /etc/sysconfig/network-scripts
- pwd
- cd -
- Note(FYI):
- Change directory to the /home/student directory.
- pwd, display current working directory.
- Change directory to the /etc/sysconfig/network-scripts directory.
- pwd, display current working directory.
- cd -, Go back to the previous directory.
- Instructions:
- Go To Current User's home directory
- Instructions:
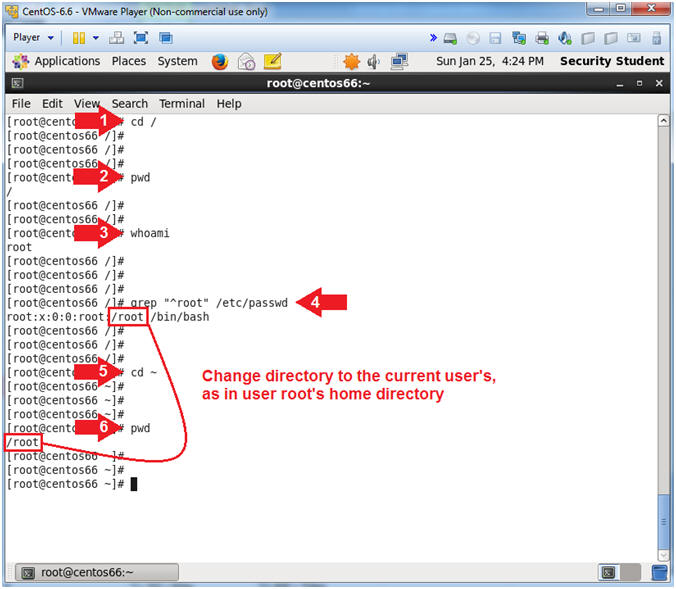
- cd /
- pwd
- whoami
- grep "^root" /etc/passwd
- cd ~
- pwd
- Note(FYI):
- Change directory to the / directory.
- pwd, display current working directory.
- whoami, this command displays the user name associated with the current effective user ID.
- grep "^root" /etc/passwd, Search the /etc/passwd file for line in the file that starts with (^) the string "root".
- Change directory to the /etc/sysconfig/network-scripts directory.
- pwd, display current working directory.
- cd ~, Go to current user's home directory. The currently user is root. User root's home directory is located in "/root".
- Instructions:
| Section 6. Basic Linux File Types |
- Creating File Types
- Instructions:
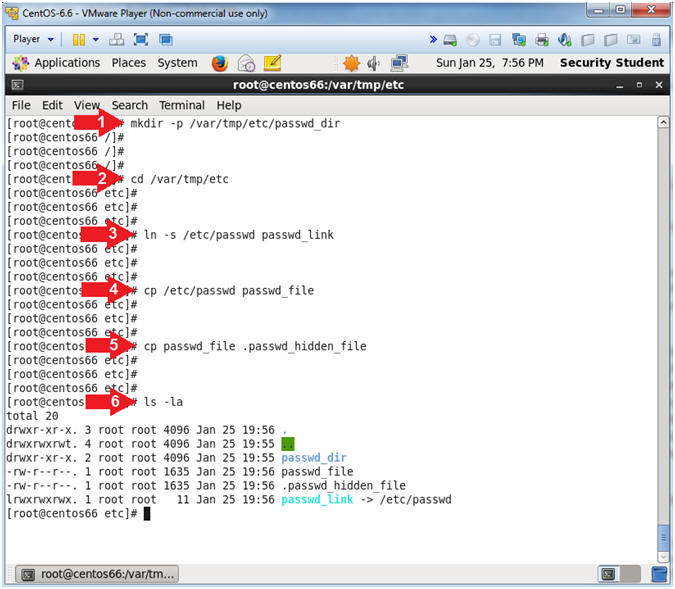
- mkdir -p /var/tmp/etc/passwd_dir
- cd /var/tmp/etc
- ln -s /etc/passwd passwd_link
- cp /etc/passwd passwd_file
- cp passwd_file .passwd_hidden_file
- ls -la
- Note(FYI):
- mkdir, this command create a directory. The "-p" option will create any directories that don't already exist.
- Change Directory into the /var/tmp/etc directory.
- Create a softlink or short cut, called passwd_link to the /etc/passwd.
- Copy the /etc/passwd file and name it passwd_file
- Make another copy of the passwd_file and name it .passwd_hidden_file. In Linux, a file starting with a period(.) makes it invisible to a regular file listing.
- ls -la, The ls command list directory contents. The "-l" option provides a long listing format. The "-a" will display invisible files starting with period(.).
- Instructions:
- Listing Visible and Invisible Files
- Instructions:
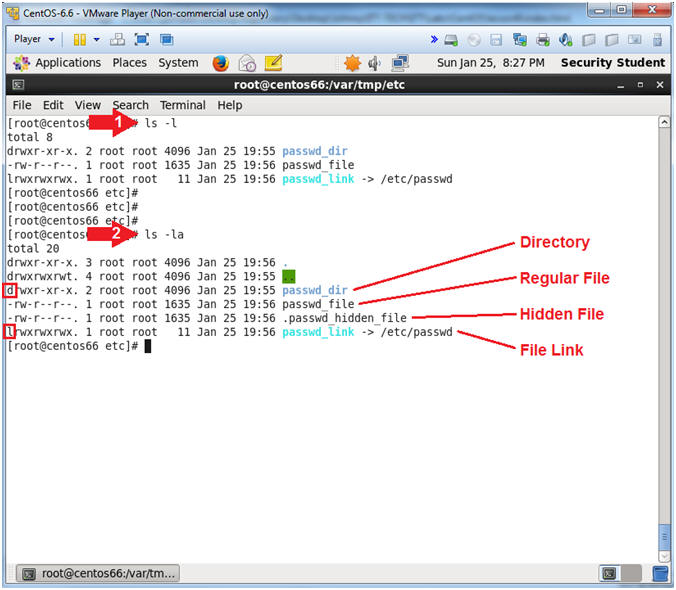
- ls -l
- ls -la
- Note(FYI):
- ls -l, This command displays a long listing of the visible files. Notice, you cannot see the .passwd_hidden_file.
- ls -la, This command displays a long
listing of both visible and invisible files.
- passwd_dir, is a directory. Notice the permissions (drwxr-xr-x) start with a "d" that indicates the file is actually a directory.
- passwd_file, is a file. The permissions (-rw-r--r--)start with a "-", which indicates a file.
- .passwd_hidden_file, is also a file, but since it starts with a ".", it is not visible to a regular file listing.
- passwd_link, is a symbolic link. The permissions (lrwxrwxrwx) start with a "l", which indicates a link.
- Instructions:
- Determine File Types
- Instructions:
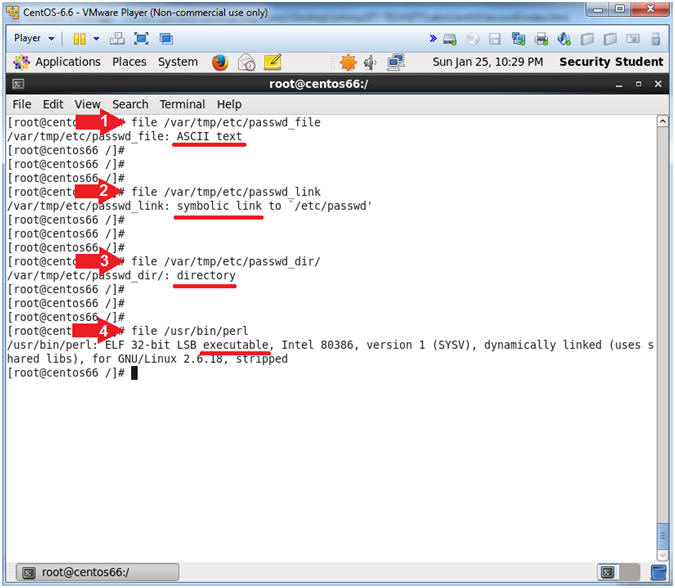
- file /var/tmp/etc/passwd_file
- file /var/tmp/etc/passwd_link
- file /var/tmp/etc/passwd_dir/
- file /usr/bin/perl
- Note(FYI):
- file, is a command used to determine
file types.
- /var/tmp/etc/passwd_file - ASCII text
- /var/tmp/etc/passwd_link - Symbolic link
- /var/tmp/etc/passwd_dir/ - Directory
- /usr/bin/perl - Executable
- file, is a command used to determine
file types.
- Instructions:
- Listing All Directory Contents
- Instructions:
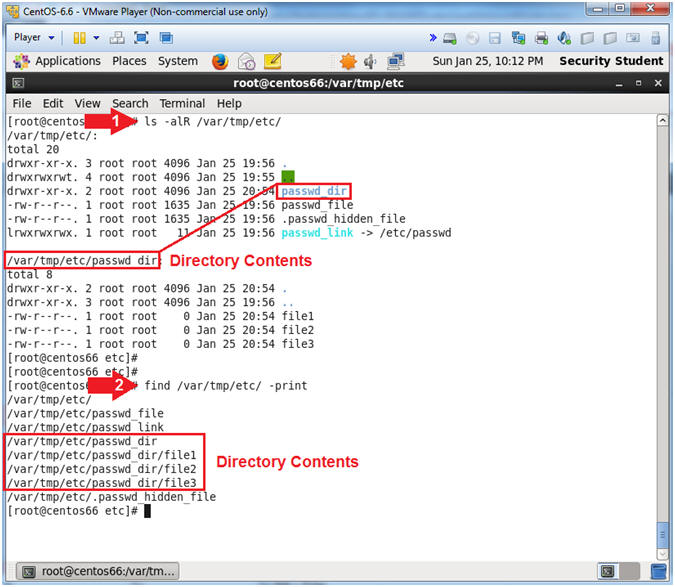
- ls -alR /var/tmp/etc/
- find /var/tmp/etc/ -print
- Note(FYI):
- ls -alR /var/tmp/etc/, Recursively(R) long list(l) all(a) the contents of the /var/tmp/etc/ directory. Notice that after all the immediate directories and files have been listed, then all the files located in /var/tmp/etc/passwd_dir are listed.
- find /var/tmp/etc/ -print, The find command is used in the same fashion to list all the files in /var/tmp/etc. Notice it is a cleaner looking list that could better be used in a program.
- Instructions:
| Section 7. Display File Contents |
- Using the cat command (Print Output)
- Instructions:
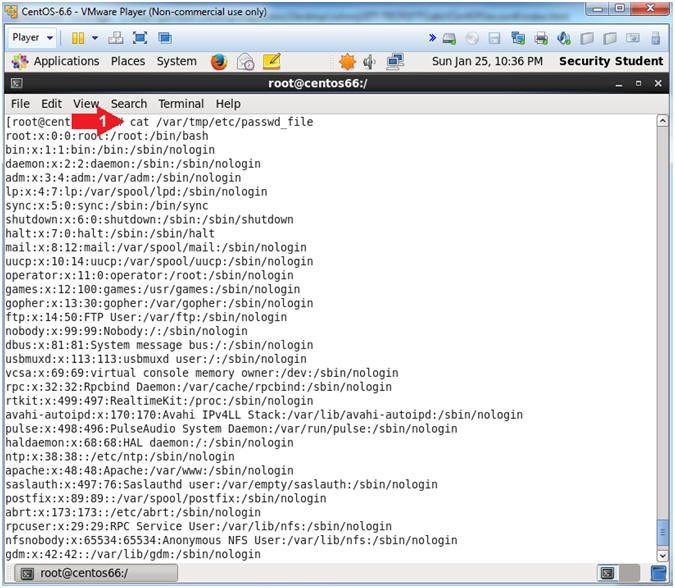
- cat /var/tmp/etc/passwd_file
- Note(FYI):
- cat, this command can be used for (1) concatenating files and (2)printing output to the screen. In this case, we are using it to just display the contents of a file.
- Instructions:
- Using the cat command (File Creation)
- Instructions:
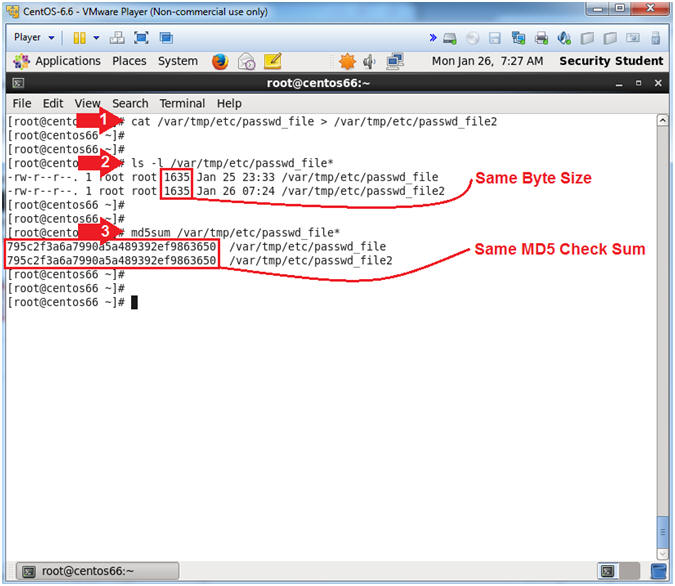
- cat /var/tmp/etc/passwd_file > /var/tmp/etc/passwd_file2
- ls -l /var/tmp/etc/passwd_file*
- md5sum /var/tmp/etc/passwd_file*
- Note(FYI):
- (cat /var/tmp/etc/passwd_file) will display file contents to the screen. The the greater than/redirect operator (>) will redirect the content into another file called /var/tmp/etc/passwd_file2.
- (ls -l /var/tmp/etc/passwd_file*), will display all the files starting with the string passwd_file in the /var/tmp/etc directory.
- (md5sum /var/tmp/etc/passwd_file*) will display all the MD5 checksums for all the files starting with the string passwd_file.
- Instructions:
- Using the more command
- Instructions:
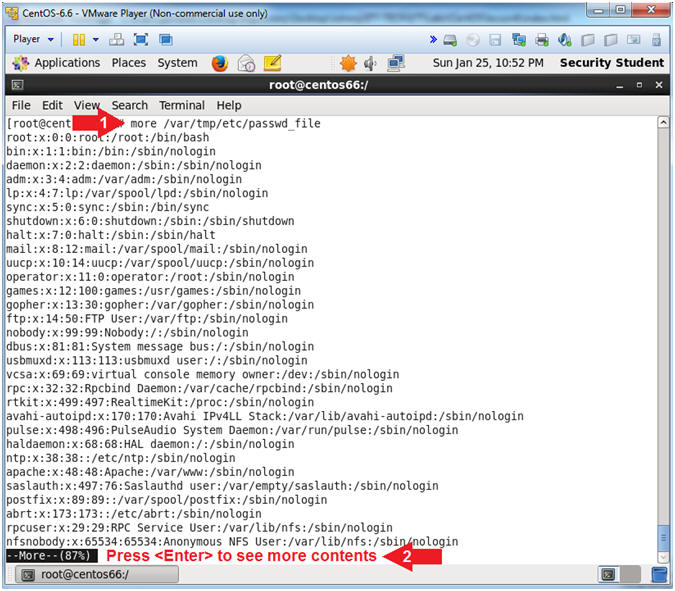
- more /var/tmp/etc/passwd_file
- Press <Enter> until off the contents of the file is displayed.
- Note(FYI):
- more, is a command that is used to page through text one screenful at a time.
- Instructions:
| Section 8. Display File Contents |
- Opening a file with VI
- Instructions:
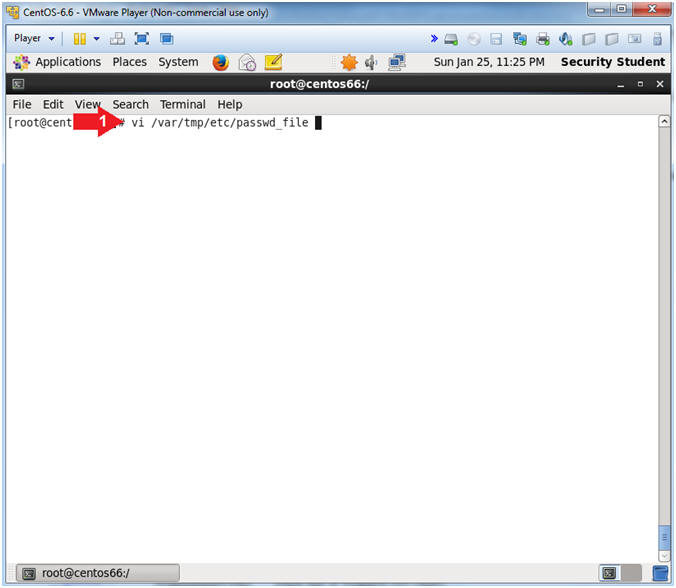
- vi /var/tmp/etc/passwd_file
- Note(FYI):
- vi is a plain text editor.
- Instructions:
- Save and Exit VI
- Instructions:
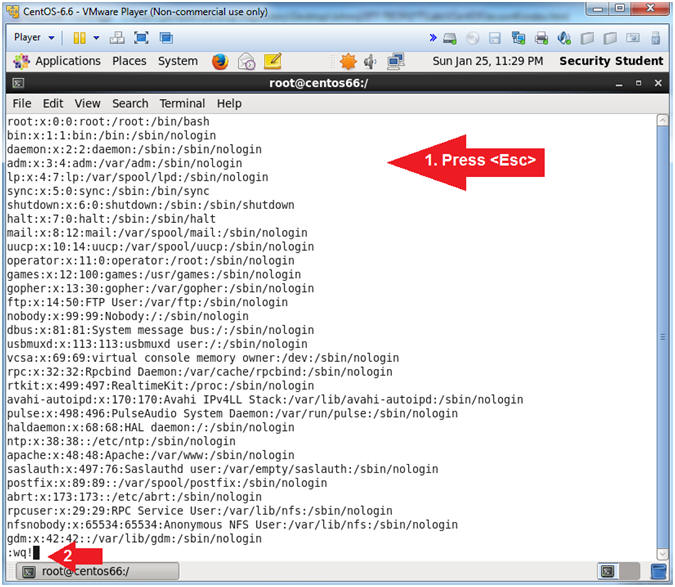
- Press the <Esc> button
- Type :wq!
- Instructions:
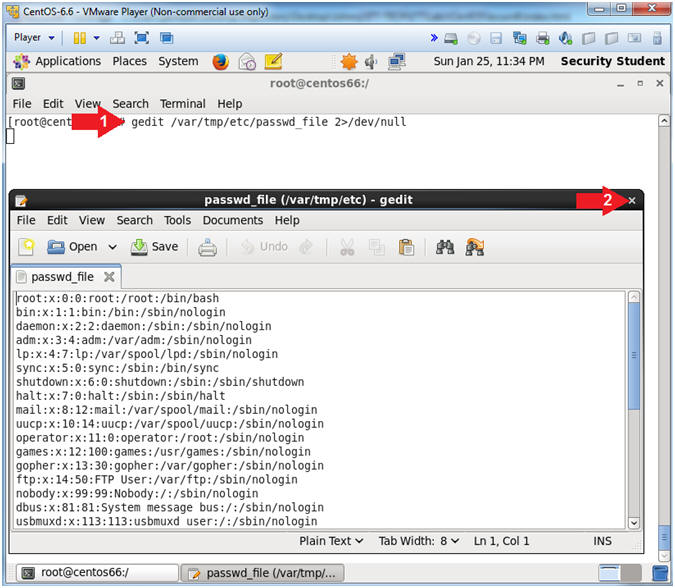
- Opening a file with gedit
- Instructions:
- gedit /var/tmp/etc/passwd_file 2>/dev/null
- Click "X" to close gedit
- Note(FYI):
- gedit, is the gnome text editor.
- Instructions:
| Section 9. Copying, Moving and Deleting Files |
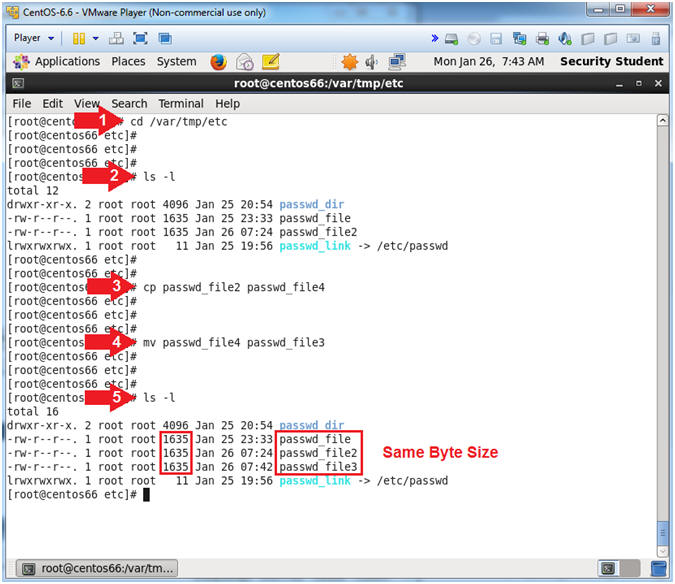
- Opening a file with gedit
- Instructions:
- cd /var/tmp/etc
- ls -l
- cp passwd_file2 passwd_file4
- mv passwd_file4 passwd_file3
- ls -l
- Note(FYI):
- cd /var/tmp/etc, Change directory into /var/tmp/etc.
- ls -l, List the files in the /var/tmp/etc directory.
- cp passwd_file2 passwd_file4, use the copy command (cp) to copy file passwd_file2 and name the new file passwd_file4.
- mv passwd_file4 passwd_file3, use the move/rename command (mv)to rename passwd_file4 to passwd_file3.
- ls -l, List the files in the /var/tmp/etc directory.
- Instructions:
- Opening a file with gedit
- Instructions:
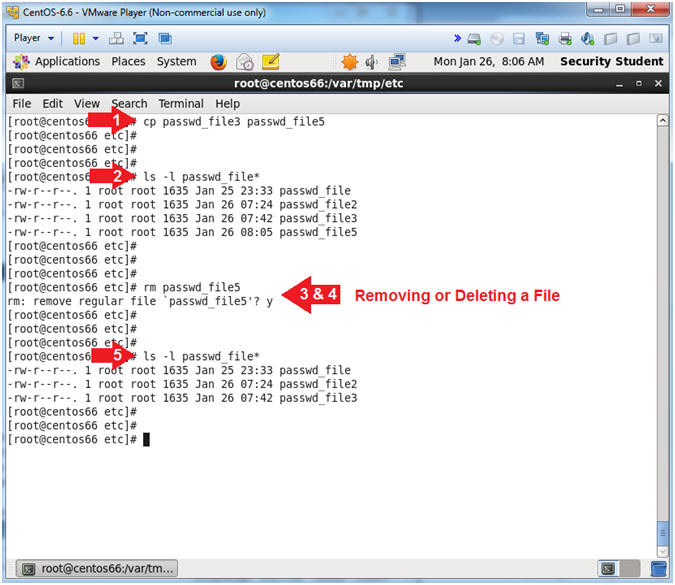
- cp passwd_file3 passwd_file5
- ls -l passwd_file*
- rm passwd_file5
- y
- ls -l passwd_file*
- Note(FYI):
- cp passwd_file3 passwd_file5, use the copy command (cp) to copy file passwd_file3 and name the new file passwd_file5.
- ls -l passwd_file*, In the /var/tmp/etc directory, list all the files that start with the string passwd_file. The asterisk(*) is a wild card.
- rm passwd_file5, use the remove/delete command (rm)to delete the passwd_file5 file.
- If you do not use the (-f) option with the rm command, then you will prompted to re-verify the deletion of a file.
- See comment #2.
- Instructions:
| Section 10. Proof of Lab |
- Proof of Lab
- Instructions:
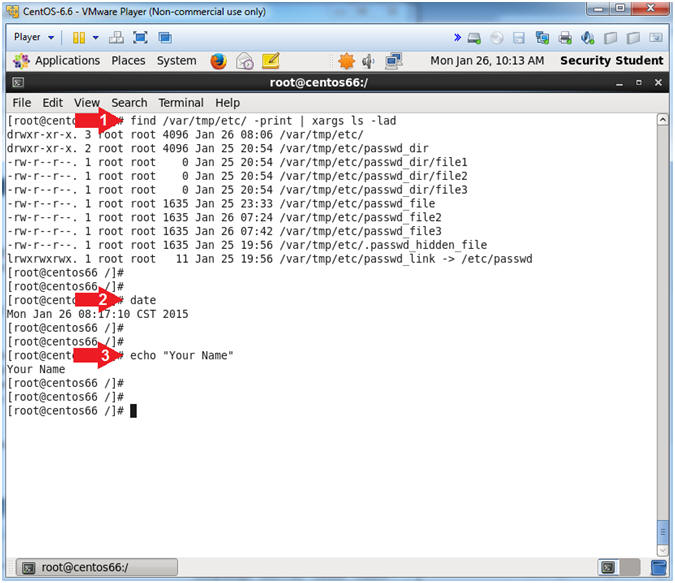
- find /var/tmp/etc/ -print | xargs ls -lad
- date
- echo "Your Name"
- Put in your actual name in place of "Your Name"
- e.g., echo "John Gray"
- Note(FYI):
- find /var/tmp/etc/ -print | xargs
ls -lad
- Use (find /var/tmp/etc/ -print)to display all the file in the /var/tmp/etc directory.
- Use (xargs ls -lad) to display the long listing of both visible and invisible files.
- find /var/tmp/etc/ -print | xargs
ls -lad
-
Proof of Lab
Instructions
- Press the <Ctrl> and <Alt> key at the same time.
- Press the <PrtScn> key.
- Paste into a word document
- Upload to Moodle
- Instructions: