(Volatility: Lesson 4)
{ Analyzing A SET Memory Capture from Windows XP SP2 }
| Section 0. Background Information |
- Volatility Overview
- https://www.volatilesystems.com/
- The Volatility Framework is a completely open collection of tools, implemented in Python under the GNU General Public License, for the extraction of digital artifacts from volatile memory (RAM) samples. The extraction techniques are performed completely independent of the system being investigated but offer unprecedented visibility into the runtime state of the system. The framework is intended to introduce people to the techniques and complexities associated with extracting digital artifacts from volatile memory samples and provide a platform for further work into this exciting area of research.
- Prerequisite Labs
-
Lab Notes
- In this lab we will do the following:
- Download Volatility 2.2.
- Un-Tar Volatility 2.2.
- In this lab we will do the following:
- Legal Disclaimer
- As a condition of your use of this Web site, you warrant to computersecuritystudent.com that you will not use this Web site for any purpose that is unlawful or that is prohibited by these terms, conditions, and notices.
- In accordance with UCC § 2-316, this product is provided with "no warranties, either express or implied." The information contained is provided "as-is", with "no guarantee of merchantability."
- In addition, this is a teaching website that does not condone malicious behavior of any kind.
- Your are on notice, that continuing and/or using this lab outside your "own" test environment is considered malicious and is against the law.
- © 2013 No content replication of any kind is allowed without express written permission.
| Section 1. Login to BackTrack |
- Start BackTrack VM Instance
- Instructions:
- Start Up VMWare Player
- Select BackTrack5R1
- Play virtual machine

- Instructions:
- Login to BackTrack
- Instructions:
- Login: root
- Password: toor or <whatever you changed it to>.
-
- Instructions:
- Bring up the GNOME
- Instructions
- Type startx
-
- Instructions
| Section 2. Bring up a console terminal |
- Bring up a console terminal
| Section 3. Using Volatility |
- Navigate to Forensic Image
- Instructions
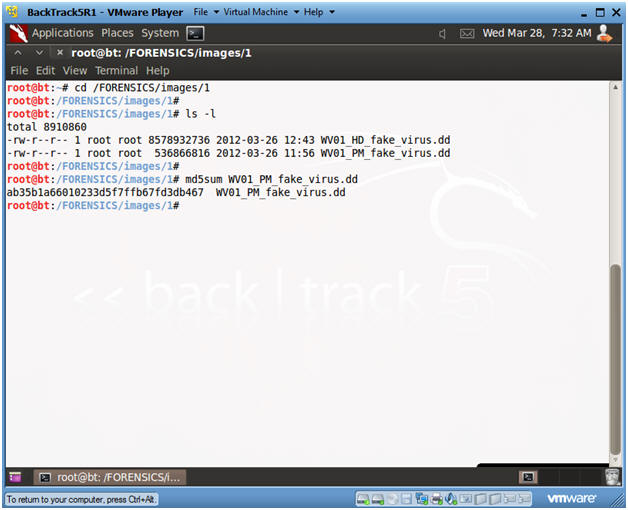
- cd /FORENSICS/images/1
- ls -l
- md5sum WV01_PM_fake_virus.dd
- Instructions
- Navigate to Volatility
- Instructions
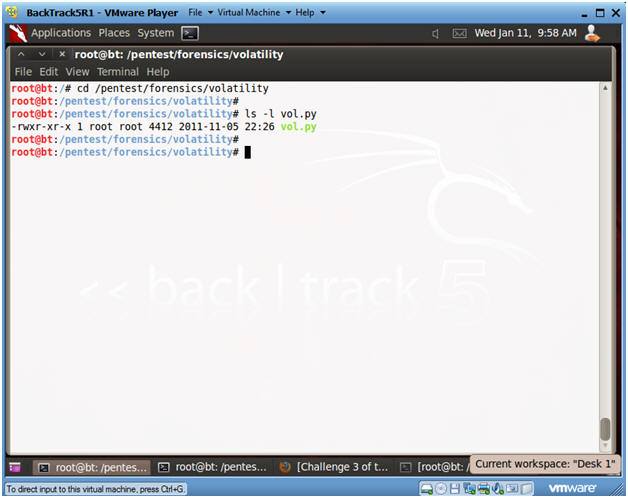
- cd /pentest/forensics/volatility
- ls -l vol.py
- Instructions
- Obtain the image profile
- Instructions:
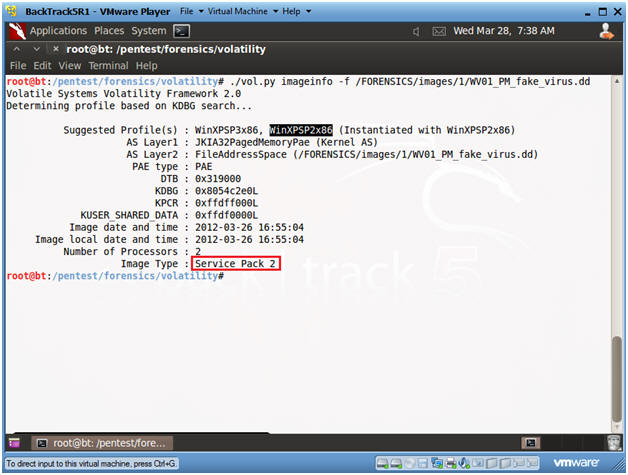
- ./vol.py imageinfo -f /FORENSICS/images/1/WV01_PM_fake_virus.dd
- Notes(FYI):
- The Volatility Framework tries to guess and tell you what image profile to use.
- We know that our Server is Windows XP running SP2.
- Volatility suggest that we either use the profile WinXPSP3x86 or WinXPSP2x86.
- We will use the WinXPSP2x86 profile.
- Instructions:
- View Open Connections with Volatility
- Instructions
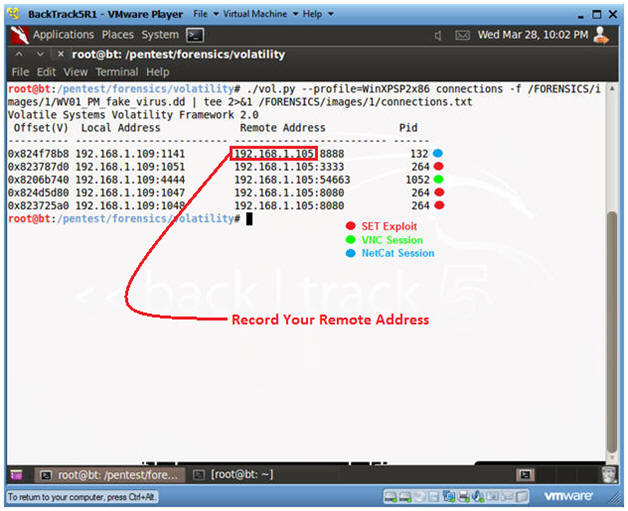
- ./vol.py --profile=WinXPSP2x86
connections -f
/FORENSICS/images/1/WV01_PM_fake_virus.dd | tee 2>&1
/FORENSICS/images/1/connections.txt
- This command both displays connection output on the screen and write the output to a file called connections.
- ./vol.py --profile=WinXPSP2x86
connections
- Use the WinXPSP2x86 profile and display connections.
- -f, this flag is used to specify the image file.
- tee, means to display on screen and send to an output file.
- 2>&1, means to place standard error(2) into standard output(1).
- Record Your Remote Address!!! (See Picture)
- Record the Pid's of your SET(264), VNC(1052) and NetCat(132) Process.
- Notes(FYI):
- Port 8888 was used by NetCat when we dumped both Physical Memory and the Hard Disk to the BackTrack Server.
- Port 3333 and 8080 were created by the SET exploit.
- Port 54663 was used by the VNC session.
- View Open and Dead Connections with Volatility
- Instructions:
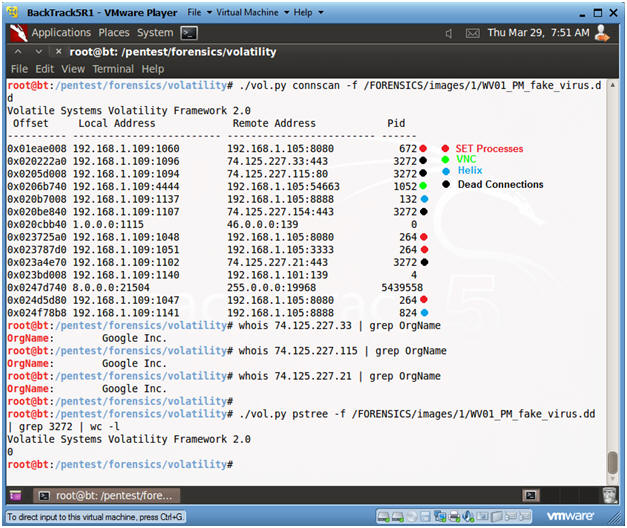
- ./vol.py connscan -f /FORENSICS/images/1/WV01_PM_fake_virus.dd
- Notes(FYI):
- "connscan" shows both open and closed connections.
- The same SET, VNC and Helix process IDs.
- In addition, see the dead connections that are still listed from past Google Web Browsing.
- Instructions:
- View Processes with Volatility
- Instructions:
- ./vol.py --profile=WinXPSP2x86
pslist -f /FORENSICS/images/1/WV01_PM_fake_virus.dd | egrep
'(Off|^---|264|132|1052|3084)'
- Replace 264 with your SET Process ID
- Replace 132 with your Netcat Process ID.
- Replace 1052 with your VNC Process ID.
- Replace 3084 with your Helix Process ID.
- ./vol.py --profile=WinXPSP2x86
pslist -f /FORENSICS/images/1/WV01_PM_fake_virus.dd >
/FORENSICS/images/1/pslist.txt
- Display the results to an output file called pslist.txt
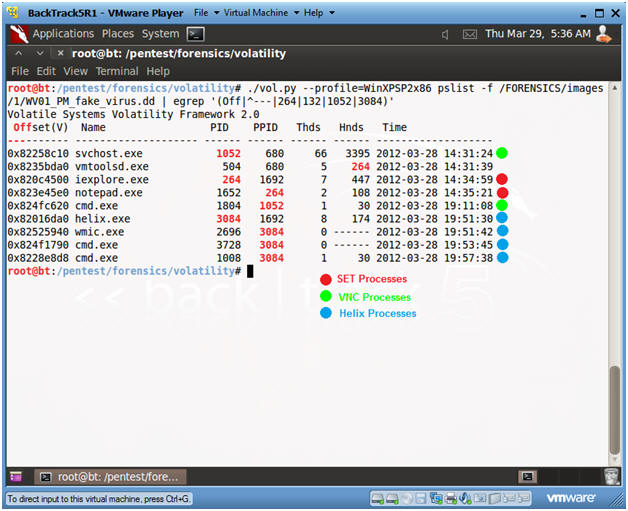
- ./vol.py --profile=WinXPSP2x86
pslist -f /FORENSICS/images/1/WV01_PM_fake_virus.dd | egrep
'(Off|^---|264|132|1052|3084)'
- Notes(FYI):
- SET Processes are associated with the PID of 264.
- VNC Processes are associated with the PID of 1052
- Helix Processes are associated with the PID of 3084
- Instructions:
- View Open Connections with Volatility
- Instructions:
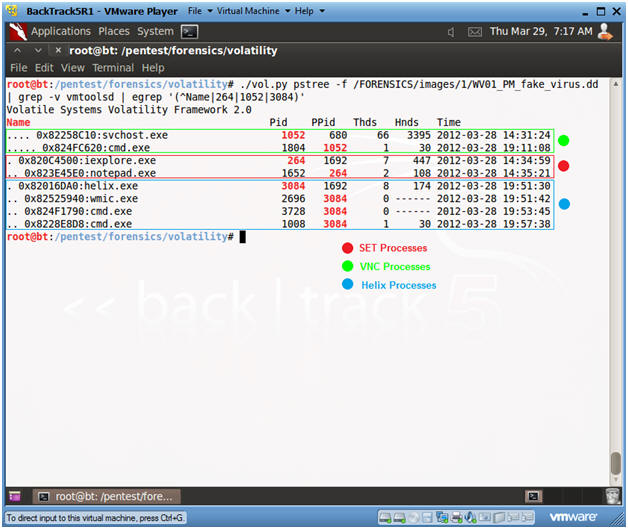
- ./vol.py pstree -f
/FORENSICS/images/1/WV01_PM_fake_virus.dd | grep -v vmtoolsd | egrep
'(^Name|264|1052|3084)' | tee 2>&1 /FORENSICS/images/1/pstree.txt
- PID 264 - SET Processes
- PID 1052 - VNC Processes
- PID 3084 - Helix Processes
- tee 2>&1, display result to output file "/FORENSICS/images/1/pstree.txt".
- ./vol.py pstree -f
/FORENSICS/images/1/WV01_PM_fake_virus.dd | grep -v vmtoolsd | egrep
'(^Name|264|1052|3084)' | tee 2>&1 /FORENSICS/images/1/pstree.txt
- Instructions:
- Comparing Volatility to netstat and pslist on
the Victim Machine
- Note(FYI):
- The below analysis will be conducted on WindowsVulnerable01.
- Replace 192.168.1.105 with the Remote Address obtained in (Section 3, Step 4).
- In addition to gathering a live image, it is always a good idea to run system commands on the victim's machine to have a second source of validation.
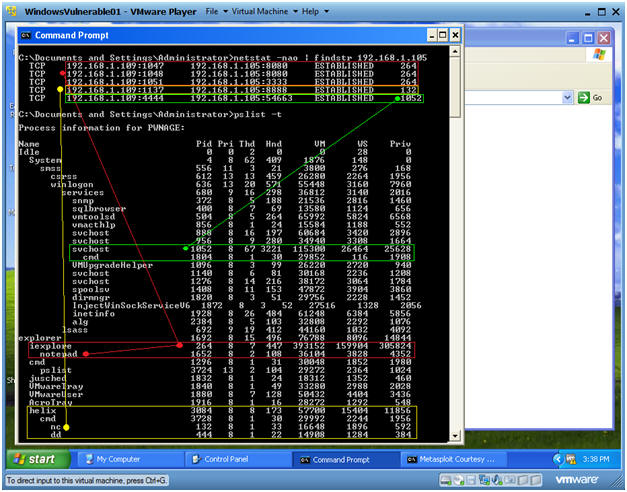
- netstat -nao | findstr
192.168.1.105
- In my case, 192.168.1.105 was the IP Address of the BackTrack Attacker.
- Process 264 aligns with the previous volatility results that was associated with the SET processes.
- Process 1052 aligns with the previous volatility results that was associated with the VNC processes.
- Process 3084 aligns with the previous volatility results that was associated with the Helix processes.
- pslist -t
- Digging further notice PID 264 aligns with the iexplore process, and its' child PID is the mysterious notepad process.
- Note(FYI):
- Let's Analyze what the Attacker's Network
Connections
- Note(FYI):
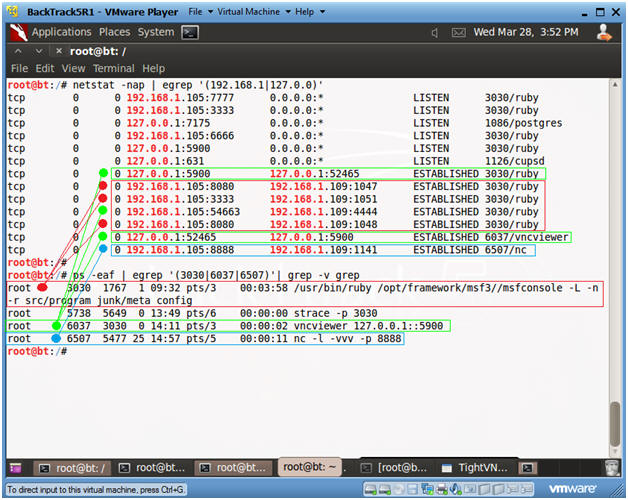
- netstat -nap | egrep
'(192.168.1|127.0.0)'
- Port 5900 and 54663 are used by the VNC Processes
- Port 8080 and 3333 are used by the SET Processes
- Port 8888 is the by the Helix Process.
- ps -eaf | egrep '(3030|6037|6507)' |
grep -v grep
- PID 3030 is the Metasploit Framework that controls SET.
- PID 6037 is the vncviewer that controls VNC.
- PID 6507 is the NetCat listener process waiting for the image.
- netstat -nap | egrep
'(192.168.1|127.0.0)'
- Note(FYI):
- Using Volatilities' hivelist and hashdump
- Instructions:
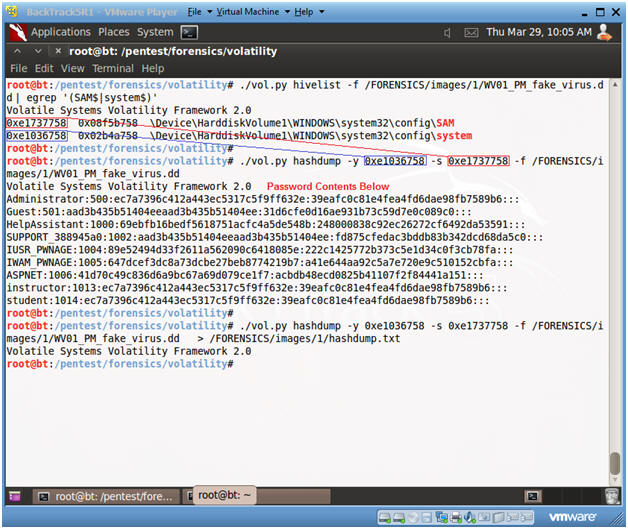
- ./vol.py hivelist -f
/FORENSICS/images/1/WV01_PM_fake_virus.dd | egrep '(SAM$|system$)'
- Record the memory address in the first column for SAM.
- Record the memory address in the first column for system.
- ./vol.py hashdump -y
0xe1036758
-s 0xe1737758 -f /FORENSICS/images/1/WV01_PM_fake_virus.dd
- After the -y, specific the system memory address you recorded.
- After the -s, specific the SAM memory address you recorded.
- ./vol.py hashdump -y
0xe1036758
-s 0xe1737758 -f /FORENSICS/images/1/WV01_PM_fake_virus.dd >
/FORENSICS/images/1/hashdump.txt
- Place output in a file called hashdump.txt.
- ./vol.py hivelist -f
/FORENSICS/images/1/WV01_PM_fake_virus.dd | egrep '(SAM$|system$)'
- Instructions:
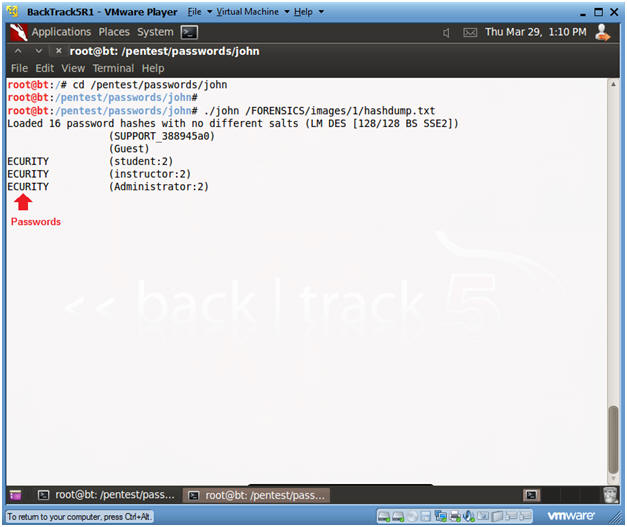
- Using John the Ripper to crack the hashdump
- Instructions:
- cd /pentest/passwords/john
- ./john /FORENSICS/images/1/hashdump.txt
- Note(FYI):
- This could takes hours. Continue to the Proof of Lab section.
- Instructions:
| Section 4. Proof of Lab |
- Proof of Lab
- Instructions
- Open a new terminal (See Section 2, Step 1)
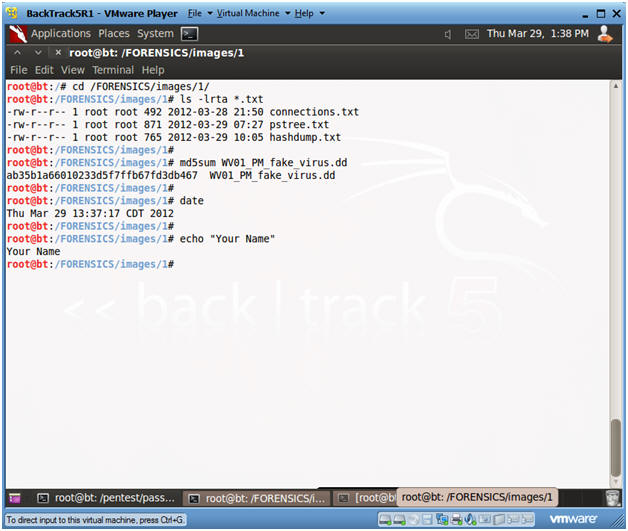
- cd /FORENSICS/images/1/
- ls -lrta *.txt
- md5sum WV01_PM_fake_virus.dd
- date
- echo "Your Name"
- Replace the string "Your Name" with your actual name.
- e.g., echo "John Gray"
- Proof Of Lab Instructions:
- Do a PrtScn of the below commands
- Paste into a word document
- Upload to Moodle