Tenable Network
Security provides enterprise-class solutions
for continuous monitoring and visibility of
vulnerabilities, configurations, user
activity and system events that impact
security and compliance.
(NESSUS: Lesson 0)
{ Register and Download Nessus Security Scanner }
| Section 0: Background Information |
- What is NESSUS?
- Nessus features high-speed discovery, configuration auditing, asset profiling, sensitive data discovery and vulnerability analysis of your security posture.
-
- Reference Link:
-
Lab Notes
- In this lab we will do the following:
- Download Nessus
- Retrieve Registration Code
- Install Nessus
- In this lab we will do the following:
- Legal Disclaimer
- As a condition of your use of this Web site, you warrant to computersecuritystudent.com that you will not use this Web site for any purpose that is unlawful or that is prohibited by these terms, conditions, and notices.
- In accordance with UCC § 2-316, this product is provided with "no warranties, either express or implied." The information contained is provided "as-is", with "no guarantee of merchantability."
- In addition, this is a teaching website that does not condone malicious behavior of any kind.
- Your are on notice, that continuing and/or using this lab outside your "own" test environment is considered malicious and is against the law.
- © 2013 No content replication of any kind is allowed without express written permission.
| Section 1: Login to PENTEST-WXP |
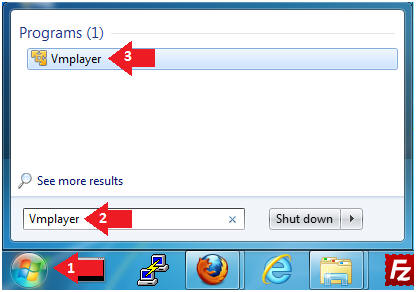
- Start Up VMWare Player
- Instructions:
- Click the Start Button
- Type Vmplayer in the search box
- Click on Vmplayer
- Instructions:
- Edit Virtual Machine Settings
- Instructions:
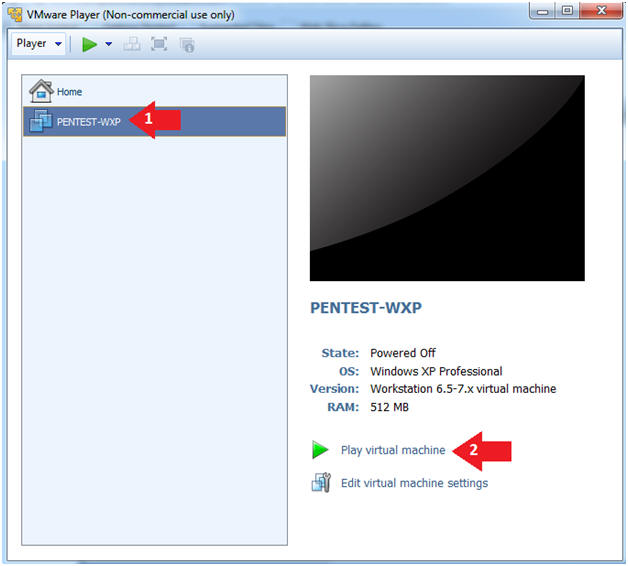
- Click on PENTEST-WXP
- Edit Virtual Machine Settings
- Note:
- This VM is running Windows XP.
- Instructions:
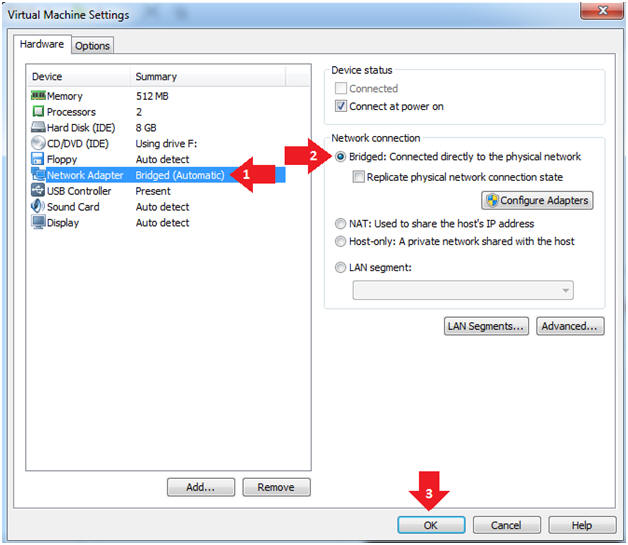
- Set Network Adapter
- Instructions:
- Click on Network Adapter
- Click on the radio button "Bridged: Connected directly to the physical network".
- Instructions:
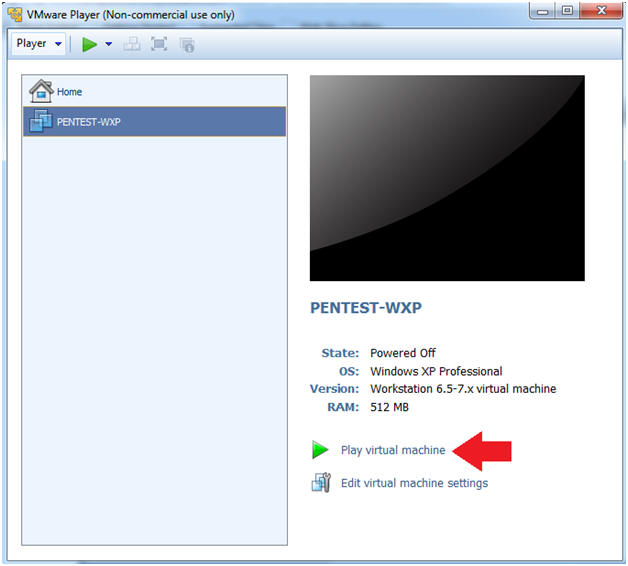
- Start Up PENTEST-WXP
- Instructions:
- Click Play virtual machine
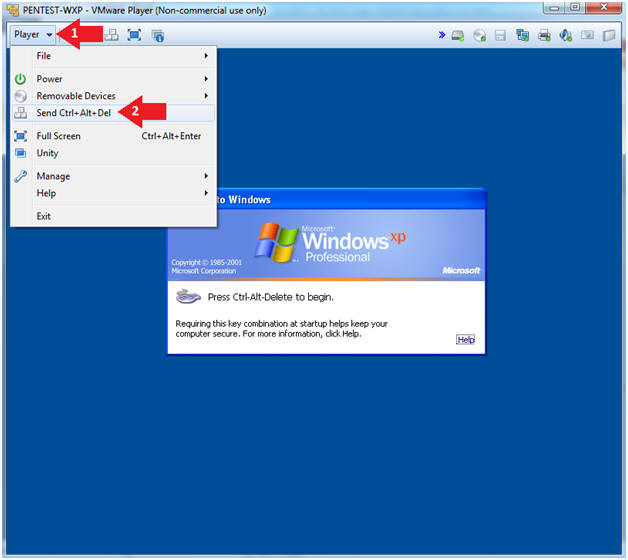
- Instructions:
- Send Ctrl+Alt+Del
- Instructions:
- Click Player
- Click Send Ctrl+Alt+Del
- Instructions:
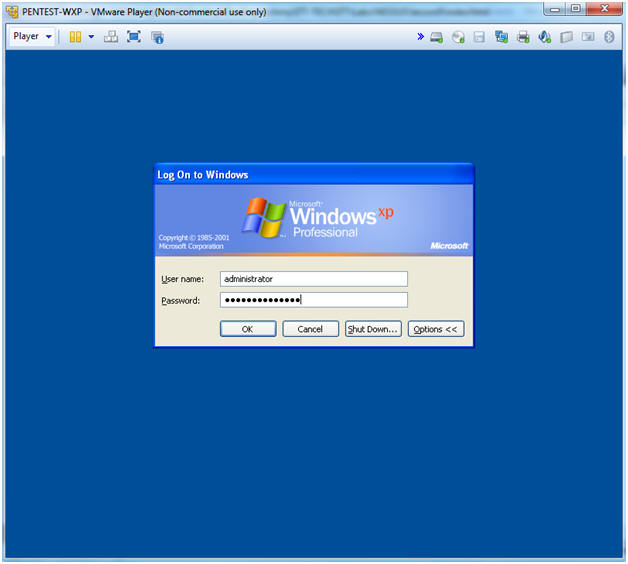
- Logging into PENTEST-WXP
- Instructions:
- Username: administrator
- Password: Supply your password
- Instructions:
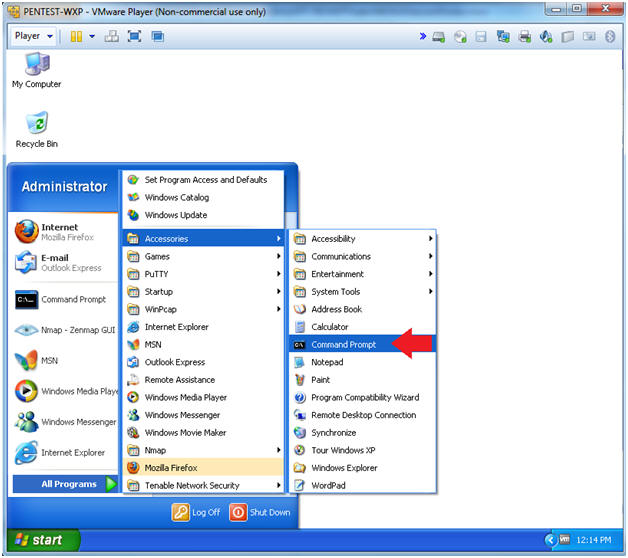
- Open a Command Prompt
- Instructions:
- Start --> All Programs --> Accessories --> Command Prompt
- Instructions:
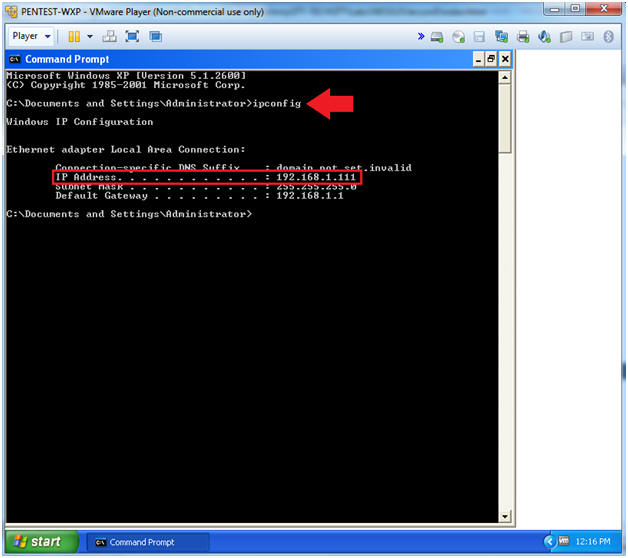
- Determine IP Address
- Instructions:
- ipconfig
- Note(FYI):
- My IP Address is 192.168.1.111. Your IP Address will probably be different.
- Instructions:
| Section 2: Download Firefox |
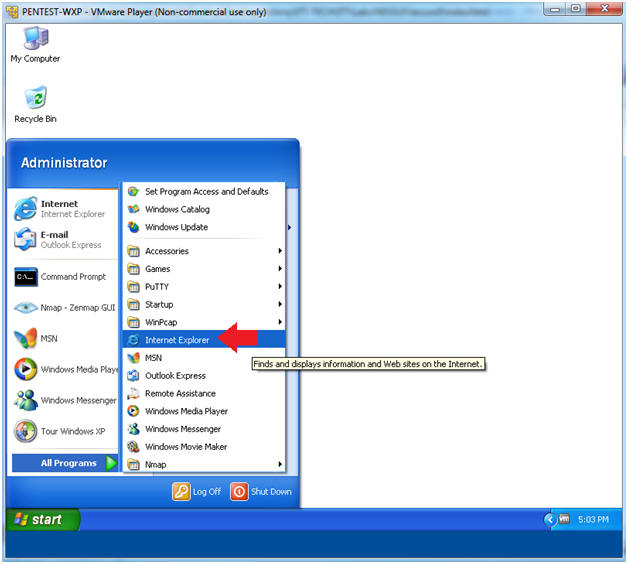
- Start Internet Explorer
- Note(FYI):
- If you already have Firefox installed, then skip Section 2 and continue to Section 3.
- Instructions:
- Start --> All Programs --> Internet Explorer
- Note(FYI):
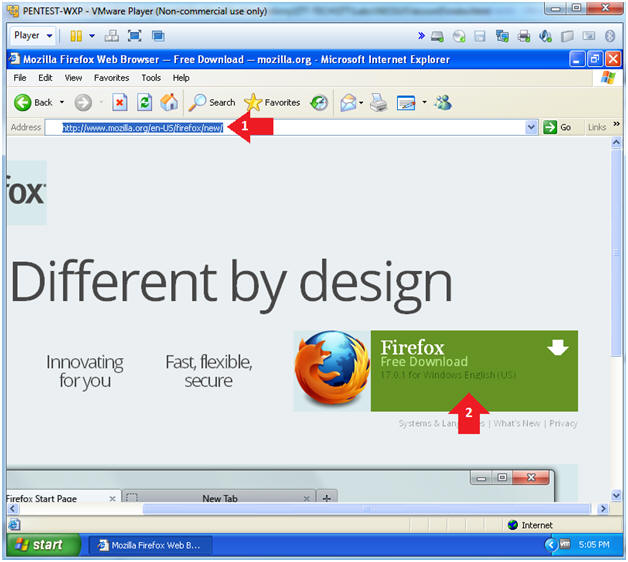
- Navigate to Firefox
- Instructions:
- Place http://www.mozilla.org/en-US/firefox/new/ into the Address Bar
- Click on Firefox Free Download
- Instructions:
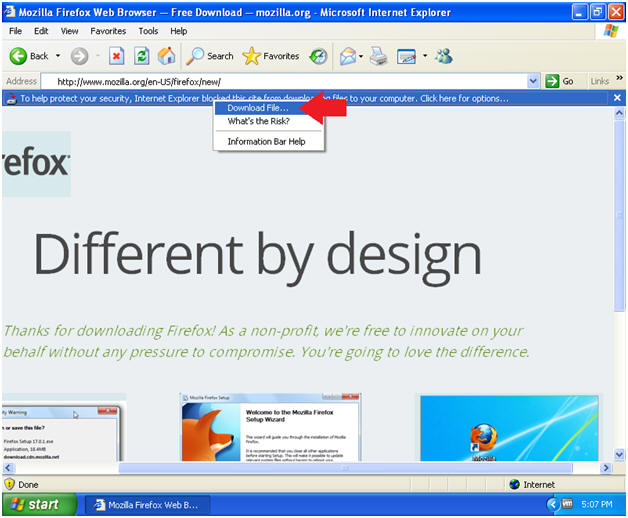
- Possible Blocked Download Message
- Instructions:
- Click on the banner "To help protect your security".
- Click on Download File...
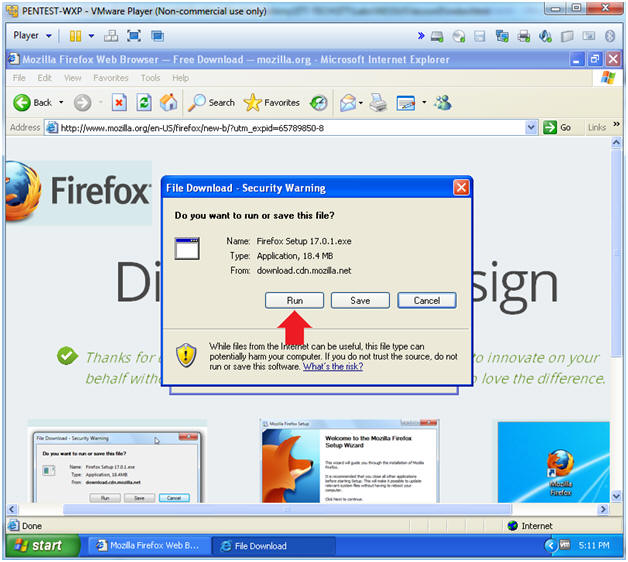
- Instructions:
- Start Installation
- Instructions:
- Click Run
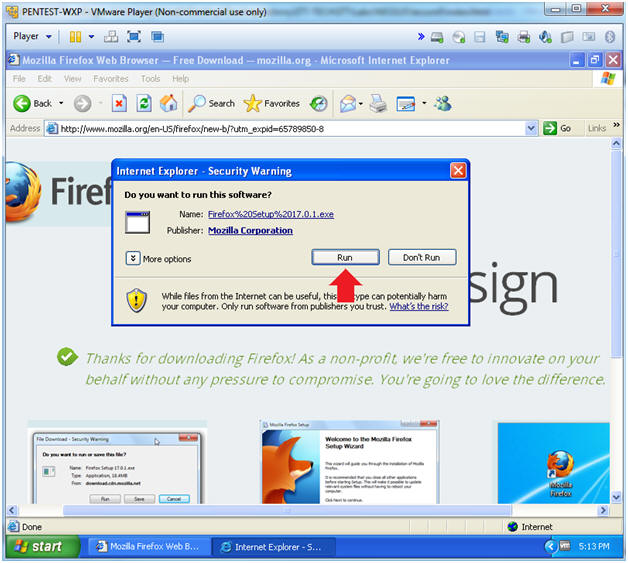
- Instructions:
- Run this software
- Instructions:
- Click Run
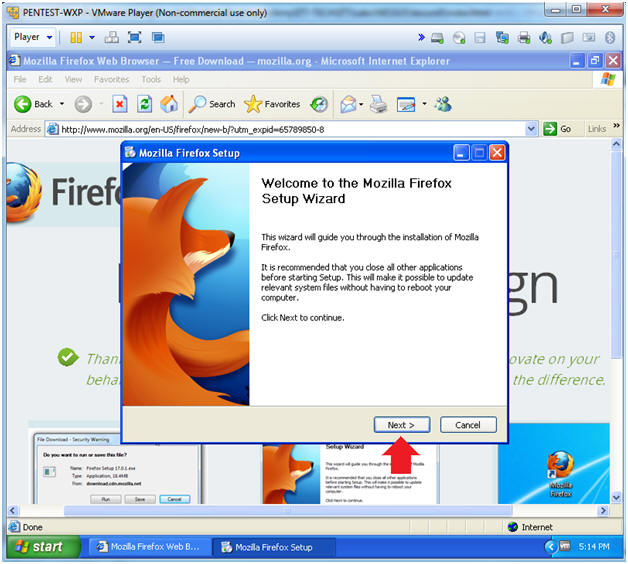
- Instructions:
- Mozilla Firefox Setup
- Instructions:
- Click Next
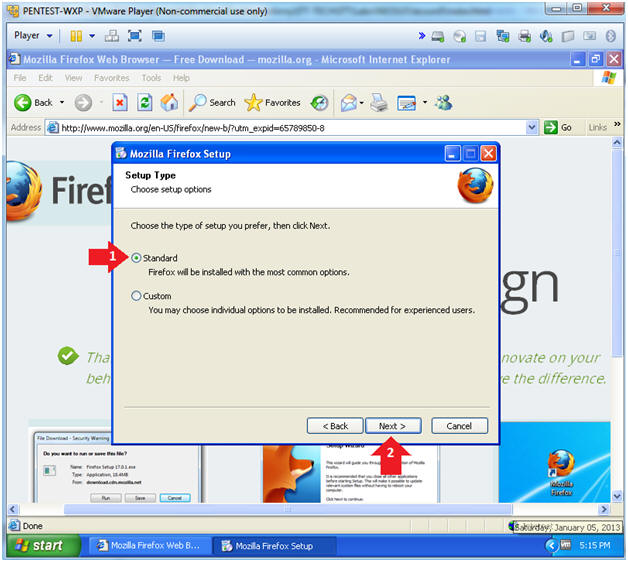
- Instructions:
- Mozilla Firefox Setup Type
- Instructions:
- Select Standard
- Click the Next Button
- Instructions:
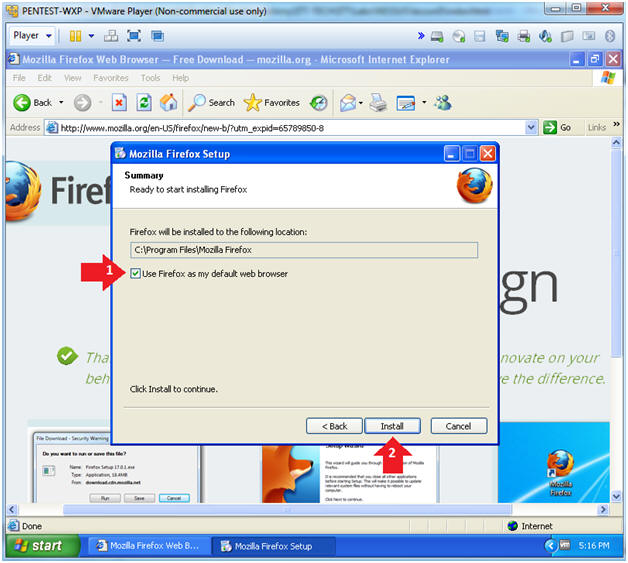
- Mozilla Firefox Setup Summary
- Instructions:
- Select Firefox as default web browser
- Click the Install Button
- Instructions:
- Launch Firefox now
- Instructions:
- Check the "Launch Firefox now" checkbox
- Click the Finish Button

- Instructions:
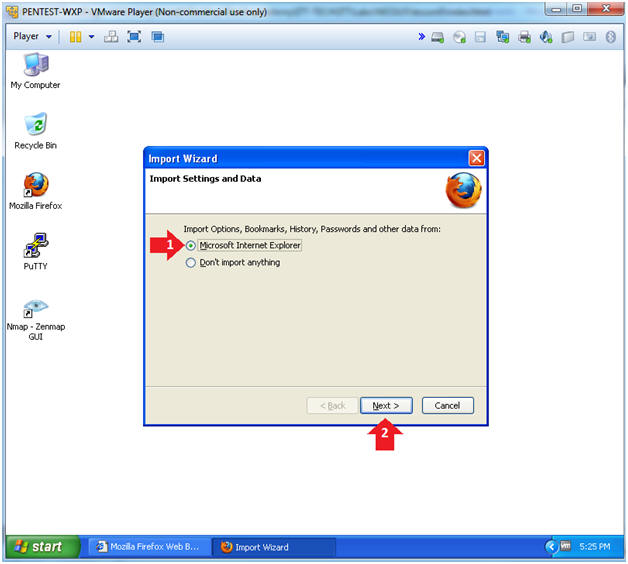
- Import Settings and Data
- Instructions:
- Select the "Microsoft Internet Explorer" radio button
- Click the Next Button

- Instructions:
- Home Page Selection
- Instructions:
- Select the "Import your home page from Internet Explorer" radio button
- Click the Next Button
- Instructions:
| Section 3: Obtain Nessus Activation Code |
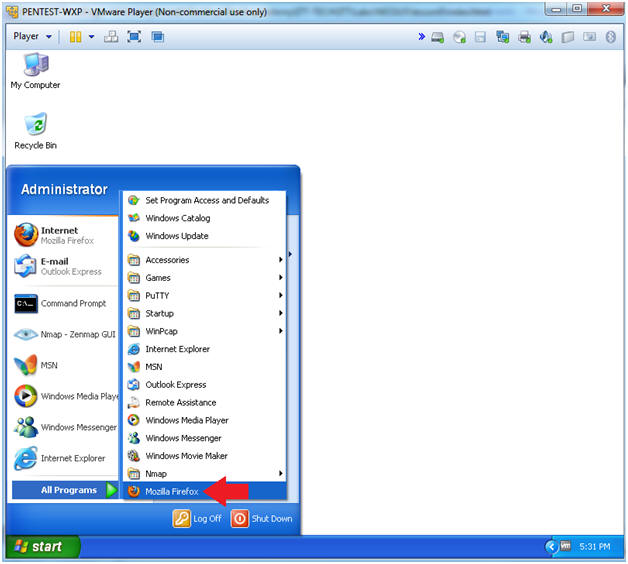
- Start Up Firefox
- Instructions:
- Start --> All Programs --> Firefox
- Instructions:
- Open a Command Prompt
- Instructions:
- Place the following URL into Firefox
- http://www.tenable.com/products/nessus/nessus-homefeed
- Supply First Name
- Supply Last Name
- Supply Email
- Click on the "I Agree" Checkbox
- Click the Register Button
- Place the following URL into Firefox

- Instructions:
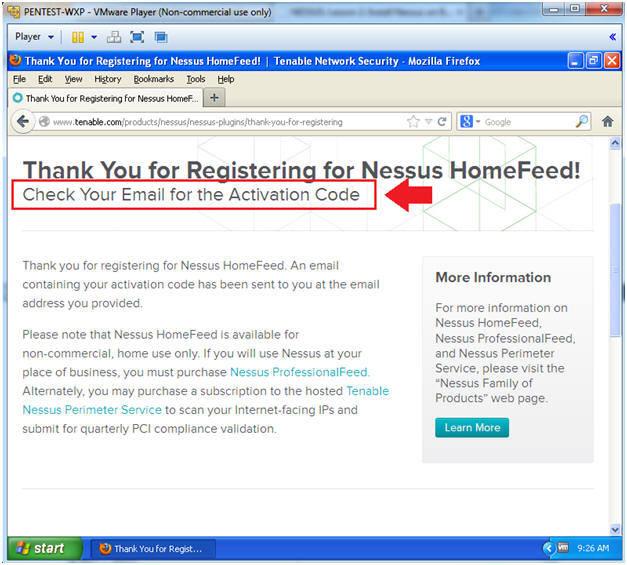
- Thank Your for Registering!
- Note:
- Check Your Email Inbox for your registration code.
- You will need the registration code to complete the Nessus Scanner Installation.
- Note:
| Section 4: Download Nessus |
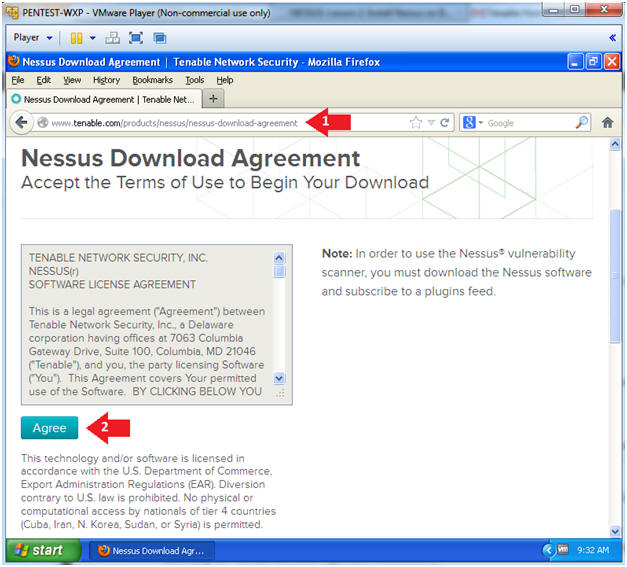
- Navigate to Download Agreement
- Instructions:
- Place the below URL in the address bar.
- http://www.tenable.com/products/nessus/nessus-download-agreement
- Click on the Agree Button
- Place the below URL in the address bar.
- Instructions:
- Select Download File
- Instructions:
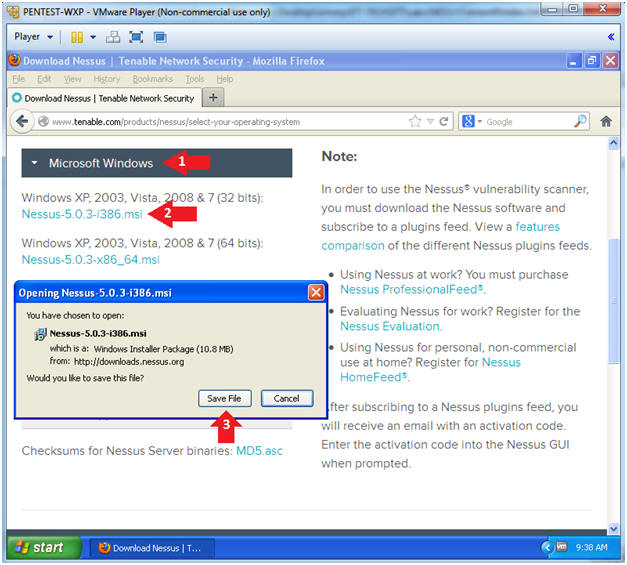
- Click on the Microsoft Windows Twistie
- Click on either the 32 bit or 64 bit version of the Nessus Scanner
- Click the Save File Button
- Instructions:
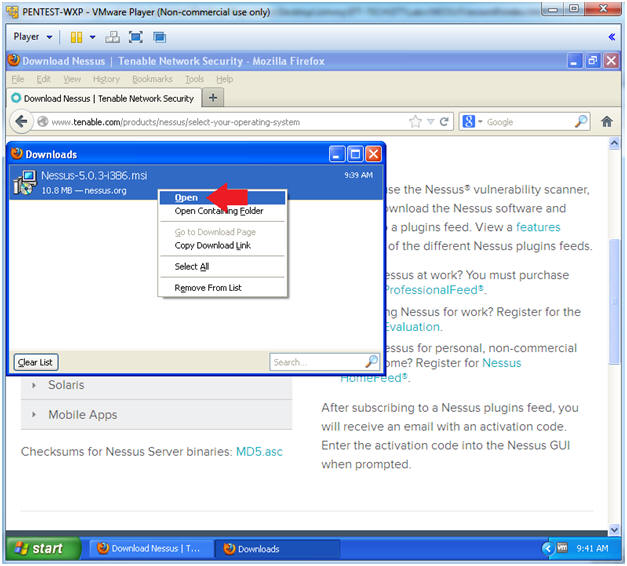
- Open the Nessus msi file
- Instructions:
- Right Click on the Nessus msi file
- Click on Open
- Instructions:
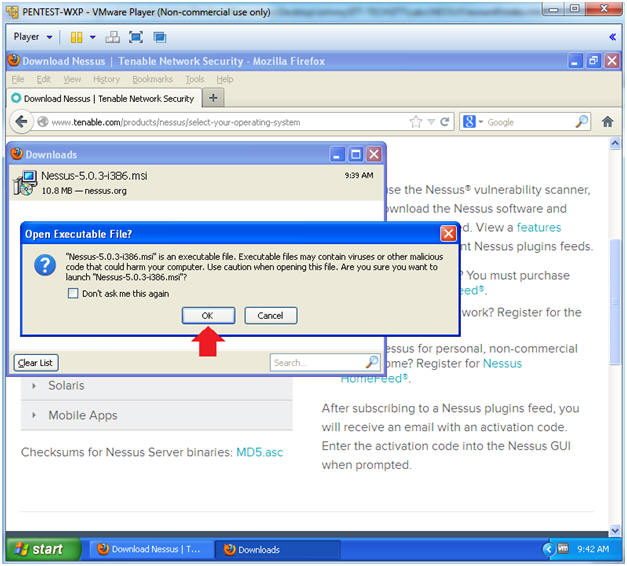
- Open Executable File?
- Instructions:
- Click the OK button.
- Instructions:
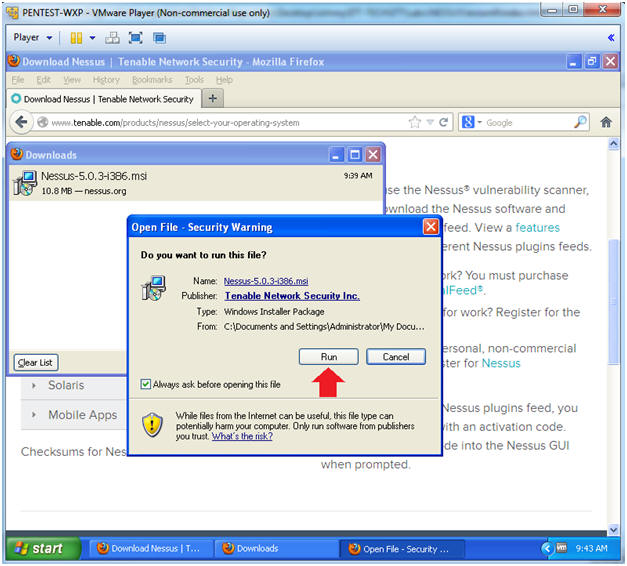
- Open Fire - Security Warning
- Instructions:
- Click the Run Button
- Instructions:
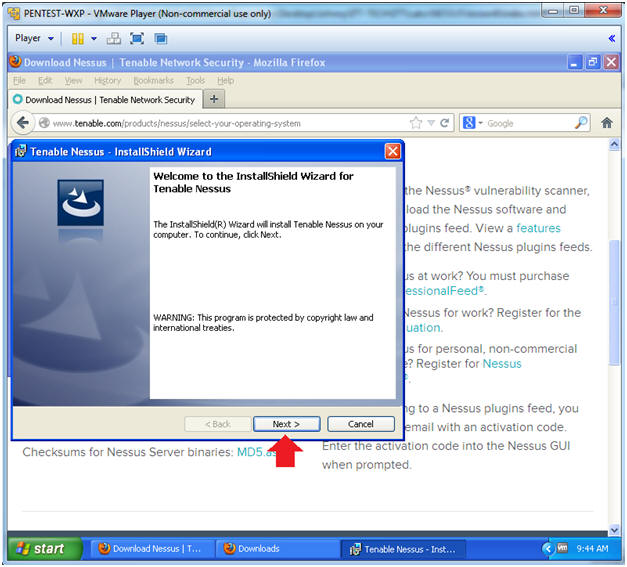
- Tenable Nessus - InstallShield Wizard
- Instructions:
- Click the Next Button
- Instructions:
- Tenable Nessus Software License Agreement
- Instructions:
- Click the radio button "I accept the terms in the license agreement"
- Click the Next Button.
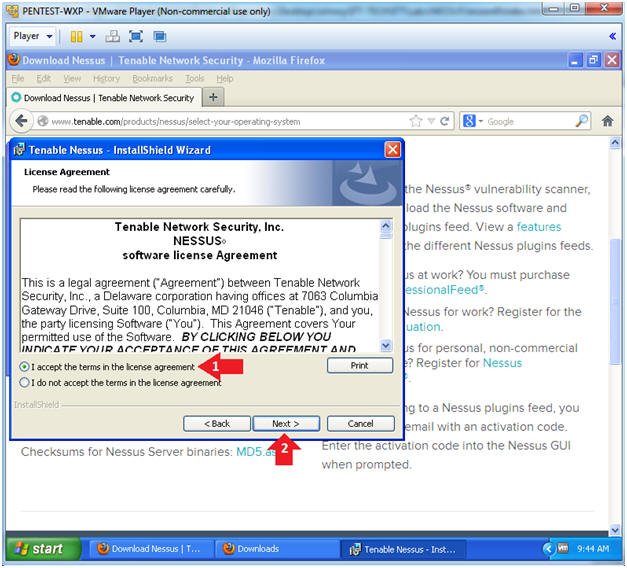
- Instructions:
- Install Tenable Nessus to:
- Instructions:
- Click the Next Button
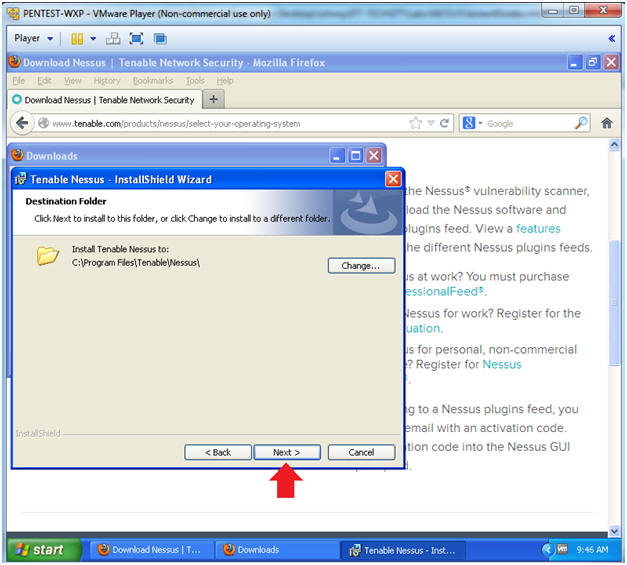
- Instructions:
- Please select a setup type
- Instructions:
- Click the radio button "Complete"
- Click the Next Button
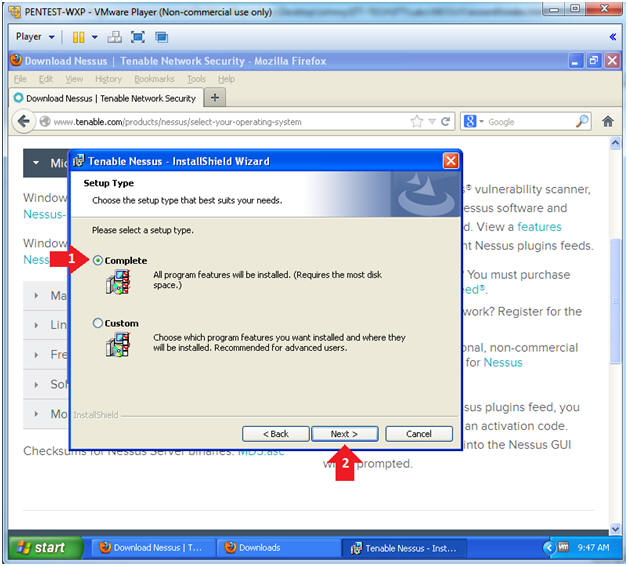
- Instructions:
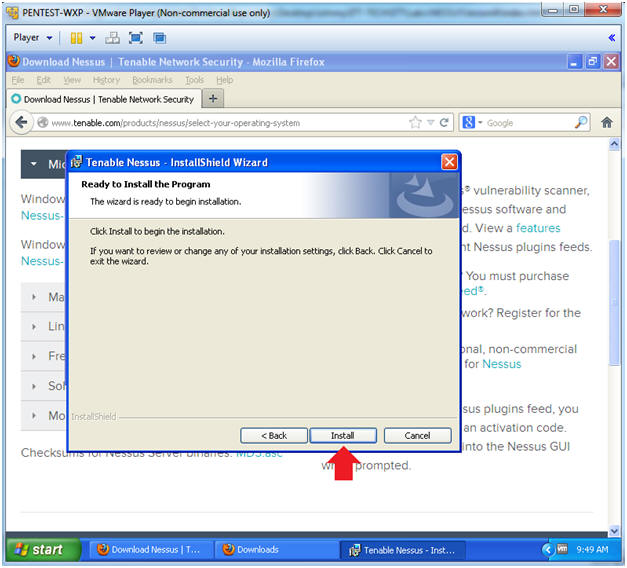
- Ready to Install the Program
- Instructions:
- Click the Install Button
- Instructions:
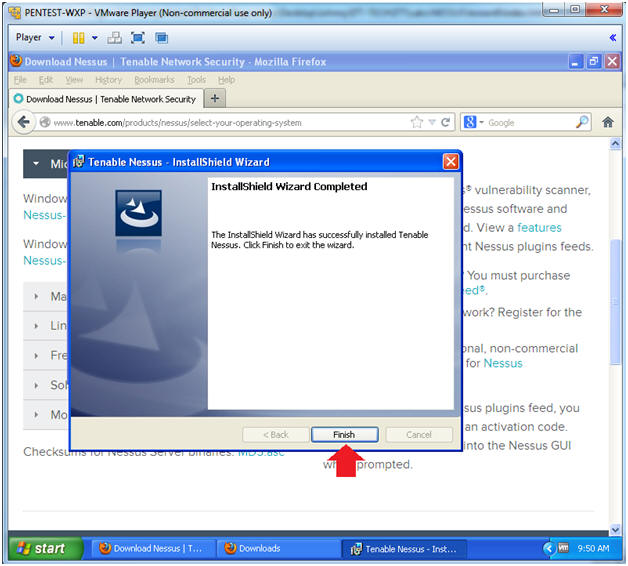
- InstallShield Wizard Completed
- Instructions:
- Click the Finish Button
- Instructions:
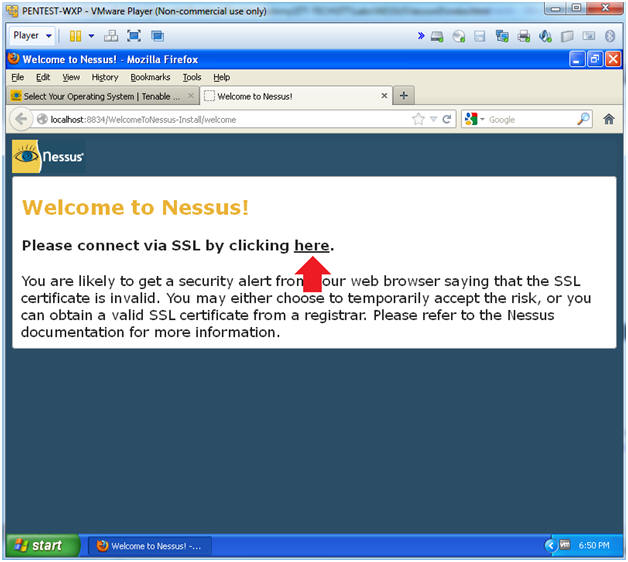
- Welcome to Nessus!
- Instructions:
- Click the here link (See Below)
- Instructions:
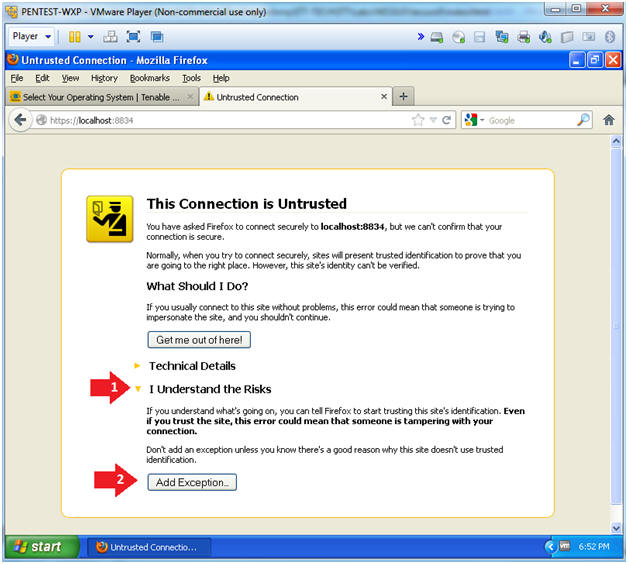
- Untrusted Connection Message
- Instructions:
- Click on "I Understand the Risks"
- Click on the Add Exception Button
- Instructions:
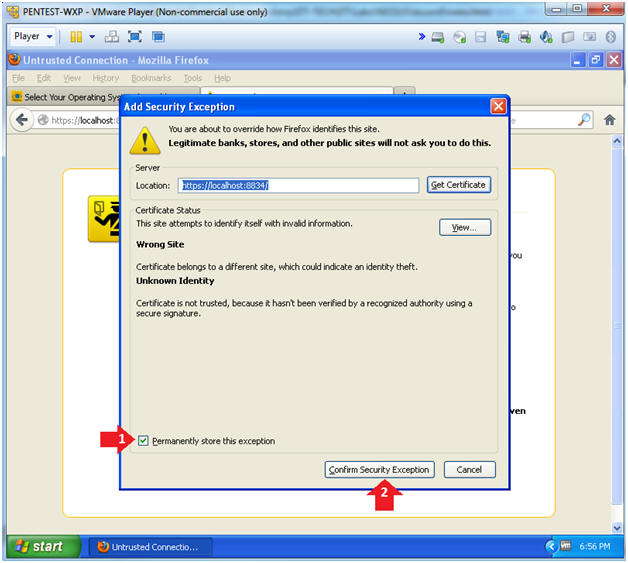
- Add Security Exception
- Instructions:
- Check the "Permanently store this exception" checkbox.
- Click on the Confirm Security Exception Button
- Instructions:
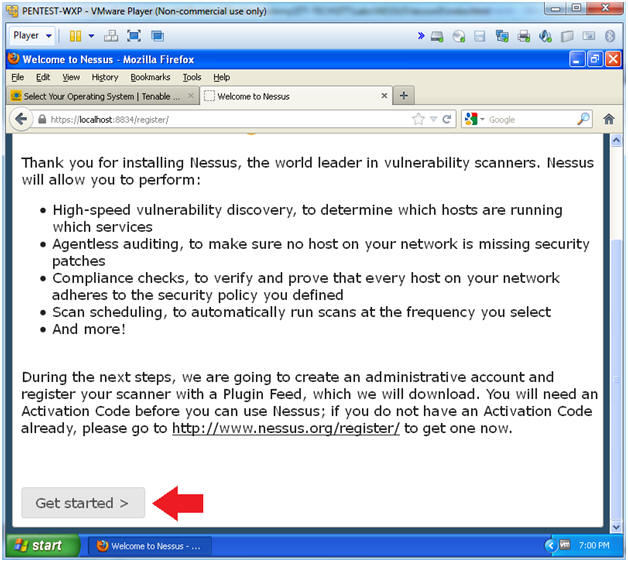
- Getting Started
- Instructions:
- Click on the Get Started Button
- Instructions:
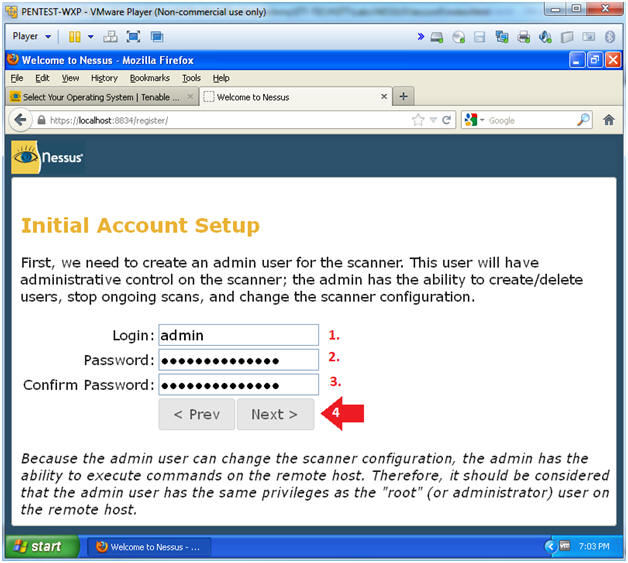
- Initial Account Setup
- Instructions:
- Login: admin
- Password: Input a Password.
- Confirm Password: Input the same Password
- Click the Next Button
- Instructions:
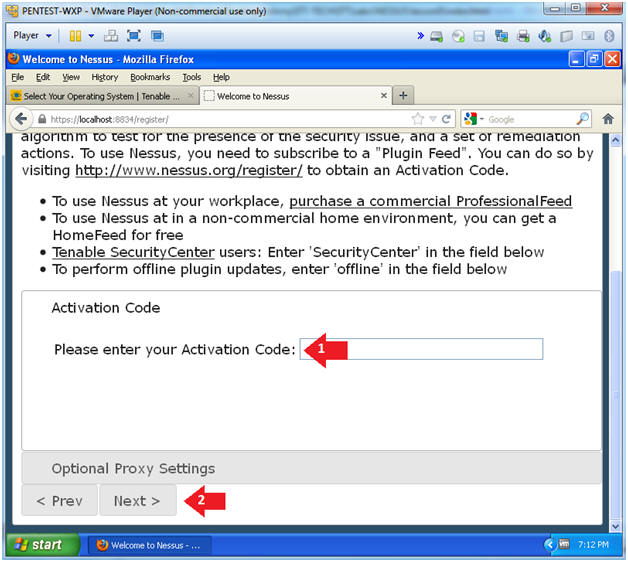
- Registration
- Instructions:
- Provide the Activation Code
- Click the Next Button
- Instructions:
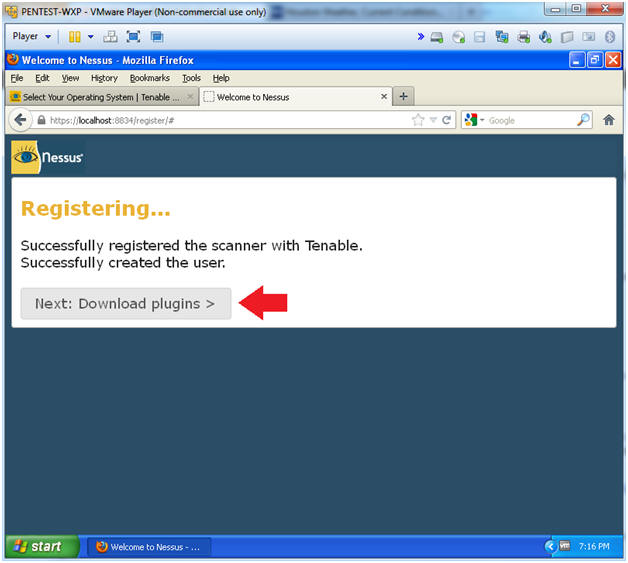
- Download Plugsin
- Instructions:
- Click on the Download Plugins Button
- Instructions:
- The pluggin download takes between 10 and 15 minutes.
- Initialization takes between 15 and 25 minutes.
- Instructions:
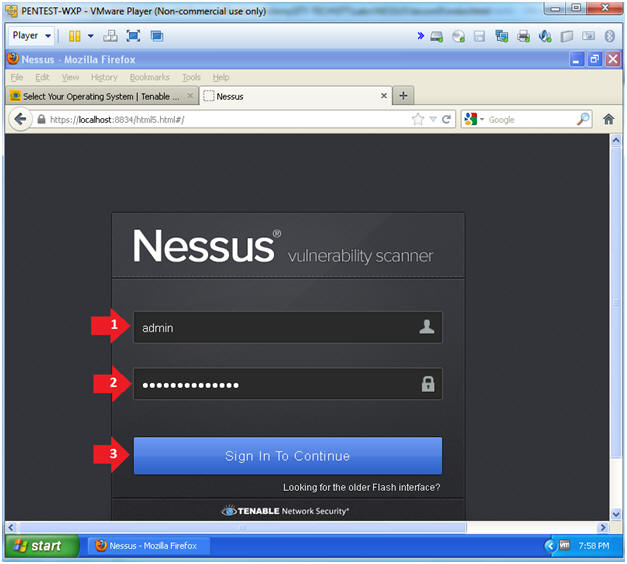
- Test Login Credentials
- Instructions:
- Username: admin
- Password: Supply your password
- Click the Sign In To Continue Button
- Instructions:
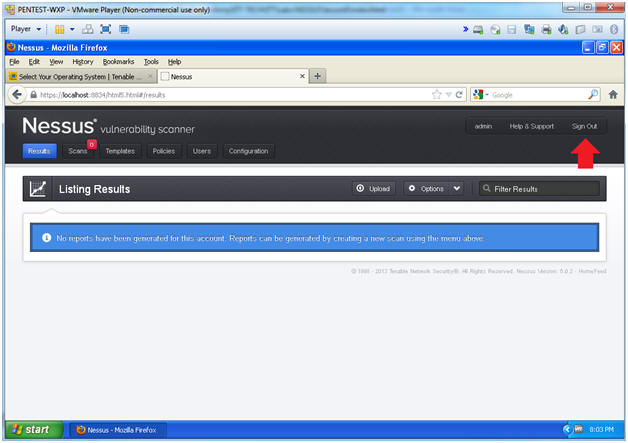
- Sign Out
- Instructions:
- Click the Sign Out Button
- Instructions:
| Section 5: Create Nessus Desktop Icon |
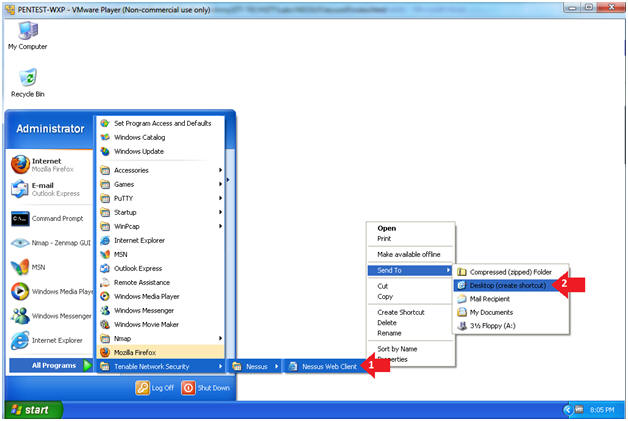
- Create Nessus Decktop Icon
- Instructions:
- All Programs --> Tenable Network Security --> Nessus --> Nessus Web Click (Right Click)
- Send To --> Desktop (create shortcut)
- Instructions:
- Nessus Web Client
- Note(FYI):
- On your desktop you should see an icon called "Nessus Web Client" (See Below)
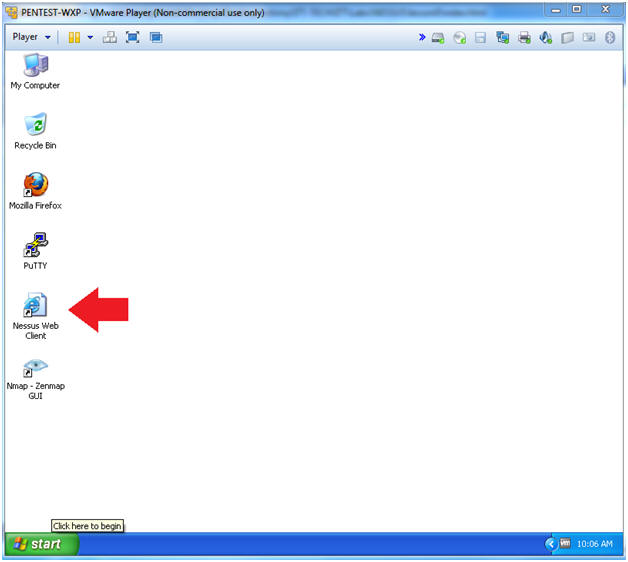
- Note(FYI):
| Section 6: Proof of Lab |
- Start the Nessus Web Client
- Instructions:
- Click on the Nessus Web Client located on the desktop
- Instructions:
- Open a Command Prompt
- Instructions:
- Start --> All Programs --> Accessories --> Command Prompt
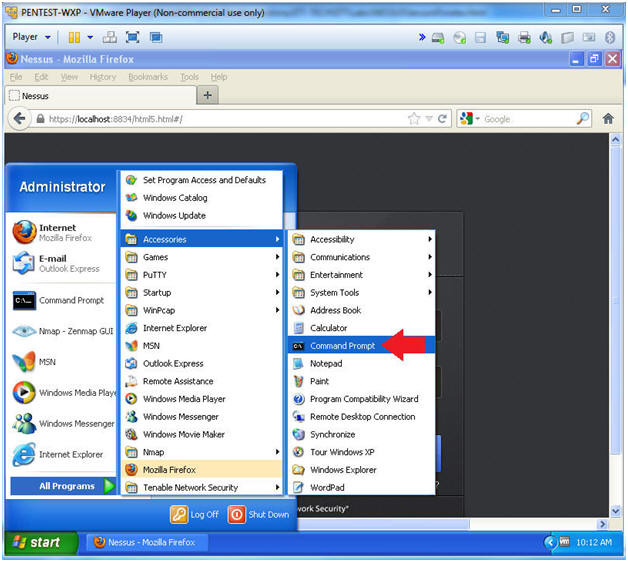
- Instructions:
-
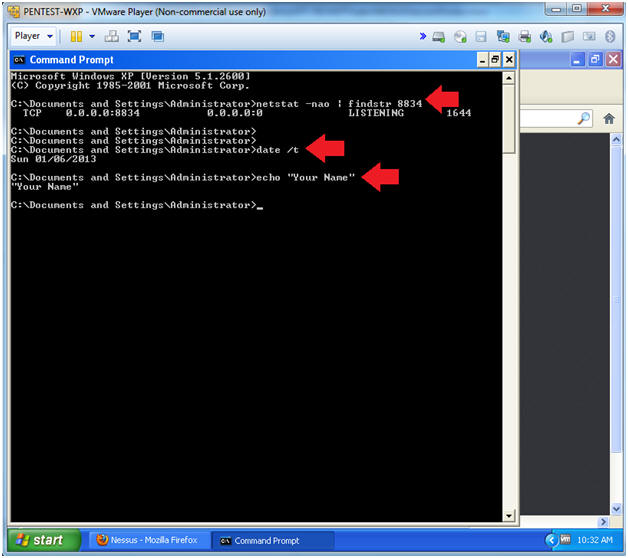
Proof of Lab Instructions
- Instructions:
- netstat -nao | findstr 8834
- date /t
- echo "Your Name"
- Replace the string "Your Name" with your actual name.
- e.g., echo "John Gray"
- Do a PrtScn
- Paste into a word document
- Upload to Moodle
- Instructions: