(Sniffing Traffic: Lesson 1)
{ Using TCPDUMP to Capture and Crack Base64 Encryption }
| Section 0. Background Information |
- What is Base64 Encryption/Encoding
- Base64 encoding schemes are commonly used when there is a need to encode binary data that needs be stored and transferred over media that is designed to deal with textual data.
- This is to ensure that the data remains intact without modification during transport.
- Base64 is commonly used in a number of applications including email via MIME, Basic .htaccess authentication, and storing complex data in XML.
- Sniffing Base64 Encryption Traffic
- In this lab, I will show you how to do the
following:
- How to set up an Apache2 password protected directory using htpasswd.
- How to sniff traffic using tcpdump.
- How to decode/decrypt Base64 encoding/encryption.
- In this lab, I will show you how to do the
following:
- References
- Author: @PROFESX0R
- Legal Disclaimer
- As a condition of your use of this Web site, you warrant to computersecuritystudent.com that you will not use this Web site for any purpose that is unlawful or that is prohibited by these terms, conditions, and notices.
- In accordance with UCC § 2-316, this product is provided with "no warranties, either express or implied." The information contained is provided "as-is", with "no guarantee of merchantability."
- In addition, this is a teaching website that does not condone malicious behavior of any kind.
- You are on notice, that continuing and/or using this lab outside your "own" test environment is considered malicious and is against the law.
- © 2012 No content replication of any kind is allowed without express written permission.
| Section 1: Configure BackTrack Virtual Machine Settings |
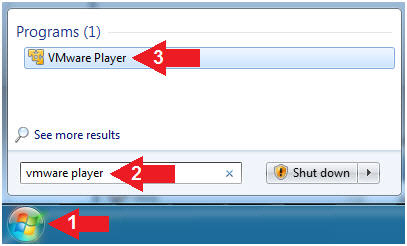
- Start VMware Player
- Instructions
- Click Start Button
- Search for "vmware player"
- Click VMware Player
- Instructions
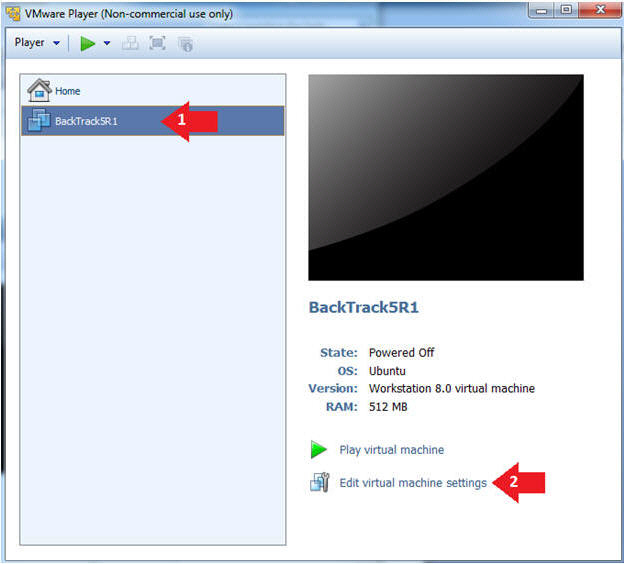
- Edit the BackTrack5R1 VM
- Instructions:
- Select BackTrack5R1 VM
- Click Edit virtual machine settings
- Instructions:
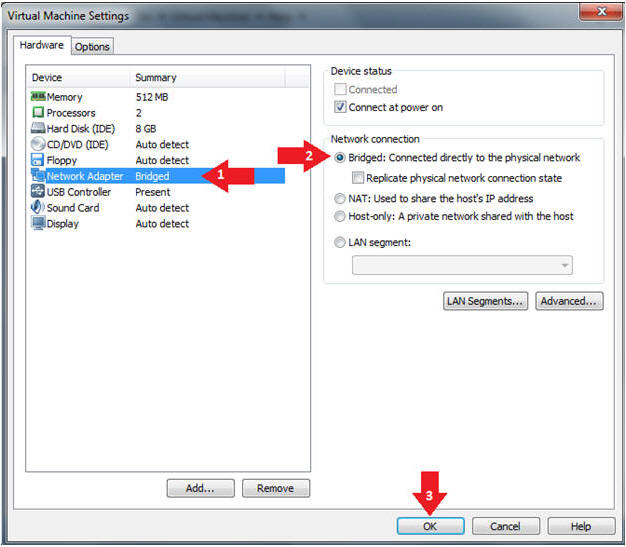
- Edit Network Adapter Settings
- Instructions:
- Click on Network Adapter
- Click on the Bridged Radio button
- Click on the OK Button
- Instructions:
| Section 2: Login to BackTrack |
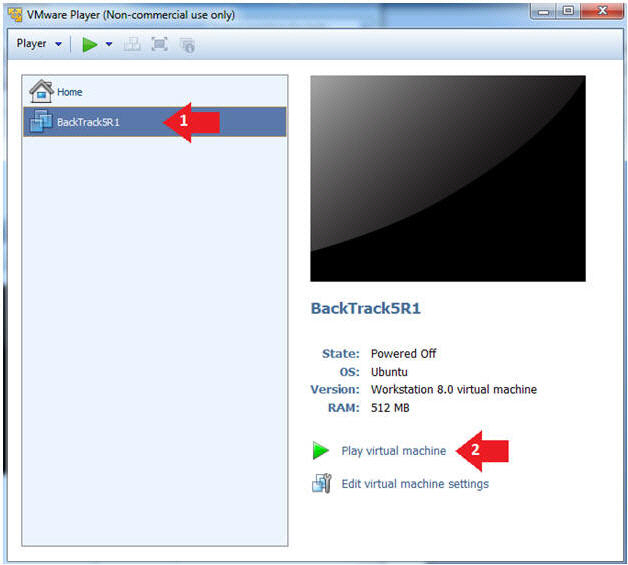
- Play the BackTrack5R1 VM
- Instructions:
- Click on the BackTrack5R1 VM
- Click on Play virtual machine
- Instructions:
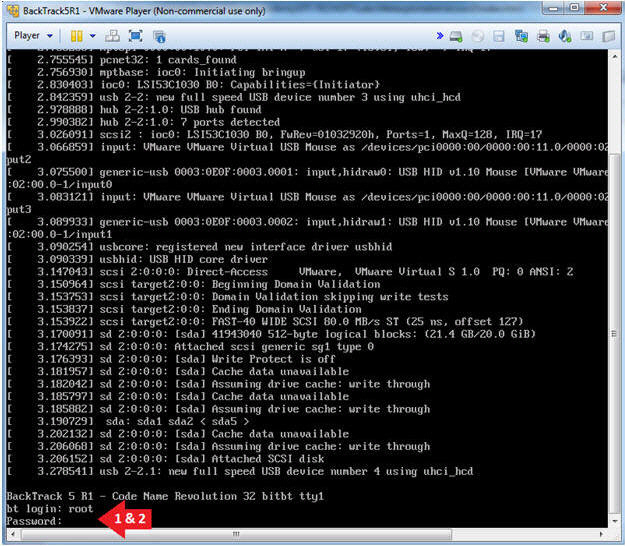
- Login to BackTrack
- Instructions:
- Login: root
- Password: toor or <whatever you changed it to>.
- Instructions:
- Bring up the GNOME
- Instructions:
- Type startx
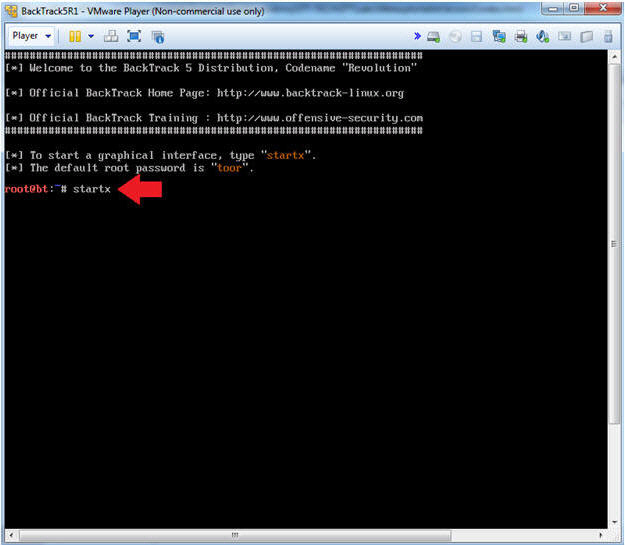
- Instructions:
| Section 3: Configure Password Protected Apache Directory |
- On BackTrack, Start up a terminal window
- Instructions:
- Click on the Terminal Window
- Instructions:
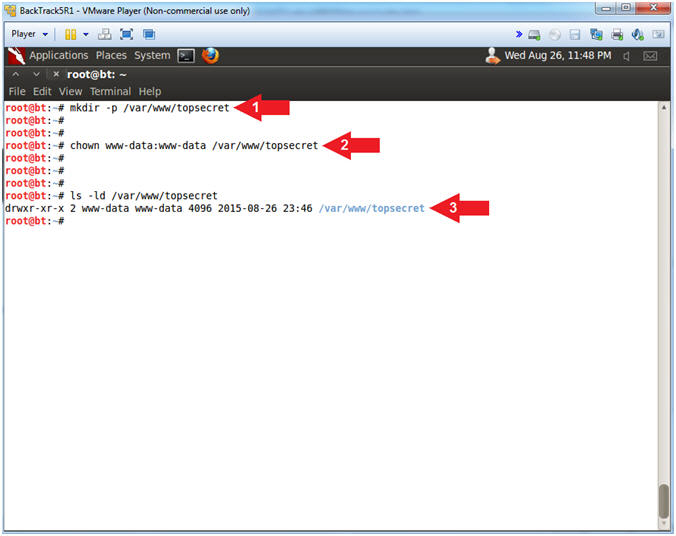
- Create Apache Web Directory
- Instructions:
- mkdir -p /var/www/topsecret
- chown www-data:www-data /var/www/topsecret
- ls -ld /var/www/topsecret
- Instructions:
- Create Web Directory Password
- Instructions:
- cd /var/www/topsecret
- htpasswd -c .htpasswd student
- New Password: Try2H4ckM3!
- Re-type new Password: Try2H4ckM3!
- cat .htpasswd
- Notice the password for "student" is encrypted.
- Instructions:
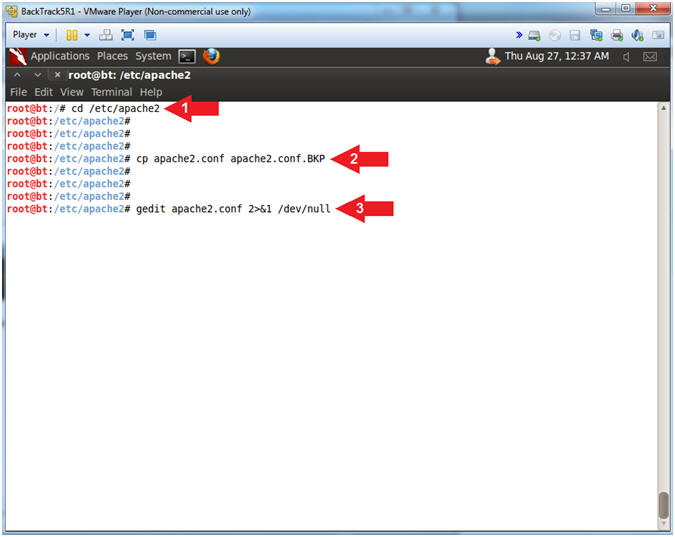
- Backup and edit the apache2.conf file
- Instructions:
- cd /etc/apache2
- cp apache2.conf apache2.conf.BKP
- gedit apache2.conf > /dev/null 2>&1
- Instructions:
- Access gedit Preferences (Part 1)
- Instructions:
- Click Edit
- Click Preferences
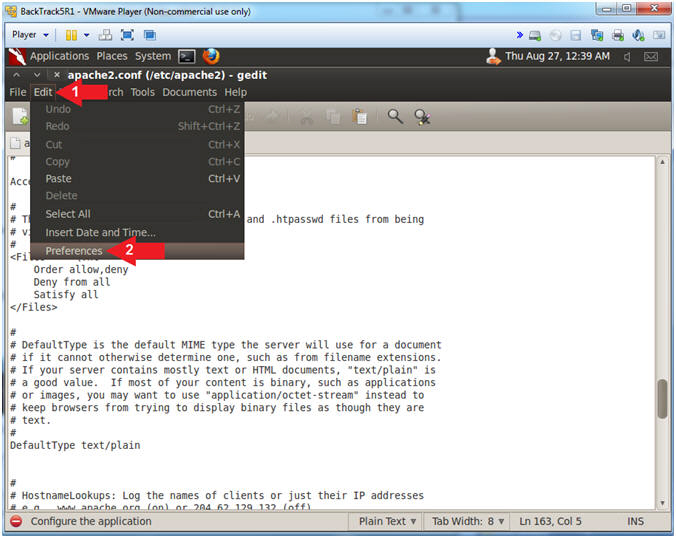
- Instructions:
- Access gedit Preferences (Part 2)
- Instructions:
- Check Display line numbers
- Check Highlight current line
- Click the Close Button
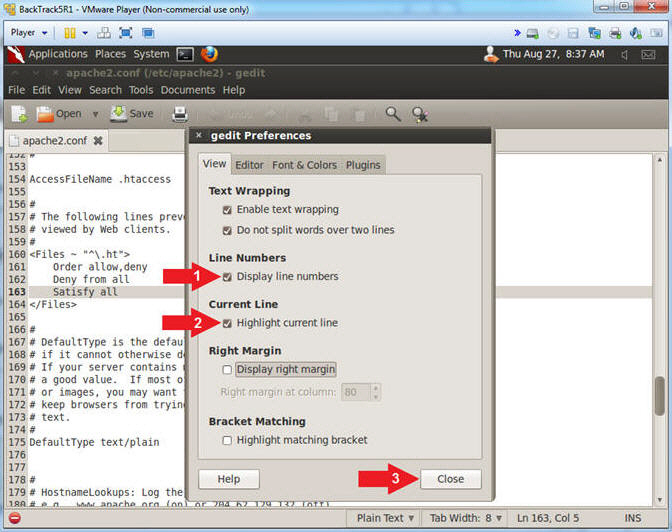
- Instructions:
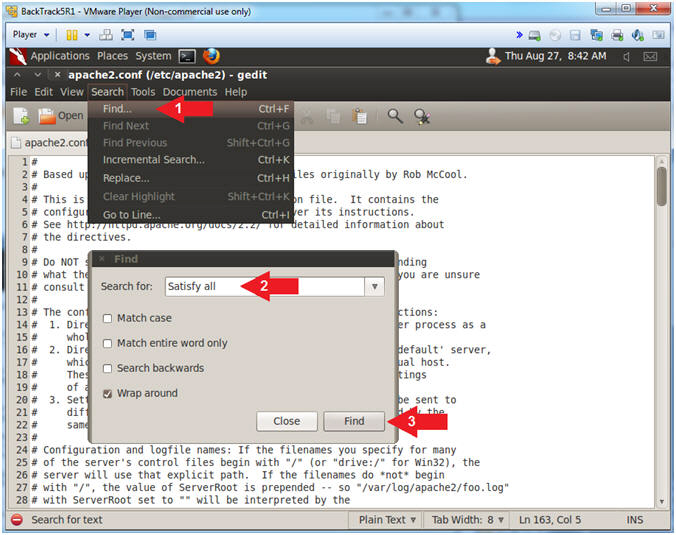
- Search for "Satisfy all"
- Instructions:
- Search --> Find...
- Search for: Satisfy all
- Click the Find Button
- Instructions:
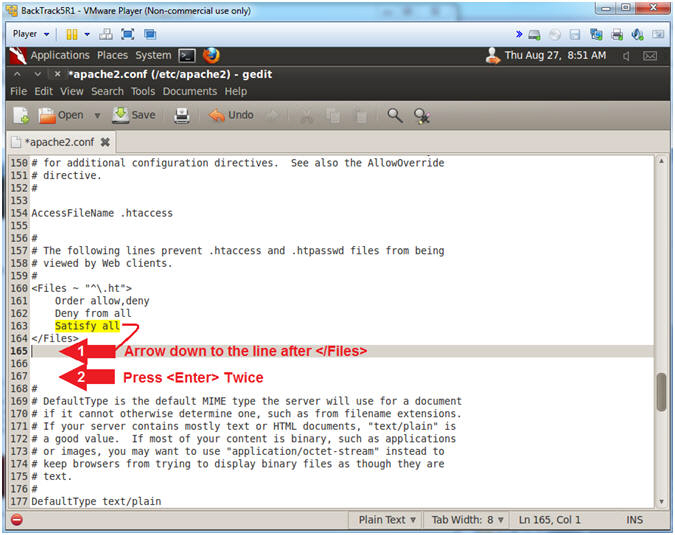
- Making some room
- Instructions:
- Arrow down one line after the line that
contains </Files>.
- It should be line 165
- Press <Enter> two times
- Now there should be three blank lines after the line that contains </Files>.
- Arrow down one line after the line that
contains </Files>.
- Instructions:
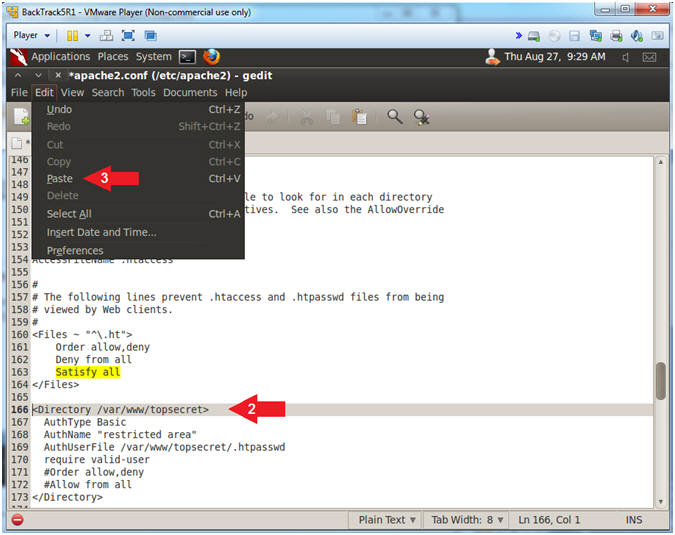
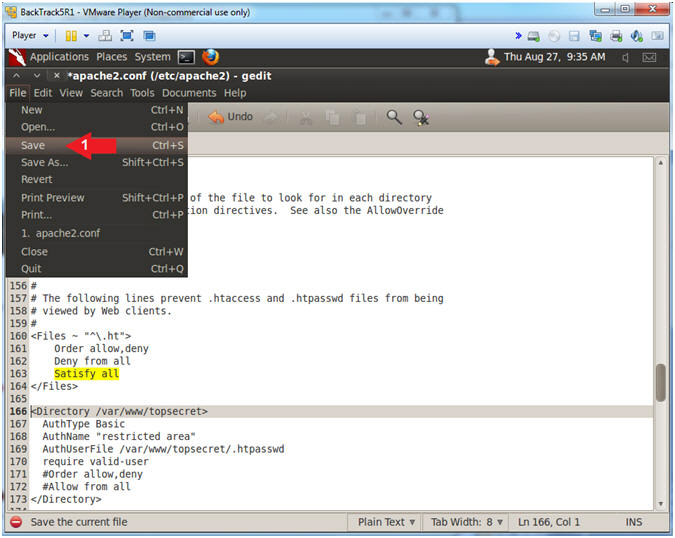
- Copy the below Apache Directive
- Instructions:
- Highlight and Copy the below Apache
Directive
-
<Directory /var/www/topsecret>
  AuthType Basic
  AuthName "restricted area"
  AuthUserFile /var/www/topsecret/.htpasswd
  require valid-user
  #Order allow,deny
  #Allow from all
</Directory>
-
- Arrow Down to line 166
- Edit --> Paste
- Highlight and Copy the below Apache
Directive
-
- Instructions:
- Save your work
- Instructions:
- File --> Save
- Instructions:
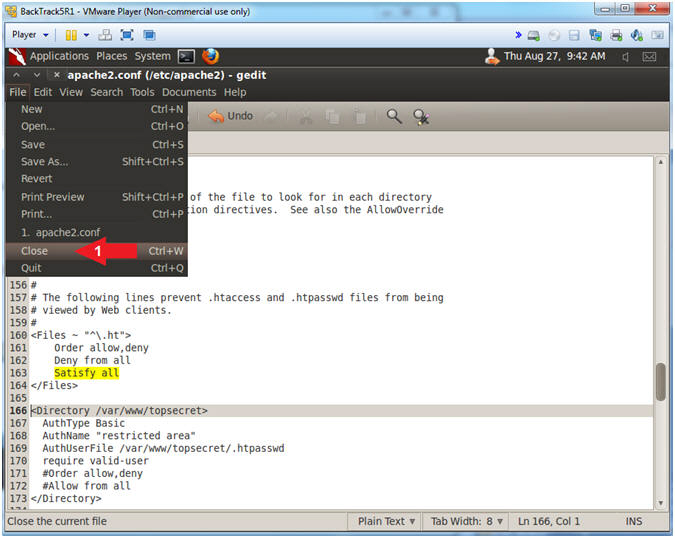
- Close apache2.conf
- Instructions:
- File --> Close
- Instructions:
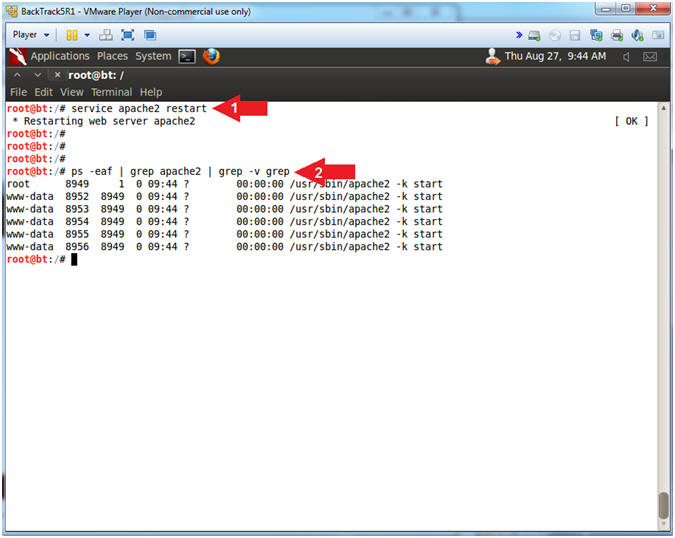
- Restart Apache Webserver
- Instructions:
- service apache2 restart
- ps -eaf | grep apache2 | grep -v grep
- Note(FYI):
- The service command runs the following init script (apache2) to perform some action (restart)
- ps -eaf, show me all the processes. | grep apache2, only show me apache2 processes. | grep -v grep, ignore the actual grep command searching for the apache2 process.
- Instructions:

| Section 4: Capture Base64 Web Authentication |
- Prepare to Sniff Traffic
- Instructions:
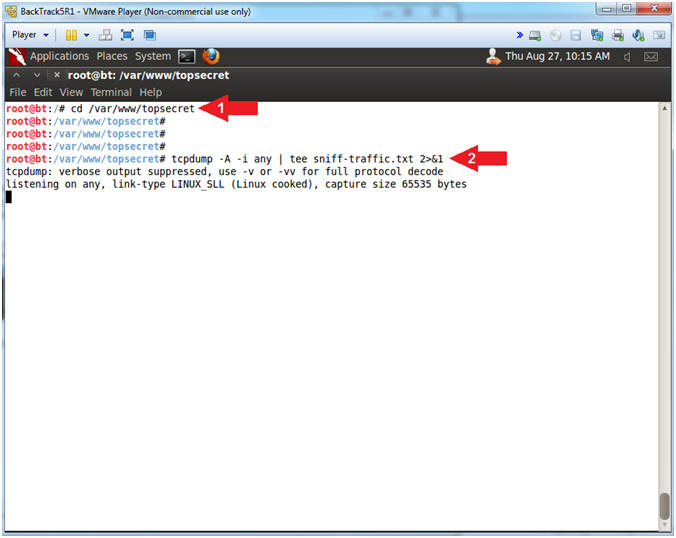
- cd /var/www/topsecret
- tcpdump -A -i any | tee 2>&1 sniff-traffic.txt
- Note(FYI):
- tcpdump is used to dump and view
network traffic.
- The "-A" means to display in ASCII format
- The "-i any" means to listen on any port.
- tee is used to both view the contents of tcpdump and log it to a file named sniff-traffic.txt
- 2>&1 means to log all standard error (2) into standard out (1).
- tcpdump is used to dump and view
network traffic.
- Instructions:
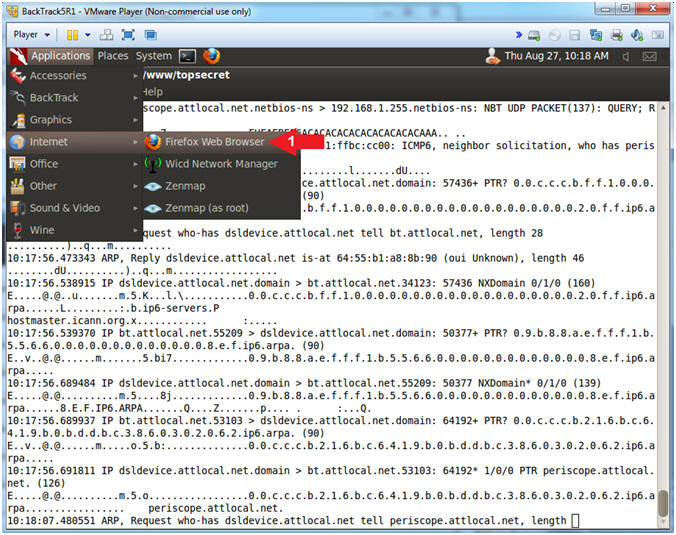
- Open Firefox Web Browser
- Instructions:
- Applications --> Internet --> Firefox Web Browser
- Instructions:
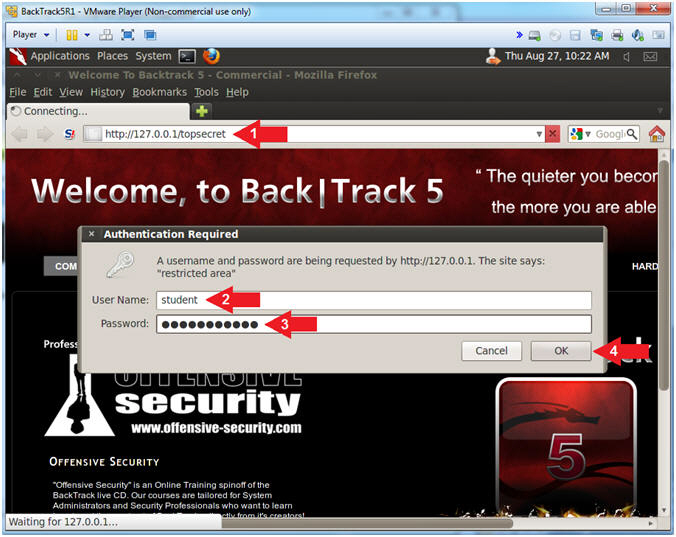
- Navigate to password protected directory
- Instructions:
- Navigate to the following URL:
- http://127.0.0.1/topsecret
- Username: student
- Password: Try2H4ckM3!
- Click the OK Button
- Navigate to the following URL:
- Instructions:
- Stop tcpdump
- Instructions:
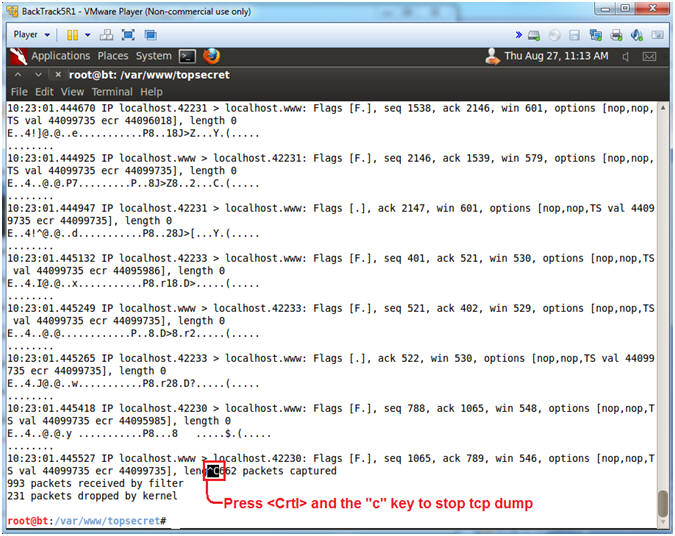
- Press the <Ctrl> and "c" keys at the same time to stop tcpdump
- Instructions:
- View Encrypted Apache Authorization Request
- Instructions:
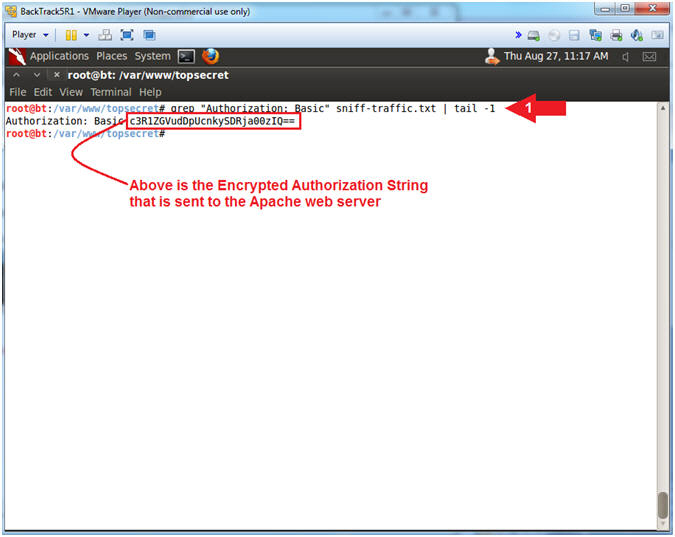
- grep "Authorization: Basic" sniff-traffic.txt | tail -1
- Note(FYI):
- You should see some encrypted text similar to mine
- Above is the Encrypted Authorization String being made to the Apache web server.
- Instructions:
| Section 5: Cracking Base64 Traffic with Perl |
- Download Perl Base64 Decoding Script
- Instructions:
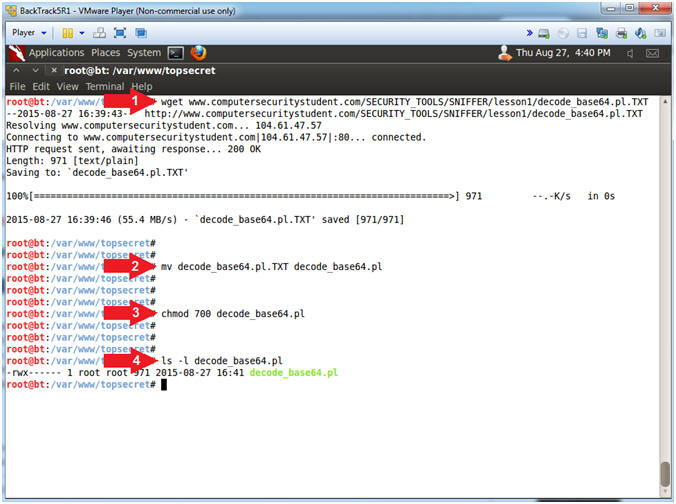
- wget www.computersecuritystudent.com/SECURITY_TOOLS/SNIFFER/lesson1/decode_base64.pl.TXT
- mv decode_base64.pl.TXT decode_base64.pl
- chmod 700 decode_base64.pl
- ls -l decode_base64.pl
- Note(FYI):
- wget is used to download files from webpages.
- mv is the move or rename command in the Unix/Linux world.
- chown is used to change the file owner and/or group ownership.
- ls is used to list the directory contents. (-l) provides a long listing or details of the file.
- Instructions:
- Run Base64 Decoding Script
- Instructions:
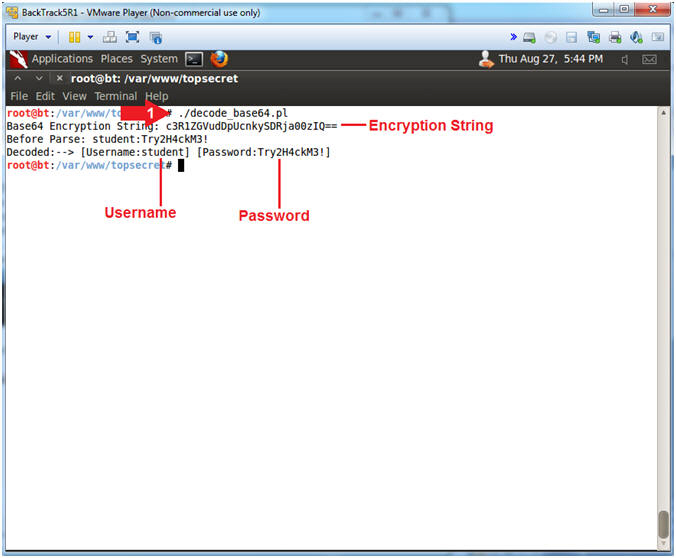
- ./decode_base64.pl
- Note(FYI):
- decode_base64.pl is a perl script that using the MIME::Base64 module to decode the Base64 encoding.
- Notice how we can easily decode and extract both the username and password.
- Instructions:
| Section 6: Proof of Lab |
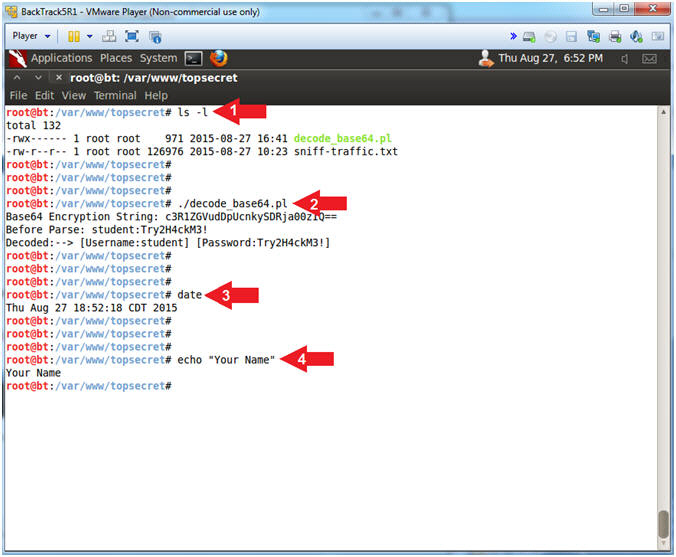
- Proof of Lab
- Instructions:
- ls -l
- ./decode_base64.pl
- date
- echo "Your Name"
- Replace the string "Your Name" with your actual name.
- E.g., echo "John Gray"
-
Proof of Lab
Instructions
- Press the <Ctrl> and <Alt> key at the same time.
- Press the <PrtScn> key.
- Paste into a word document
- Upload to Moodle
- Instructions: