(Fedora: Lesson 16)
{ Installing rkhunter }
| Section 0. Background Information |
- What is rkhunter?
- rkhunter (Rootkit Hunter) is a Unix/Linux-based tool that scans for rootkits, backdoors and possible local exploits.
- It does this by comparing SHA-1 hashes of core operating system files with known good files against its' database.
- It searches for default directories (of rootkits), wrong permissions, hidden files, suspicious strings in kernel modules, and conducts additional tests for Linux and FreeBSD.
- Pre-Requisite Lab
- Legal Disclaimer
- As a condition of your use of this Web site, you warrant to computersecuritystudent.com that you will not use this Web site for any purpose that is unlawful or that is prohibited by these terms, conditions, and notices.
- In accordance with UCC § 2-316, this product is provided with "no warranties, either expressed or implied." The information contained is provided "as-is", with "no guarantee of merchantability."
- In addition, this is a teaching website that does not condone malicious behavior of any kind.
- Your are on notice, that continuing and/or using this lab outside your "own" test environment is considered malicious and is against the law.
- © 2012 No content replication of any kind is allowed without express written permission.
| Section 1: Configure Fedora14 Virtual Machine Settings |
- Open Your VMware Player
- Instructions:
- On Your Host Computer, Go To
- Start --> All Program --> VMWare --> VMWare Player
- Instructions:
- Edit BackTrack Virtual Machine Settings
- Instructions:
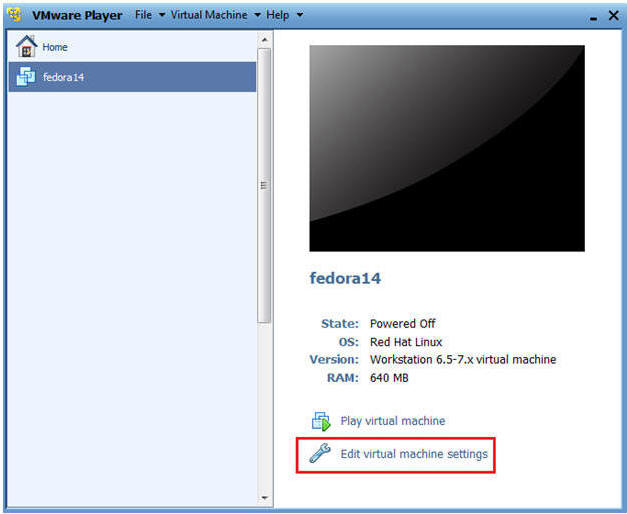
- Highlight fedora14
- Click Edit virtual machine settings
- Instructions:
- Edit Network Adapter
- Instructions:
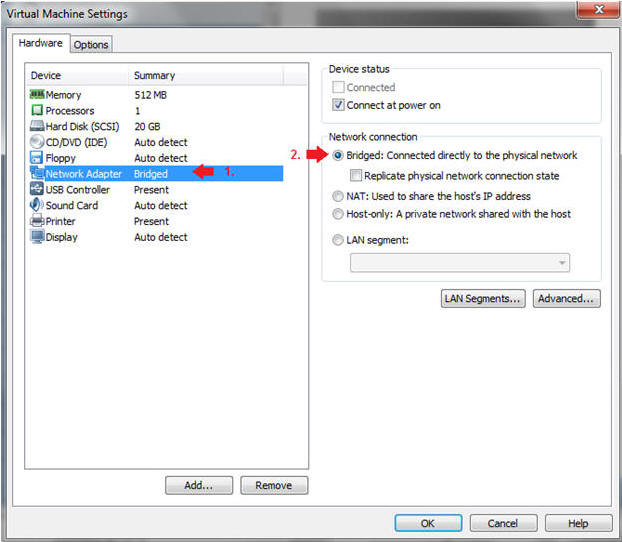
- Highlight Network Adapter
- Select Bridged
- Click on the OK Button.
- Instructions:
| Section 2: Login to your Fedora14 server. |
- Start Fedora14 VM Instance
- Instructions:
- Start Up VMWare Player
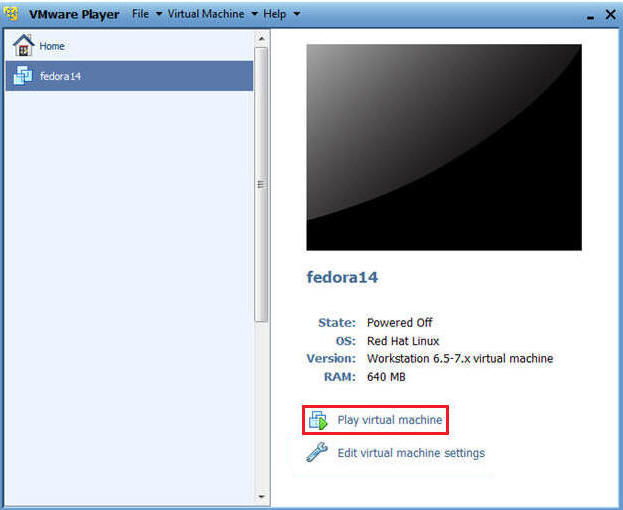
- Select Fedora14
- Play virtual machine
- Instructions:
- Login to Fedora14
- Instructions:
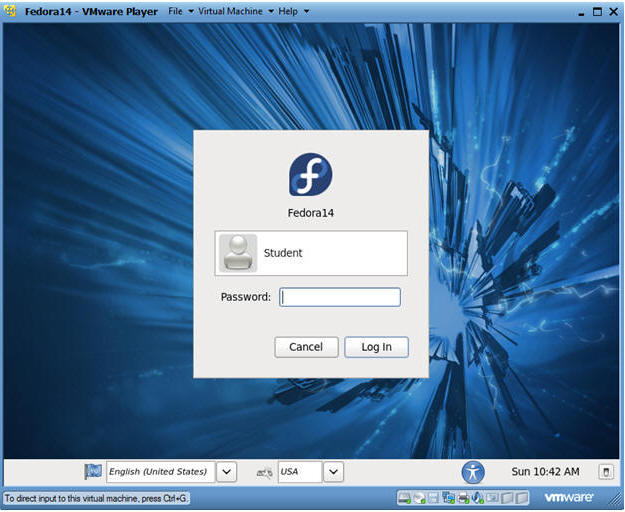
- Login: student
- Password: <whatever you set it to>.
- Instructions:
| Section 3: Open Console Terminal and Retrieve IP Address |
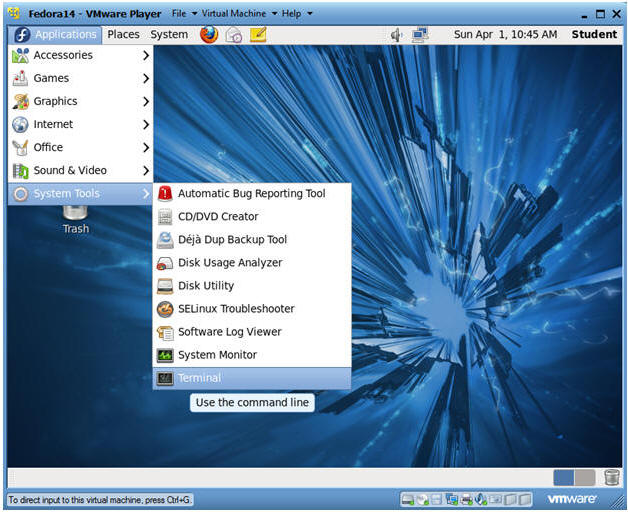
- Start a Terminal Console
- Instructions:
- Applications --> Terminal
- Instructions:
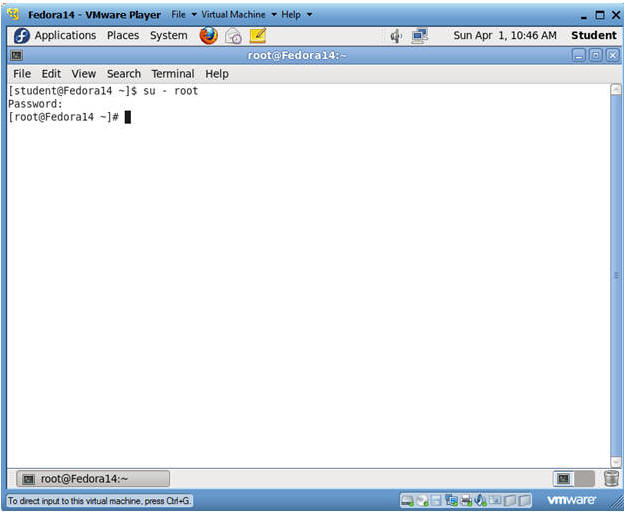
- Switch user to root
- Instructions:
- su - root
- <Whatever you set the root password to>
- Instructions:
- Get IP Address
- Instructions:
- ifconfig -a
- Note(fyi):
- As indicated below, my IP address is 192.168.1.106.
- Please record your IP address.
- Issue the below commands if you do not
have an IP Address:
- dhclient -v
- ifconfig -a
- Instructions:
| Section 4: Installing rkhunter |
- Search for rkhunter
- Instructions:
- yum list rkhunter

- Instructions:
- Install rkhunter
- Instructions:
- yum install rkhunter

- Instructions:
- Answer "y"
- Instructions:
- Is this ok [y/N]: y
- Instructions:
- View installation results
- Note(FYI):
- You "should" see a Complete message following the installation.
- Note(FYI):
| Section 5: Running rkhunter |
- Run rkhunter
- Instructions:
- rkhunter --check
- Instructions:
- Command Check
- Note(FYI):
- rkhunter has just performed a file property check on all the core system commands.
- Instructions:
- Press Enter

- Note(FYI):
- Root Kit Check
- Note(FYI):
- rkhunter checked all the previous unix/linux commands for root kits.
- Instructions:
- Press Enter
- Note(FYI):
- Network, Local Host, Password and SSH Check
- Note(FYI):
- rkhunter just checked both the external and internet network services.
- rkhunter checked the password file for other users that also had root UID privileges of 0.
- rkhunter check ssh for various items including if root was allowed to log in remotely.
- Instructions:
- Press Enter
- Note(FYI):
- System checks summary
- Note(FYI):
- Once complete rkhunter will display a summary for File properties checks, Rootkit checks, and Applications checks.
- Note(FYI):
| Section 6: Create rkhunter cronjob |
- Search for mailx
- Instructions:
- yum list mailx
- Note(FYI):
- We will use mailx to sent chkrootkit email reports.

- Instructions:
- Install mailx
- Instructions:
- yum install mailx
- Is this ok [y/N]: y

- Instructions:
- Verify mailx installation results
- Notes:
- Verify the installation report finished with a "Complete!" message.

- Notes:
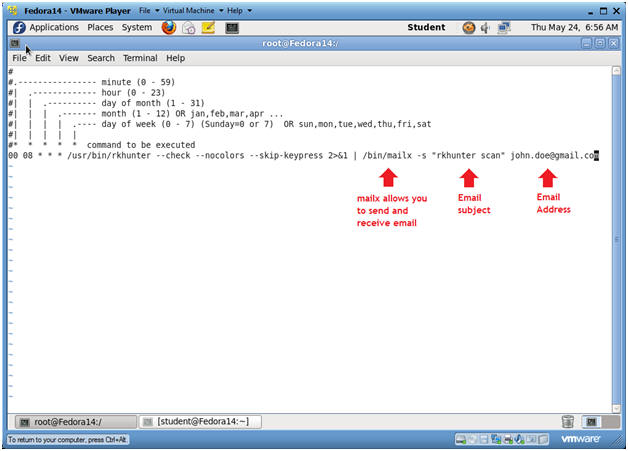
- Setting up cron
- Instructions:
- su - root, if you are not already root.
- crontab -e
- crontab is a unix/linux scheduler that allows each user, daemon, or system process run a task at a specified time.
- In this case, we are going to set up a scheduled task for user root.
- Instructions:
- Copy Cronjob Entry
- Instructions:
- Highlight and Copy the below text.
-
#
#.---------------- minute (0 - 59)
#|  .------------- hour (0 - 23)
#|  |  .---------- day of month (1 - 31)
#|  |  |  .------- month (1 - 12) OR jan,feb,mar,apr ...
#|  |  |  |  .---- day of week (0 - 7) (Sunday=0 or 7)  OR sun,mon,tue,wed,thu,fri,sat
#|  |  |  |  |
#*  *  *  *  *  command to be executed
00 08 * * * /usr/bin/rkhunter --check --nocolors --skip-keypress 2>&1 | /bin/mailx -s "rkhunter scan" YourEmail
- Note(FYI):
- rkhunter --check --nocolors --skip-keypress
- --check, run rkhunter like you did from command line.
- --nocolors, do not use colors.
- --skip-keypress, does not require a human's interactive input.
- 2>&1
- 2 is standard error in unix/linux.
- 1 is standard input.
- >&, means redirect standard error into standard input.
- |
- rkhunter's output is piped (i.e., or sent to) mailx.
- mailx -s "rkhunter scan" YourEmail
- mailx, allows you to send and receive email. (Read Manpage)
- -s "rkhunter", is the subject of the email.
- YourEmail, is your actual email address.
- rkhunter --check --nocolors --skip-keypress
- Instructions:
- Setting up cron
- Instructions:
- Press "i" to get into INSERT MODE.
- Select Edit --> Paste from the menu
- Press the <Esc> key to get out of INSERT MODE
- Type :wq to save and exit the vi editor.
- Instructions:
| Section 7: Proof of Lab |
- Proof of Lab
-
Instructions
- su - root, if you are not already root.
- grep "Rootkit Hunter" /var/log/secure | tail -2
- cat /var/spool/cron/root
- date
- echo "Your Name"
- Replace the string "Your Name" with your actual name.
- e.g., echo "John Gray"
-
Proof of Lab Instructions
- Press both the <Ctrl> and <Alt> keys at the same time.
- Do a <PrtScn>
- Paste into a word document
- Upload to Moodle
-

-
Instructions
