(Fedora: Lesson 17)
{ Installing and Testing denyhosts and brutessh.py }
| Section 0. Background Information |
- What is denyhosts
- DenyHosts is a log-based intrusion prevention security tool for SSH servers written in Python. It is intended to prevent brute force attacks on SSH servers by monitoring invalid login attempts in the authentication log and blocking the originating IP addresses.
- http://denyhosts.sourceforge.net/
- What is brutessh.py
- Brutessh is a program that uses the paramiko ssh library, to launch bruteforce passwords attacks to the sshd service. The tools is multithreading and uses a dictionary for the passwords.
- Prerequisite
-
Lab Notes
- In this lab we will how to do the following:
- We will install denyhosts on Fedora.
- We will install brutessh.py on BackTrack.
- We will use brutessh on BackTrack to attack Fedora.
- In this lab we will how to do the following:
- Legal Disclaimer
- As a condition of your use of this Web site, you warrant to computersecuritystudent.com that you will not use this Web site for any purpose that is unlawful or that is prohibited by these terms, conditions, and notices.
- In accordance with UCC § 2-316, this product is provided with "no warranties, either express or implied." The information contained is provided "as-is", with "no guarantee of merchantability."
- In addition, this is a teaching website that does not condone malicious behavior of any kind.
- Your are on notice, that continuing and/or using this lab outside your "own" test environment is considered malicious and is against the law.
- © 2012 No content replication of any kind is allowed without express written permission.
| Section 1: Start Fedora |
- Start Fedora
- Instructions
- For Windows 7
- Start --> All Programs --> VMware Player
- For Windows XP
- Starts --> Programs --> VMware Player
- For Windows 7
- Instructions
- Open Your VMware Player
- Instructions:
- On Your Host Computer, Go To
- Start --> All Program --> VMWare --> VMWare Player
- Instructions:
- Edit BackTrack Virtual Machine Settings
- Instructions:
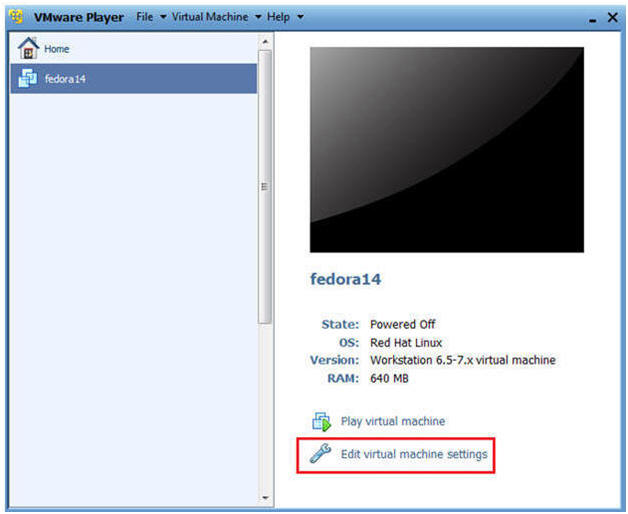
- Highlight fedora14
- Click Edit virtual machine settings
- Instructions:
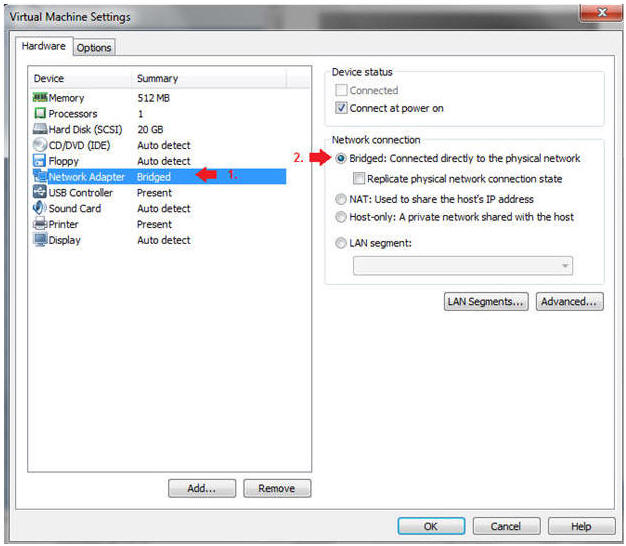
- Edit Network Adapter
- Instructions:
- Highlight Network Adapter
- Select Bridged
- Click on the OK Button.
- Instructions:
| Section 2: Login to your Fedora14 server |
- Start Fedora14 VM Instance
- Instructions:
- Start Up VMWare Player
- Select Fedora14
- Play virtual machine
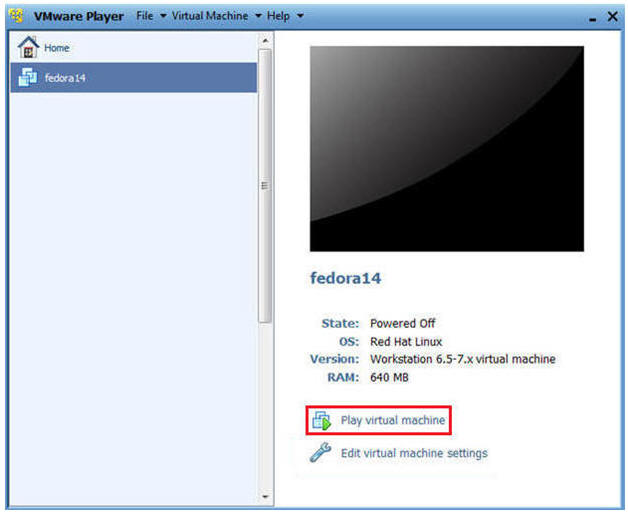
- Instructions:
- Login to Fedora14
- Instructions:
- Login: student
- Password: <whatever you set it to>.
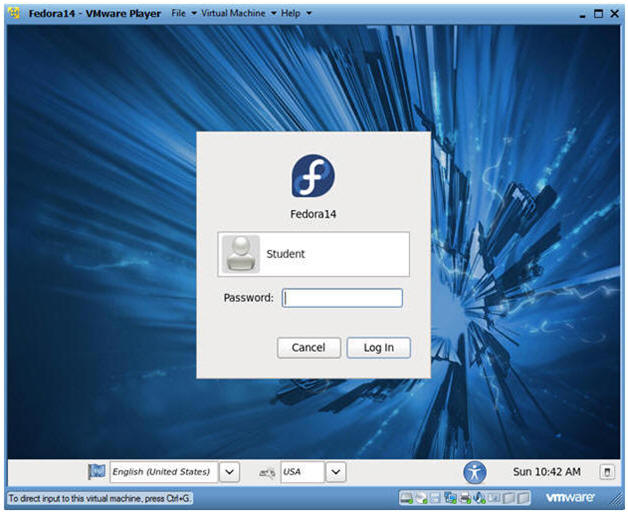
- Instructions:
| Section 3: Open Console Terminal and Retrieve IP Address |
- Start a Terminal Console
- Instructions:
- Applications --> Terminal
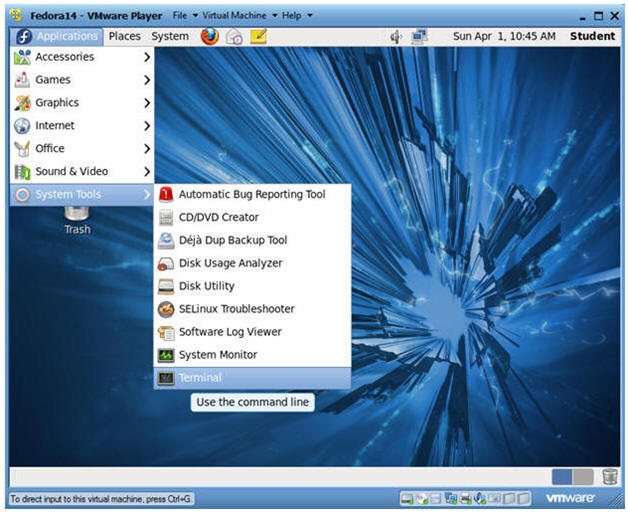
- Instructions:
- Switch user to root
- Instructions:
- su - root
- <Whatever you set the root password to>
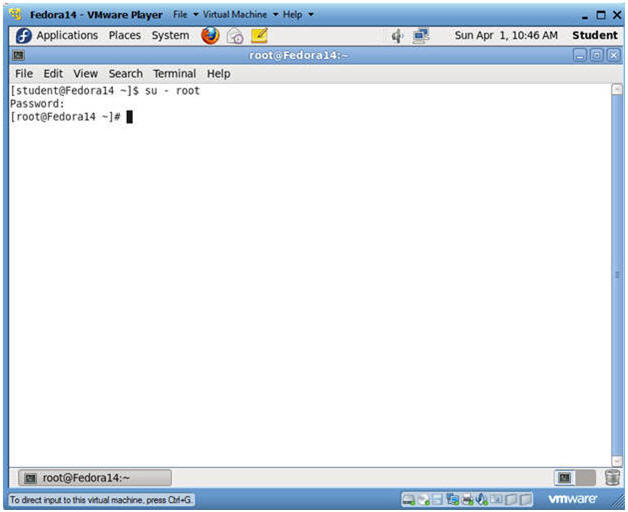
- Instructions:
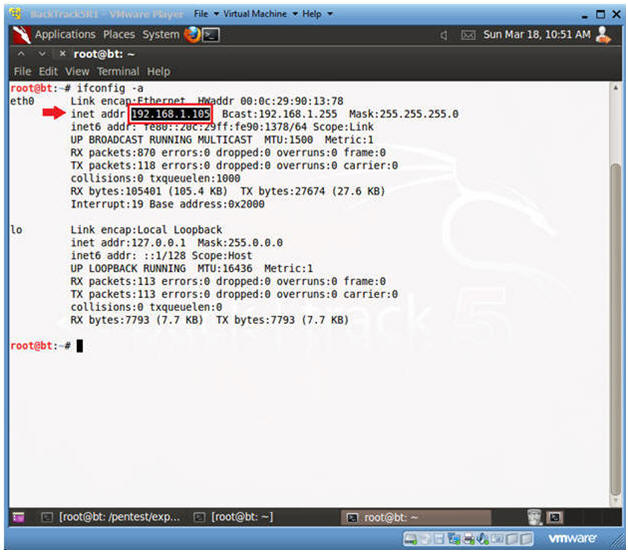
- Get IP Address
- Instructions:
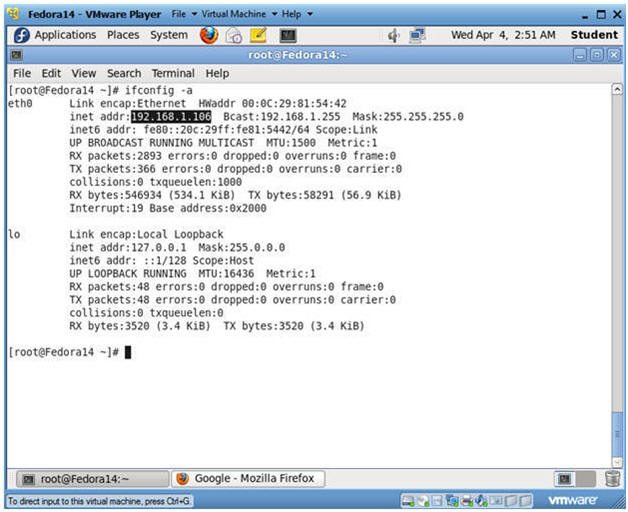
- ifconfig -a
- Notes:
- As indicated below, my IP address is 192.168.1.106.
- Please record your IP address.
- Instructions:
| Section 4: Installing denyhosts |
- Search for DenyHosts
- Instructions
- yum list denyhosts
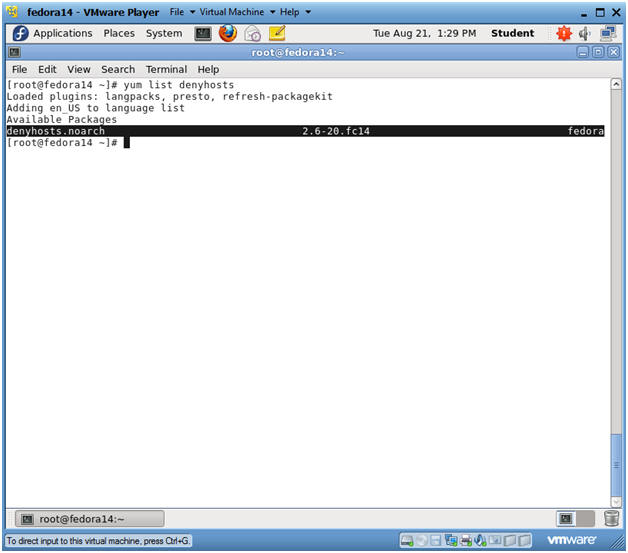
- Instructions
- Install DenyHosts
- Instructions
- yum install denyhosts
- Is this ok [y/N]: y
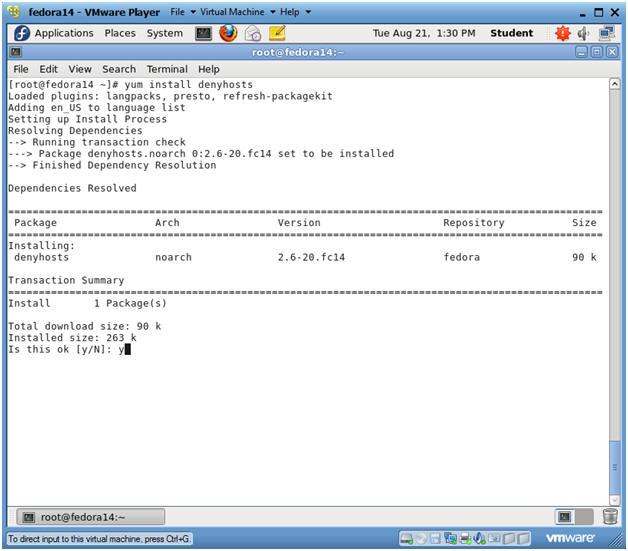
- Instructions
- Verify Installation Results
- Notes:
- Once a command line is returned you will hopefully see a "Complete!" like below.
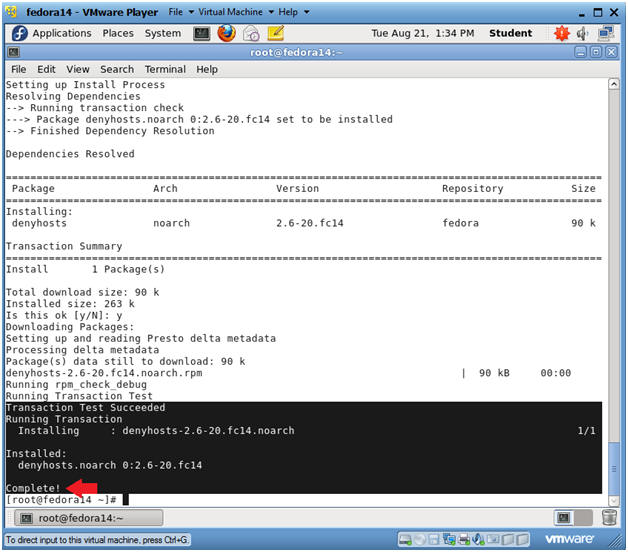
- Notes:
| Section 5: Starting DenyHosts |
- Starting DenyHosts
- Instructions
- ps -eaf | grep -v grep | grep denyhosts
| wc -l
- A "0" is returned, because denyhosts is NOT currently running.
- cd /etc/init.d/
- ./denyhosts strat
- ps -eaf | grep -v grep | grep denyhosts
| wc -l
- A "1" is returned, because denyhosts IS currently running.
- ps -eaf | grep -v grep | grep denyhosts
- This actually lists the denyhosts process.
- ps -eaf | grep -v grep | grep denyhosts
| wc -l
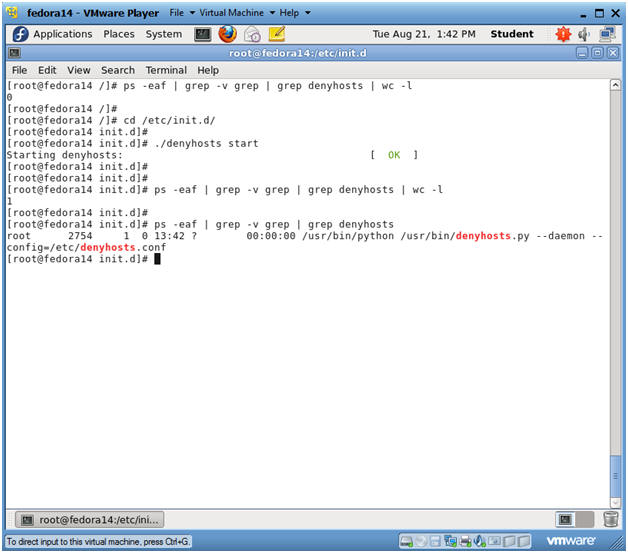
- Instructions
| Section 6: Startup Script for denyhosts |
- Create Start Up Scripts
- Instructions
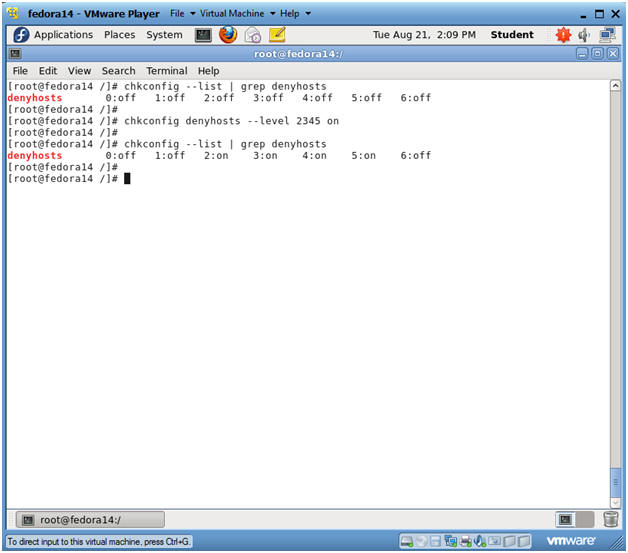
- chkconfig --list | grep denyhosts
- Notice that all run level start up scripts are OFF.
- chkconfig denyhosts --level 2345 on
- We are turning on start up scripts for run levels 2, 3, 4, and 5.
- chkconfig --list | grep denyhosts
- Notice that run level start up scripts are ON for 2, 3, 4, and 5.
- chkconfig --list | grep denyhosts
- Instructions
- Startup Script for denyhosts
- Instructions
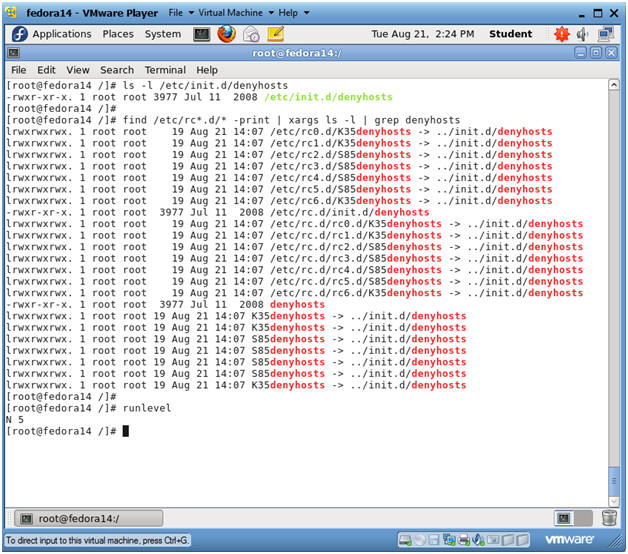
- ls -l /etc/init.d/denyhosts
- As part of the denyhosts installation, the denyhosts startup script is placed in /etc/init.d/denyhosts.
- find /etc/rc*.d/* -print | xargs ls -l
| grep denyhosts
- Identifies start up and kill scripts for denyhosts.
- runlevel
- Identifies the current run level.
- 0 Halt
- 1 Single-User Mode
- 2 User Definable (unused)
- 3 Multi-User Mode
- 4 Not Used
- 5 Full Multi-User Mode (X-based logins)
- 6 Reboot
- Identifies the current run level.
- ls -l /etc/init.d/denyhosts
- Instructions
- Stopping and Starting denyhosts with /etc/init.d/denyhosts
- Instructions
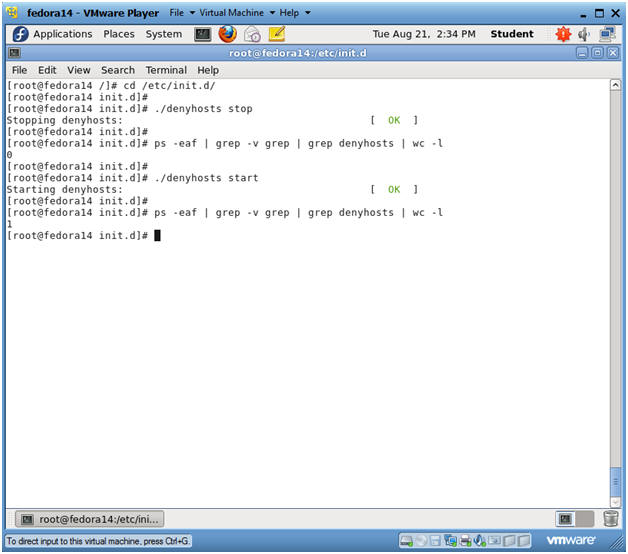
- cd /etc/init.d
- ./denyhosts stop
- ps -eaf | grep -v grep | grep denyhosts
| wc -l
- Notice, that a "0" is returned, because denyhosts is NOT running.
- ./denyhosts start
- ps -eaf | grep -v grep | grep denyhosts
| wc -l
- Notice, that a "1" is returned, because denyhosts IS running.
- Instructions
- Stopping and Starting DENYHOSTS with the "service"
command
- Instructions
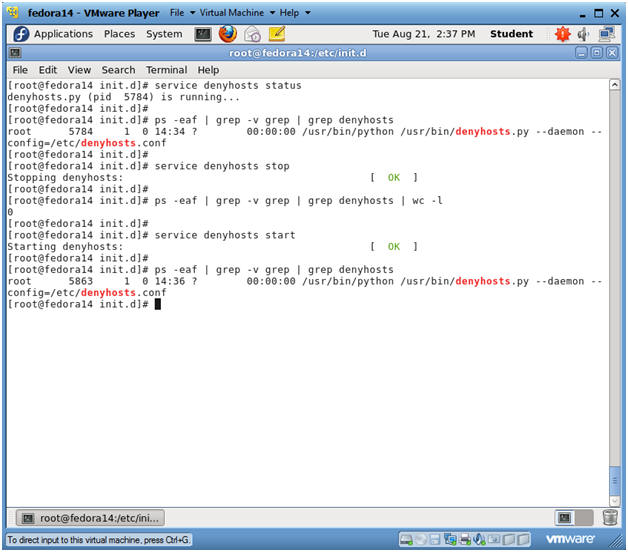
- service denyhosts status
- This will show a PID if denyhosts is running.
- ps -eaf | grep -v grep | grep denyhosts
- This will show the denyhosts process.
- service denyhosts stop
- This command will stop the denyhosts daemon.
- ps -eaf | grep -v grep | grep denyhosts
| wc -l
- Notice, that a "0" is returned, because denyhosts is NOT running.
- service denyhosts start
- This will start the denyhosts daemon/service.
- ps -eaf | grep -v grep | grep denyhosts
- This will show the denyhosts process.
- service denyhosts status
- Instructions
| Section 7: Configure BackTrack Virtual Machine Settings |
- Open Your VMware Player
- Instructions:
- On Your Host Computer, Go To
- Start --> All Program --> VMWare --> VMWare Player
- Instructions:
- Edit BackTrack Virtual Machine Settings
- Instructions:
- Highlight BackTrack5R1
- Click Edit virtual machine settings
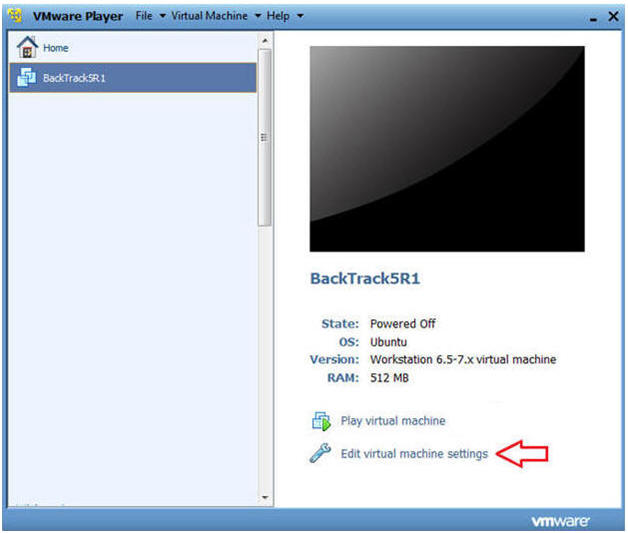
- Instructions:
- Edit Network Adapter
- Instructions:
- Highlight Network Adapter
- Select Bridged
- Do not Click on the OK Button.
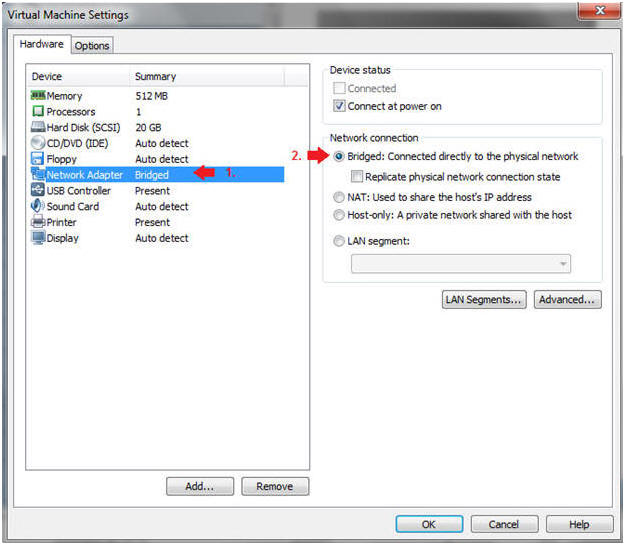
- Instructions:
| Section 8: Login to BackTrack |
- Start BackTrack VM Instance
- Instructions:
- Start Up VMWare Player
- Select BackTrack5R1
- Play virtual machine
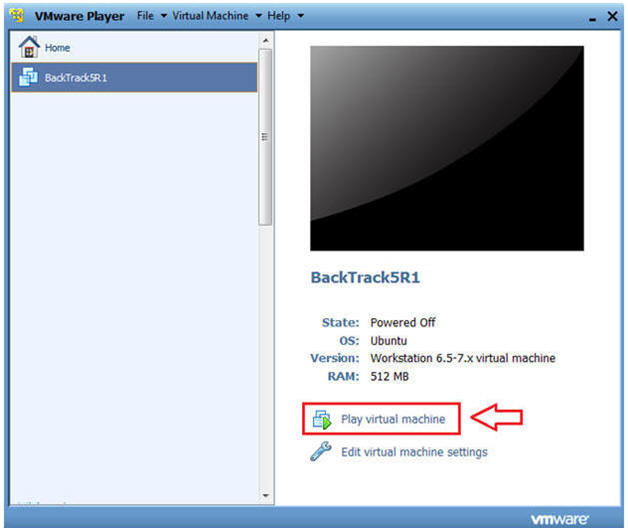
- Instructions:
- Login to BackTrack
- Instructions:
- Login: root
- Password: toor or <whatever you changed it to>.
- Instructions:
- Bring up the GNOME
- Instructions:
- Type startx
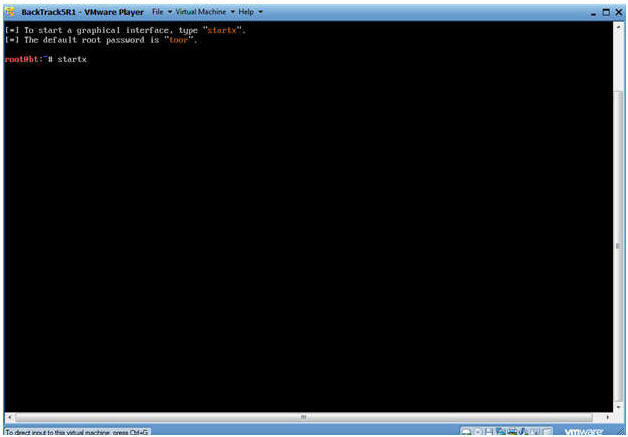
- Instructions:
| Section 9: Open Console Terminal and Retrieve IP Address |
- Open a console terminal
- Instructions:
- Click on the console terminal
- Instructions:
- Get IP Address
- Instructions:
- ifconfig -a
- Notes:
- As indicated below, my IP address is 192.168.1.105.
- Please record your IP address.
- Instructions:

| Section 10: Test SSH Between BackTrack and Fedora |
- Test SSH from Backtrack to Fedora
- Notes:
- Issue the below commands from the BackTrack Terminal.
- Instructions:
- ssh
student@192.168.1.106
"uptime"
- If you do not have a student account on Fedora, replace it with the system account you create in Lab 1.
- Replace 192.168.1.106 with Fedora's IP address you obtained in (Section 3, Step 3).
- connecting (yes/no)? yes
- Provide Password
- ssh
student@192.168.1.106
"uptime"
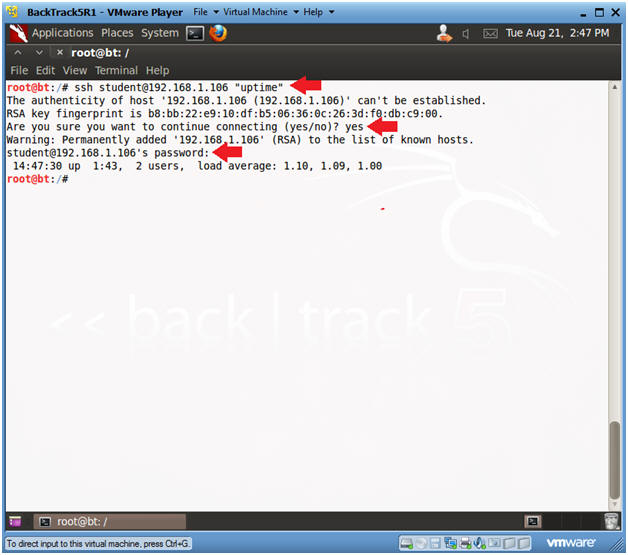
- Notes:
- Check Fedora's secure log
- Notes:
- Issue the below commands from the Fedora Terminal.
- Instructions:
- grep "Accepted password" /var/log/auth.log
| grep "192.168.1.105"
- Replace 192.168.1.105 with BackTrack's IP Address obtained in (Section 9, Step 2).
- grep "Accepted password" /var/log/auth.log
| grep "192.168.1.105"
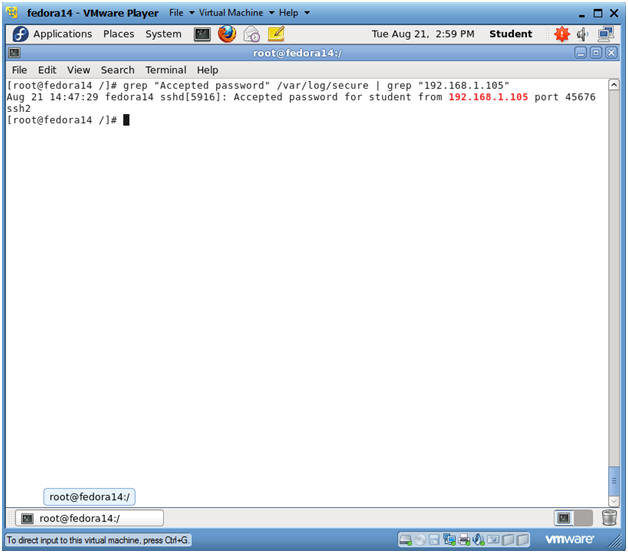
- Notes:
| Section 11: Install and run BruteSSH.py against Fedora |
- Search for BruteSSH.py
- Notes:
- Issue the below commands from the BackTrack Terminal.
- IF BRUTESSH IS ALREADY INSTALLED, THEN CONTINUE TO SECTION 12.
- Instructions:
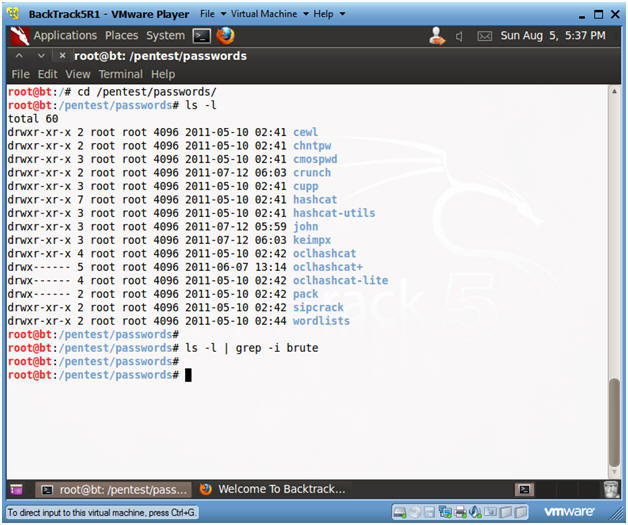
- cd /pentest/passwords/
- In BackTrack, the password cracking programs are typically located in this directory.
- ls -l
- ls -l | grep -i brute
- Here we are checking to see if BruteSSH is already installed.
- Our search for brute does not return results.
- cd /pentest/passwords/
- Notes:
- Start Firefox
- Instructions:
- Applications --> Internet --> Firefox Web Browser
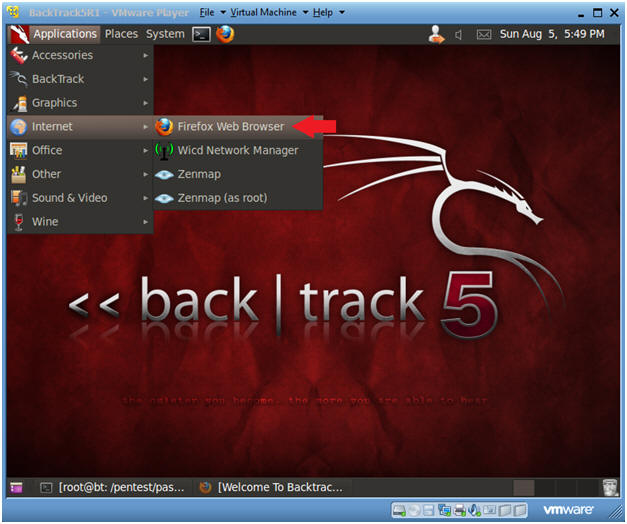
- Instructions:
- Download brutessh
- Instructions:
- Place the below URL in the address box
and Press Enter
- http://www.computersecuritystudent.com/UNIX/UBUNTU/lesson13/brutessh-0.5.tar.bz2
- Click the Save File radio button
- Click OK
- Place the below URL in the address box
and Press Enter
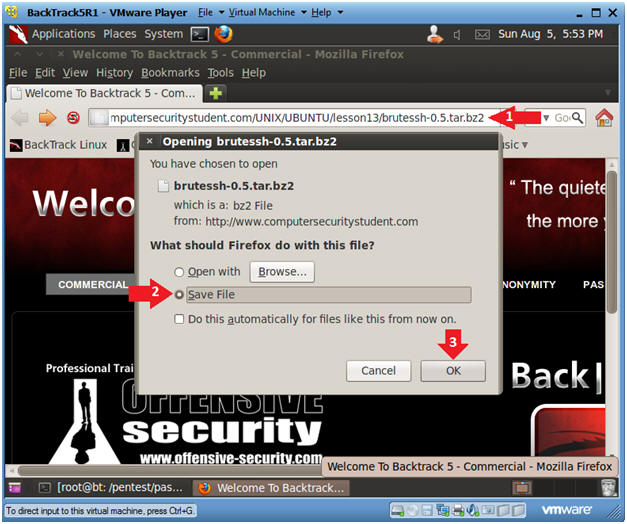
- Instructions:
- Save to /pentest/passwords
- Instructions:
- Click on Browse for other folders
- Click on File System
- Navigate to /pentest/passwords
- Click Save
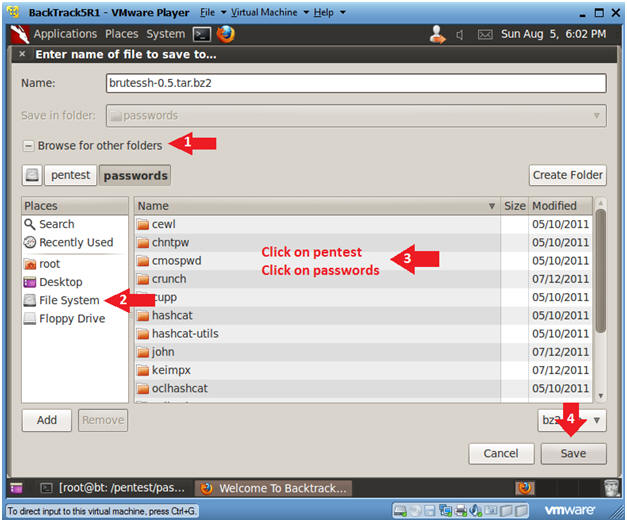
- Instructions:
- Unzip brutessh-0.5.tar.bz2
- Instructions:
- cd /pentest/passwords/
- ls -l brutessh-0.5.tar.bz2
- bunzip2 brutessh-0.5.tar.bz2
- ls -l brutessh-0.5.tar
- tar xovf brutessh-0.5.tar
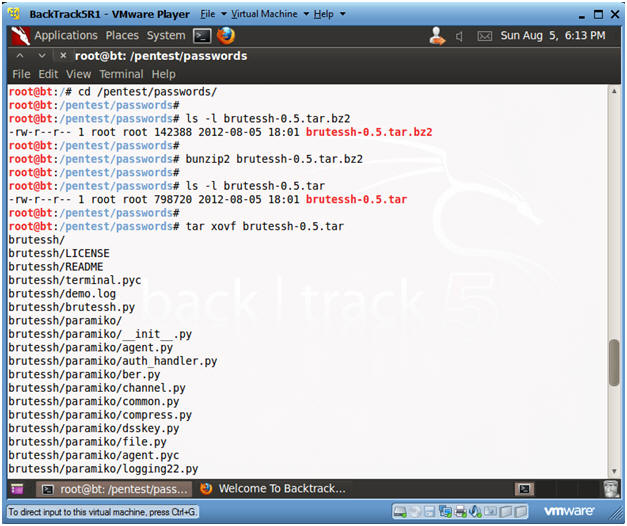
- Instructions:
- BruteSSH House Cleaning
- Instructions:
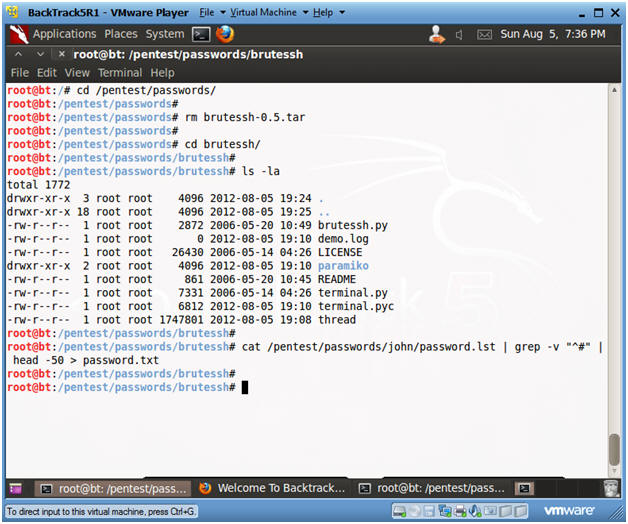
- cd /pentest/passwords/
- rm brutessh-0.5.tar
- We no longer need the tar file.
- cd brutessh/
- ls -la
- cat /pentest/passwords/john/password.lst
| grep -v "^#" | head -50 > password.txt
- I grabbed the first 50 passwords from John the Ripper to create enough future brute force ssh traffic for denyhosts to block.
- Instructions:
- Using BruteSSH
- Instructions:
- python brutessh.py -help
- The -help flag produced the usage options.
- python brutessh.py -help
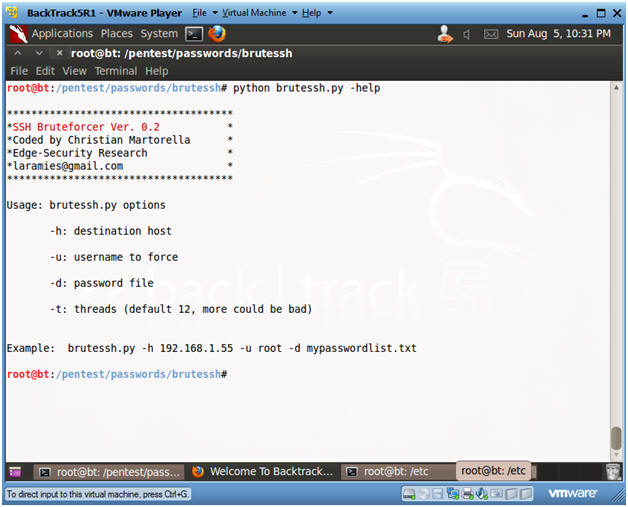
- Instructions:
- Using BruteSSH Against DenyHosts
- Instructions:
- python brutessh.py -h
192.168.1.106 -u root -d password.txt
- 192.168.1.106 is the IP address of the victim Fedora machine in my case. Refer to (Section 3, Step 3) to obtain Fedora IP Address.
- python brutessh.py -h
192.168.1.106 -u root -d password.txt
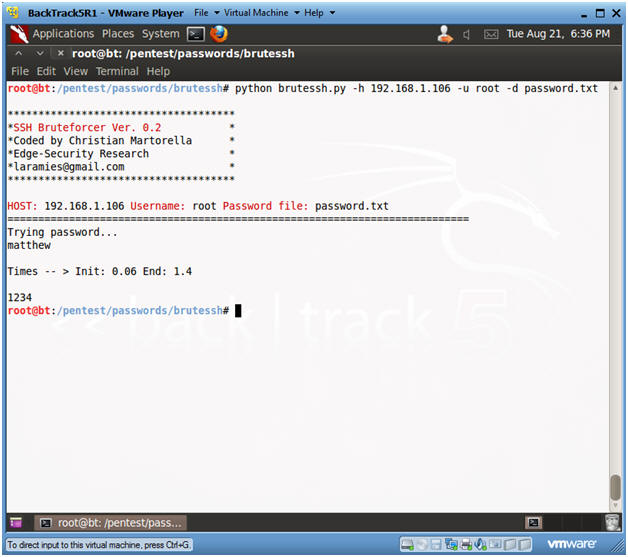
- Instructions:
| Section 12: Testing Blocked SSH Traffic from BackTrack to Fedora |
- Testing Blocked SSH Connection
- Instructions:
- ssh
student@192.168.1.106
- If you do not have a student account on Fedora, replace it with the system account you created in Lab 1.
- Replace 192.168.1.106 with Fedora's IP address you obtained in (Section 3, Step 3).
- Note: DenyHosts on the Fedora server is now blocking the ssh protocol from connecting to port 22.
- telnet 192.168.1.106 22
- Here I am testing to see if IP Addressed is really blocked or if just SSH traffic is blocked.
- Note: Although BackTrack SSH traffic is now blocked, it is still possible to connect use TCP over port 22.
- ssh
student@192.168.1.106
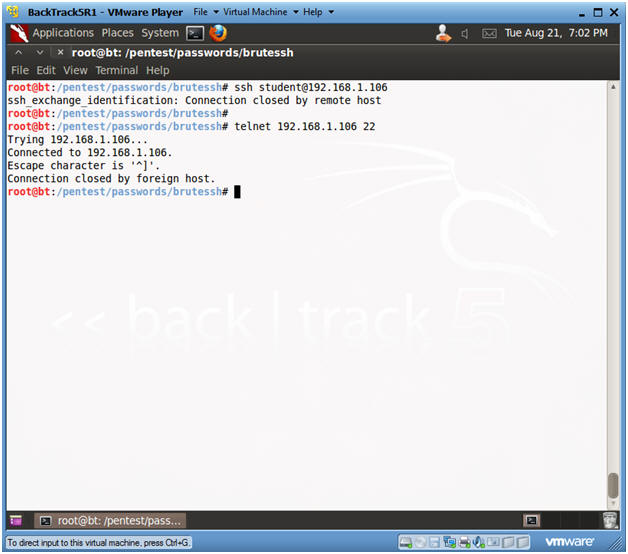
- Instructions:
| Section 13: Proof of Lab |
- Analyzing Fedora Deny Host Logs
- Notes:
- Make sure you are on the Fedora Server.
- You will be analyzing Fedora log files.
- Instructions:
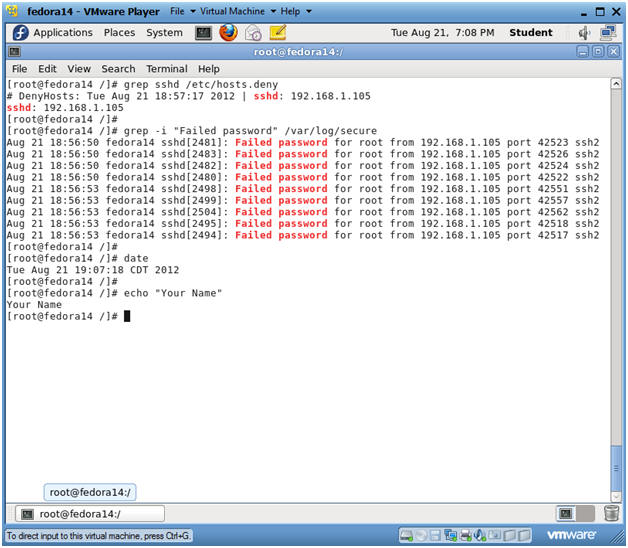
- grep sshd /etc/hosts.deny
- The hosts.deny file contains all the ports that have been blocked by the denyhosts daemon.
- grep -i "Failed password" /var/log/secure
| grep "192.168.1.105"
- Replace 192.168.1.105 with BackTrack's IP Address obtained in (Section 9, Step 2).
- date
- echo "Your Name"
- Replace the string "Your Name" with your actual name.
- e.g., echo "John Gray"
- grep sshd /etc/hosts.deny
-
Proof of Lab Instructions
- Press both the <Ctrl> and <Alt> keys at the same time.
- Do a <PrtScn>
- Paste into a word document
- Upload to Moodle
- Notes:
| Section 14: Unblock BackTrack |
- Stop rsyslog and denyhosts
- Notes:
- Make sure you are on the Fedora Server.
- Instructions:
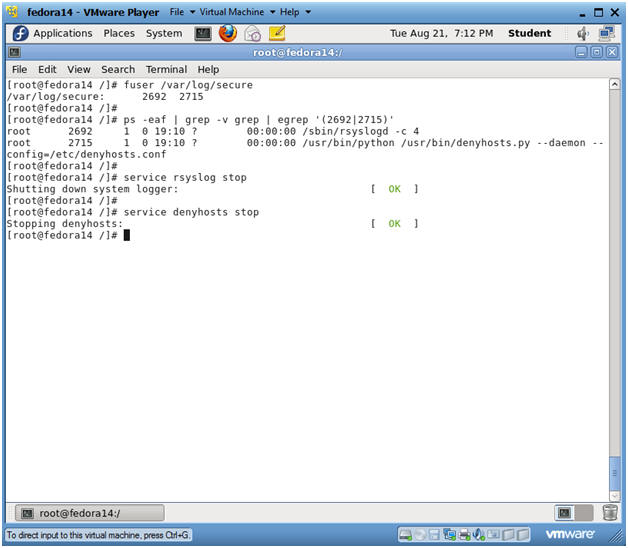
- fuser /var/log/auth.log
- The command fuser identifies process IDs (PID)s that have open sockets to a file.
- Notice that PIDs 2692 and 2715 currently have open sockets to the secure file.
- ps -eaf | grep -v grep | egrep
'(2692|2715)'
- Replace 2692 and 2715 with the PIDs that fuser lists in your session.
- service rsyslog stop
- service denyhosts stop
- fuser /var/log/auth.log
- Notes:
- Scrub the hosts.deny file
- Instructions:
- cd /etc
- grep -v "192.168.1.105"
hosts.deny > hosts.deny.new
- Replace 192.168.1.105 with BackTrack's IP Address obtained in (Section 9, Step 2).
- grep "192.168.1.105"
hosts.deny.new | wc -l
- Replace 192.168.1.105 with BackTrack's IP Address obtained in (Section 9, Step 2).
- mv hosts.deny hosts.deny.old
- mv hosts.deny.new hosts.deny
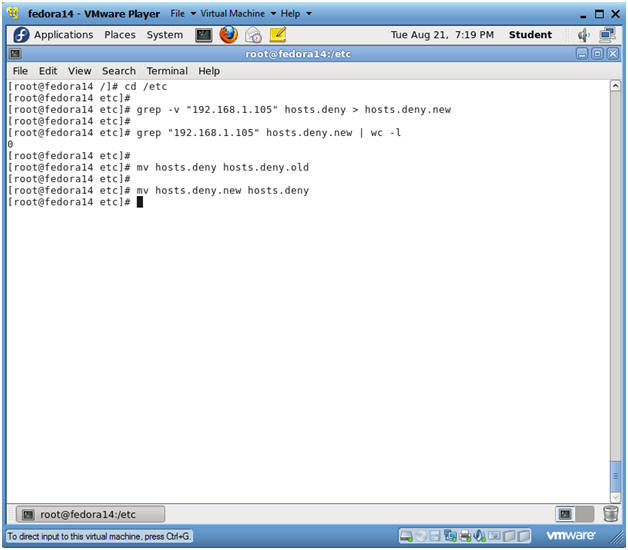
- Instructions:
- Scrub the auth.log file
- Instructions:
- cd /var/log/
- grep -v "192.168.1.105"
auth.log > auth.log.new
- Replace 192.168.1.105 with BackTrack's IP Address obtained in (Section 9, Step 2).
- grep "192.168.1.105"
auth.log.new | wc -l
- Replace 192.168.1.105 with BackTrack's IP Address obtained in (Section 9, Step 2).
- mv auth.log auth.log.old
- mv auth.log.new auth.log
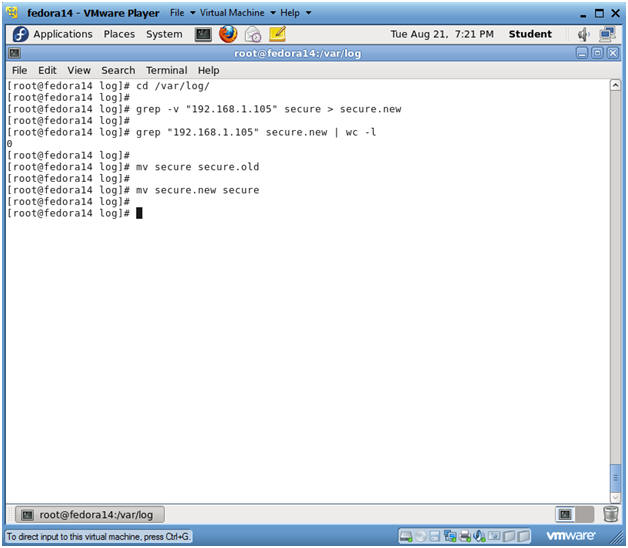
- Instructions:
- Scrub the denyhosts file
- Instructions:
- cd /var/log/
- grep -v "192.168.1.105"
denyhosts > denyhosts.new
- Replace 192.168.1.105 with BackTrack's IP Address obtained in (Section 9, Step 2).
- mv denyhosts denyhosts.old
- mv denyhosts.new denyhosts
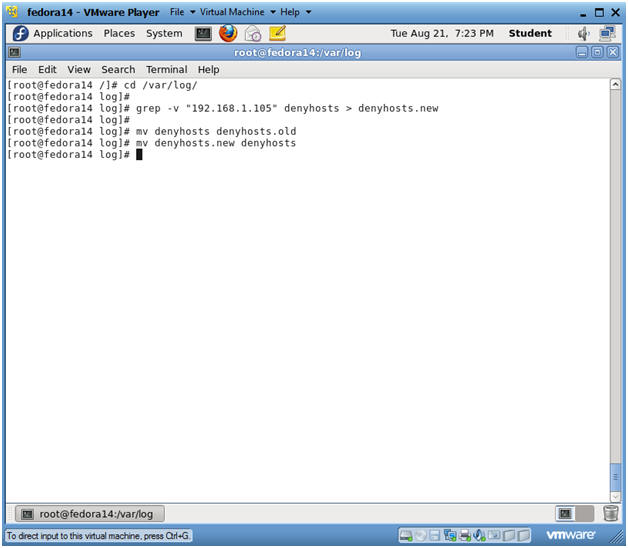
- Instructions:
- Start syslog and denyhosts
- Instructions:
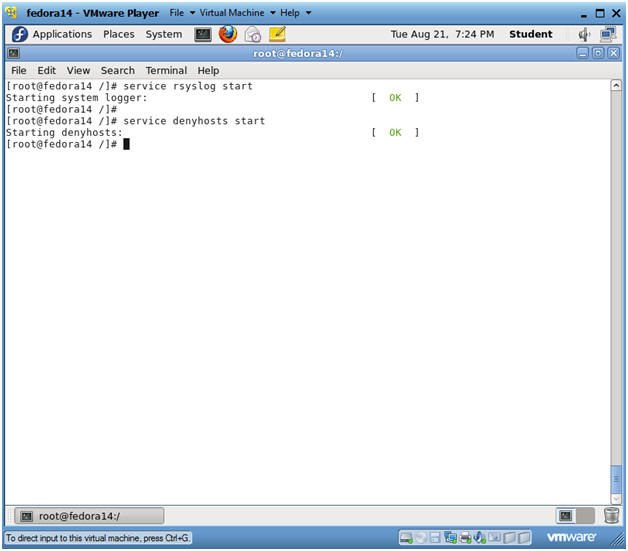
- service rsyslog start
- service denyhosts start
- Instructions:
- Test SSH Connection from BackTrack to Fedora
- Notes:
- Make sure you are on the BackTrack Server.
- Instructions:
- ssh
student@192.168.1.106
"hostname"
- If you do not have a student account on Fedora, replace it with the system account you created in Lab 1.
- Replace 192.168.1.106 with Fedora's IP address you obtained in (Section 3, Step 3).
- Provide Password.
- ssh
student@192.168.1.106
"hostname"
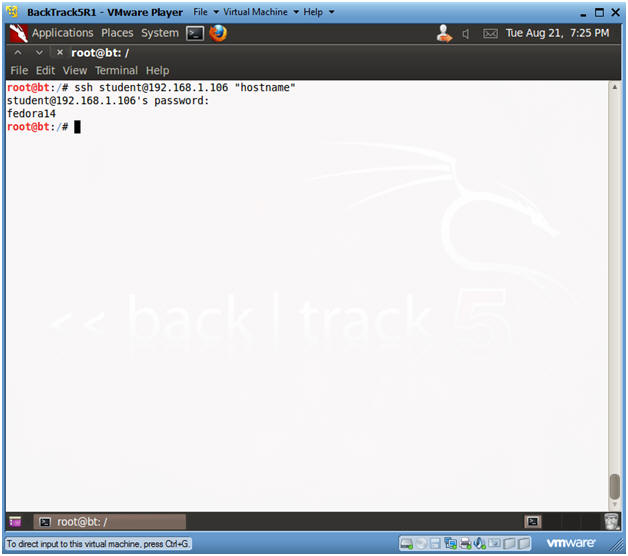
- Notes: