(Fedora:
Lesson 18)
{ Installing and
Configuring denyhosts }
|
Section 0. Background
Information |
- What is denyhosts?
- The "denyhosts" server watches the /var/log/secure
logfile for invalid ssh login attempts, and if the configurable
threshold is crossed, IP_ADDRESSES are automatically blocked by being
added to /etc/hosts.deny.
- The denyhosts configuration file is located
in /etc/denyhosts.conf
- What is Secure Shell?
- Secure Shell (SSH) is a network protocol
for secure data communication, remote shell services or command
execution and other secure network services between two networked
computers that it connects via a secure channel over an insecure
network.
- The protocol specification distinguishes
two major versions that are referred to as SSH-1 and SSH-2.
- The best-known application of the protocol
is for access to shell accounts on Unix-like operating systems.
- It was designed as a replacement for Telnet
and other insecure remote shell protocols such as the Berkeley rsh and
rexec protocols, which send information, notably passwords, in
plaintext, rendering them susceptible to interception and disclosure
using packet analysis.
- The encryption used by SSH is intended to
provide confidentiality and integrity of data over an unsecured network,
such as the Internet.
- What Is YUM?:
- The Yellowdog Updater, Modified (YUM) is an open-source command-line
package-management utility for RPM-compatible Linux operating systems
and has been released under the GNU General Public License. YUM
has been adopted by Red Hat Enterprise Linux, Fedora, CentOS, and many
other RPM-based Linux distributions, including Yellow Dog Linux itself,
where it has replaced the original YUP utility
- Pre-Requisite Lab
-
Fedora: Lesson 1: Installing Fedora 14
-
Fedora: Lesson 7: Installing, Configuring and Securing SSHD
-
Lab
Notes
- In this lab we will do the following:
- Install denyhosts.
- Configure denyhosts.
- Legal Disclaimer
- As a
condition of your use of this Web site, you warrant to
computersecuritystudent.com that you will not use this Web site for any
purpose that is unlawful or that is prohibited
by these terms, conditions, and notices.
- In accordance with UCC § 2-316, this
product is provided with "no warranties, either express or implied." The
information contained is provided "as-is", with "no guarantee of
merchantability."
- In addition, this is a teaching website
that does not condone malicious behavior of
any kind.
- You are on notice, that continuing
and/or using this lab outside your "own" test environment
is considered malicious and is against the law.
- © 2013 No content replication of any
kind is allowed without express written permission.
|
Section 1: Edit the
Fedora14 Virtual Machine |
- Open Your VMware Player
- Instructions:
- On Your Host Computer, Go To
- Start --> All Program --> VMWare -->
VMWare Player
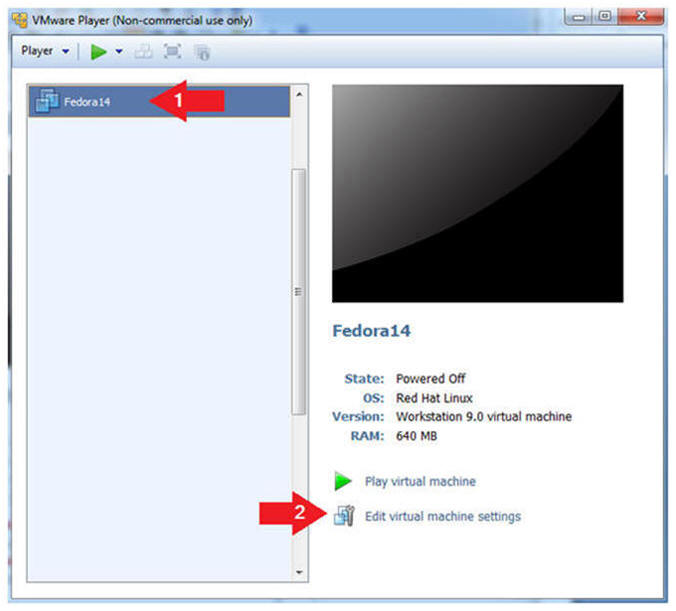
- Edit Fedora 14 Virtual Machine Settings
- Instructions:
- Highlight Fedora14
- Click Edit virtual machine settings
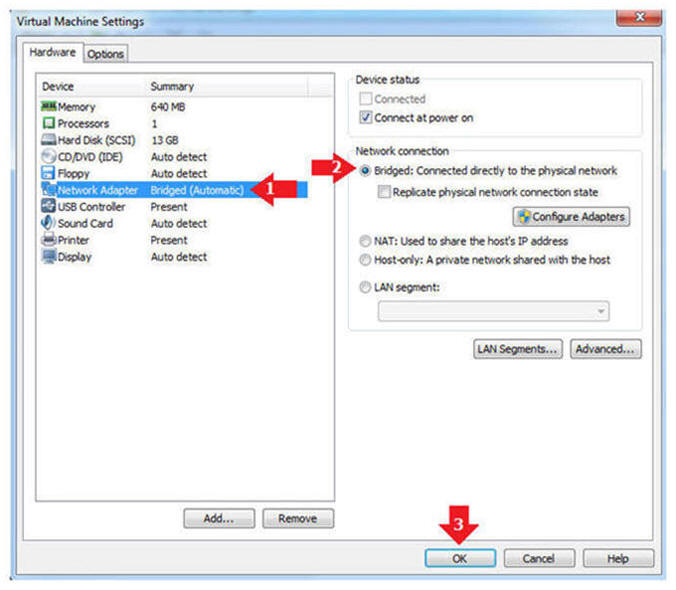
- Edit Network Adapter
- Instructions:
- Highlight Network Adapter
- Select Bridged
- Click the OK Button
|
Section 2: Play the
Fedora14 Virtual Machine |
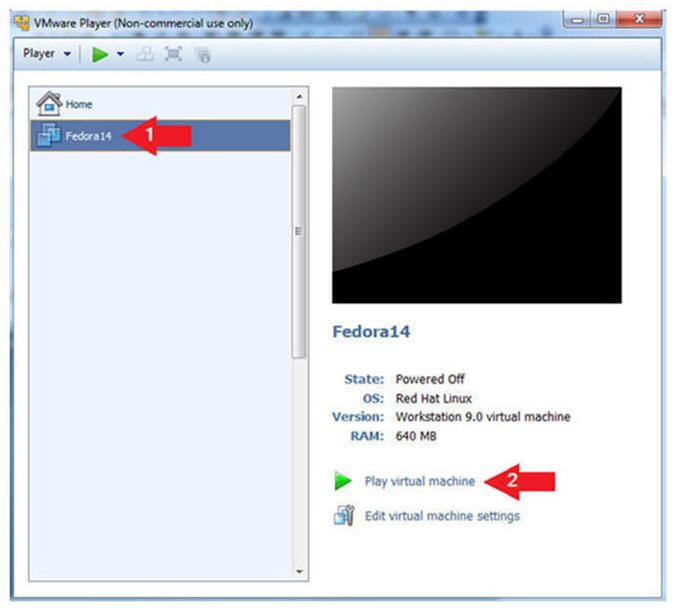
- Start the Fedora14 VM
- Instructions:
- Click on the Fedora14 VM
- Click on Play virtual machine
|
Section 3: Login to
your Fedora14 server. |
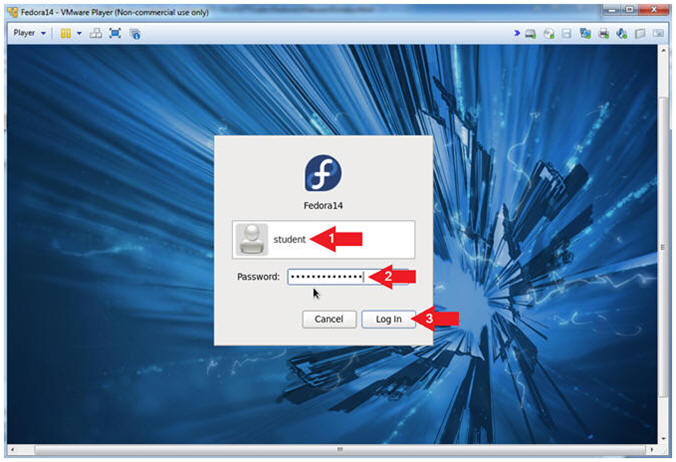
- Login As student
- Instructions:
- Click on student
- Provide student password
- Click the Login Button
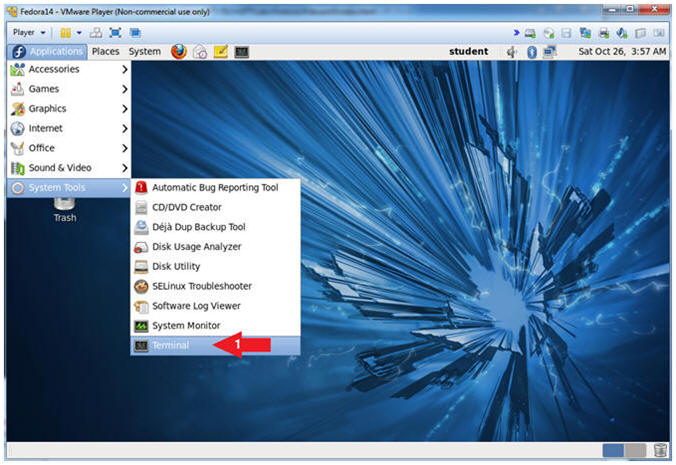
- Start Up A Terminal.
- Applications --> System Tools --> Terminal
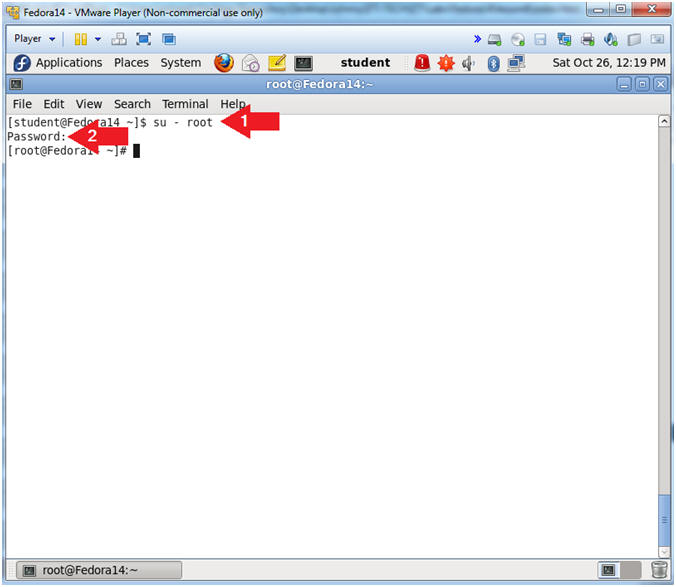
- Switch User to root
- Instruction:
- su - root
- Supply the Root Password
-
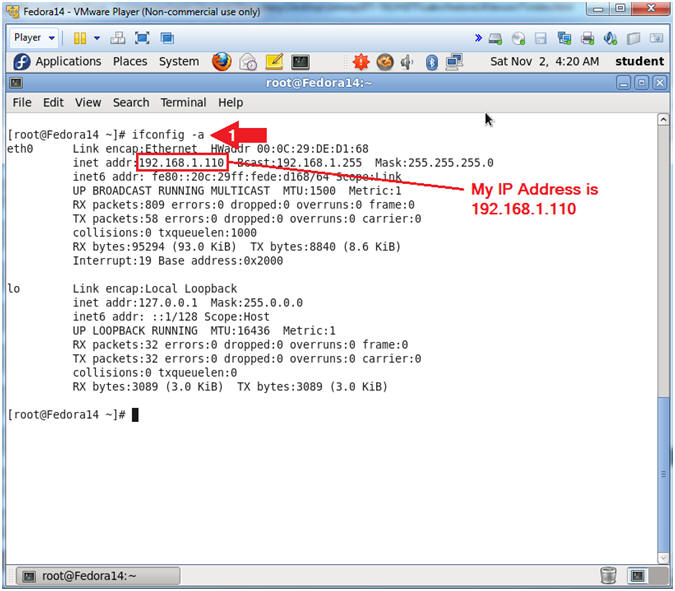
- Get IP Address
- Instructions:
- ifconfig -a
- Notes (FYI):
- As indicated below, my IP address is
192.168.1.110.
- Please record your IP address.
|
Section 4:
Installing denyhosts |
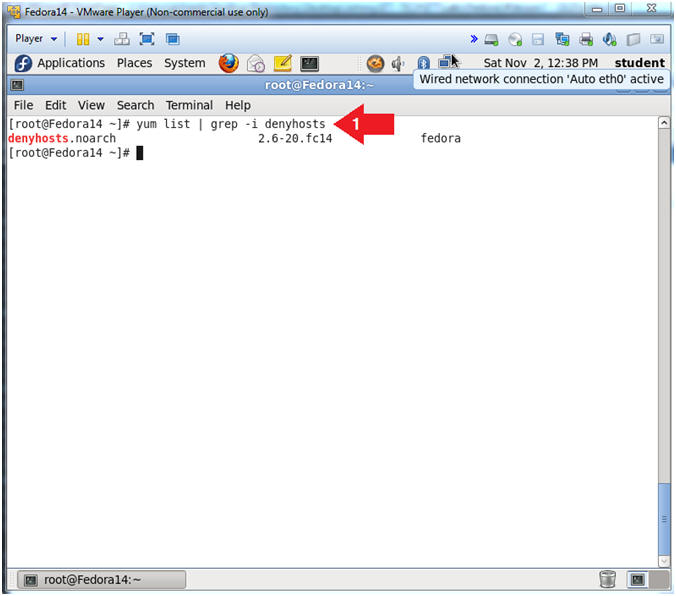
- Check to see if openssh-server is installed.
- Instruction:
- yum list | grep -i denyhosts
- Note(FYI):
- yum list, by itself will list all the
available packages for download.
- | grep -i denyhosts, searching for only
packages with the name denyhosts.
- Let's install denyhosts
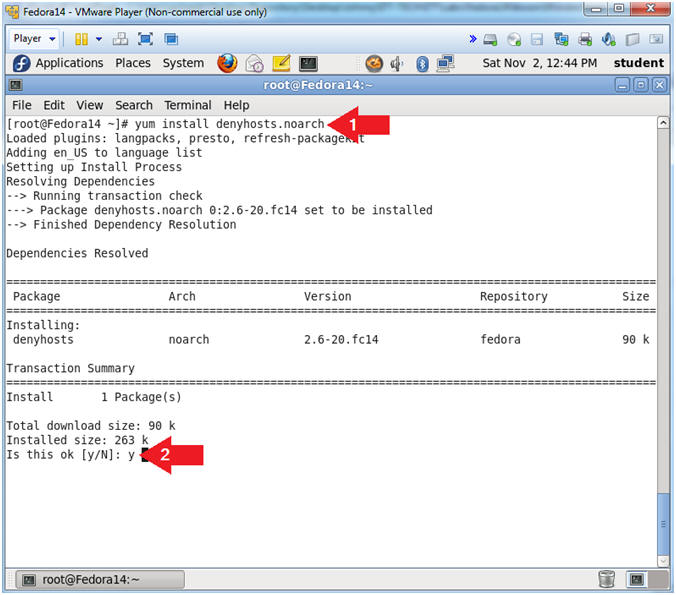
- Instruction:
- yum install denyhosts.noarch
- Is this ok [y/N]:
y
|
Section 5: Configure
Startup Scripts |
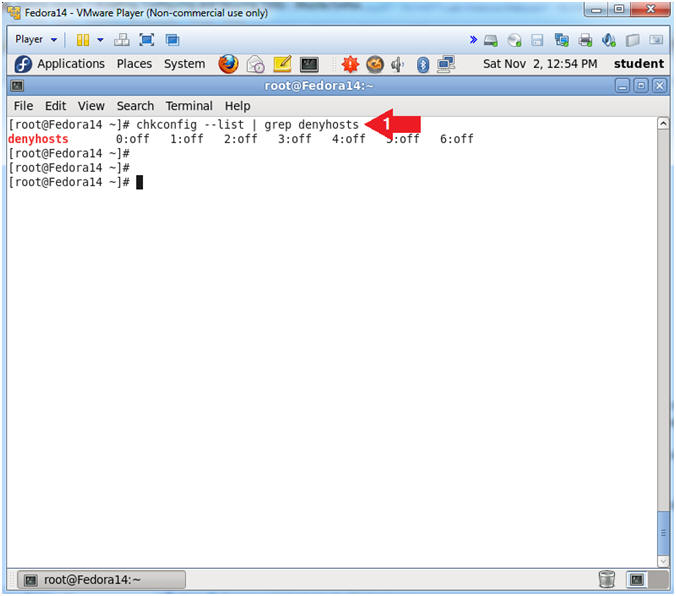
- Check to see if denyhosts is running.
- Instructions:
- chkconfig --list | grep denyhosts
- Note(FYI):
- chkconfig - updates and queries
runlevel information for system services.
- chkconfig has five distinct functions:
adding new services for management, removing services from
management,
listing the current startup information for services, changing the
startup information for services, and checking
the startup state of a particular service.
- Notice that run-levels 0 through 6 do
not have a startup scripts (e.g., 0:off) for denyhosts.
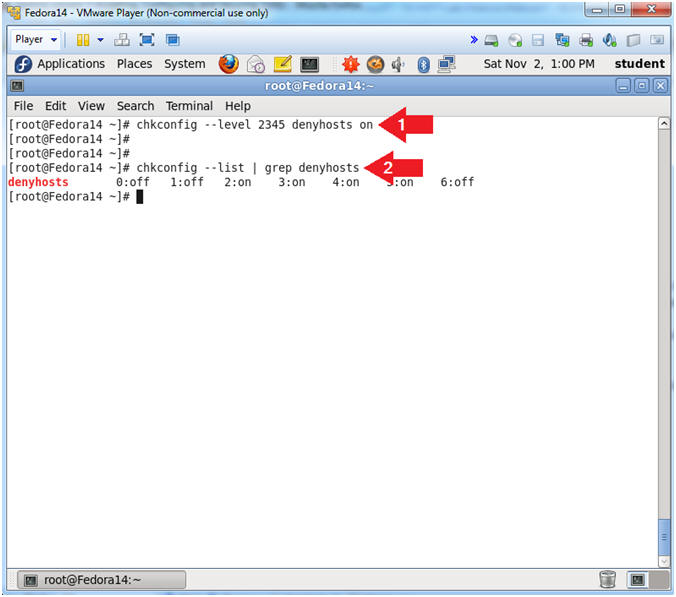
- Create Startup scripts for denyhosts
- Instructions:
- chkconfig --level 2345 denyhosts on
- chkconfig --list | grep denyhosts
- Note(FYI):
- Create denyhosts start up scripts for
run-level 2, 3, 4 and 5.
- Notice that chkconfig now shows that a startup script exists
(e.g., 0:off) for run levels
2, 3, 4 and 5.
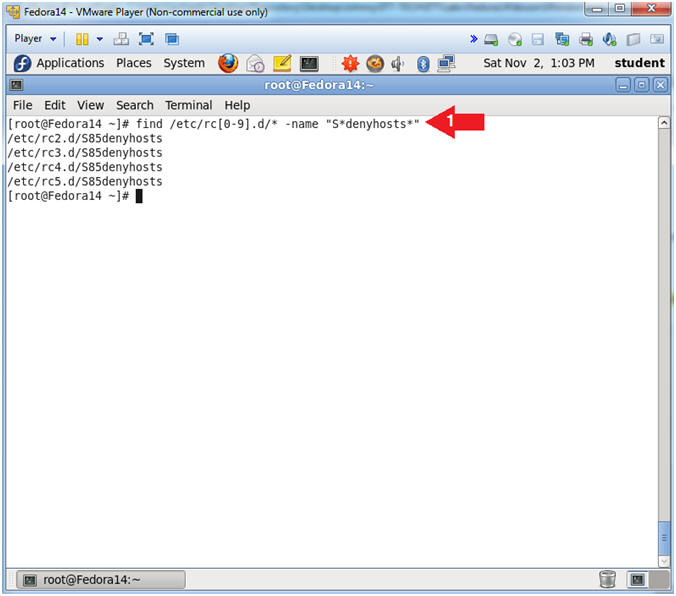
- Verify Startup scripts have been created using
the find command.
- Instructions:
- find /etc/rc[0-9].d/* -name "S*denyhosts*"
- Note(FYI):
- find /etc/rc[0-9].d/*, Search file and
directories in /etc/, where rc directories need have a number after
the "rc" and before the ".d". (e.g., rd2.d).
- The denyhosts start up scripts start with a
"S".
- -name "S*denyhosts*",
means search for anything that starts with a "S"
and contains denyhosts after the "S".
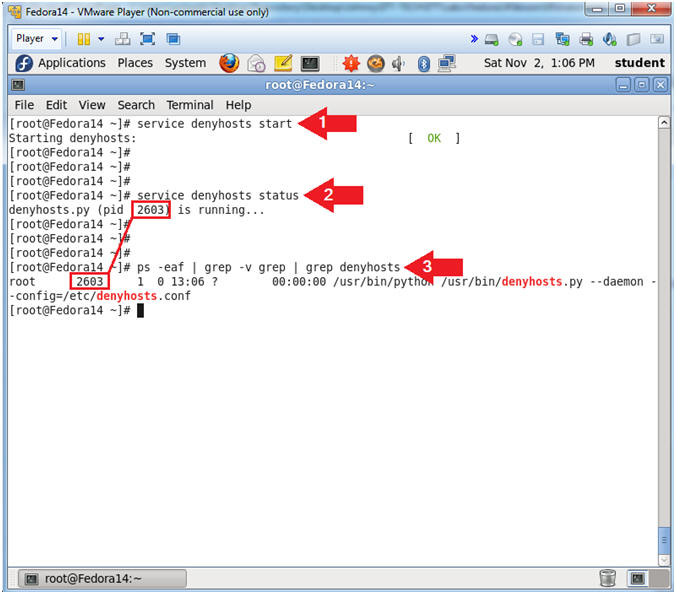
- Let's start up the denyhosts daemon.
- Instruction:
- service denyhosts start
- service denyhosts status
- ps -eaf | grep -v grep | grep denyhosts
- Note(FYI):
- Start up the denyhosts service.
- Check the status of the denyhosts
service, which shows the PID.
- Here is another way to see the actual
process and the PID.
|
Section 6: Denyhost
Configuration File |
- Denyhosts Configuration File Location
- Instruction:
- ls -l /etc/denyhosts.conf
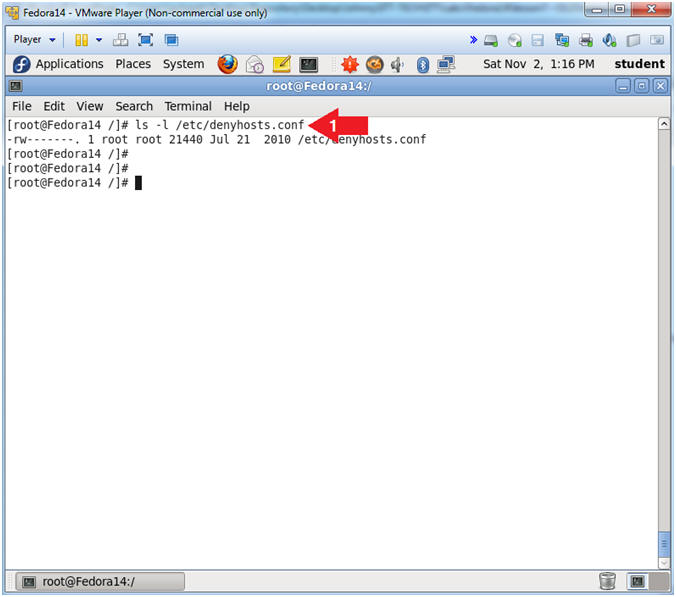
- Denyhosts Configuration File Location
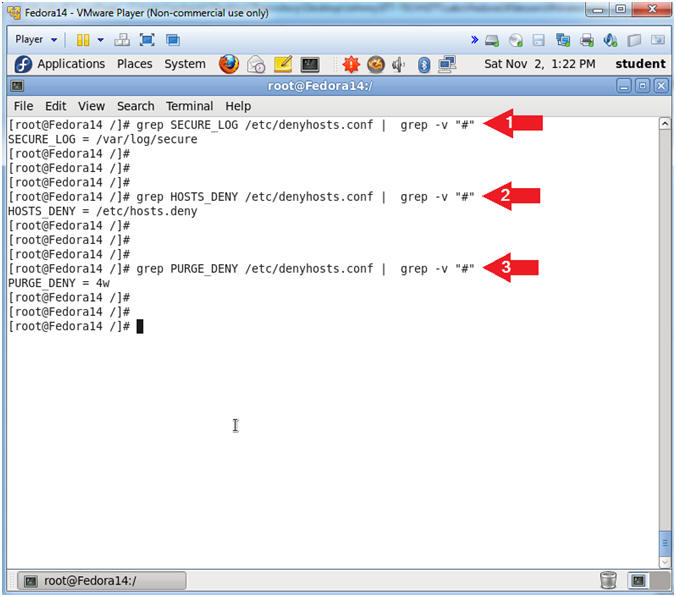
- Instruction:
- grep SECURE_LOG /etc/denyhosts.conf |
grep -v "#"
- grep HOSTS_DENY /etc/denyhosts.conf |
grep -v "#"
- grep PURGE_DENY /etc/denyhosts.conf |
grep -v "#"
- Note(FYI):
- /var/log/secure - Contains information
related to authentication and authorization privileges. For example,
sshd logs all the messages here, including unsuccessful login.
- /etc/hosts.deny - This file is used to
deny services to IP addresses for all xinted services.
- Do not purge for 4 weeks.
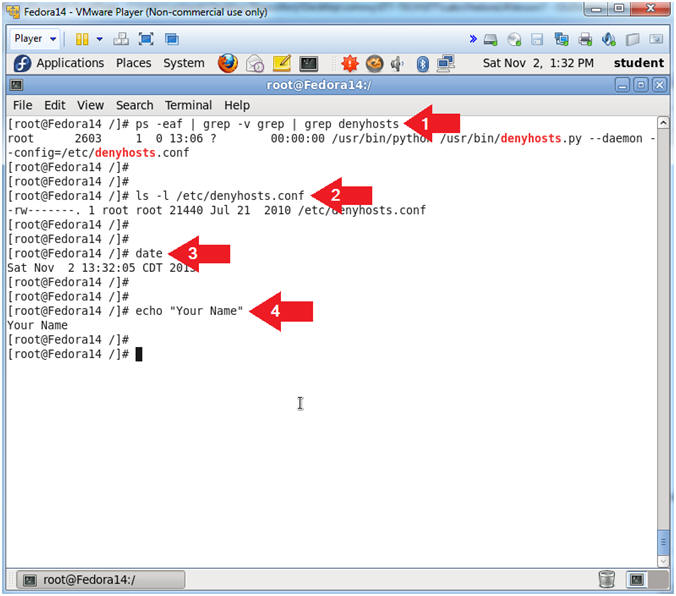
- Proof of Lab
- Instructions:
- ps -eaf | grep -v grep | grep denyhosts
- ls -l /etc/denyhosts.conf
- date
- echo "Your Name"
- Replace the string "Your Name" with
your actual name.
- e.g., echo "John Gray"
-
Proof of Lab Instructions:
- Do a PrtScn
- Paste into a word document
- Upload to Moodle
-
|
 
|