(Fedora: Lesson 7)
{ Installing, Configuring and Securing SSHD }
| Section 0. Background Information |
- What is Secure Shell?
- Secure Shell (SSH) is a network protocol for secure data communication, remote shell services or command execution and other secure network services between two networked computers that it connects via a secure channel over an insecure network.
- The protocol specification distinguishes two major versions that are referred to as SSH-1 and SSH-2.
- The best-known application of the protocol is for access to shell accounts on Unix-like operating systems.
- It was designed as a replacement for Telnet and other insecure remote shell protocols such as the Berkeley rsh and rexec protocols, which send information, notably passwords, in plaintext, rendering them susceptible to interception and disclosure using packet analysis.
- The encryption used by SSH is intended to provide confidentiality and integrity of data over an unsecured network, such as the Internet.
- What Is YUM?:
- The Yellowdog Updater, Modified (YUM) is an open-source command-line package-management utility for RPM-compatible Linux operating systems and has been released under the GNU General Public License. YUM has been adopted by Red Hat Enterprise Linux, Fedora, CentOS, and many other RPM-based Linux distributions, including Yellow Dog Linux itself, where it has replaced the original YUP utility
- Pre-Requisite Lab
-
Lab
Notes
- In this lab we will do the following:
- Install openssh-server.
- Configure openssh-server.
- Test openssh-server.
- In this lab we will do the following:
- Legal Disclaimer
- As a condition of your use of this Web site, you warrant to computersecuritystudent.com that you will not use this Web site for any purpose that is unlawful or that is prohibited by these terms, conditions, and notices.
- In accordance with UCC § 2-316, this product is provided with "no warranties, either express or implied." The information contained is provided "as-is", with "no guarantee of merchantability."
- In addition, this is a teaching website that does not condone malicious behavior of any kind.
- You are on notice, that continuing and/or using this lab outside your "own" test environment is considered malicious and is against the law.
- © 2013 No content replication of any kind is allowed without express written permission.
| Section 1: Edit the Fedora14 Virtual Machine |
- Open Your VMware Player
- Instructions:
- On Your Host Computer, Go To
- Start --> All Program --> VMWare --> VMWare Player
- Instructions:
- Edit Fedora 14 Virtual Machine Settings
- Instructions:
- Highlight Fedora14
- Click Edit virtual machine settings
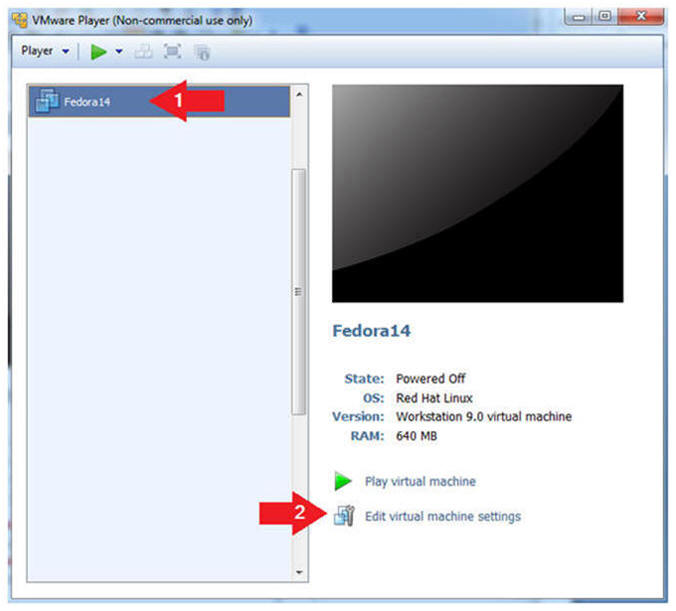
- Instructions:
- Edit Network Adapter
- Instructions:
- Highlight Network Adapter
- Select Bridged
- Click the OK Button
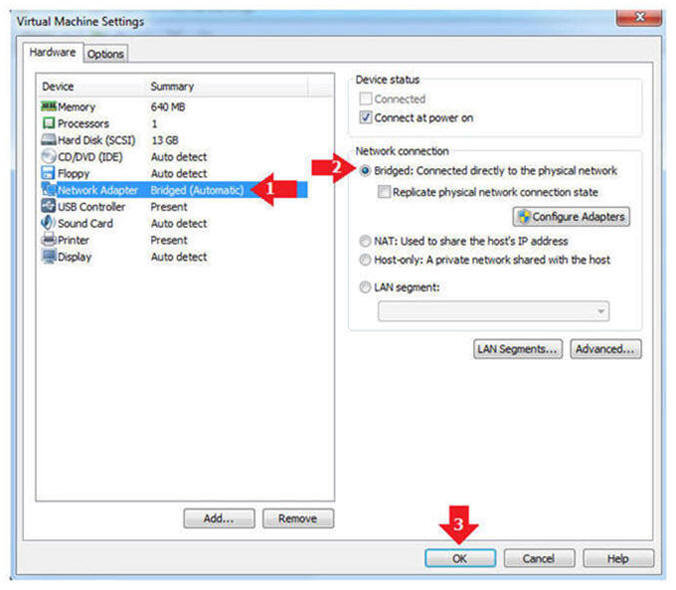
- Instructions:
| Section 2: Play the Fedora14 Virtual Machine |
- Start the Fedora14 VM
- Instructions:
- Click on the Fedora14 VM
- Click on Play virtual machine
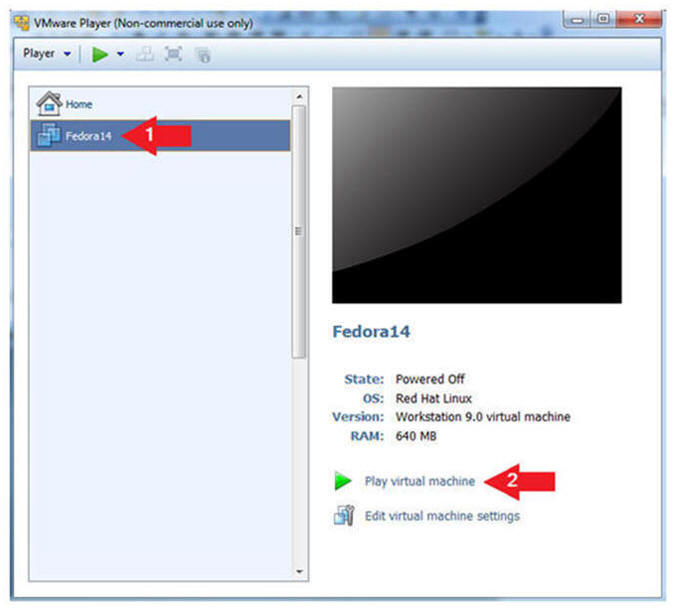
- Instructions:
| Section 3: Login to your Fedora14 server. |
- Login As student
- Instructions:
- Click on student
- Provide student password
- Click the Login Button
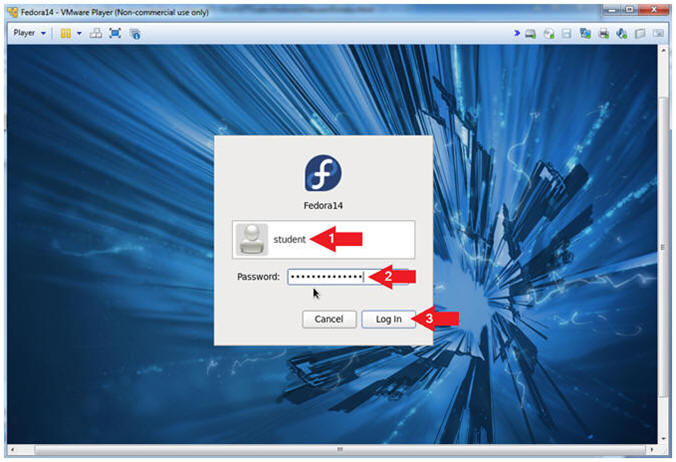
- Instructions:
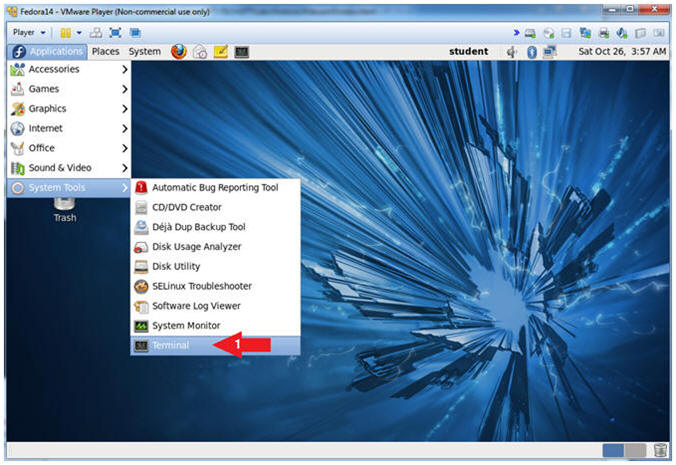
- Start Up A Terminal.
- Applications --> System Tools --> Terminal
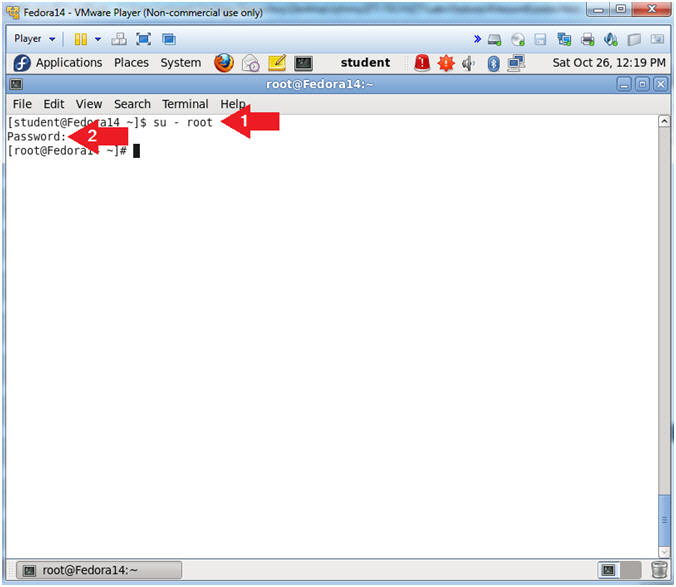
- Switch User to root
- Instruction:
- su - root
- Supply the Root Password
-
- Instruction:
- Get IP Address
- Instructions:
- ifconfig -a
- Notes (FYI):
- As indicated below, my IP address is 192.168.1.110.
- Please record your IP address.

- Instructions:
| Section 4: Installing openssh |
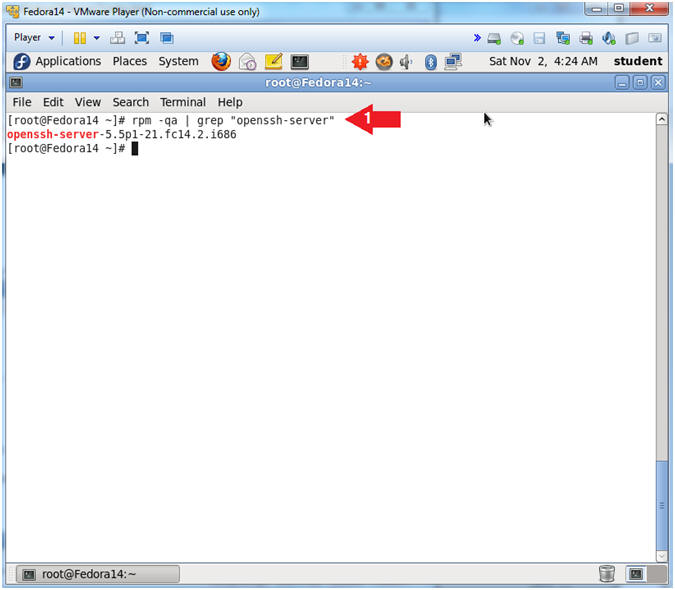
- Check to see if openssh-server is installed.
- Instruction:
- rpm -qa | grep "openssh-server"
- Note(FYI):
- rpm - RPM Package Manager
- q = Query
- a = all
- grep = Search for string "open-server"
- Instruction:
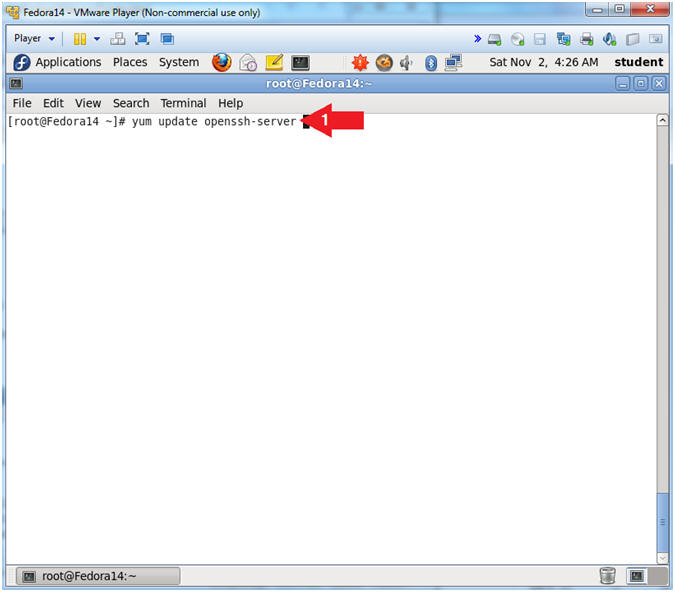
- Let's update openssh-server
- Instruction:
- yum update openssh-server
- Note(FYI):
- If openssh-server was not found, then your
command would be:
- yum install openssh-server
- It's always a good idea to make sure you have the latest update for ssh.
- If openssh-server was not found, then your
command would be:
- Instruction:
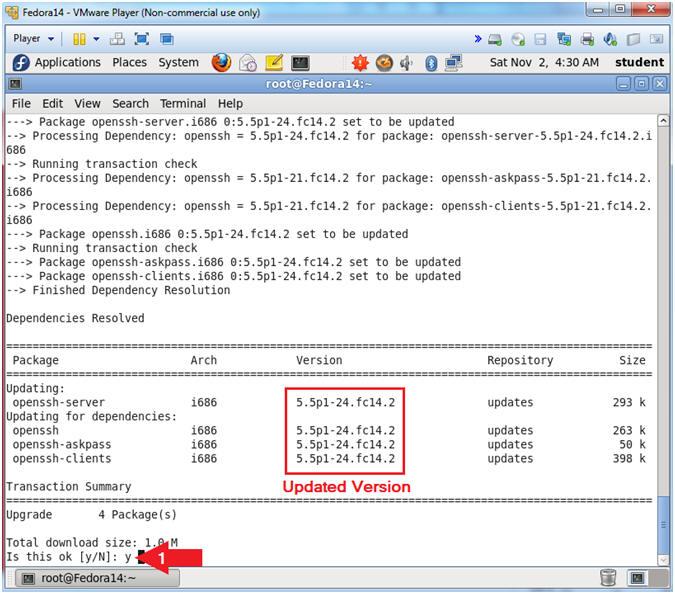
- Install openssh-server.
- Instructions:
- Select "y"
- Note(FYI):
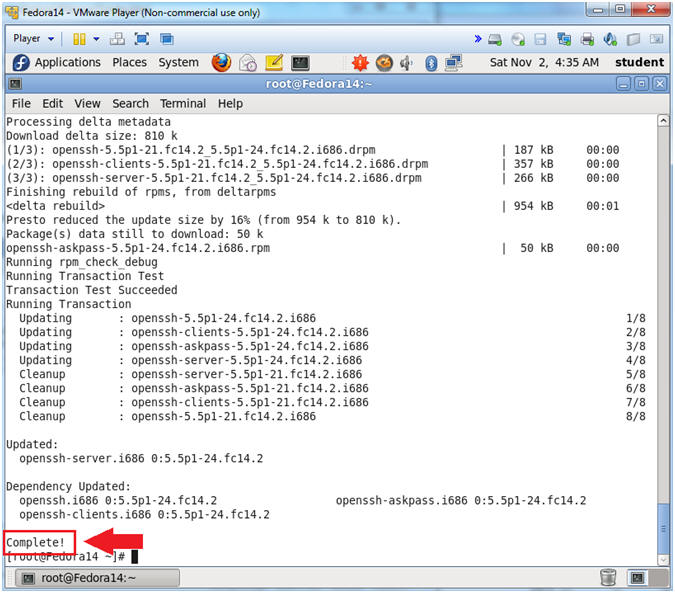
- In (Section 4, Step 1) the version of ssh is 5.5p1-21.fc14.2.i686.
- YUM reports that the latest update is 5.5p1-24.fc14.2.
- Instructions:
- Installation Analysis
- Note(FYI):
- You will see that the below packages have been updated followed by the "Complete!" message.
- Note(FYI):
| Section 5: Starting openssh |
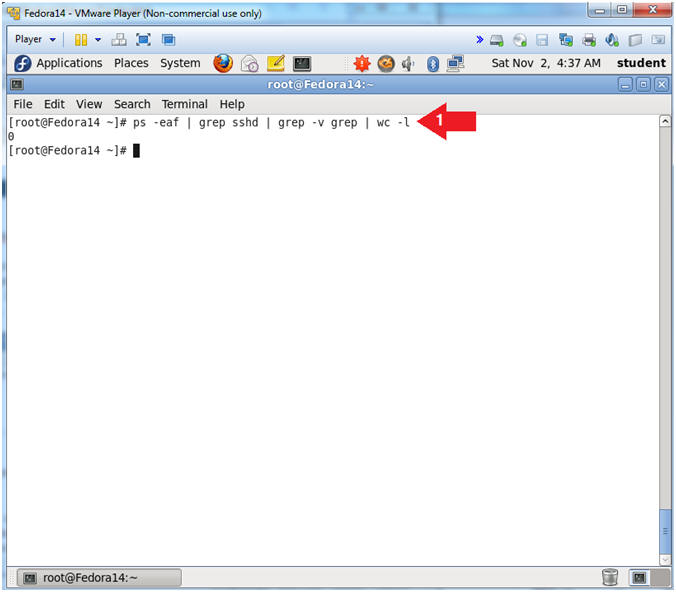
- Check to see if sshd is running.
- Instructions:
- ps -eaf | grep sshd | grep -v grep | wc -l
- Note(FYI):
- ps -eaf = List all running processes
- grep sshd = search for sshd is the process list.
- grep -v grep = ignore the grep process in the process list.
- wc -l = count how many times sshd is listed.
- As a result, "0" line were counted, which means sshd is not running.
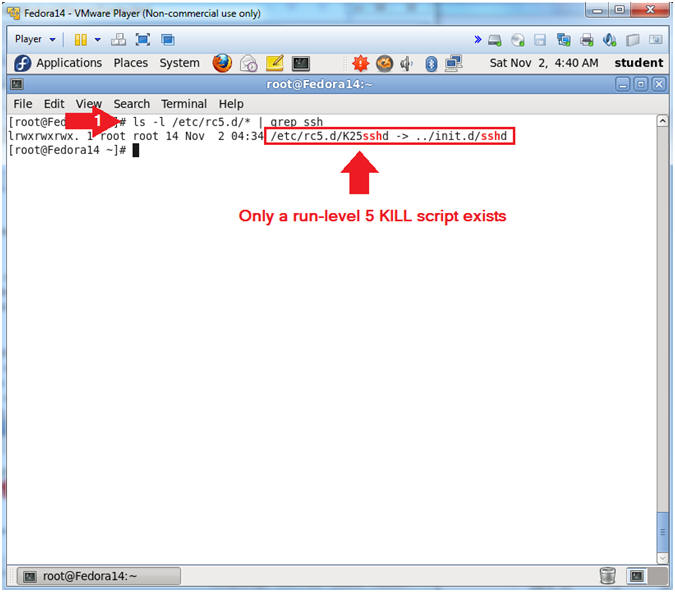
- Instructions:
- Why is sshd not running although openssh-server
was previously installed and now updated?
- Instructions:
- ls -l /etc/rc5.d/* | grep ssh
- Note(FYI):
- We are checking to see if there is a start up script in run-level 5 for sshd. Remember run-level 5 is the graphical multiuser mode where the file systems are mounted and the network is up.
- The result shows us that there is only a kill script, but not a start up script. All scripts that start with a "K" are kill scripts, and all scripts that start with a "S" are deemed startup scripts.
- Therefore, if there is not a startup script for sshd, then that would explain why sshd is not running.
- Instructions:
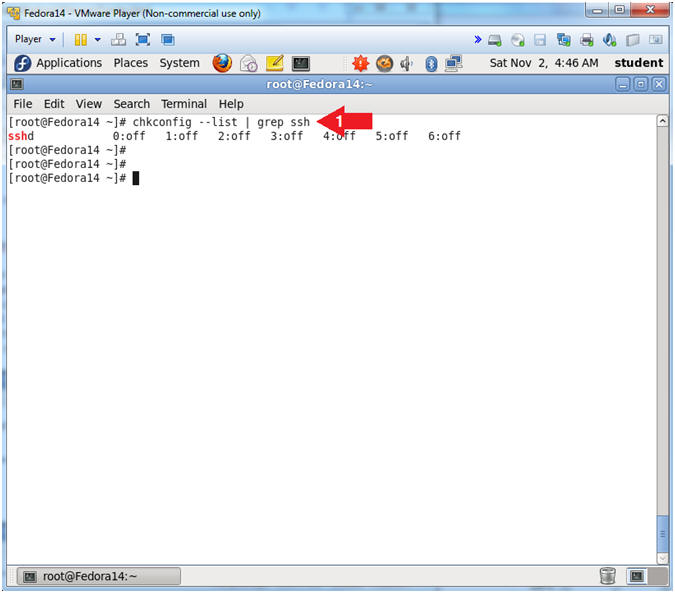
- Let's use chkconfig to verify that there
is not a start up script for sshd.
- Instruction:
- chkconfig --list | grep ssh
- Note(FYI):
- chkconfig - updates and queries runlevel information for system services.
- chkconfig has five distinct functions:
adding new services for management, removing services from
management,
listing the current startup information for services, changing the startup information for services, and checking
the startup state of a particular service. - Notice that run-levels 0 through 6 do not have a startup script for sshd.
- Instruction:
- Create Startup scripts for sshd
- Instructions:
- chkconfig sshd --level 2345 on
- chkconfig --list | grep ssh
- Note(FYI):
- Create SSHD start up scripts for run-level 2, 3, 4 and 5.
- Notice that chkconfig now shows that a startup script exists for run levels 2, 3, 4 and 5.

- Instructions:
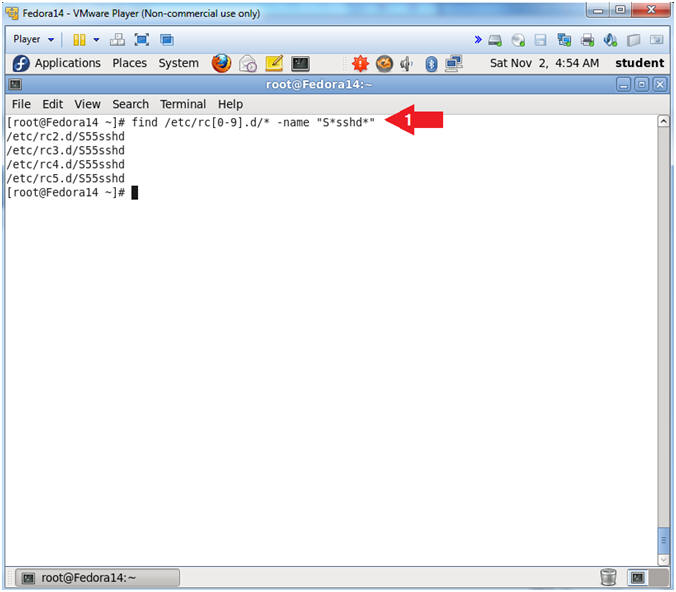
- Verify Startup scripts have been created using
the find command.
- Instructions:
- find /etc/rc[0-9].d/* -name "S*sshd*"
- Note(FYI):
- find /etc/rc[0-9].d/*, Search file and directories in /etc/, where rc directories need have a number after the "rc" and before the ".d". (e.g., rd2.d).
- The SSHD start up scripts start with a "S".
- -name "S*sshd*", means search for anything that starts with a "S" and contains sshd after the "S".
- Instructions:
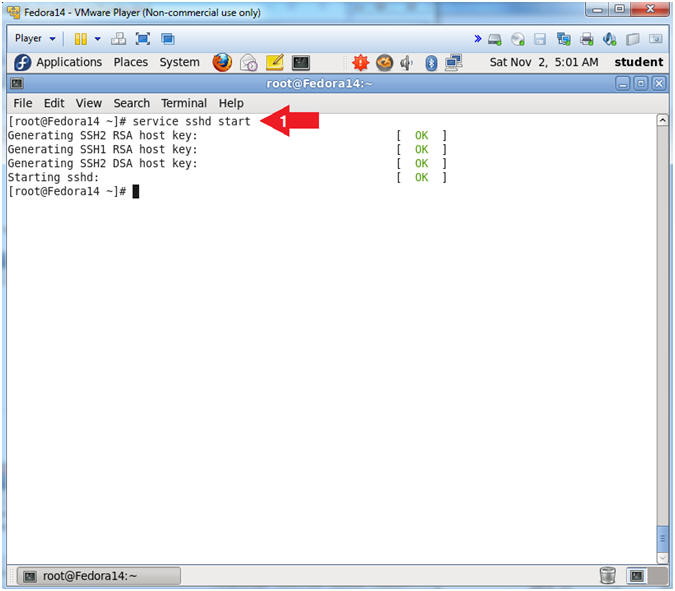
- Let's start up the sshd daemon.
- Instruction:
- service sshd start
- Note(FYI):
- The first time that sshd starts it will generate SSH2 and SSH1 host keys.
- Instruction:
- Verify sshd is running.
- Instruction:
- ps -eaf | grep sshd | grep -v grep

- Instruction:
| Section 6: Secure openssh |
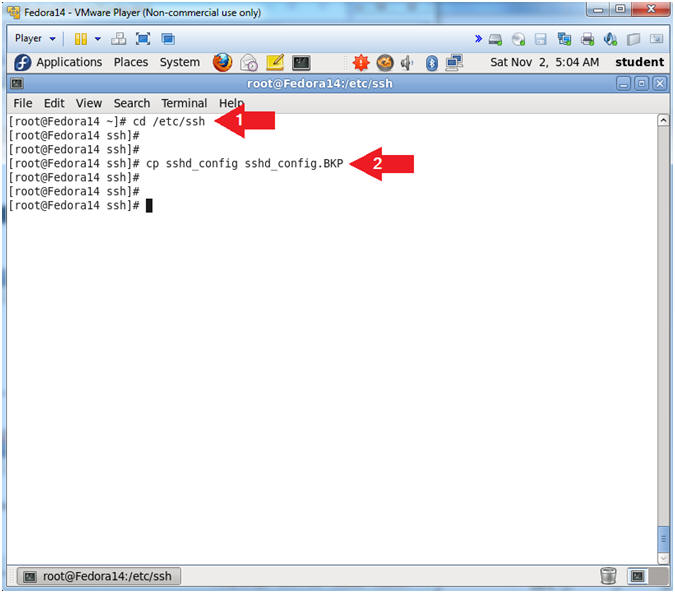
- Make a sshd_config backup file.
- Instruction:
- cd /etc/ssh
- cp sshd_config sshd_config.BKP
- Note(FYI):
- Change directory to /etc/ssh. This is where the ssh configuration files exist.
- Make a backup copy, so if you mess something up, you can revert to the original file.
- Instruction:
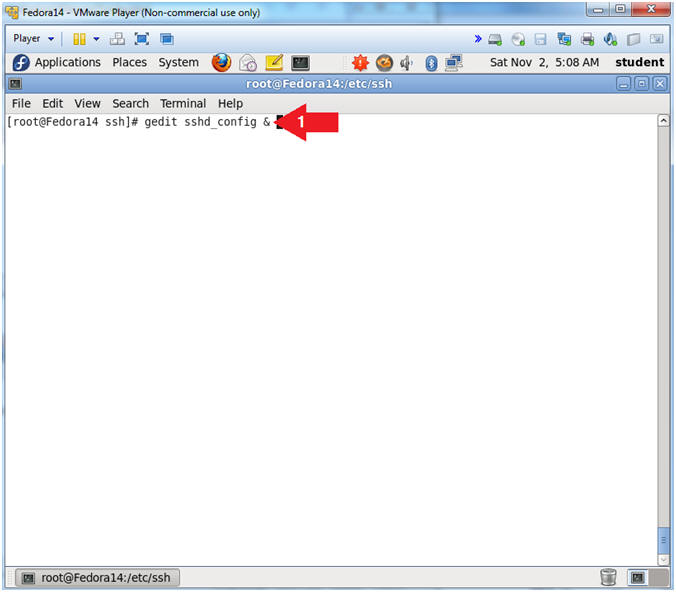
- Open sshd_config
- Instruction:
- gedit sshd_config &
- Note(FYI):
- gedit, is a text editor for the GNOME desktop environment.
- sshd_config is the name of the file.
- &, means put the process of opening gedit sshd_config in the background.
- Instruction:
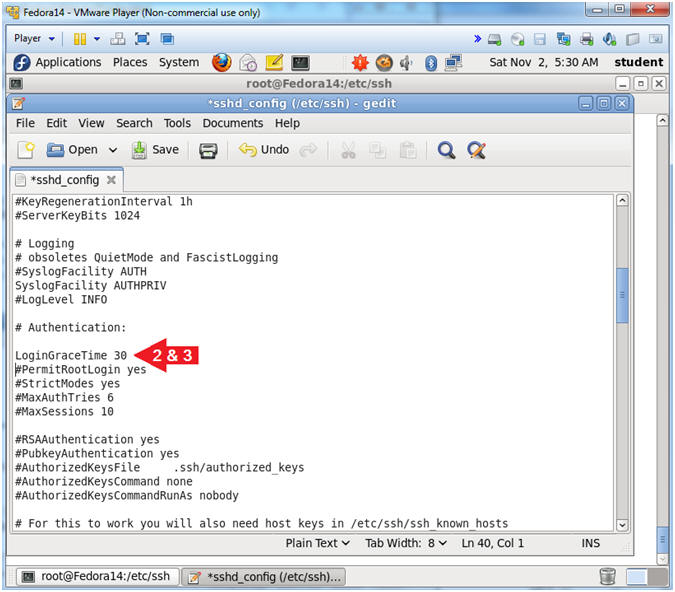
- Find LoginGraceTime
- Instructions:
- Arrow down to "#LoginGraceTime 2m"
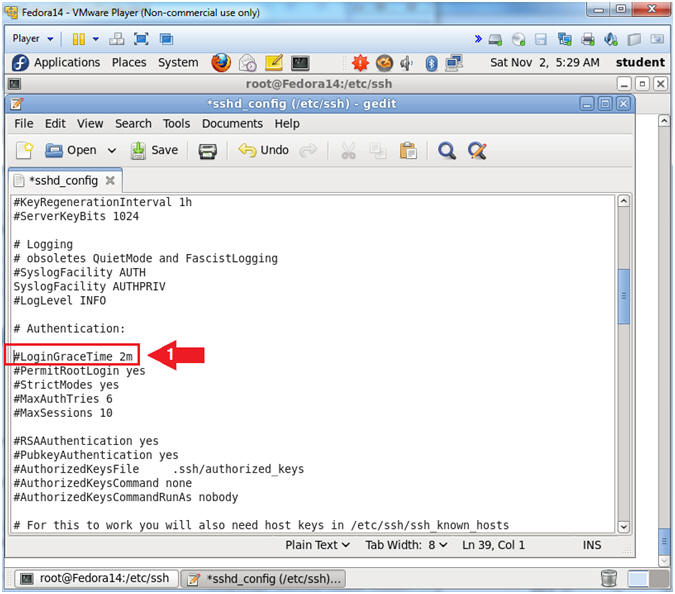
- Instructions:
- Reduce the maximum amount of time allowed to
successfully login before disconnecting.
- Instructions:
- Delete the "#" character that proceeds "#LoginGraceTime 2m".
- Change 2m to 30.
- Note(FYI):
- The default of 2 minutes is too much time to stay open for an unauthenticated connection attempt. So, we will reduce the amount of time to remain open from 2 minutes to 30 seconds.
- Instructions:
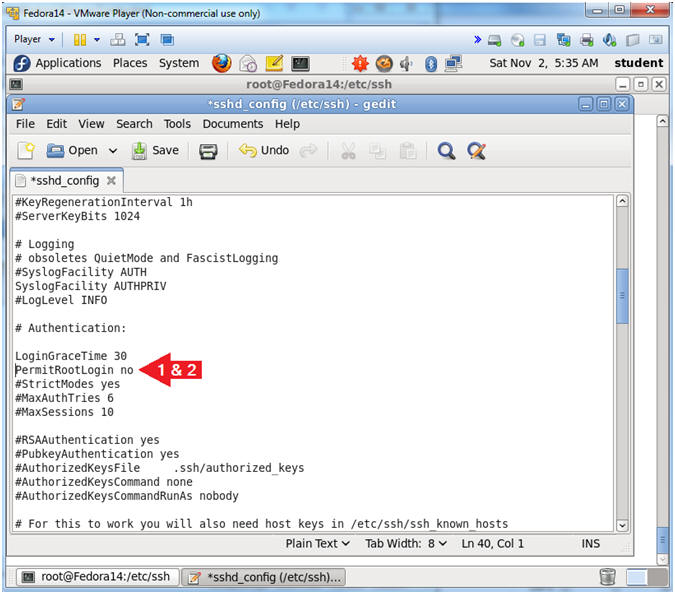
- Find
"#PermitRootLogin yes"
- Instruction:
- Arrow down to "#PermitRootLogin yes"
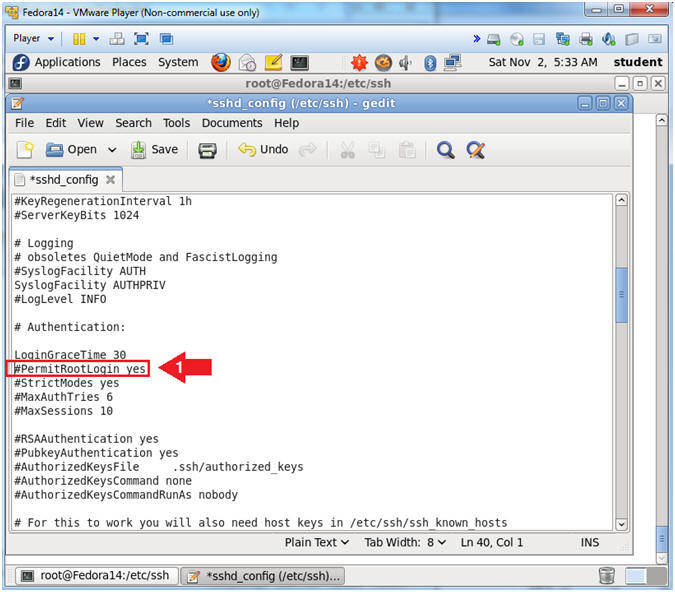
- Instruction:
- Configure PermitRootLogin
- Instructions:
- Delete the "#" character that proceeds PermitRootLogin.
- Replace "yes" with a "no" and that follows PermitRootLogin.
- Note(FYI):
- This will disabled the ability for somebody to login as root.
- Instructions:
- Configure PAM authentication
- Instructions:
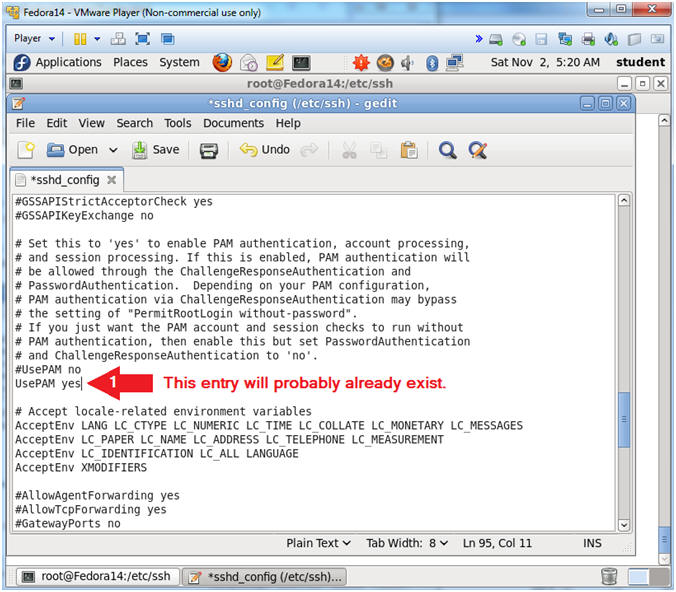
- Arrow down until you get to the line "#UsePAM no"
- Verify "UsePAM yes" exists under the line "#UsePAM no"
- Note(FYI):
- If the line "UsePAM yes" already exists, then you are not required to do anything. If it does NOT exist, then add it.
- Basically, we need to verify that there is a line stating "UsePAM yes".
- Instructions:
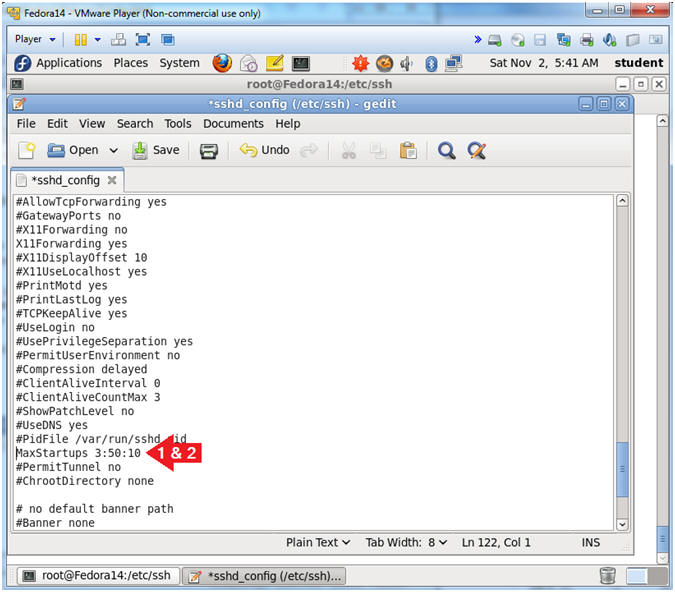
- Find "#MaxStartups 10"
- Instructions:
- Arrow down until you get to the line "#MaxStartups 10"
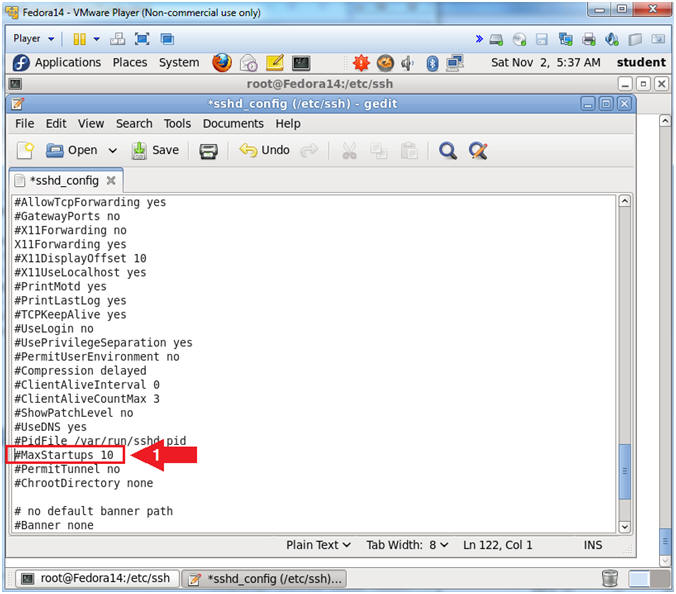
- Instructions:
- Limit the maximum number of unauthenticated
connections that the ssh server will handle at the same time.
- Instructions:
- Remove the "#" character that proceeds "#MaxStartups 10".
- Change 10 to 3:50:10
- Note(FYI):
- The smaller this is, the harder it is for attackers to make parallel, coordinated brute force attempts with multiple connections.
- The colon separated values tells the ssh server to, "allow 3 users to attempt logging in at the same time, and to randomly and increasingly drop connection attempts between 3 and the maximum of 10".
- This should be increased on servers with a substantial number of valid ssh users.
- Instructions:
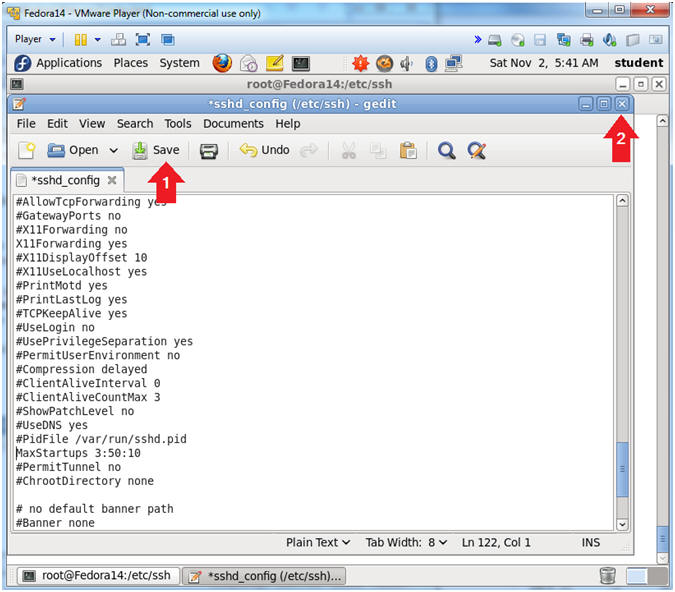
- Save and Close sshd_config
- Instructions:
- Click Save
- Click the "X" to Close
- Instructions:
- Restart the sshd daemon.
- Instructions:
- service sshd restart
- Note(FYI):
- When ever you make a change to the sshd_config file, you will need to restart the sshd daemon in order for the changes to take affect.

- Instructions:
| Section 7: Configure Firewall |
- Open the Firewall
- Instructions:
- System --> Administration --> Firewall
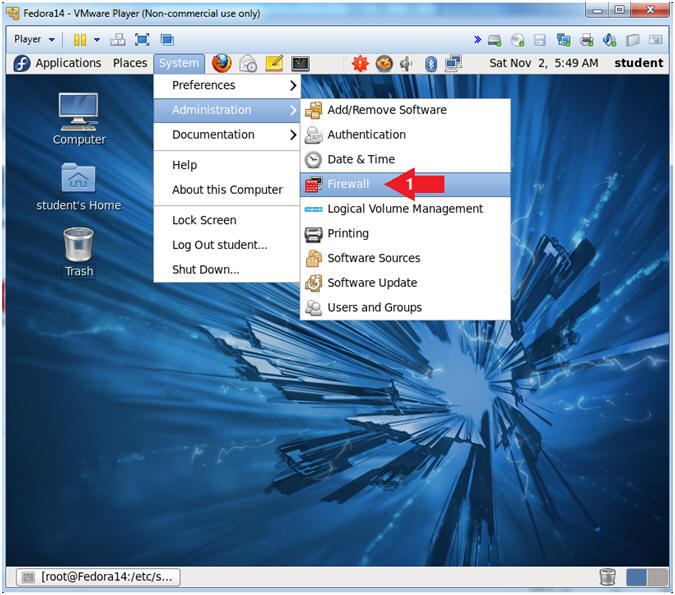
- Instructions:
- Firewall Configuration Startup Message
- Instructions:
- Click the Close Button
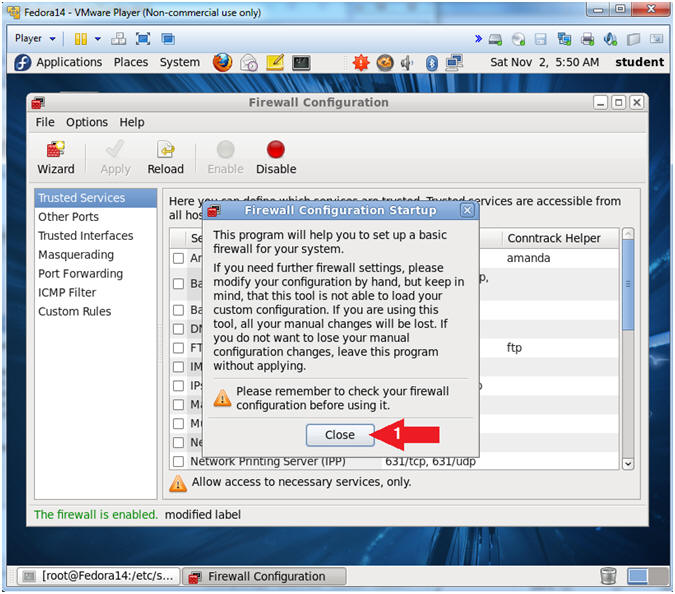
- Instructions:
- Enter the root password
- Instructions:
- Supply the root password
- Click the Authenticate Button

- Instructions:
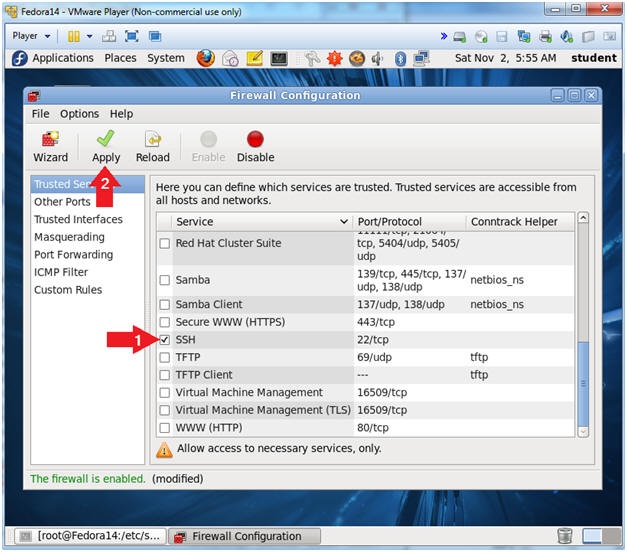
- Enable SSH
- Instructions:
- Check the SSH checkbox
- If this box is already checked, uncheck and recheck it.
- Click on the Apply Green Checkmark
- Check the SSH checkbox
- Instructions:
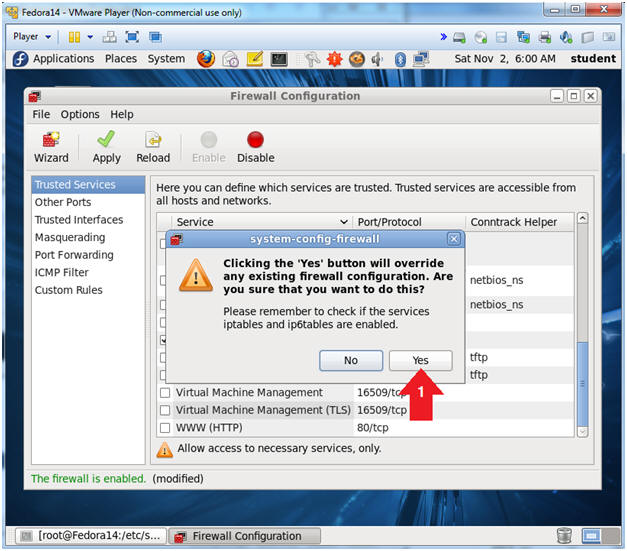
- system-config-firewall message
- Instructions:
- Click the Yes button
- Instructions:
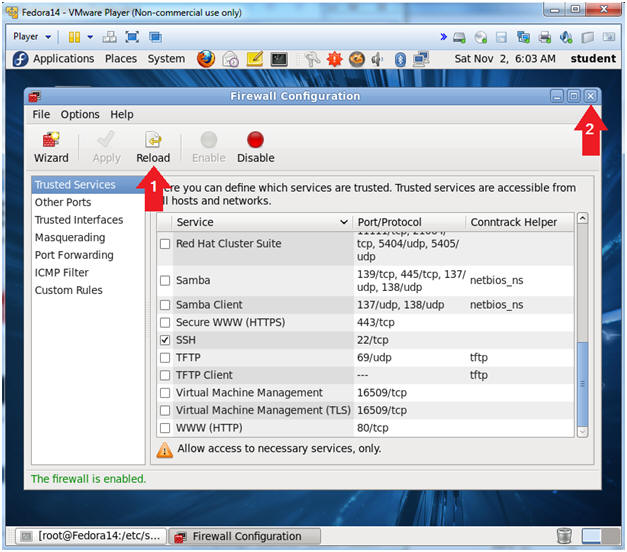
- Reload Firewall
- Instructions:
- Click Reload
- Click the X to close
- Instructions:
| Section 8: Test sshd to not allow root to login |
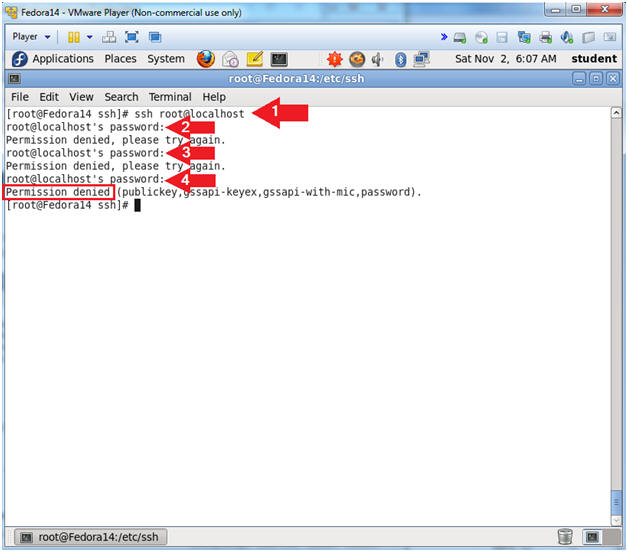
- Test sshd to not allow root to login
- Instructions:
- ssh root@localhost
- Supply root password
- Supply root password again
- Supply root password again
- Note(FYI):
- If you get prompted for an RSA key fingerprint, then answer "yes"
- Notice that even though you are typing the correct root password you are not able to login.
- Instructions:
| Section 9: Proof of Lab |
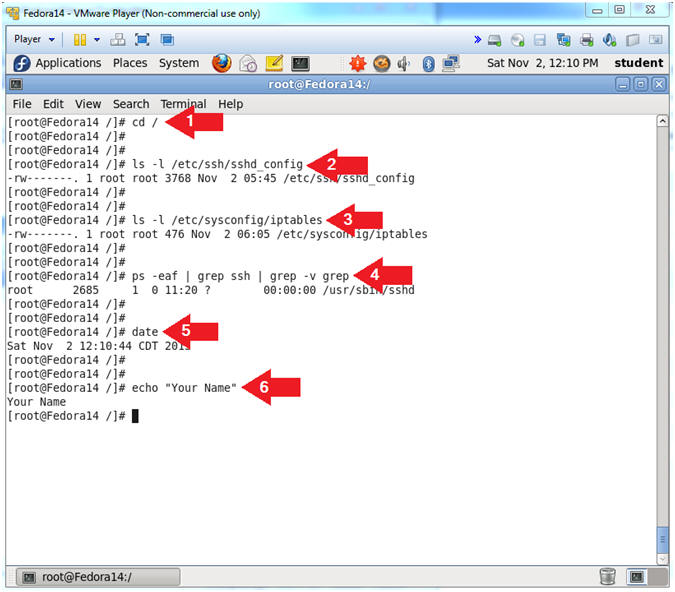
- Proof of Lab
- Instructions:
- cd /
- ls -l /etc/ssh/sshd_config
- ls -l /etc/sysconfig/iptables
- ps -eaf | grep ssh | grep -v grep
- date
- echo "Your Name"
- Replace the string "Your Name" with your actual name.
- e.g., echo "John Gray"
-
Proof of Lab Instructions
- Press both the <Ctrl> and <Alt> keys at the same time.
- Do a <PrtScn>
- Paste into a word document
- Upload to Moodle
-
- Instructions: