(Fedora: Lesson 9)
{ Installing Apache }
| Section 0. Background Information |
- What is the apache web server?
- The Apache HTTP Server, commonly referred to as Apache, is web server software notable for playing a key role in the initial growth of the World Wide Web.
- Pre-Requisite Lab
-
Lab
Notes
- In this lab we will do the following:
- Install Apache Web Server.
- Create Apache Web Server Start Up Scripts.
- Configured the Firewall to allow people to view the Apache Web Server.
- We will create a test webpage.
- In this lab we will do the following:
- Legal Disclaimer
- As a condition of your use of this Web site, you warrant to computersecuritystudent.com that you will not use this Web site for any purpose that is unlawful or that is prohibited by these terms, conditions, and notices.
- In accordance with UCC § 2-316, this product is provided with "no warranties, either express or implied." The information contained is provided "as-is", with "no guarantee of merchantability."
- In addition, this is a teaching website that does not condone malicious behavior of any kind.
- You are on notice, that continuing and/or using this lab outside your "own" test environment is considered malicious and is against the law.
- © 2013 No content replication of any kind is allowed without express written permission.
| Section 1: Edit the Fedora14 Virtual Machine |
- Open Your VMware Player
- Instructions:
- On Your Host Computer, Go To
- Start --> All Program --> VMWare --> VMWare Player
- Instructions:
- Edit Fedora 14 Virtual Machine Settings
- Instructions:
- Highlight Fedora14
- Click Edit virtual machine settings
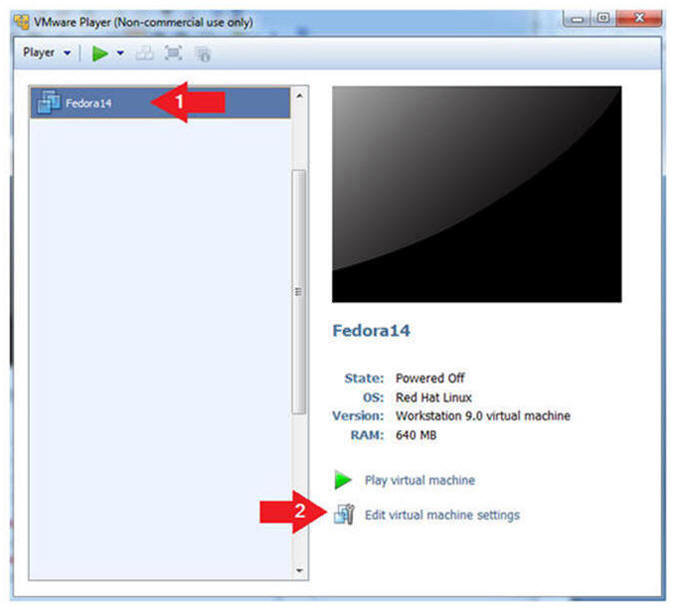
- Instructions:
- Edit Network Adapter
- Instructions:
- Highlight Network Adapter
- Select Bridged
- Click the OK Button
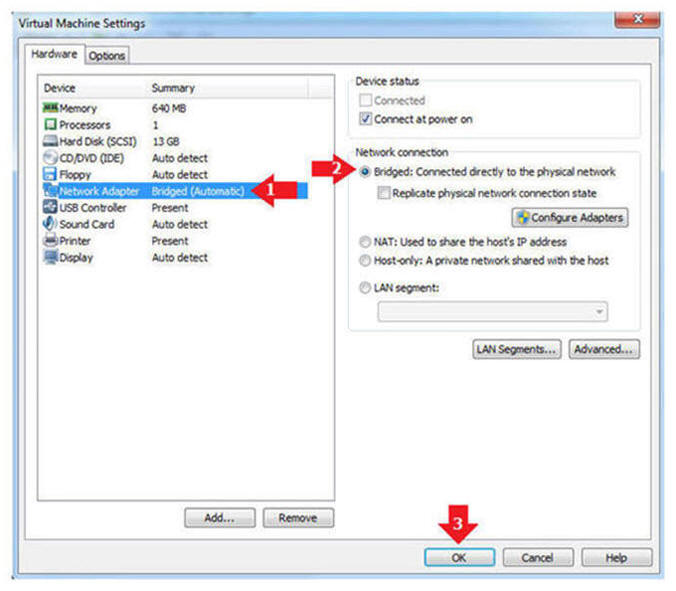
- Instructions:
| Section 1: Play Virtual Machine |
- Start the Fedora14 VM
- Instructions:
- Click on the Fedora14 VM
- Click on Play virtual machine
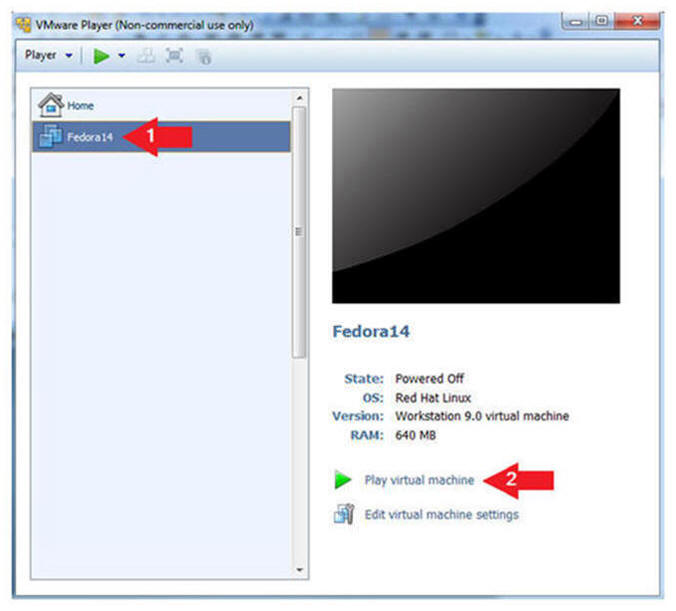
- Instructions:
| Section 2: Login to your Fedora14 server. |
- Login As student
- Instructions:
- Click on student
- Provide student password
- Click the Login Button
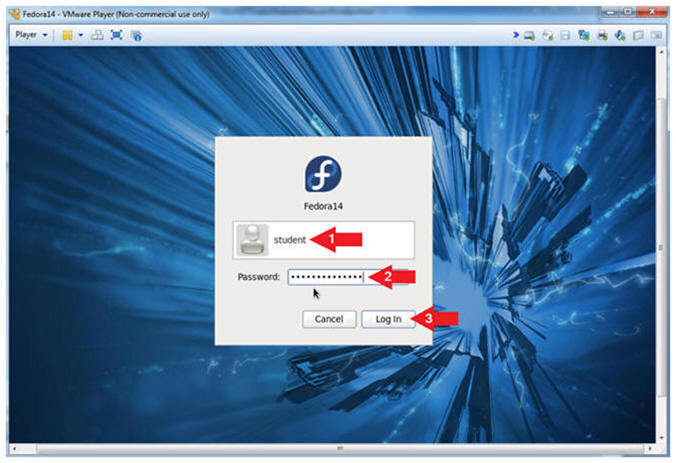
- Instructions:
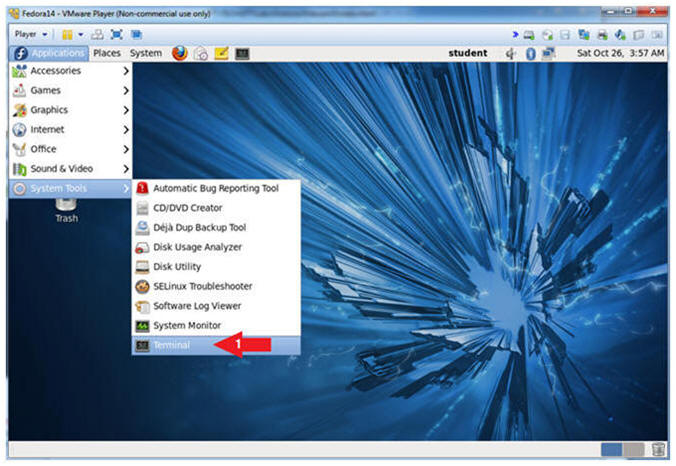
- Start Up A Terminal.
- Instruction:
- Applications --> System Tools --> Terminal
- Instruction:
- Switch User to root
- Instruction:
- su - root
- Supply the Root Password
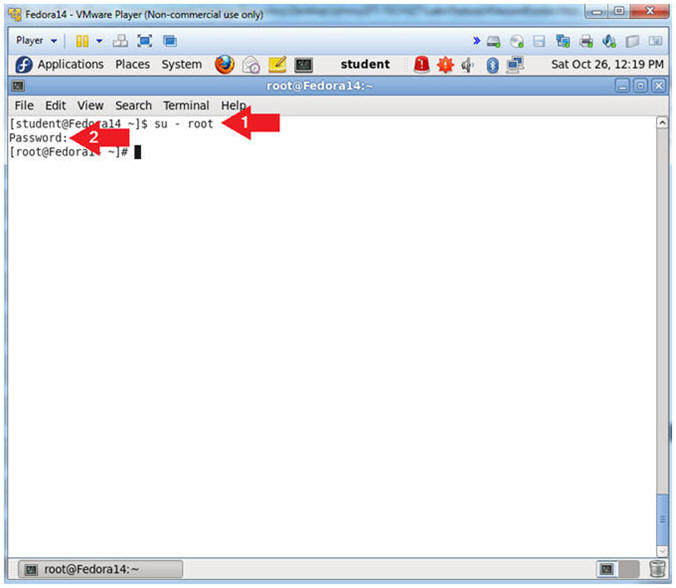
- Instruction:
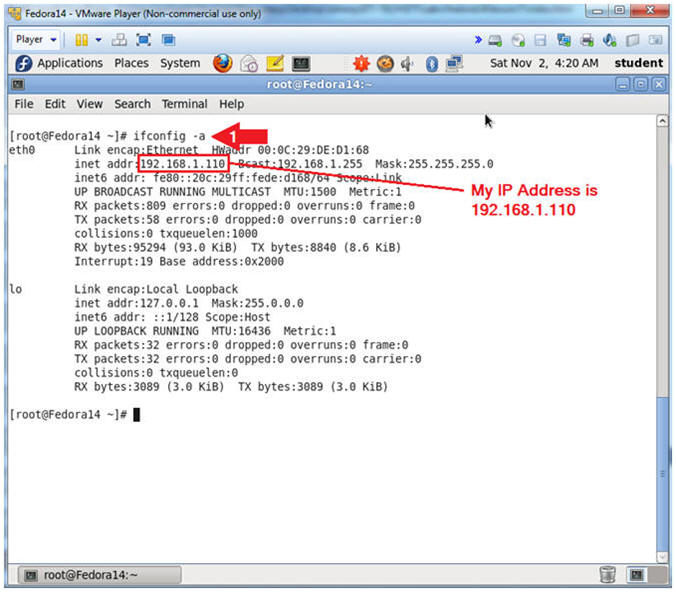
- Get IP Address
- Instructions:
- ifconfig -a
- Notes (FYI):
- As indicated below, my IP address is 192.168.1.110.
- Please record your IP address.
- Instructions:
| Section 3: Searching the server to see if apache is installed |
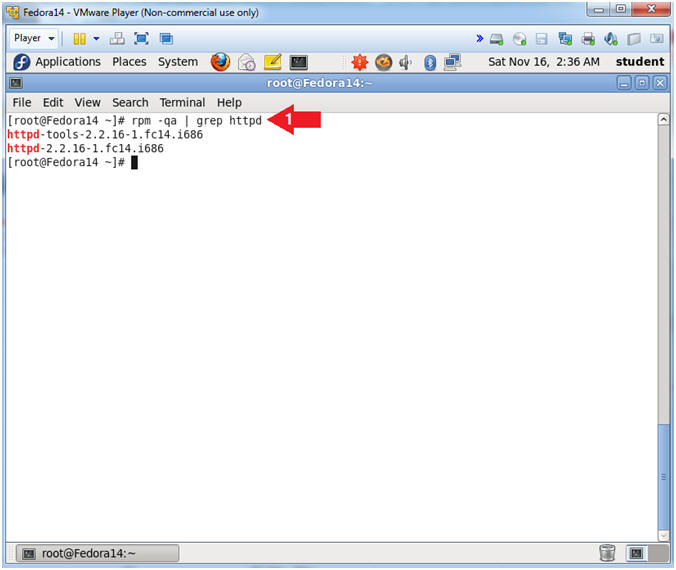
- Is httpd installed?
- Instructions:
- rpm -qa | grep httpd
- Note(FYI):
- rpm, RPM Package Manager
- -qa, "q" means query and "a" means all.
- grep httpd, print lines matching the string "httpd"
- It is apparent that httpd is installed at version 2.2.26.1.
- Instructions:
| Section 4: Updating Apache |
- List available httpd packages
- Instructions:
- yum list | grep httpd
- Note(FYI):
- yum, Yellowdog Updater Modified
- list, list all available packages
- grep httpd, print lines matching the string "httpd"
- Notice the update to httpd.i686 is 2.2.17.1.fc14.
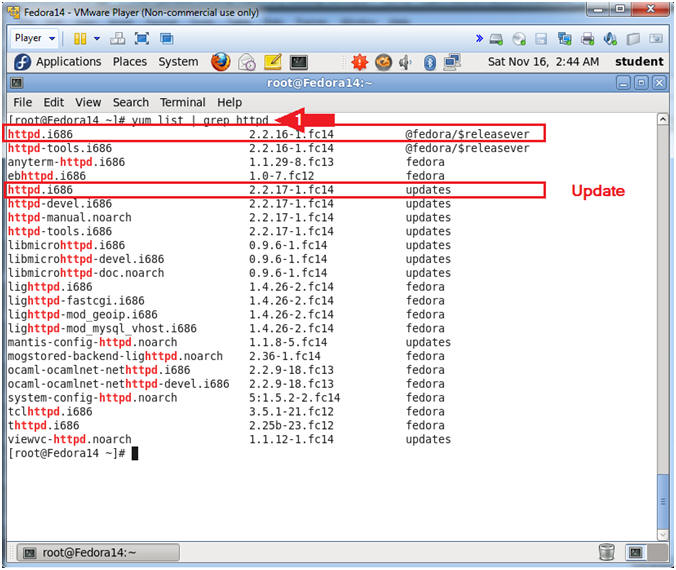
- Instructions:
- Let's install/update httpd
- Instructions:
- yum install httpd.i686
- Is this ok [y/N]: y
- Note(FYI):
- yum, Yellowdog Updater Modified
- install, specified package
- Since httpd is already installed on the machine, httpd will be updated to the latest version.
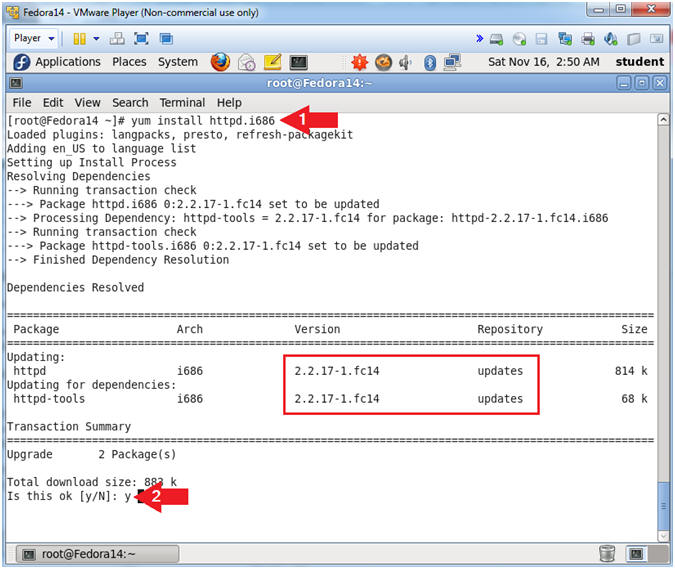
- Instructions:
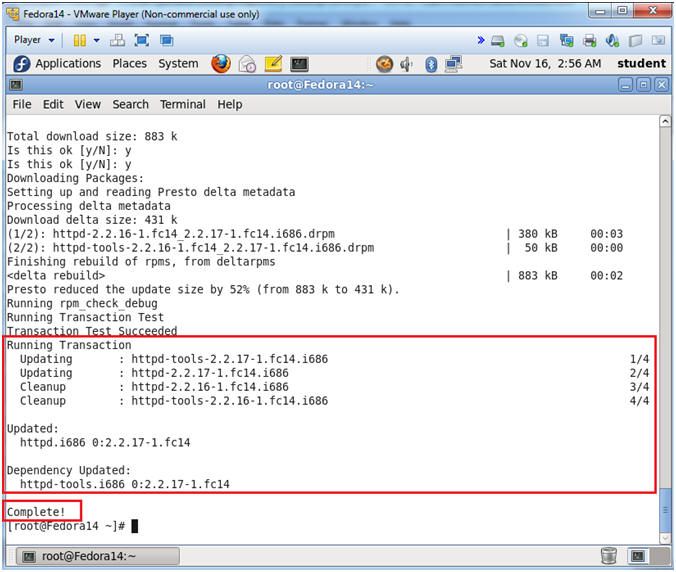
- Reviewing the installation Log
- Note(FYI):
- Just note that httpd and httpd-tools was updated and the installation completed successfully.
- Note(FYI):
| Section 5: Configuring httpd startup scripts |
- Check to see which run levels have a startup
script.
- Instructions:
- chkconfig --list | grep httpd
- Note(FYI):
- chkconfig, updates and queries runlevel information for system services.
- --list, lists all of the services which
chkconfig knows about, and whether they are stopped or started
in each runlevel. - grep httpd, print lines matching the string "httpd"
- Notice all run levels do not have a httpd startup script.
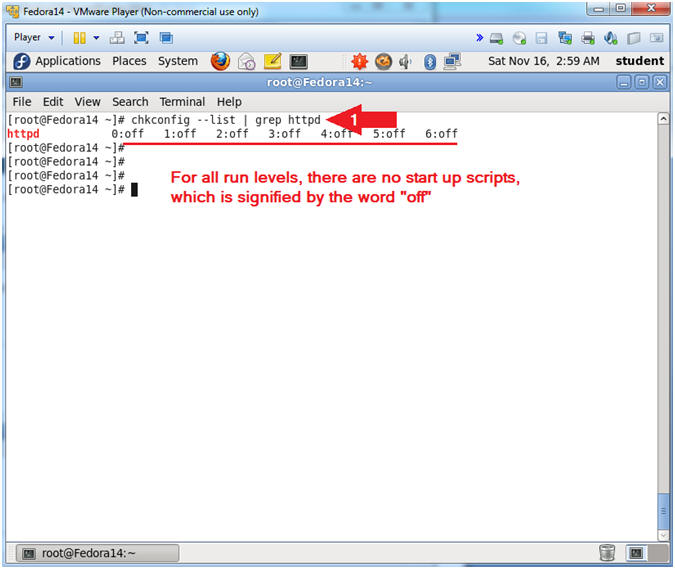
- Instructions:
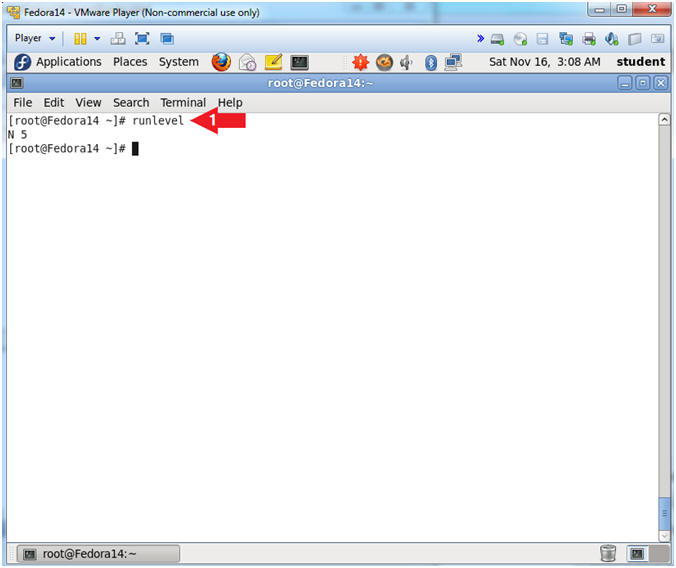
- What runlevel are we in?
- Instructions:
- runlevel
- Note(FYI):
- The term runlevel refers to a mode of operation in one of the computer operating systems that implement Unix System V-style initialization.
- We are in runlevel 5.
- 0, Halt, Shuts down the system.
- 1, Single-user Mode, Mode for administrative tasks.
- 2, Multi-user Mode, Does not configure network interfaces and does not export networks services.
- 3, Multi-user Mode with Networking, Starts the system normally.
- 4, Not used/User-definable, For special purposes.
- 5, Start the system normally with appropriate display manager. ( with GUI ), Same as runlevel 3 + display manager.
- 6, Reboot, Reboots the system.
- Instructions:
- Create a startup script
- Instructions:
- chkconfig httpd --level 35 on
- Note(FYI):
- This will add a start up script for runlevels 3(Multi-user Mode with Networking) and 5(Same as runlevel 3 + display manager).
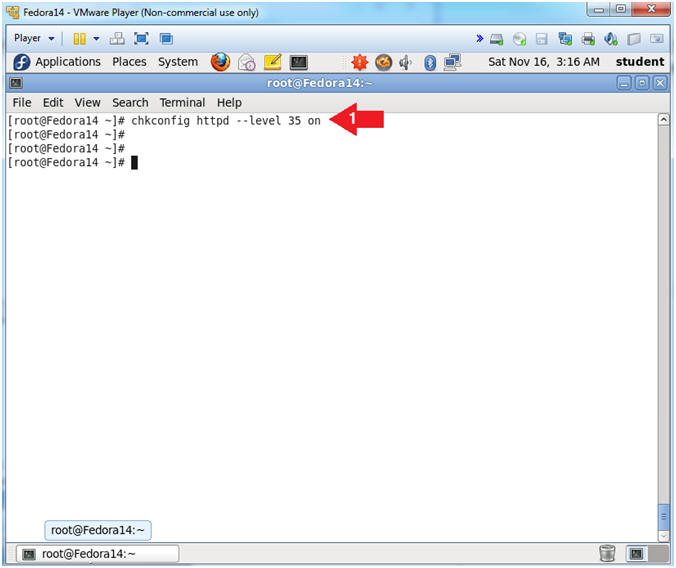
- Instructions:
- Verify startup script were created
- Instructions:
- chkconfig --list | grep httpd
- Note(FYI):
- Notice httpd for runlevel 3 and 5 are now on.
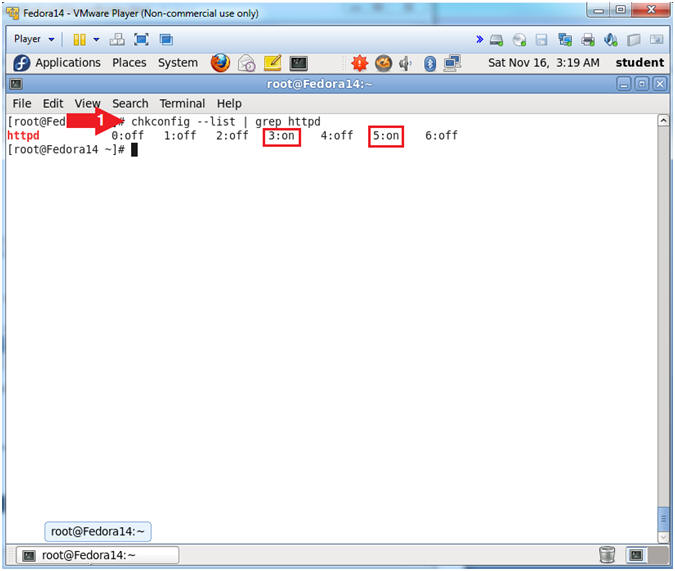
- Instructions:
- Verify Startup scripts have been created using
the find command.
- Instructions:
- find /etc/rc[0-9].d/* -name "S*httpd*"
- Note(FYI):
- find /etc/rc[0-9].d/*, Search file and directories in /etc/, where rc directories need have a number after the "rc" and before the ".d". (e.g., rd2.d).
- The HTTPD start up scripts start with a "S".
- -name "S*httpd*", means search for anything that starts with a "S" and contains httpd after the "S".
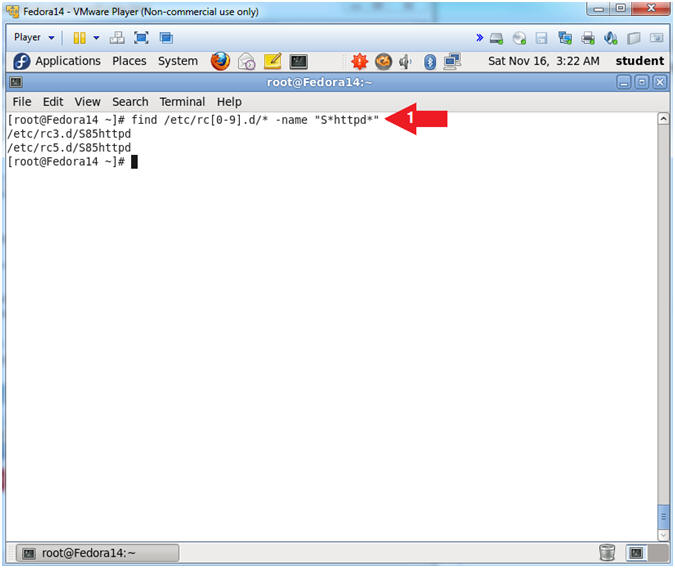
- Instructions:
| Section 6: Starting the Apache Web Server |
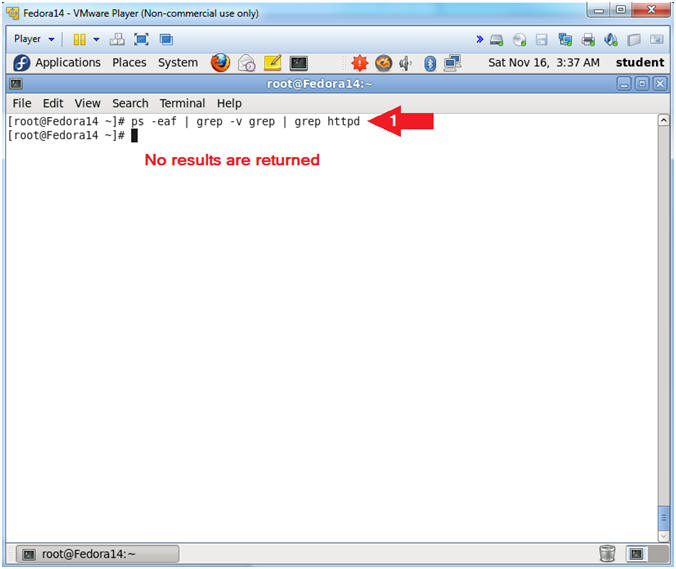
- Is the Apache Web Server (aka, httpd) running?
- Instruction:
- ps -eaf | grep -v grep | grep httpd
- Note(FYI):
- ps -eaf, show all running processes
- grep -v grep, use "-v" to ignore the string "grep"
- grep httpd, display results with the string "httpd"
- Note, no results are found, because httpd is not running.
- Instruction:
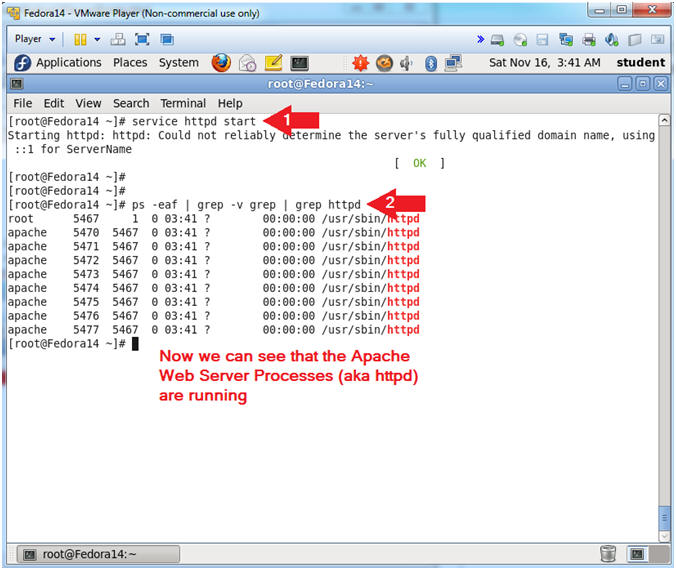
- Let's start up the Apache Web Server processes
- Instruction:
- service httpd start
- ps -eaf | grep -v grep | grep httpd
- Note(FYI):
- service command will execute the httpd start up script.
- Now we see that the Apache Web Server processes are now running.
- Instruction:
| Section 7: Configure the Firewall |
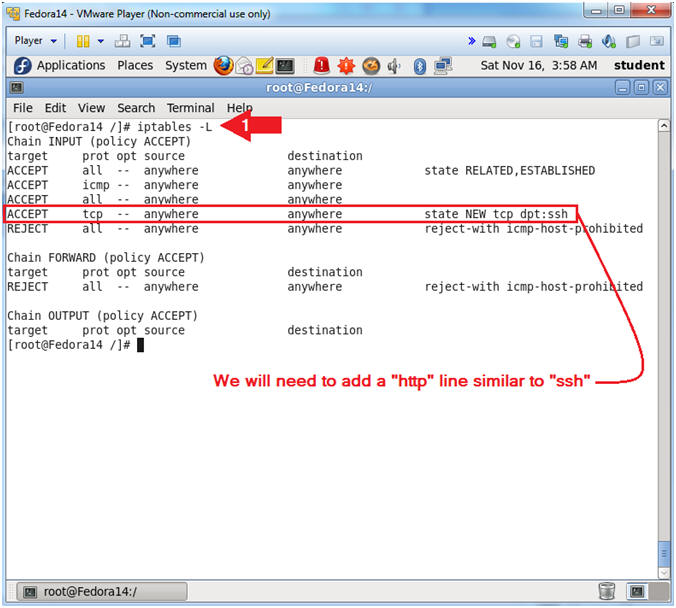
- View Running Firewall Rules
- Instruction:
- iptables -L
- Note(FYI):
- iptables - administration tool for IPv4 packet filtering and NAT (aka, the Firewall).
- Notice there is a firewall rule for "ssh", but not for "http".
- Instruction:
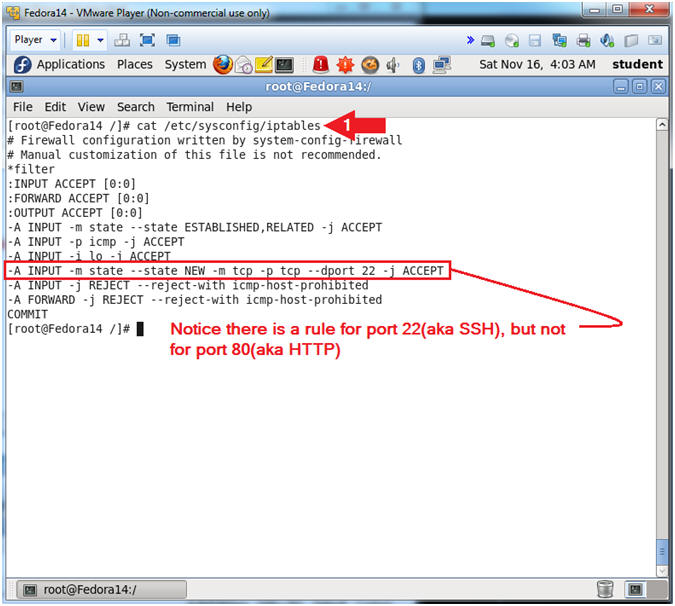
- View Firewall Rules File
- Instruction:
- cat /etc/sysconfig/iptables
- Note(FYI):
- The iptables file contains the firewall rules for the actual firewall.
- Notice there is a firewall rule for port 22(ssh), but not for port 80(http).
- Instruction:
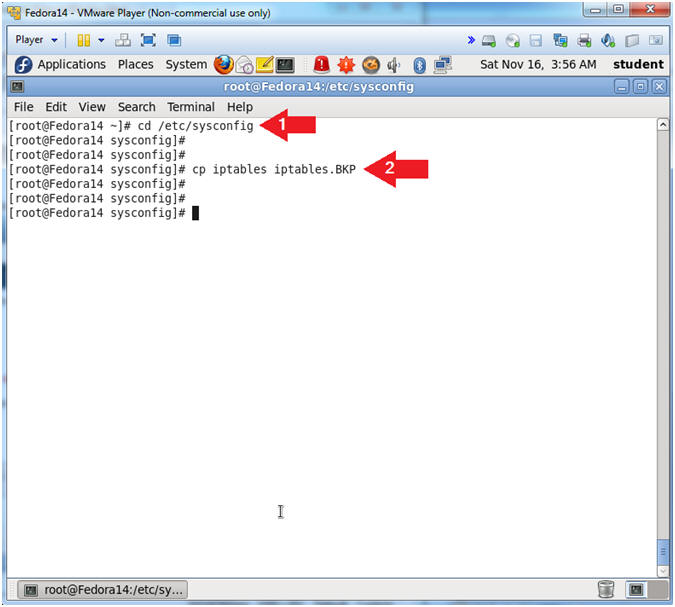
- Make Backup Copy
- Instruction:
- cd /etc/sysconfig
- cp iptables iptables.BKP
- Note(FYI):
- The /etc/sysconfig directory contains many system configuration files for the operating system, including the firewall.
- When making change to any configuration file, it is always a good idea to make a copy first.
- Instruction:
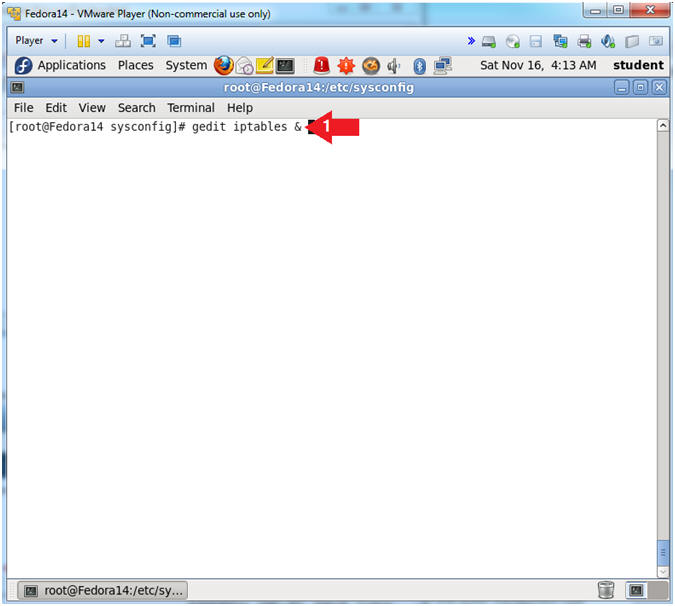
- Open the iptables file
- Instruction:
- gedit iptables &
- cp iptables iptables.BKP
- Note(FYI):
- gedit - text editor for the GNOME Desktop
- Instruction:
- Create Empty Line
- Instruction:
- Place your cursor to the far right of the word ACCEPT in the line that contains port 22, and press <Enter> once.
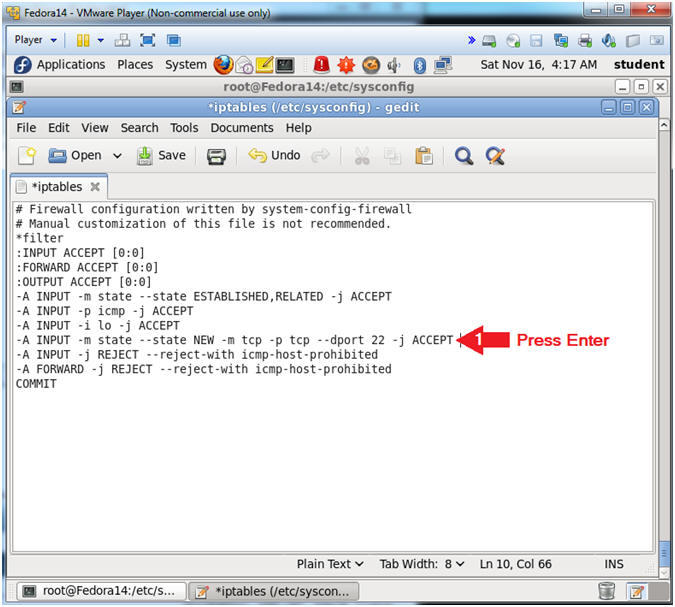
- Instruction:
- Add Apache Web Server Firewall Rule
- Instruction:
- Place the below rule underneath the
port 22(SSH) rule
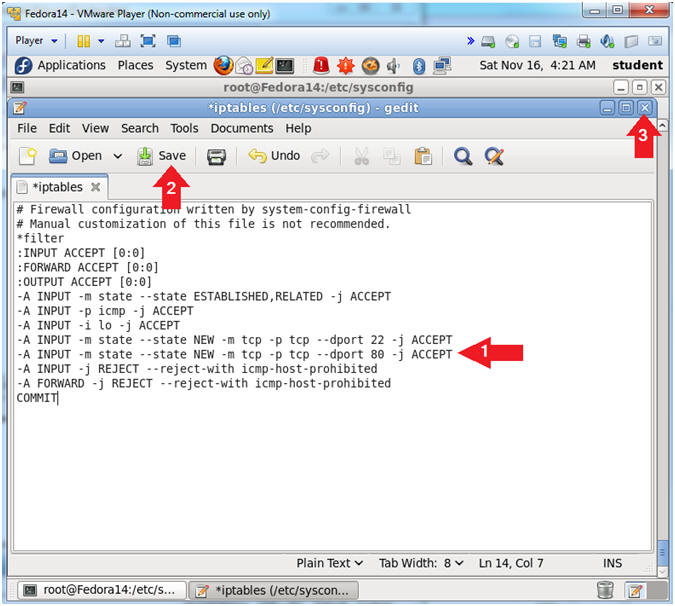
- -A INPUT -m state --state NEW -m tcp -p tcp --dport 80 -j ACCEPT
- Click the Save Button
- Click X to Close
- Place the below rule underneath the
port 22(SSH) rule
- Instruction:
- Restart and Flush Firewall
- Instruction:
- Press <Enter>, don't worry about the gedit warning.
- service iptables restart
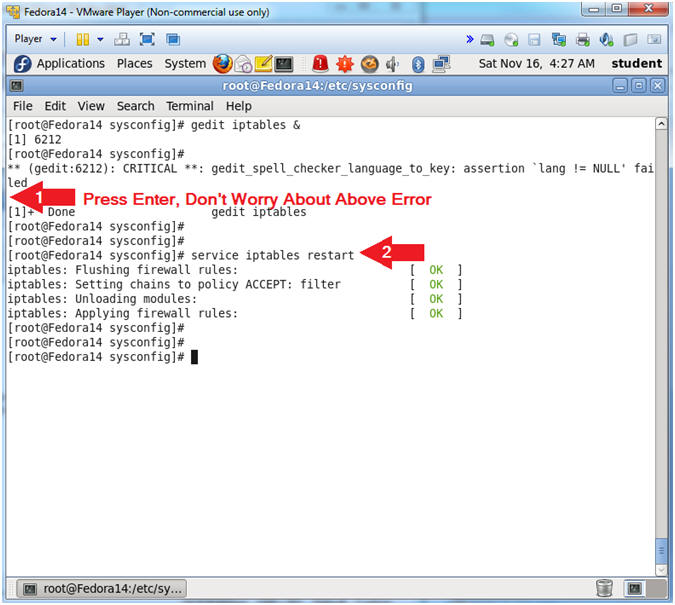
- Instruction:
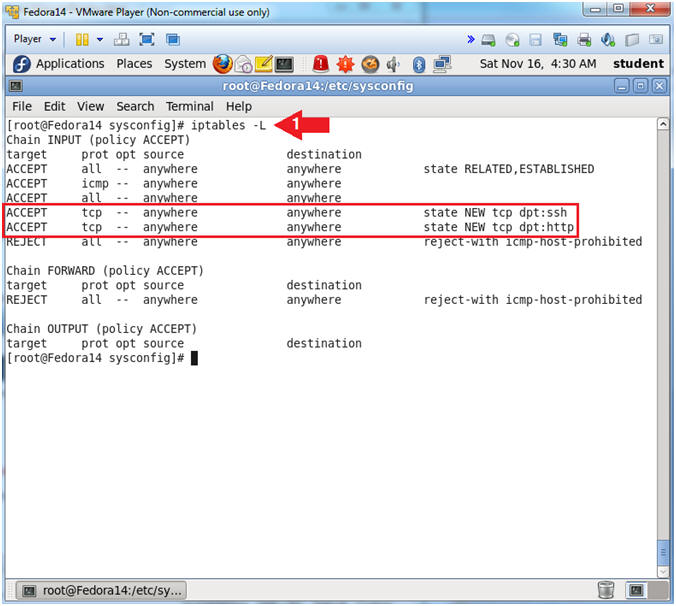
- View New Firewall Rules
- Instruction:
- iptables -L
- Note(FYI):
- Notice you have both ssh and http firewall rules.
- Instruction:
| Section 8: Apache Configuration File Explained |
- Navigate to the Apache Configuration Directory
- Instructions:
- cd /etc/httpd/conf
- ls -l
- Note(FYI):
- This is where the Apache Webserver Configuration File (httpd.conf) resides.
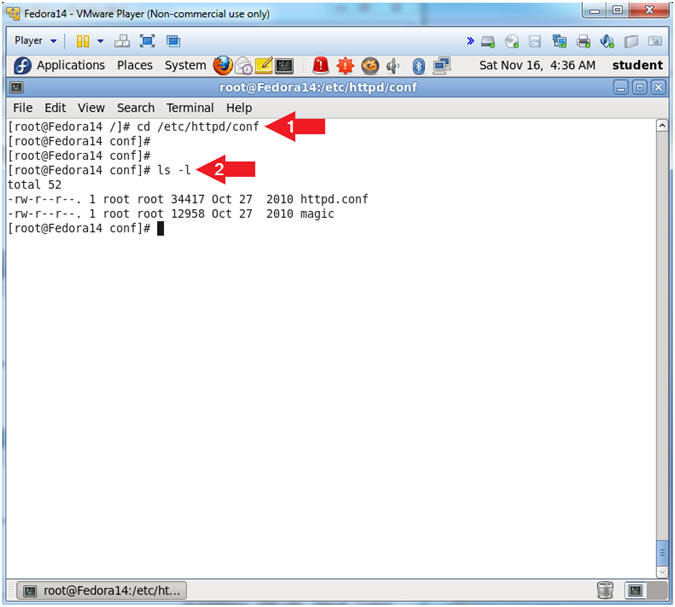
- Instructions:
- Make a httpd.conf Backup Copy
- Instructions:
- cp httpd.conf httpd.conf.BKP
- Note(FYI):
- It's always a good idea to make a backup copy
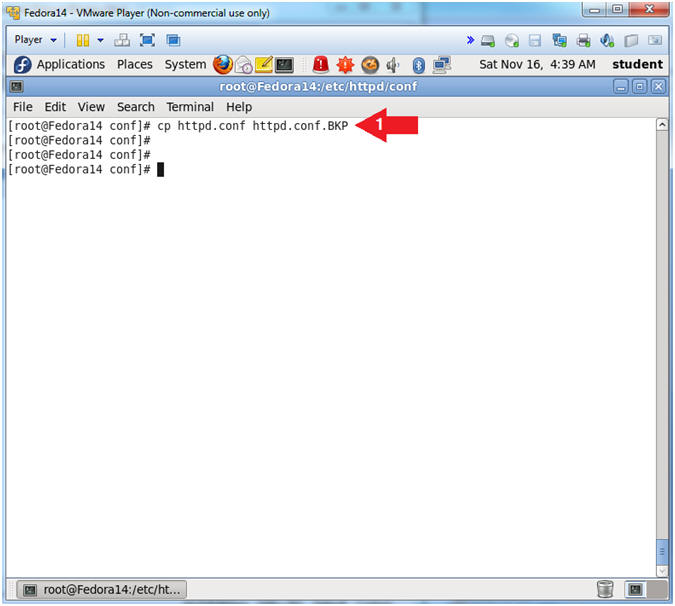
- Instructions:
- Open the httpd.conf file
- Instructions:
- gedit httpd.conf &
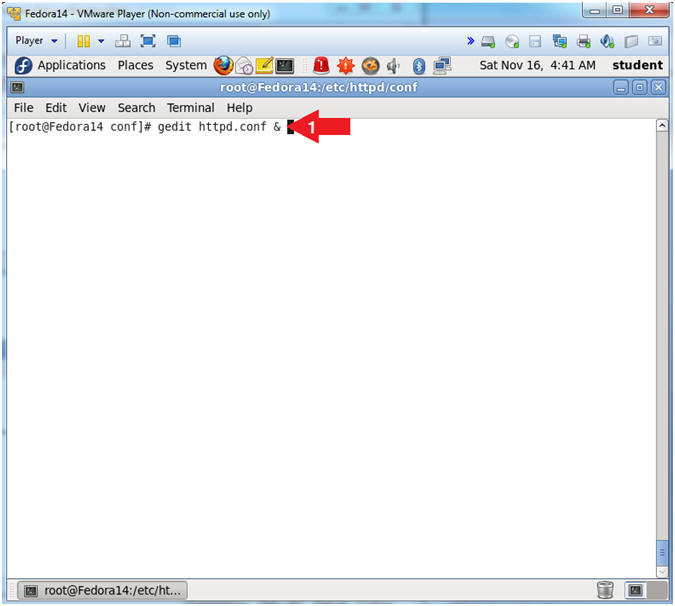
- Instructions:
- Search for the ServerRoot Directive
- Instructions:
- Search --> Find..
- Search for: ServerRoot "
- Click the Find Button
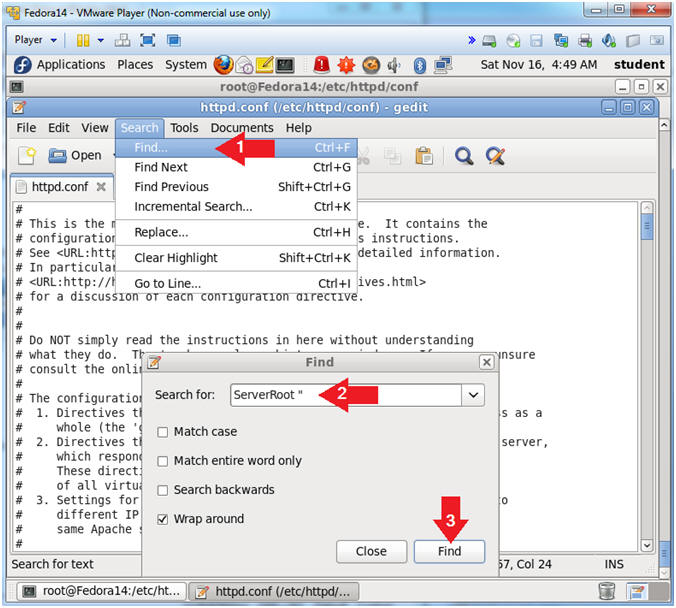
- Instructions:
- ServerRoot Directive Explanation
- Note(FYI):
- This directive The top of the directory tree under which the server's configuration, error, and log files are kept.
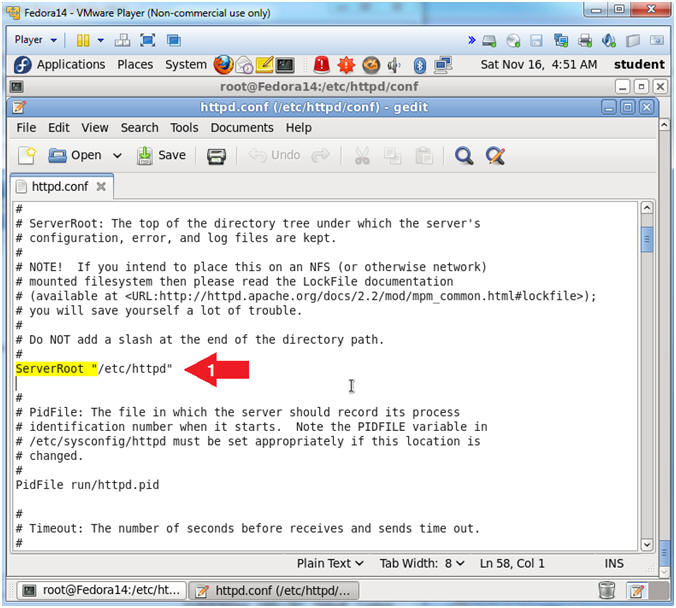
- Note(FYI):
- Search for the Listen Directive
- Instructions:
- Search --> Find..
- Search for: Listen 80
- Click the Find Button
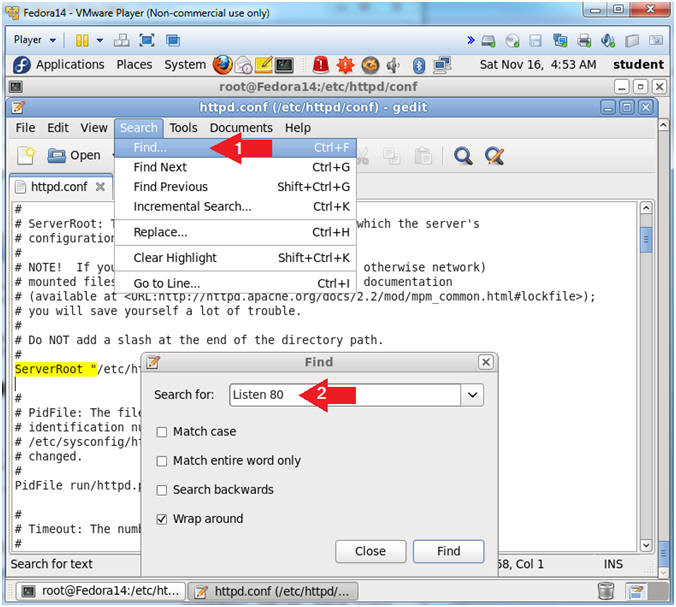
- Instructions:
- Listen Directive Explanation
- Note(FYI):
- Allows you to bind Apache to specific IP addresses and/or # ports.
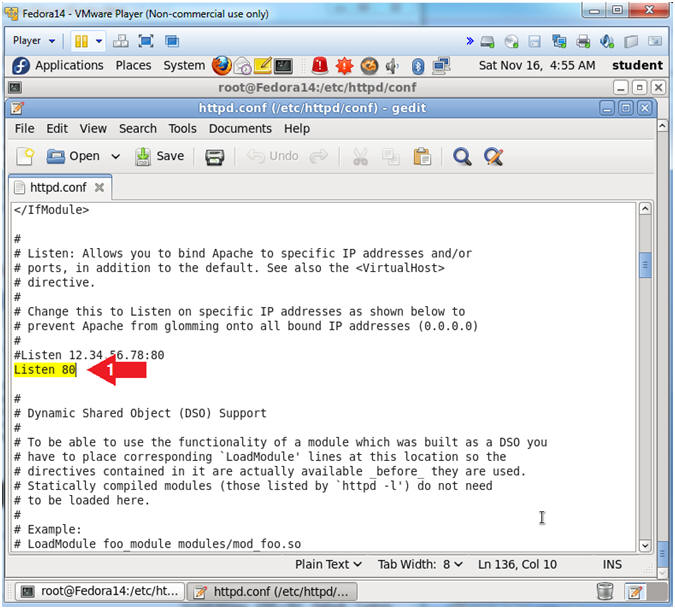
- Note(FYI):
- Search for the User/Group Directive
- Instructions:
- Search --> Find..
- Search for: User apache
- Click the Find Button
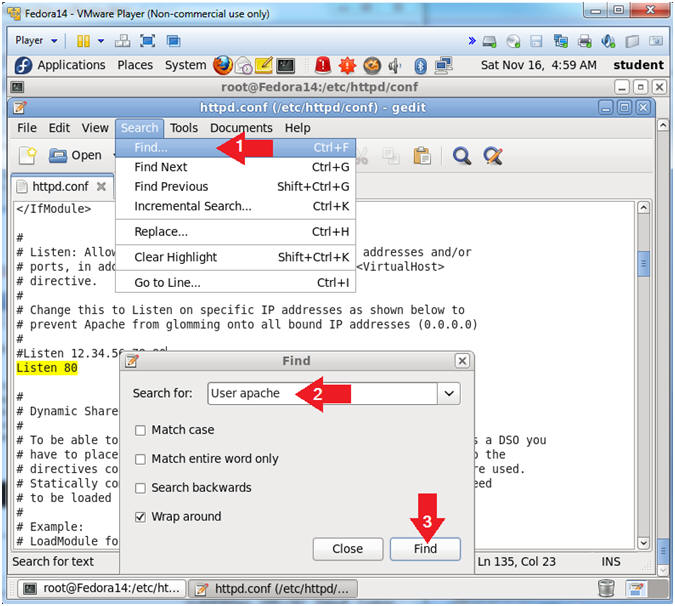
- Instructions:
- User and Group Directives Explained
- Note(FYI):
- These directives specifies ownerships that Apache Webserver will (aka httpd) will run under.
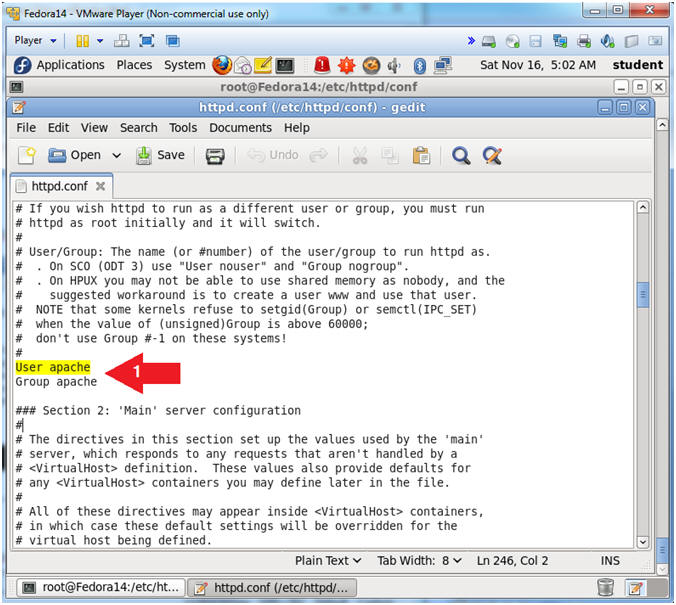
- Note(FYI):
- Search for the ServerAdmin Directive
- Instructions:
- Search --> Find..
- Search for: ServerAdmin root
- Click the Find Button
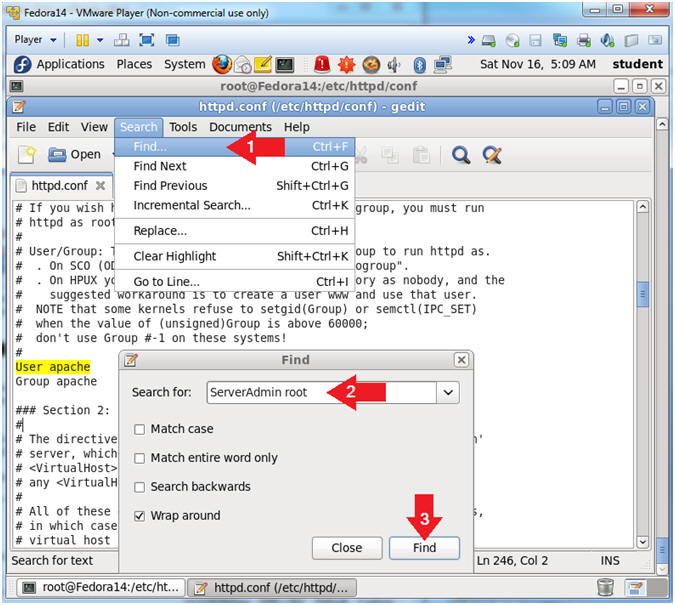
- Instructions:
- ServerAdmin Directives Explained
- Note(FYI):
- Your address, where problems with the server should be # e-mailed. This address appears on some server-generated pages, such # as error documents.
- e.g. admin@computersecuritystudent.com

- Note(FYI):
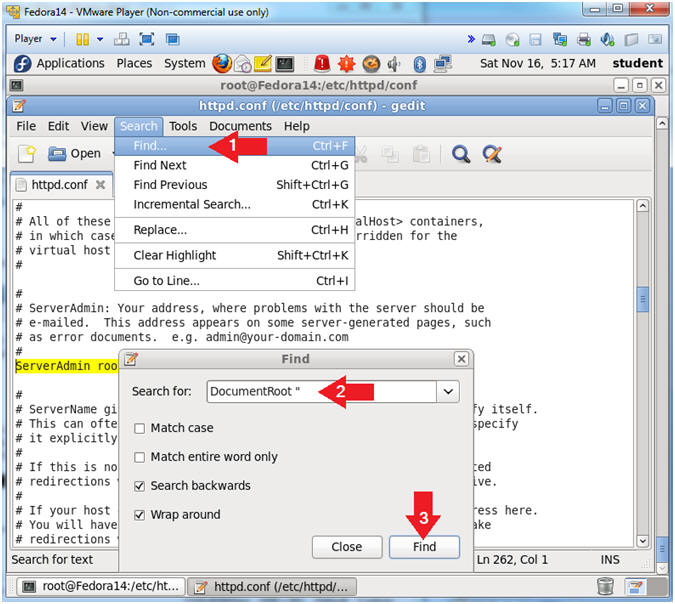
- Search for the DocumentRoot Directive
- Instructions:
- Search --> Find..
- Search for: DocumentRoot "
- Click the Find Button
- Instructions:
- DocumentRoot Directive Explained
- Note(FYI):
- This directive points to the base directory in which webpages will be served to requestors.
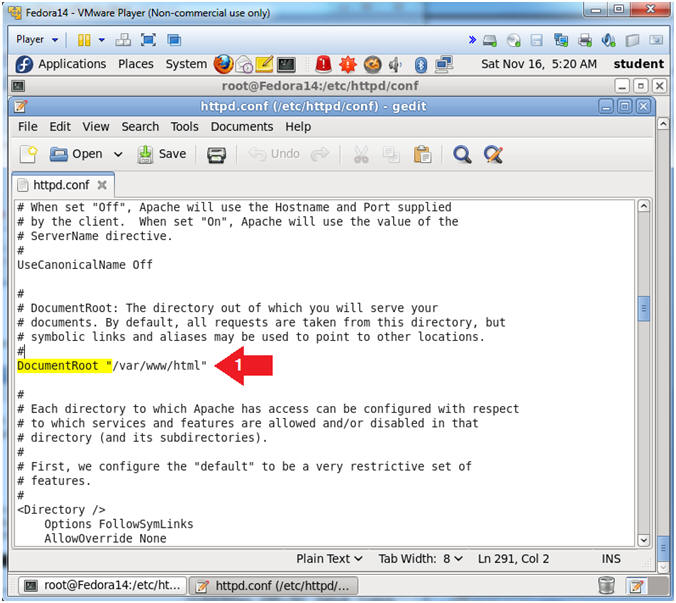
- Note(FYI):
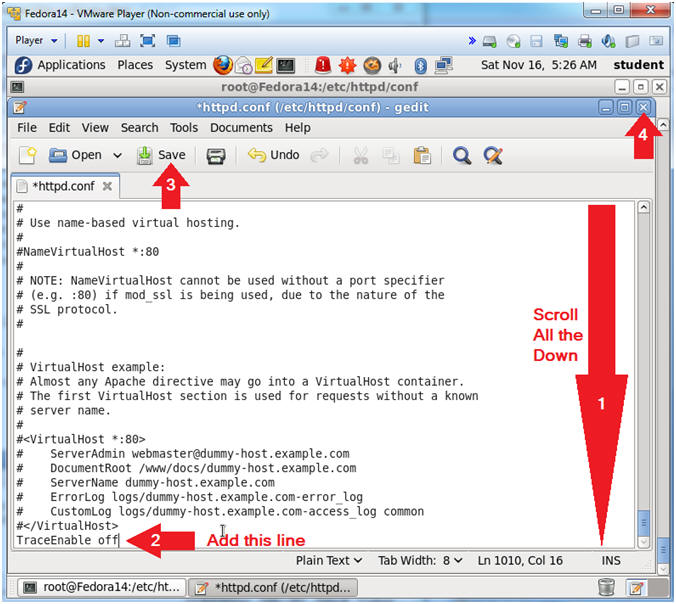
- Prevent Cross-Site Tracing
- Note(FYI): What is Cross-Site
Tracing?
- Cross-site tracing (XST) is a network security vulnerability exploiting the HTTP TRACE method. XST scripts exploit ActiveX, Flash, or any other controls that allow executing an HTTP TRACE request. The HTTP TRACE response includes all the HTTP headers including authentication data and HTTP cookie contents, which are then available to the script. In combination with cross domain access flaws in web browsers, the exploit is able to collect the cached credentials of any web site, including those utilizing SSL.
- Instructions:
- Scroll all the way down to the last line of the file
- Add the following Directive
- TraceEnable off
- Click the Save Button
- Click the X to Close
- Note(FYI): What is Cross-Site
Tracing?
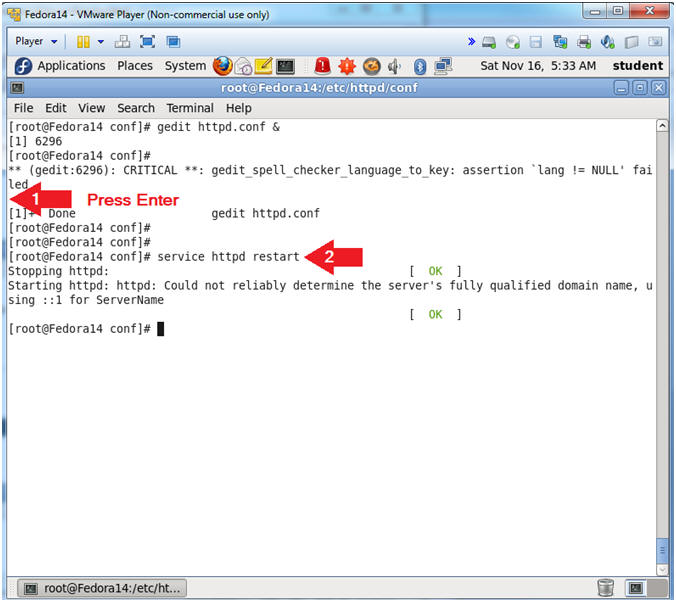
- Restart the webserver
- Instruction:
- Just Press <Enter>, Ignore gedit error
- service httpd restart
- Instruction:
| Section 8: Create a basic webpage |
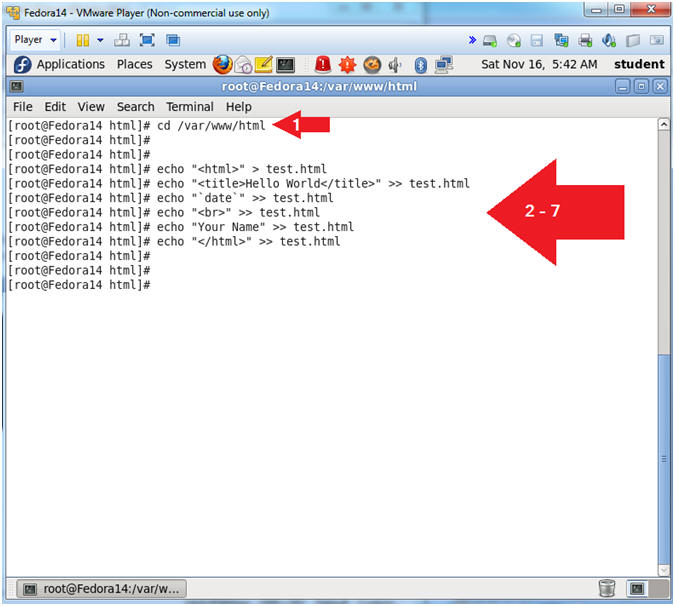
- Navigate to the /var/www/html directory
- Instruction:
- cd /var/www/html
- echo "<html>" > test.html
- echo "<title>Hello World</title>" >> test.html
- echo "`date`" >> test.html
- echo "<br>" >> test.html
- echo "Your Name"
>>
test.html
- Replace the string "Your Name" with your actual name.
- e.g., echo "John Gray"
- echo "</html>" >> test.html
- Instruction:
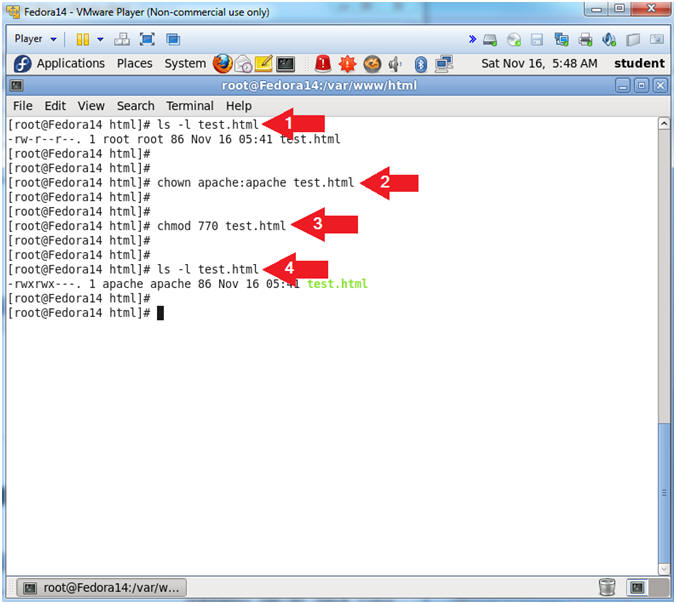
- Change the ownerships on the index.html file
- Instruction:
- ls -l test.html
- chown apache:apache test.html
- chmod 770 test.html
- ls -l test.html
- Note(FYI):
- Notice the permission are (-rw-r--r--),
which means the following:
- -rw-, User apache has read and write permissions.
- r--, Group apache has read permissions.
- r--, World has read permissions.
- Change ownerships to user apache and group apache.
- Change permission to where both user apache and group apache have read,write,execute permissions.
- Notice the permission are (-rwxrwx---),
which means the following:
- -rwx, User apache has read,write,execute permissions.
- rwx, Group apache has read,write,execute permissions.
- rwx, World has NO permissions.
- Notice the permission are (-rw-r--r--),
which means the following:
- Instruction:
| Section 9: Viewing the test.html webpage |
- Start Firefox
- Instruction:
- Click the Firefox Icon
- Instruction:
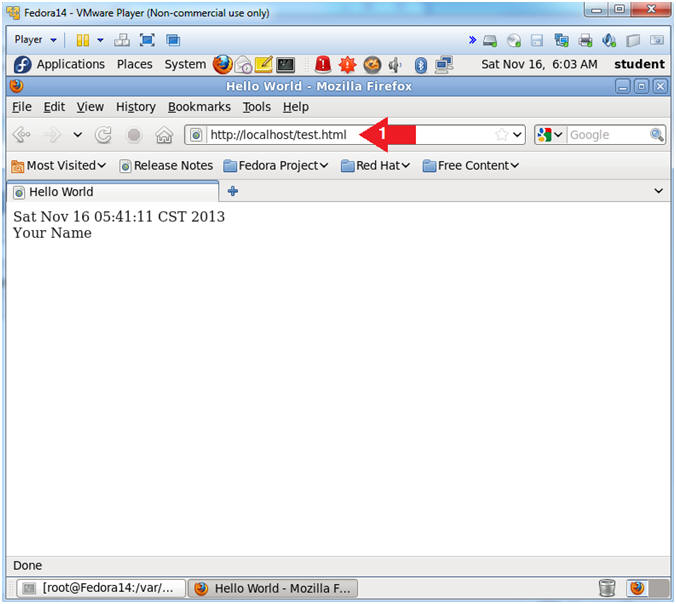
- View the test.html webpage
- Instructions:
- Place the below link in the URL box
- http://localhost/test.html
- Place the below link in the URL box
- Instructions:
| Section 10: Proof of Lab |
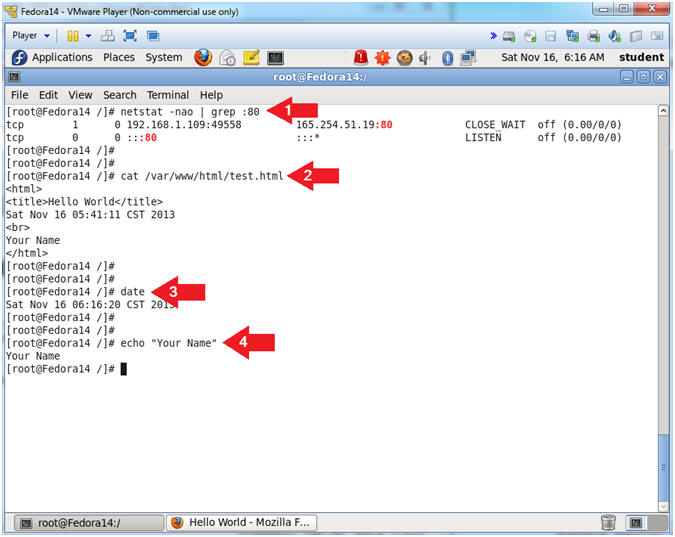
- Proof of Lab
- Instructions:
- netstat -nao | grep :80
- cat /var/www/html/test.html
- date
- echo "Your Name"
- Replace the string "Your Name" with your actual name.
- e.g., echo "John Gray"
-
Proof of Lab Instructions
- Press both the <Ctrl> and <Alt> keys at the same time.
- Do a <PrtScn>
- Paste into a word document
- Upload to Moodle
- Instructions: