(How to Set Up An SSH Key Infrastructure)
{ SSH Key Infrastructure, ssh-keygen,.ssh, authorized_keys }
| Background Information |
- I have been asked by a few people how to set up
an sshkey infrastructure. This is extremely easy to set up. From
a teaching perspective, you might want to set up an ssh infrastructure the
following reasons.
- So you do not have to manually supply your username and password to all the hundreds of servers you support or will support in the future.
- So you can write automation scripts using a
trusted host.
- May be you work for a company that does
not have monitoring and administration script.
- You can use this infrastructure to set up trusted authentication and authorization.
- In addition, you can write you own scripts that you can remotely execute on other servers for monitoring and administrative reasons.
- May be you work for a company that does
not have monitoring and administration script.
| 5.0 Prerequisite |
- Login to your
TargetUbuntu01 VM, as username student
- Make sure the Interface is up. If not, please refer to past interface Power Point Slides.
- For those of you that are not part of this class, this should be some flavor of Unix/Linux server that you have access too.
- Login to your
TargetUbuntu02 VM, as username student
- For those of you that are not part of this class, this should be another Unix/Linux server you also have access too.
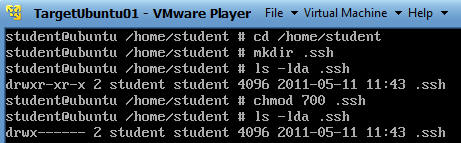
| 5.1 Setting Up Your .ssh directory on TargetUbuntu01 |
- From your TargetUbuntu01 VM
- cd /home/student
- mkdir .ssh
- ls -lda .ssh
- "-d" means to list the directory name instead of its contents.
- "-l" means display a long listing.
- "-a" means to display normally hidden files that start with a dot.
- chmod 700 .ssh
- Change the permissions of the directory to where only the user student has access. (Read, Write, Execute).
- ls -lda .ssh
- Make sure the permission are correct.
| 5.2 Setting Up Your .ssh directory on TargetUbuntu02 |
- From your TargetUbuntu02 VM
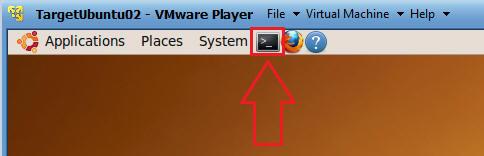
- Login as username "student"
- Then click on the Terminal Console Window (See Below)
- Now we will get your .ssh directory and
authorized_keys file set up.
- This is assuming a .ssh directory does not
exist for username student on TargetFedora01.
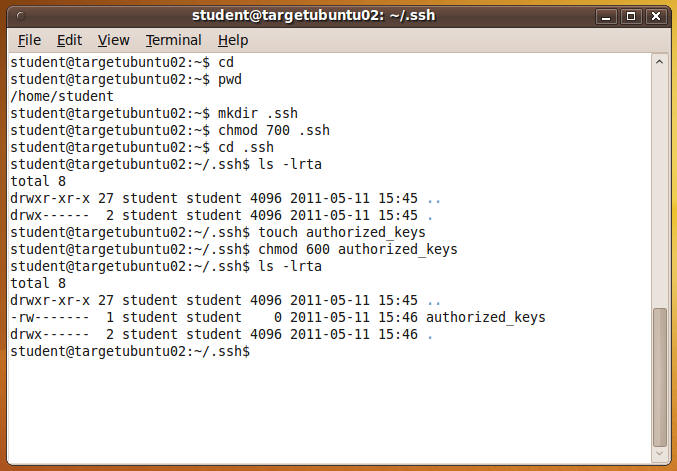
- cd
- This will put you in your home directory.
- pwd
- Tells you your current working path.
- mkdir .ssh
- Make directory called .ssh
- NOTE: Don't worry if you get an error saying the .ssh directory already exists.
- Make directory called .ssh
- chmod 700 .ssh
- Change permission on .ssh to read(4), write(2), execute(1) for only username student.
- cd .ssh
- Change directory to the .ssh directory.
- ls -lrta
- See if anything is in the directory. This is really more of a habit for me than anything.
- NOTE: If an authorized_keys file existed, then do NOT do step 7. Because the touch command would wipe out the contents of the authorized_keys file.
- touch authorized_keys
- Create a file called authorized_keys
- chmod 600 authorized_keys
- Change permission of the authorized_keys file to 600 (read, write).
- ls -lrta
- Confirm your screen looks similar to mine.
- cd
 .
.
- This is assuming a .ssh directory does not
exist for username student on TargetFedora01.
- Determine the IP Address of TargetUbuntu02
- ifconfig -a
- If the command is not found, then enter /sbin/ifconfig -a
- In my case, my IP address is 192.168.1.106
- Note: You will use TargetUbuntu02's IP address in step #1 of section 5.4.
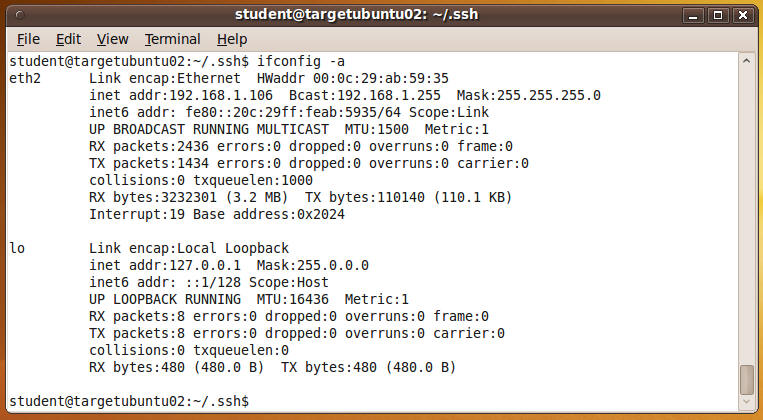
- ifconfig -a
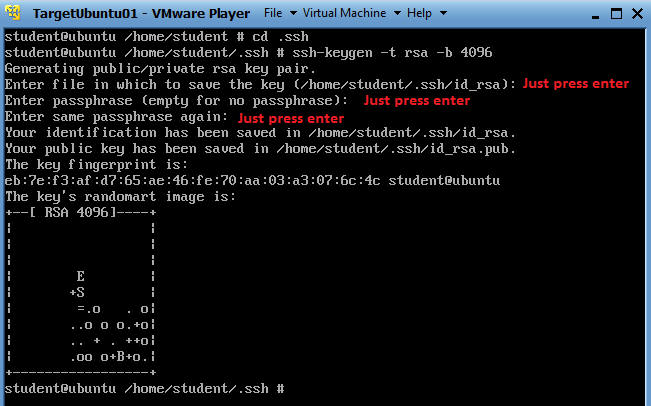
| 5.3 Creating the ssh key pair |
- From your TargetUbuntu01 VM. You need to be the student user.
- cd /home/student/.ssh
- ssh-keygen -t rsa -b 4096
- ssh-keygen is a tool that creates key
pairs. (e.g., Private and Public keys).
- "-t" specific the type of encryption used.
- "-b" specific the length of the key. Default is 2048
- For the purposes of this lab, you are not
required to name your key or to create a passphrase. It is an
industry practice to do both, but lets just cover the basics to get you
going.
- See Below Picture.
- ssh-keygen is a tool that creates key
pairs. (e.g., Private and Public keys).
- Okay, lets see what you just did.
- ls -lrta
- Notice there are two keys.
- id_rsa
- This is your PRIVATE key.
- id_rsa.pub
- This is your PUBLIC key.
- id_rsa
- Notice there are two keys.
- Although we tightened down the ".ssh"
directory, let harden the permissions on the id_rsa.pub file as well.
- chmod 700 id_rsa.pub
- ls -l id_rsa.pub

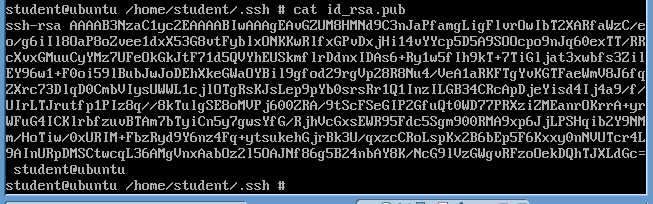
- Just for grins, look at the contents of your public key (id_rsa.pub)
- cat id_rsa.pub
- Notice a very long 4096 bit string

| 5.4 Let's put in place the "key" infrastructure |
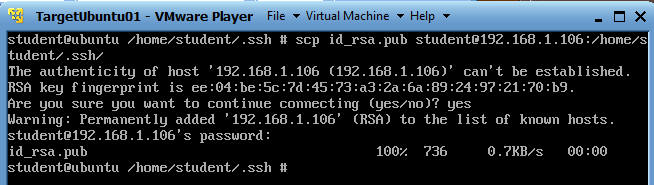
- On TargetUbuntu01
- cd /home/student/.ssh
- scp id_rsa.pub
student@192.168.1.106:/home/student/.ssh/
- scp - This is the Secure Copy command using openSSH.
- Here we are copying the public key (id_rsa.pub) on TargetUbuntu01 to TargetUbuntu02's ssh directory (/home/student/.ssh/)
- On TargetUnbuntu02
- cd /home/student/.ssh
- ls -lrta
- cat id_rsa.pub >>
authorized_keys
- The ">>" is used to get you in the habit of appending your public keys to the authorized_keys file.
- The authorized_keys file can contain multiple public keys from many different users and many different hosts.
- chmod 600 *
- It is good practice to always keep the files located in the .ssh directory hardened with (read,write) permission only.
- ls -lrta
- Verify your screen is similar to mine.

| 5.5 Testing your ssh key infrastructure |
- On your TargetUnbuntu01
- ssh student@192.168.1.106 uptime
- I am telling ssh to execute the uptime command of the TargetUbuntu02 server.
- On your TargetUnbuntu01
- ssh
student@192.168.1.106 "hostname;date;who -b"
- Now I am telling ssh to execute the command hostname, date and who -b on TargetUbuntu02.
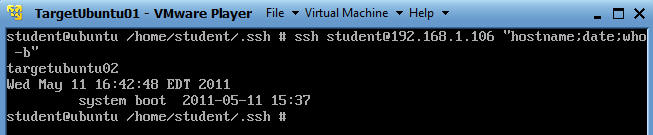
- ssh
student@192.168.1.106 "hostname;date;who -b"
- On your TargetUnbuntu01
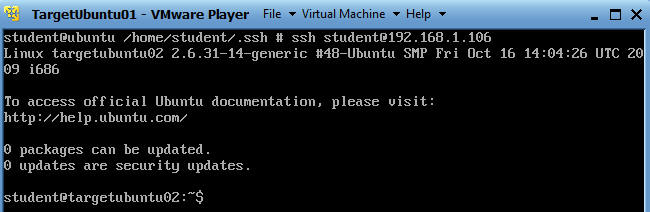
- ssh
student@192.168.1.106
- Now I am logging in using ssh directly to
TargetUbuntu02
- Pretty kool,,, right.
- Now I am logging in using ssh directly to
TargetUbuntu02

| Proof of Lab |
- Cut and Paste a screen shot that look similar to Step #3 in Section 5.5 into a word document and upload to Moodle.