(Ubuntu: Lesson 12)
{ Installing and Configuring Squid Proxy Server }
| Section 0. Background Information |
- What is the Squid Proxy Server?
- Squid is a proxy server and web cache daemon. It has a wide variety of uses, from speeding up a web server by caching repeated requests; to caching web, DNS and other computer network lookups for a group of people sharing network resources; to aiding security by filtering traffic.
- Gray Area/Malicious uses for Squid Proxy Server
- Let's say your school or work does not allow you to view websites like google, facebook and youtube.
- All you have to do it to either find a Squid Proxy Server on the internet or to install one at your home. Then you can just simply use the SOCKS client in Firefox to route all your HTTP/HTTPS requests through the Squid Proxy Server, thus circumventing the school or work ACL.
- If you install a Squid Proxy Server at your house, then you will have to allow and forward port 3128 to the correct internal address that points to your server hosting Squid.
- Prerequisite
-
Lab Notes
- In this lab we will how to do the following:
- We will update the apt-get package list.
- We will use apt-cache to search the package list for Squid.
- We will use apt-get to install squid3.
- We will use update-rc.d to create runlevel startup and kill scripts.
- We will configure Squid to allow access to specific networks.
- We will configure Squid to deny access to specific websites.
- We will configure Firefox to use its SOCKS client to pass requests to the Squid Server.
- In this lab we will how to do the following:
- Legal Disclaimer
- As a condition of your use of this Web site, you warrant to computersecuritystudent.com that you will not use this Web site for any purpose that is unlawful or that is prohibited by these terms, conditions, and notices.
- In accordance with UCC § 2-316, this product is provided with "no warranties, either express or implied." The information contained is provided "as-is", with "no guarantee of merchantability."
- In addition, this is a teaching website that does not condone malicious behavior of any kind.
- You are on notice, that continuing and/or using this lab outside your "own" test environment is considered malicious and is against the law.
- © 2012 No content replication of any kind is allowed without express written permission.
| Section 1: Start Ubuntu 12.04 |
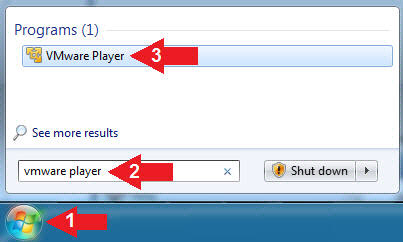
- Start VMware Player
- Instructions
- For Windows 7
- Click Start Button
- Search for "vmware player"
- Click VMware Player
- For Windows XP
- Starts --> Programs --> VMware Player
- For Windows 7
- Instructions
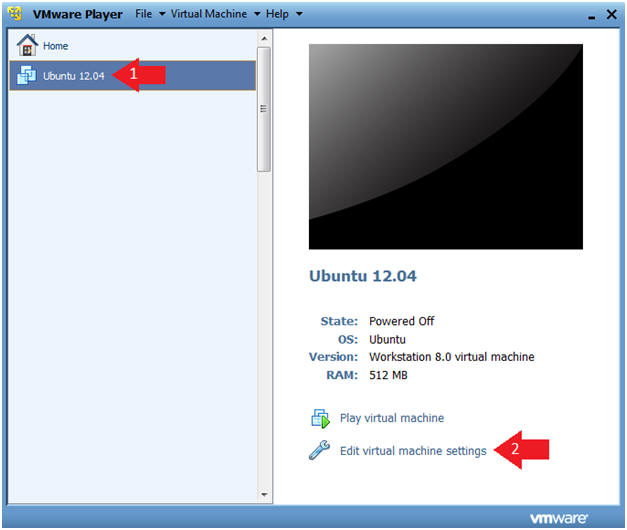
- Verify Virtual Machine Settings.
- Instructions
- Click on Ubuntu 12.04
- Click on Edit virtual machine settings
- Instructions
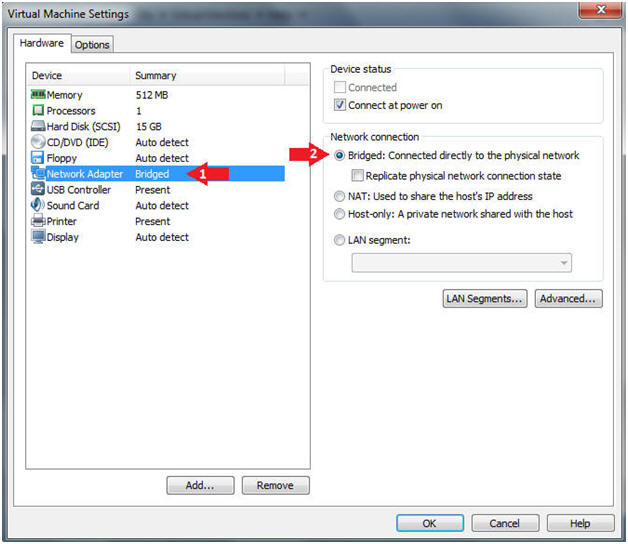
- Configure Network Adapter
- Instructions
- Click on Network Adapter
- Click on the Bridged Radio Button
- Click on the Close Button
- Instructions
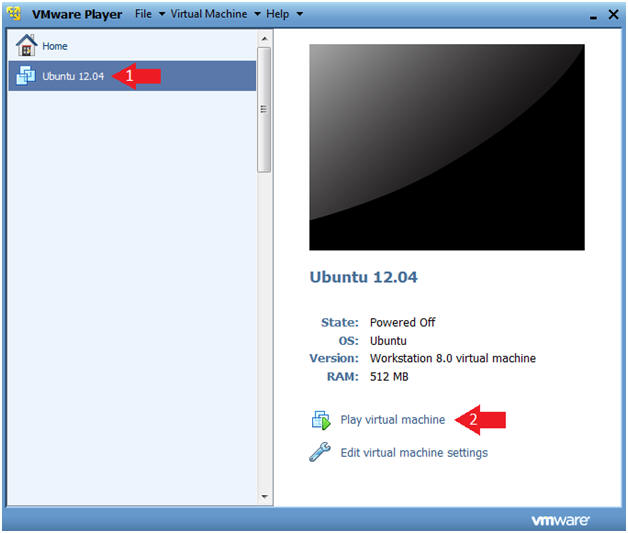
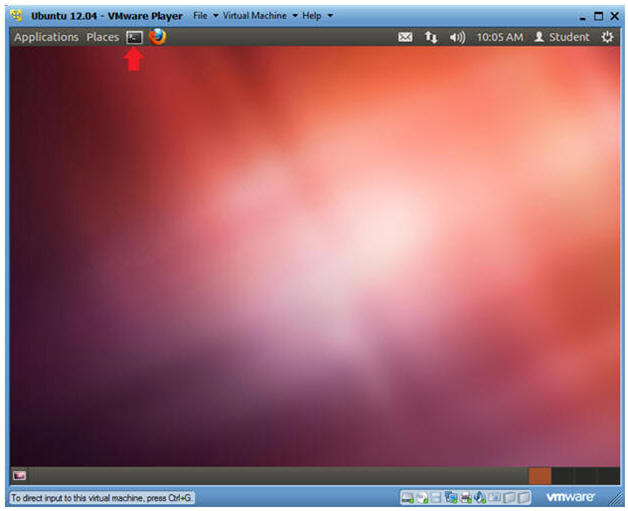
- Start the Ubuntu 12.04 VM
- Instructions
- Click on Ubuntu 12.04
- Click on Play virtual machine
- Instructions
| Section 2: Login to Ubuntu |
- Change to Gnome Classic
- Instructions:
- Click on the Circle
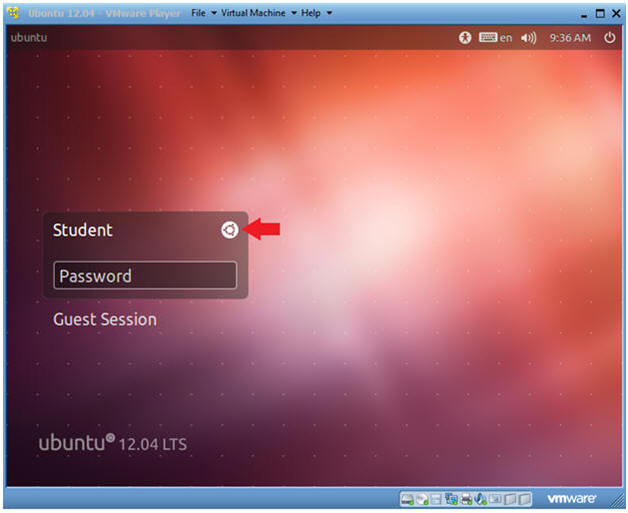
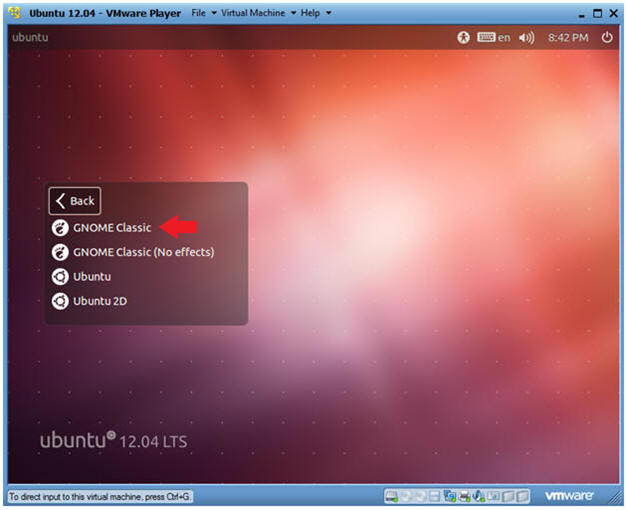
- Instructions:
- Select Gnome Classic
- Instructions:
- Double Click on GNOME Classic
- Instructions:
- Login to Server
- Instructions
- User: Student
- Password: Please supply the student password.
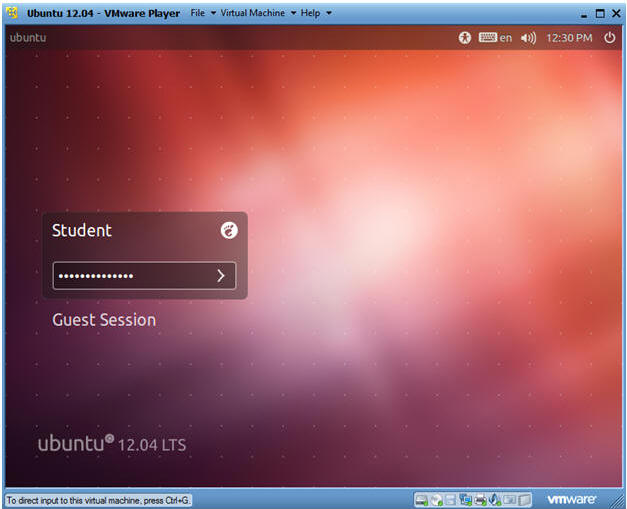
- Instructions
| Section 3: Become Root and Verify Network Connection |
- Start up a Terminal
- Instructions
- Click on the Terminal
- Instructions
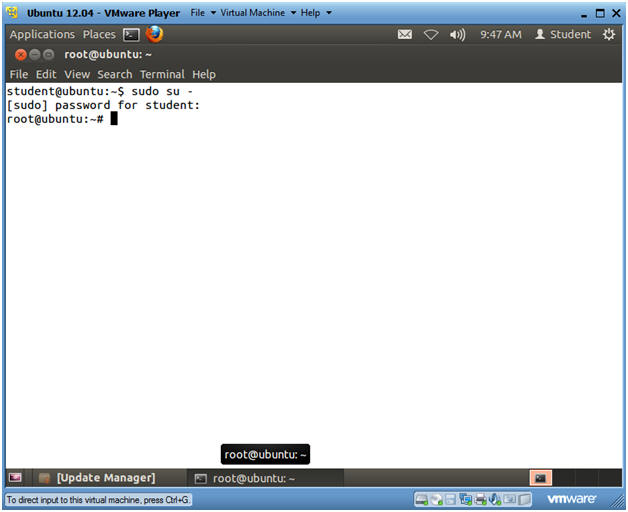
- Become Root
- Instructions
- sudo su -
- Supply the student password.
- Instructions
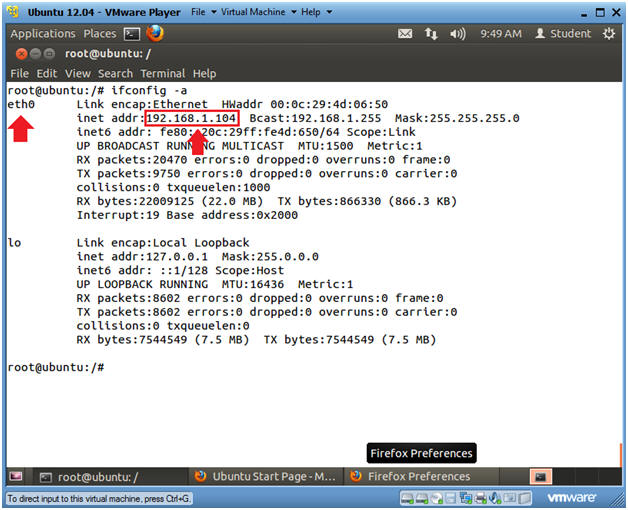
- Verify you have a network connection
- Instructions
- ifconfig -a
- eth0 is the name of my interface.
- 192.168.1.104 is my network IP address.
- ifconfig -a
- Note(FYI):
- If you do not have an DHCP IP Address
try the following:
- dhclient
- OR
- /etc/init.d/networking restart
- dhclient
- If you do not have an DHCP IP Address
try the following:
- Instructions
| Section 4: Update apt-get's package index |
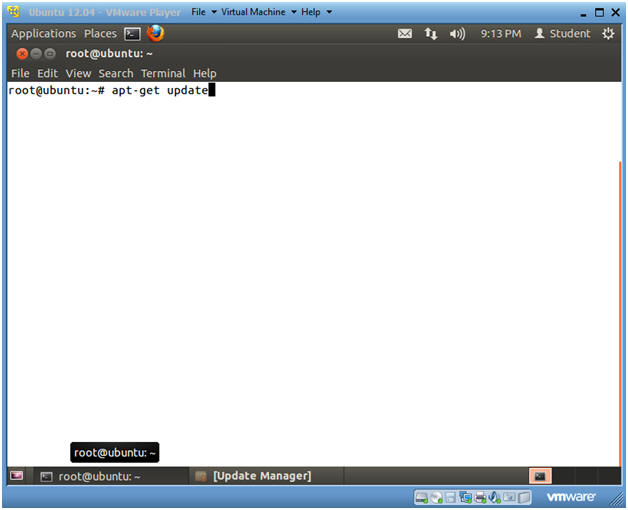
- Update apt-get's package index
- Instructions
- apt-get update
- Note(FYI):
- update is used to resynchronize the package index files from their sources. I.e., The "update" flag updates apt-get's local database with debian server's pkglist files. The indexes of available packages are fetched from the location(s) specified in /etc/apt/sources.list.
- Instructions
| Section 5: Search for Squid |
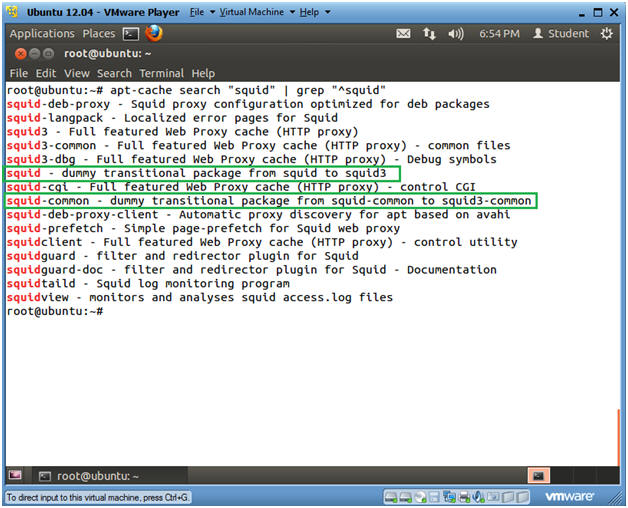
- Search for squid
- Instructions
- apt-cache search "squid" | grep "^squid"
- Note(FYI):
- apt-cache is a command to manipulate and obtain information from the ubuntu packages.
- Instructions
| Section 6: Install Squid |
- Install squid
- Instructions
- apt-get install squid squid-common
- So we are installing two packages
- squid
- squid-common
- So we are installing two packages
- Do you want to continue? Y
- apt-get install squid squid-common
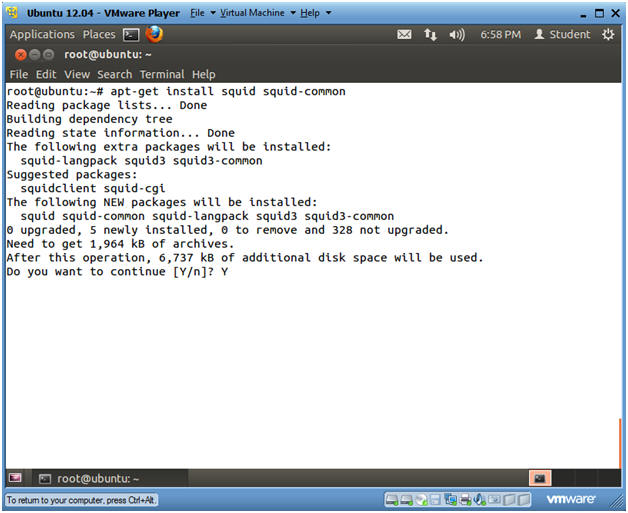
- Instructions
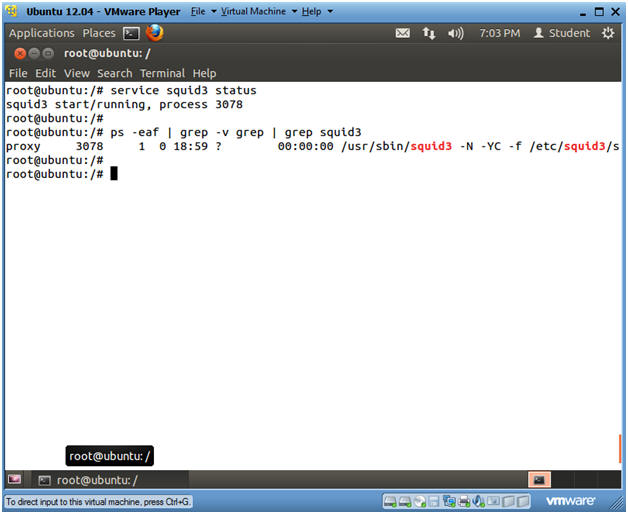
- Verify that squid is installed and is
running
- Instructions
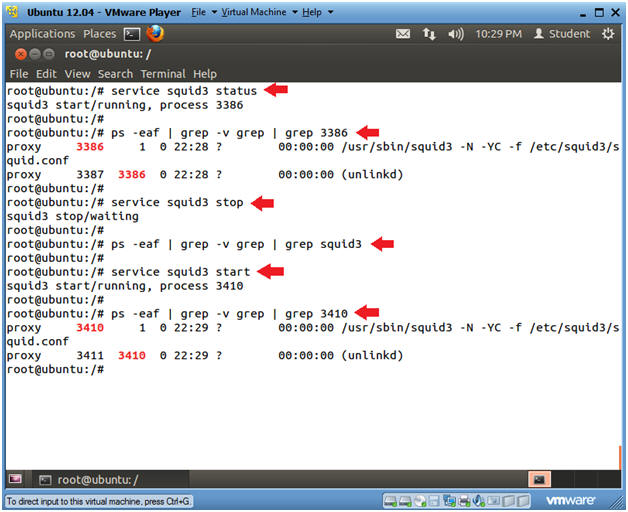
- service squid3 status
- The service runs a System V init script or upstart job.
- squid3, is the service.
- status, asks the startup script list a PID if the process is running.
- ps -eaf | grep -v grep | grep squid3
- ps -eaf, show all processes.
- grep -v grep, filter out the grep process.
- grep suid3, show only the squid process.
- service squid3 status
- Instructions
| Section 7: Startup Script for Squid |
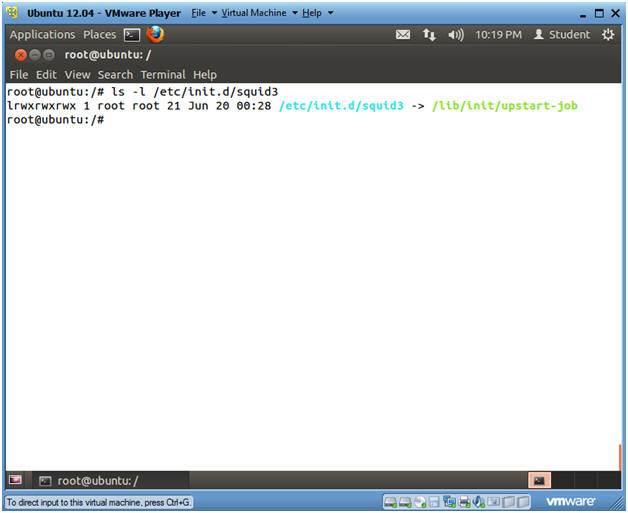
- Startup Script for Squid
- Instructions
- ls -l /etc/init.d/squid3
- Note(FYI):
- As part of the Squid installation, the squid startup script is placed in /etc/init.d/squid3.
- Instructions
- Stopping and Starting Squid with /etc/init.d/squid3
- Instructions
- cd /etc/init.d
- ./squid3 stop
- ps -eaf | grep -v grep | grep squid3
- Notice, that no lines are returned, because squid3 is not running.
- ./squid3 start
- ps -eaf | grep -v grep | grep squid3
- Now one line is returned, because squid3 is running.

- Instructions
- Stopping and Starting squid3 with the "service"
command
- Instructions
- service squid3 status
- Notice, if squid is running a process number is displayed call the PID (process ID).
- In my case, the PID is 3386.
- ps -eaf | grep -v grep | grep
3386
- Replace 3386, which your ssh PID.
- service squid3 stop
- This command still stop the squid daemon.
- ps -eaf | grep -v grep | grep squid3
- Notice, no processes are displayed for sshd, because we stopped squid in the above command.
- service squid3 start
- Since, we restarted squid, it has a new PID of 3410 in my case.
- ps -eaf | grep -v grep | egrep
'(squid3|3410)'
- ps -eaf, display all processes.
- grep -v grep, filter out the grep command.
- egrep '(sshd|3410)', search for any process containing the string squid or 3410. Remember 3410 is my PID, and to replace 3410 with your PID.
- service squid3 status
- Instructions
- Create startup and kill scripts for Squid
- Instructions
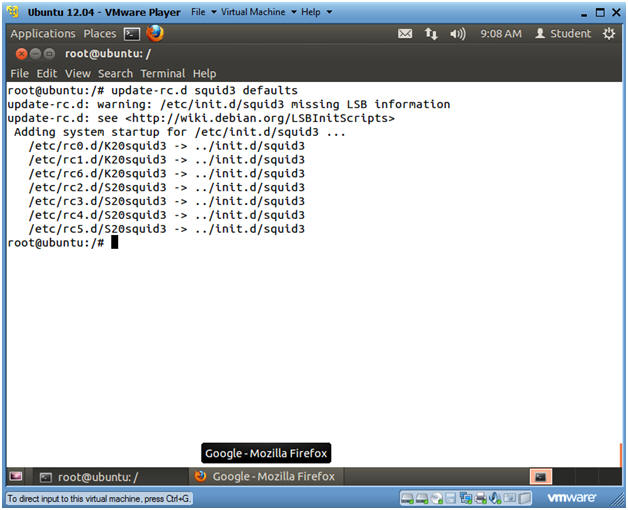
- update-rc.d squid3 defaults
- Note(FYI):
- The update-rc.d command is used to create startup, enable, kill, and remove scripts for services listed in the /etc/init.d.
- If defaults is used then update-rc.d will make links to start the service in runlevels 2345 and to stop the service in runlevels 016. By default all the links will have sequence number 20.
- Instructions
- Verify startup and kill script was created
- Instructions
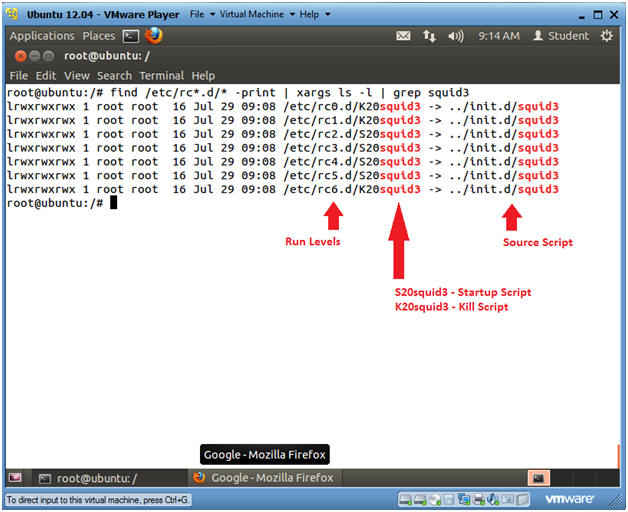
- find /etc/rc*.d/* -print | xargs ls -l
| grep squid3
- find /etc/rc*.d/* -print, list all the file in /etc/rc*.d/*
- xargs ls -l, Use the xargs command to issue provide a long list of each file that find displays.
- grep squid3, only display files containing squid3.
- find /etc/rc*.d/* -print | xargs ls -l
| grep squid3
- Instructions
| Section 8: Backup Squid Configuring File |
- Backup the Squid Configuration file
- Instructions
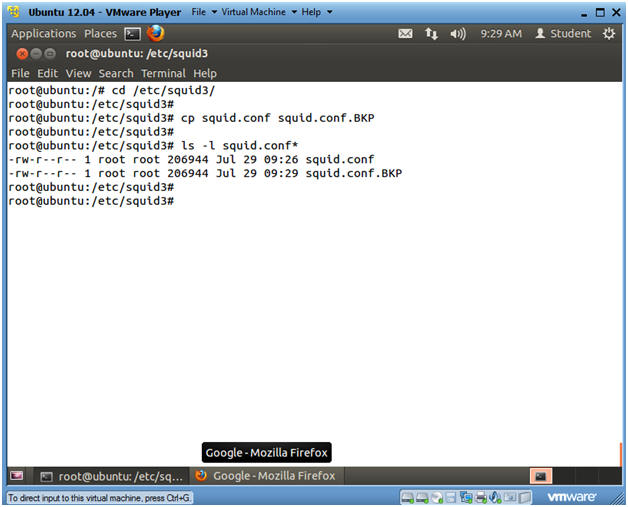
- cd /etc/squid3
- cp squid.conf squid.conf.BKP
- ls -l squid.conf*
- Instructions
| Section 9: Initial Squid Proxy Server Test |
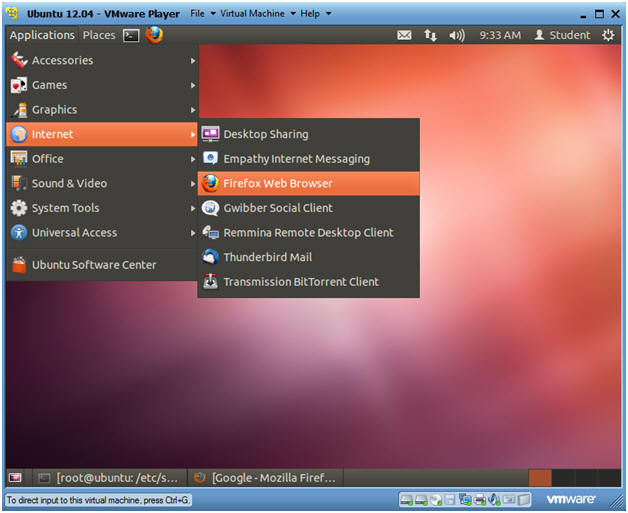
- Start Up Firefox
- Note(FYI):
- You do not have to use Ubuntu's Firefox to test the Squid Proxy Server.
- You can use any computer's web browser that has network connectivity to the Ubuntu server.
- For simplicity reasons, I am using Ubuntu's Firefox.
- Instructions
- Applications --> Internet --> Firefox
- Note(FYI):
- Select Firefox Preferences
- Instructions
- Edit --> Preferences
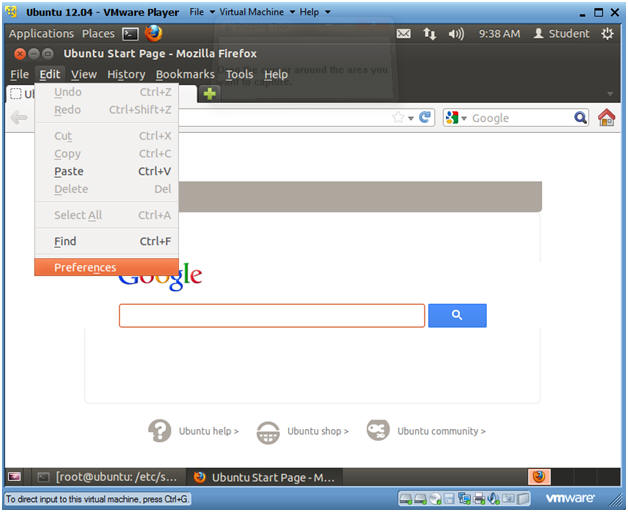
- Instructions
- Network Settings
- Instructions
- Click on Advanced
- Click on Network
- Click on Settings
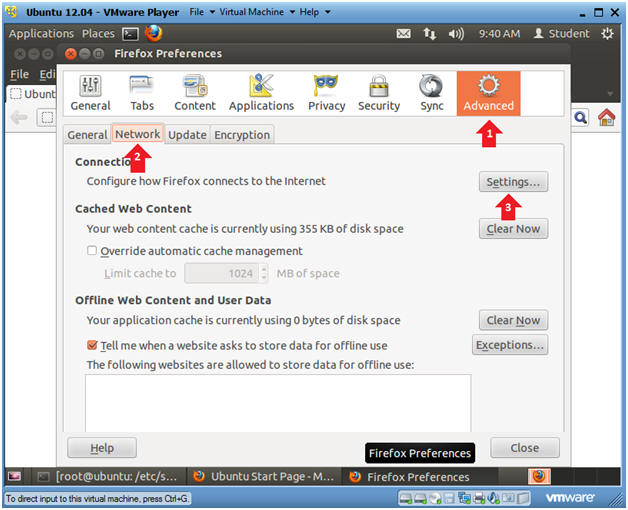
- Instructions
- Configure HTTP Proxy
- Instructions
- Click on Manual proxy configuration
- HTTP Proxy: Supply Ubuntu Server IP
Address
- Obtain IP Address from (Section 3, Step 3)
- Port: 3128
- Click on SOCKSv5 radio button
- Click OK
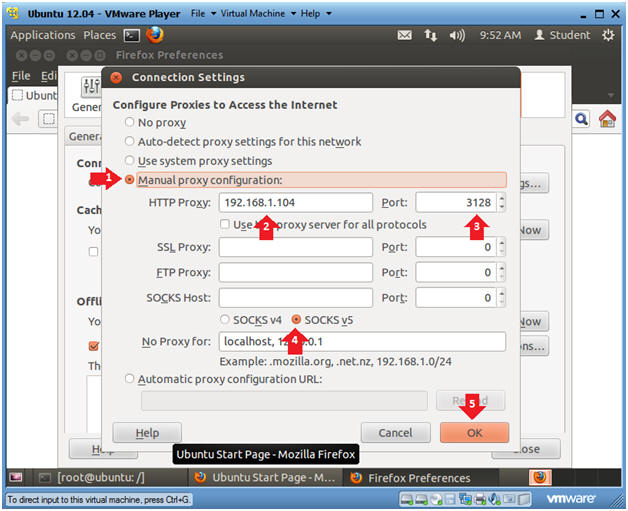
- Instructions
- Close Firefox Preferences
- Instructions
- Click Close
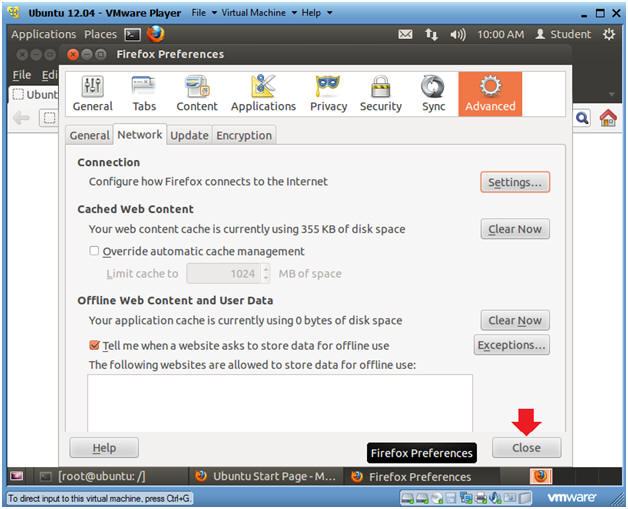
- Instructions
- Test the Squid Proxy
- Instructions
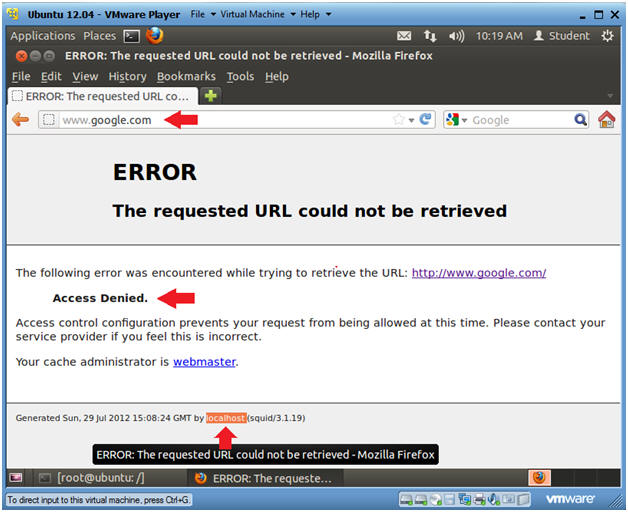
- Place www.google.com in the URL box.
- Note(FYI):
- Notice access to www.google.com was denied.
- Notice this message was generated by localhost.
- Instructions
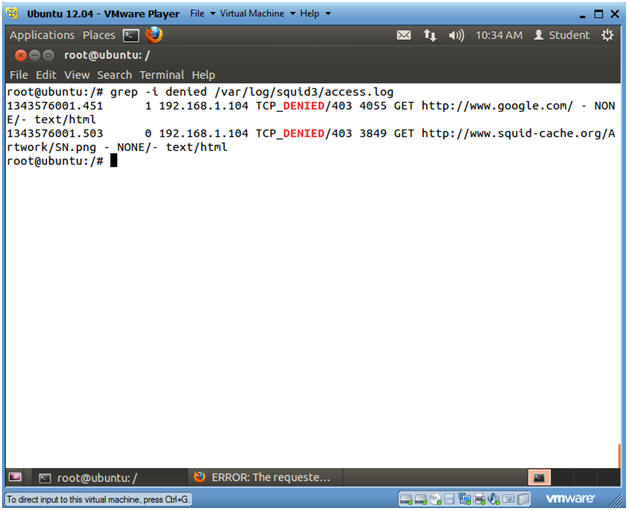
- View Squid Access Log
- Instructions
- grep -i denied /var/log/squid3/access.log
- Note(FYI):
- Notice that Squid denied access to www.google.com
- Instructions
| Section 10: Configure visible_hostname |
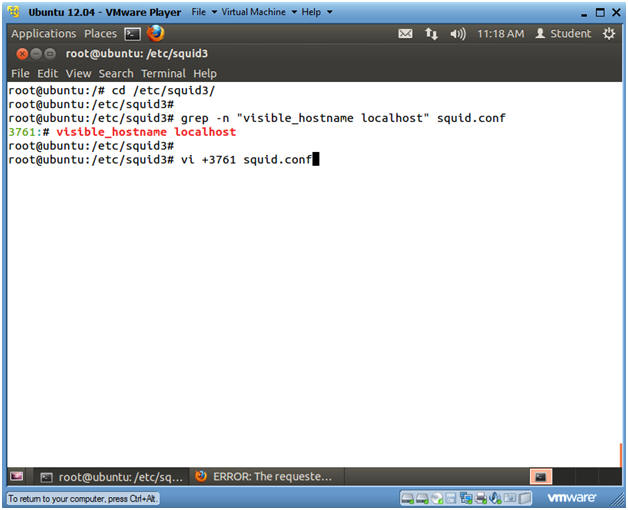
- Search For and Go To TAG: visible_hostname line
number
- Instructions
- cd /etc/squid3/
- grep -n "visible_hostname localhost"
squid.conf
- This will produce the line number that will be used in the next step. (In my case, Line Number: 3761)
- vi +3761 squid.conf
- Instructions
- View Results
- Note(FYI):
- The cursor should be on the start of
the line that looks like the below
- # visible_hostname localhost
- Continue to next step
- The cursor should be on the start of
the line that looks like the below
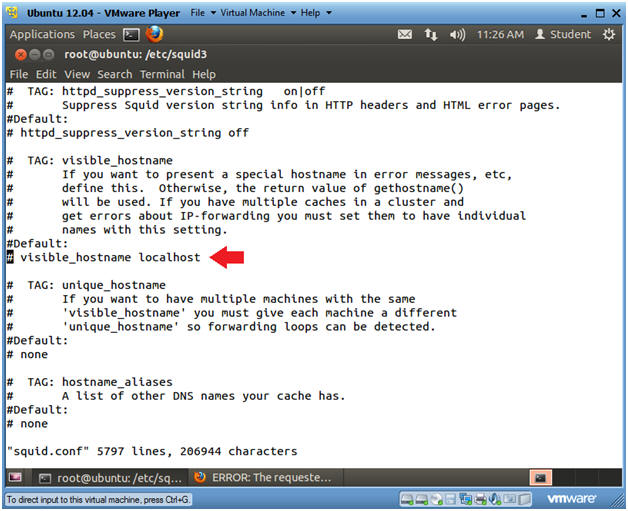
- Note(FYI):
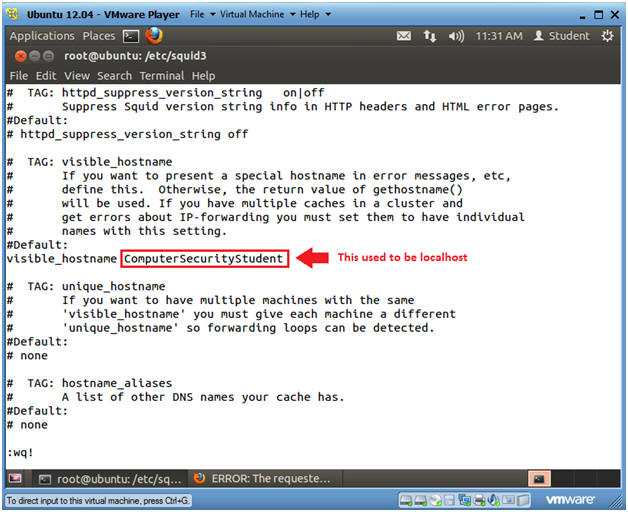
- Change the Visible Hostname
- Instructions
- Type "dw"
- This will delete all character in front of the word visible_hostname.
- Right cursor over the where the "l" is highlighted in the word localhost.
- Type "cw"
- This will allow VI to change the word.
- Rename localhost to whatever you want
to call the Squid Proxy Server.
- In my case, I am calling it ComputerSecurityStudent.
- Press the <Esc> key
- Type ":wq!"
- Press the <Enter> key
- Type "dw"
- Instructions
- Restart Squid
- Instructions
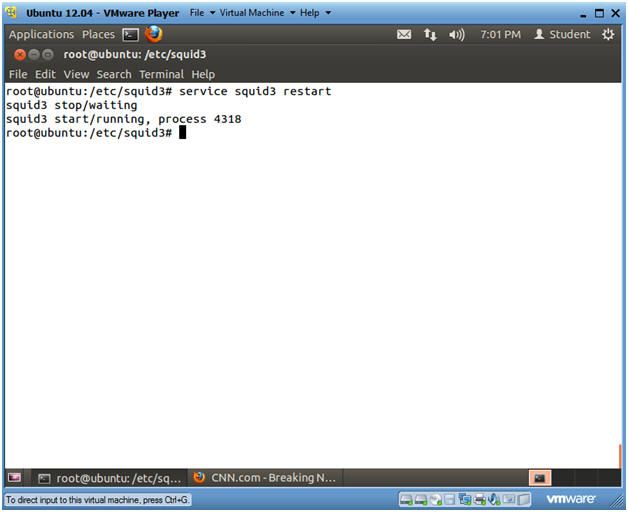
- service squid3 restart
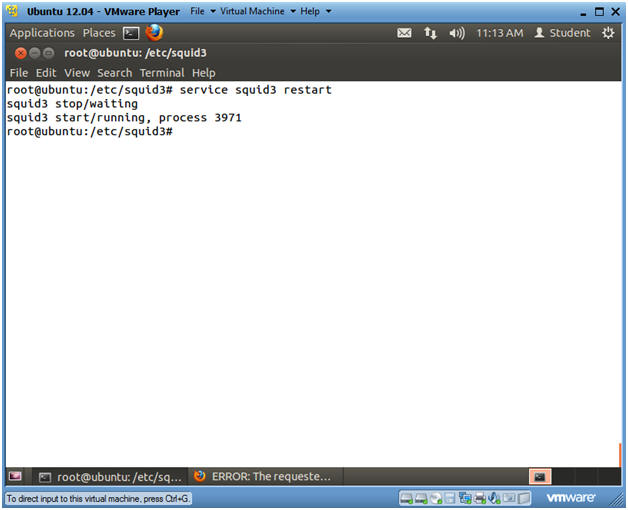
- Instructions
- Test visible_hostname
- Instructions
- Go Back to your Firefox Web Browser
- Place www.cnn.com in the URI box.
- Although CNN's access is still denied, localhost was changed to ComputerSecurityStudent. (See Below).
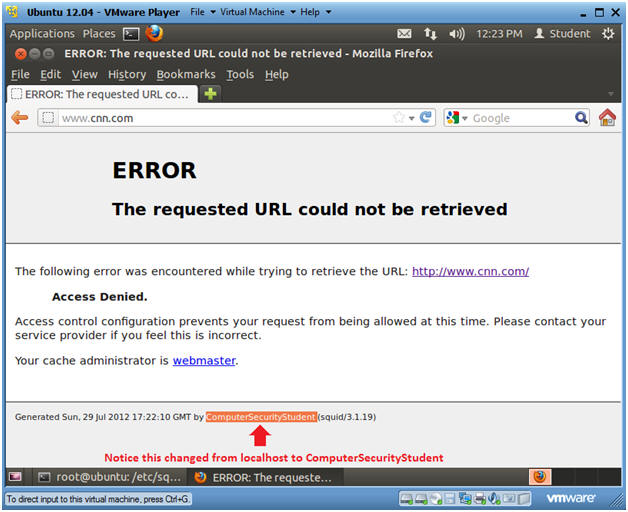
- Instructions
| Section 11: Allow Access |
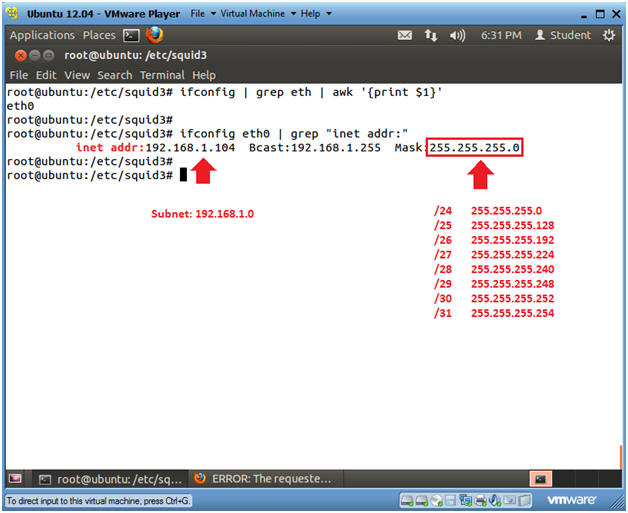
- Determine Subnet
- Instructions
- ifconfig | grep eth | awk '{print $1}'
- The first returned interface will be used in the next step.
- ifconfig eth0 | grep "inet addr:" | head -1
- In my case, Ubuntu's IP address is 192.168.1.104.
- To convert this IP address simply replace the last octet of the IP with 0.
- My subnet is 192.168.1.0
- Since the Mask is 255.255.255.0, I know
that this converts to a /24.
- E.g., 11111111.11111111.11111111.00000000
- ifconfig | grep eth | awk '{print $1}'
- Instructions
- Search For Possible Internet Network
- Instructions
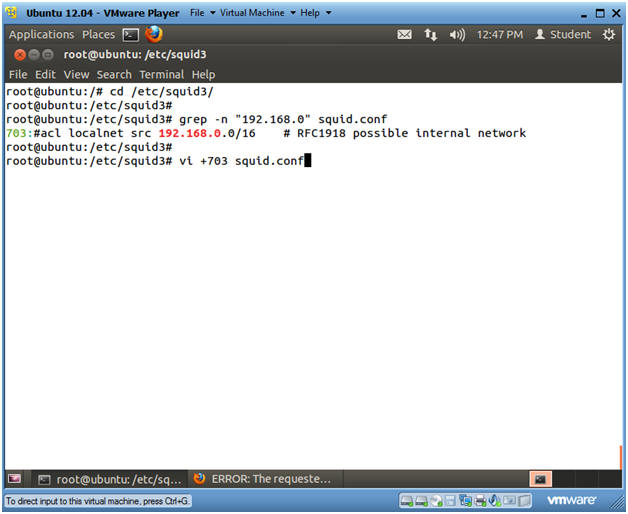
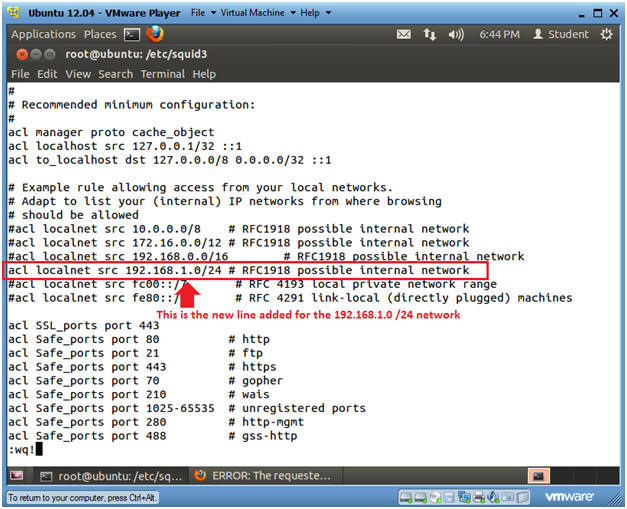
- cd /etc/squid3/
- grep -n "192.168.0" squid.conf
- Actually, use the IP Address 192.168.0 because this is a default rule in the squid.conf file.
- This will produce the line number that will be used in the next step. (In my case, Line Number: 703)
- vi +703 squid.conf
- Instructions
- Create Duplicate Entry
- Instructions
- Press "yy" to make a copy of the line that contains "192.168.0.0"
- Press "p" to past the copied line.
- Continue to Next Step
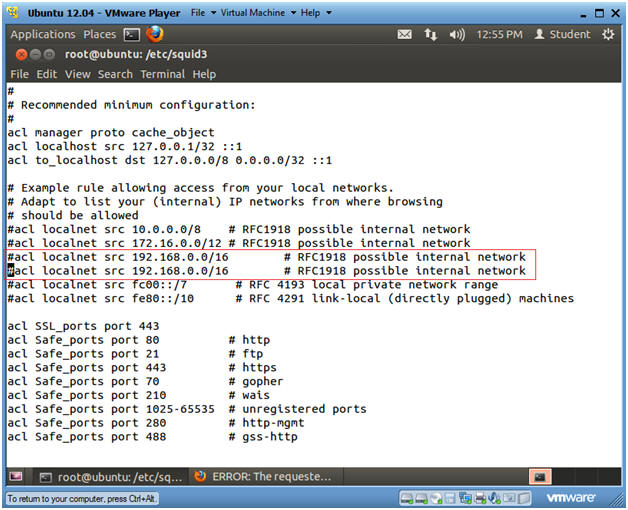
- Instructions
- View and Save Entry
- Instructions
- Press "x" to delete the "#" character.
- Right arrow over first number in the IP address and press "x" to delete the IP Address.
- Press "i" to get into insert mode and type in the correct subnet and range.
- Press the <Esc> key
- Type ":wq!"
- Press the <Enter> key
- Instructions
- Search for allow localnet
- Instructions
- cd /etc/squid3/
- grep -n "http_access allow localnet"
squid.conf
- This will produce the line number that will be used in the next step. (In my case, Line Number: 842)
- vi +842 squid.conf
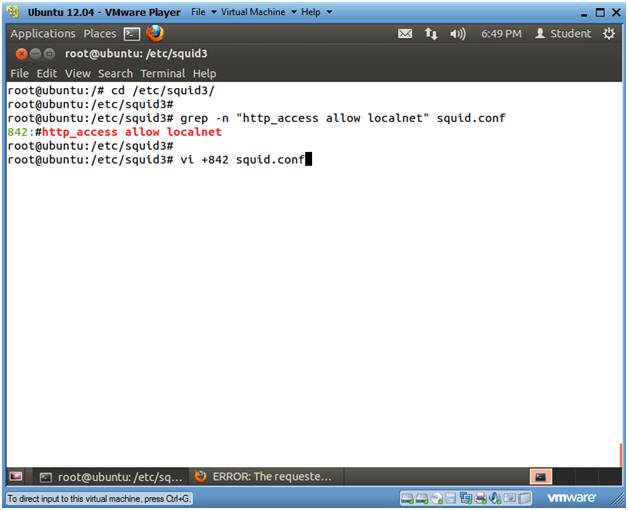
- Instructions
- Modify allow localnet
- Instructions
- The cursor should be on the "#"
character in the below line.
- E.g., #http_access allow localnet
- Press the "x" key to delete the "#" character
- Press the <Esc> key
- Type ":wq!" to save the file
- Press the <Enter> key
- The cursor should be on the "#"
character in the below line.

- Instructions
- Restart Squid
- Instructions
- service squid3 restart
- Instructions
- Test Proxy Server Access
- Instructions
- Go Back to your Firefox Web Browser
- Place www.cnn.com in the URI box.
- Note(FYI):
- You should now be able to access CNN and any website.

- Instructions
| Section 12: Deny Access to Certain Websites |
- Search for "TAG: http_access"
- Instructions
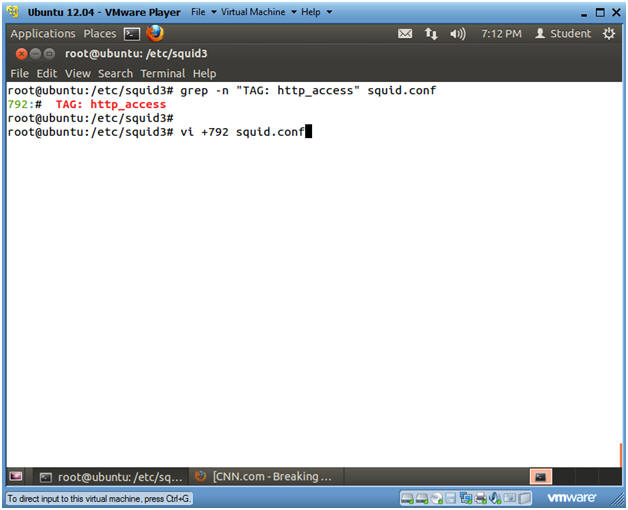
- cd /etc/squid3/
- grep -n "TAG: http_access" squid.conf
- This will produce the line number that will be used in the next step. (In my case, Line Number: 792)
- vi +792 squid.conf
- Instructions
- Deny Access to Certain Websites
- Instructions
- Press Shift and "o" to add a blank line
above the below line.
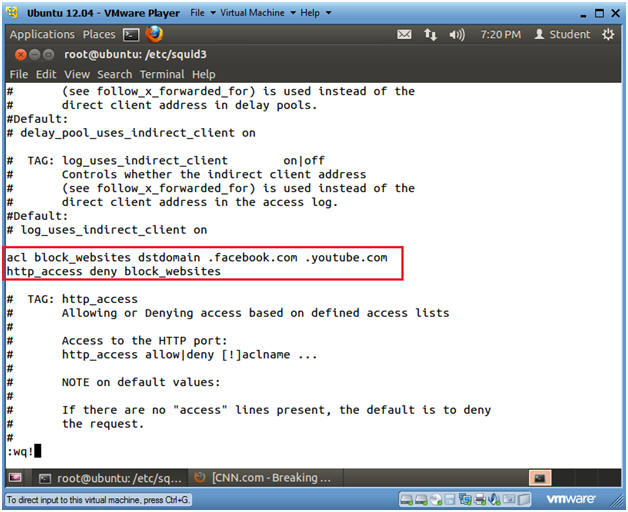
- E.g., # TAG: http_access
- Add the following two line
- acl block_websites dstdomain .facebook.com .youtube.com
- http_access deny block_websites
- Press <Enter> to add spacing.
- Press the <Esc> key to get out of insert mode.
- Type ":wq!" to save and quit the file.
- Press the <Enter> key
- Press Shift and "o" to add a blank line
above the below line.
- Instructions
- Restart Squid
- Instructions
- service squid3 restart
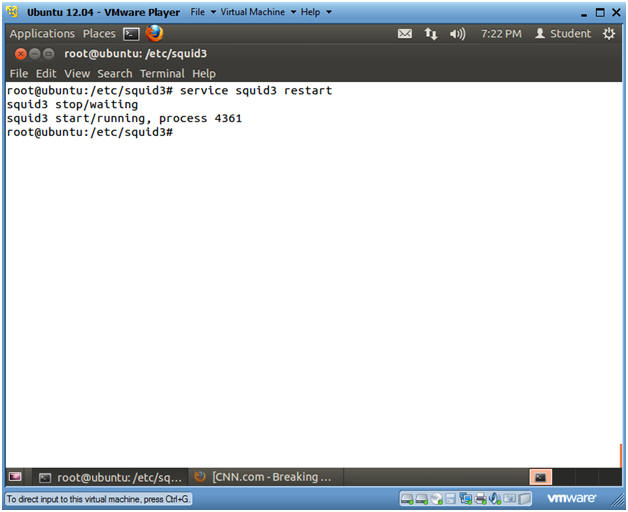
- Instructions
- Test Blocked Website Access
- Instructions
- Go Back to your Firefox Web Browser
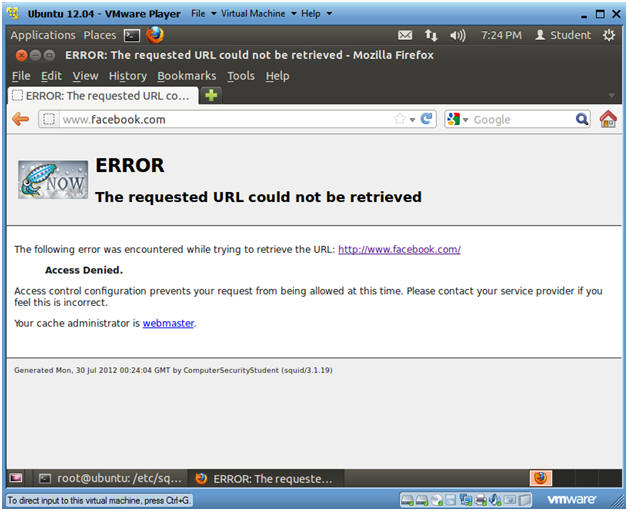
- Place www.facebook.com in the URI box.
- Place www.youtube.com in the URI box.
- Place www.cnn.com in the URI box.
- Note(FYI):
- You should NOT be able to access the FACEBOOK or YOUTUBE websites, but you should be able to access all other network available websites.
- Instructions
| Section 13: Restore Firefox Proxy Settings |
- Select Firefox Preferences
- Instructions
- Edit --> Preferences
- Instructions
- Network Settings
- Instructions
- Click on Advanced
- Click on Network
- Click on Settings
- Instructions
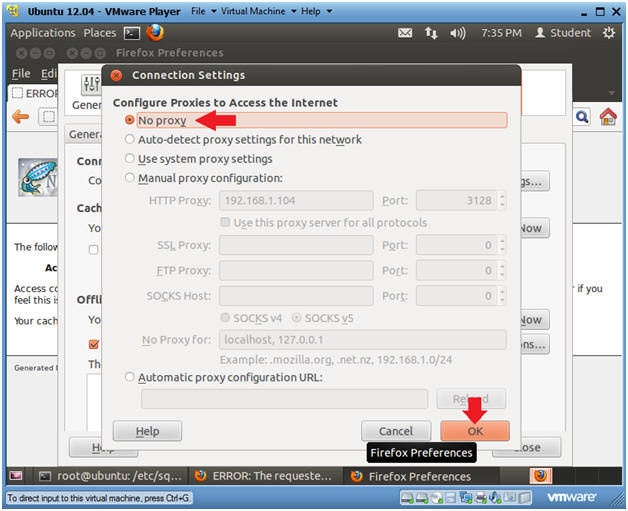
- Connection Settings
- Instructions
- Click on No proxy
- Click the OK Button
- Instructions
- Close Firefox Preferences
- Instructions
- Click Close
- Instructions
| Section 14: Proof of Lab |
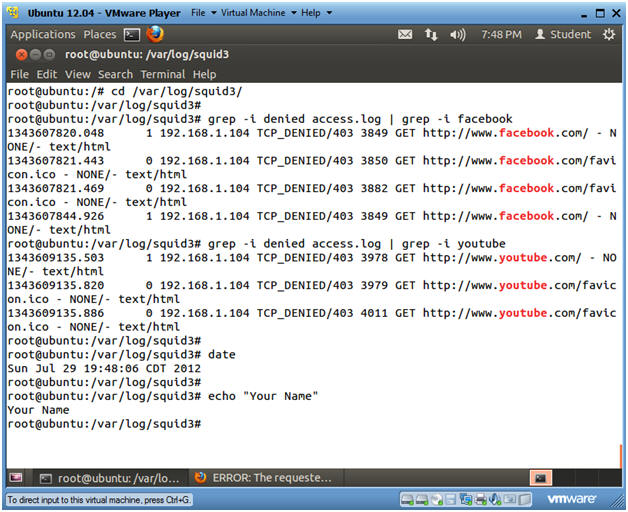
- Proof of Lab
- Instructions
- cd /var/log/squid3/
- grep -i denied access.log | grep -i facebook
- grep -i denied access.log | grep -i youtube
- date
- echo "Your Name"
- Replace the string "Your Name" with your actual name.
- e.g., echo "John Gray"
-
Proof of Lab Instructions
- Press both the <Ctrl> and <Alt> keys at the same time.
- Do a <PrtScn>
- Paste into a word document
- Upload to Moodle
- Instructions