(Damn
Vulnerable Windows 7:
Lesson 1)
{ How to create a Damn
Vulnerable Windows 7 Machine }
|
Section 0. Background
Information |
- What is Damn Vulnerable Windows 7?
- This is a Windows 7 Virtual Machine that
provides a practice environment to conduct ethical penetration
testing, vulnerability assessment, exploitation and forensics
investigation.
- The Microsoft Software License Terms for
the IE VMs are included in the release
notes.
- By downloading and using this
software, you agree to these license
terms.
- Pre-Requisite Labs
-
Lab Notes
- In this lab we will do the following:
- Download a Windows 7 (IE8)
- Disable the Firewall
- Disable Windows Update
- Disable Internet Security
- Remove most Windows 7 SP1 Patches
- Create Weak Passwords
- Legal Disclaimer
- As a condition of your use of this Web
site, you warrant to computersecuritystudent.com that you will not use
this Web site for any purpose that is unlawful or
that is prohibited by these terms, conditions, and notices.
- In accordance with UCC § 2-316, this
product is provided with "no warranties, either express or implied." The
information contained is provided "as-is", with "no guarantee of
merchantability."
- In addition, this is a teaching website
that does not condone malicious behavior of
any kind.
- You are on notice, that continuing
and/or using this lab outside your "own" test environment
is considered malicious and is against the law.
- © 2015 No content replication of any
kind is allowed without express written permission.
|
Section 1: Download
Microsoft Win7-IE8 VM |
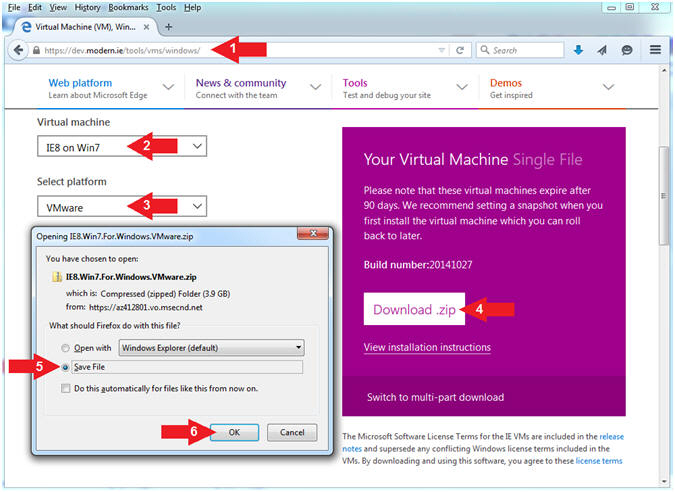
- Download Windows XP-IE6
- Download Location
- Instructions:
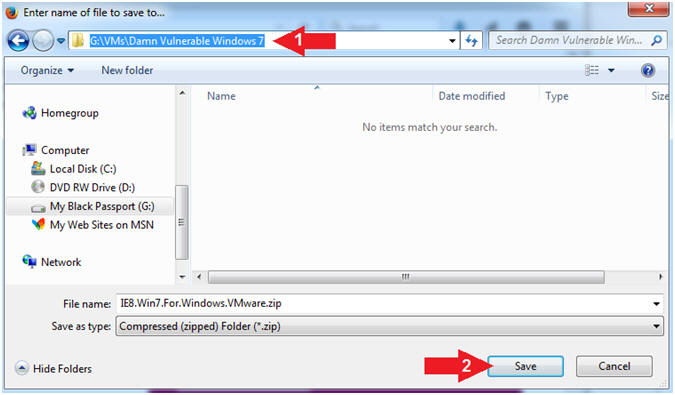
- Navigate to your preferred download
directory
- In my case,
G:\VMs\Damn Vulnerable
Windows 7
- Click the Save Button
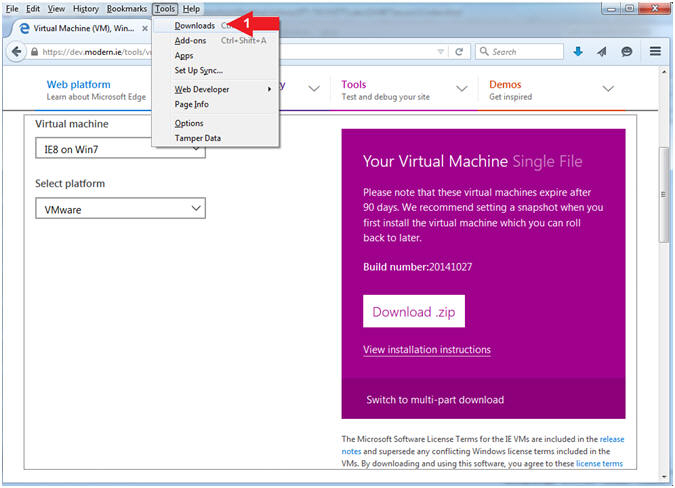
- Go To Downloads Folder (Part 1)
- Instructions:
- Tools --> Downloads
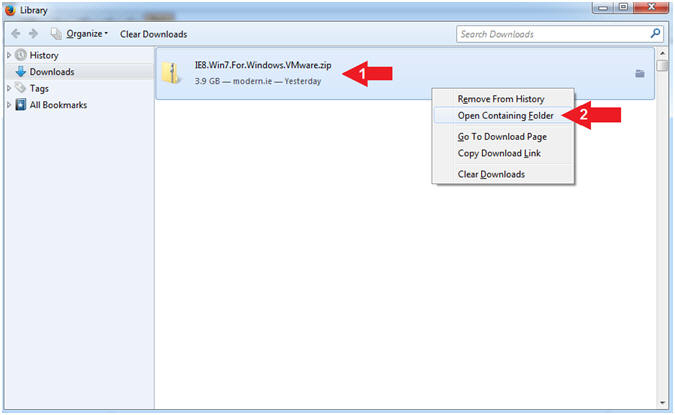
- Go To Downloads Folder (Part 2)
- Instructions:
- Right Click on
IE8.Win7.For.Windows.VMware.zip
- Open Containing Folder
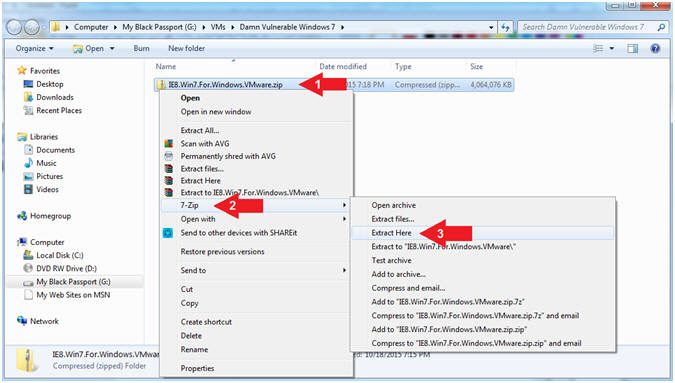
- Extract Files
- Instructions:
- Right Click on
IE8.Win7.For.Windows.VMware.zip
- Select 7-Zip
- Extract Here
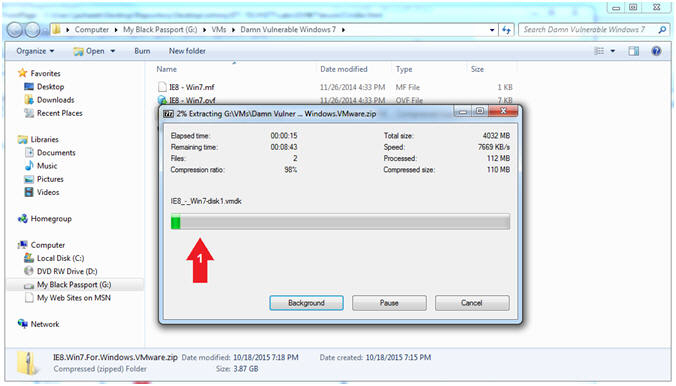
- Extract Process
- Note(FYI):
- The Extraction Process will take
between 2 to 5 minutes.
- Continue to Next Step after the
extraction completes.
|
Section 2: Create a
New Virtual Machine |
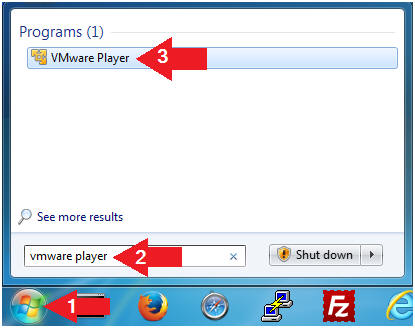
- Open VMware Player on your windows machine.
- Instructions:
- Click the Start Button
- Type "vmware player" in the search box
- Click on VMware Player
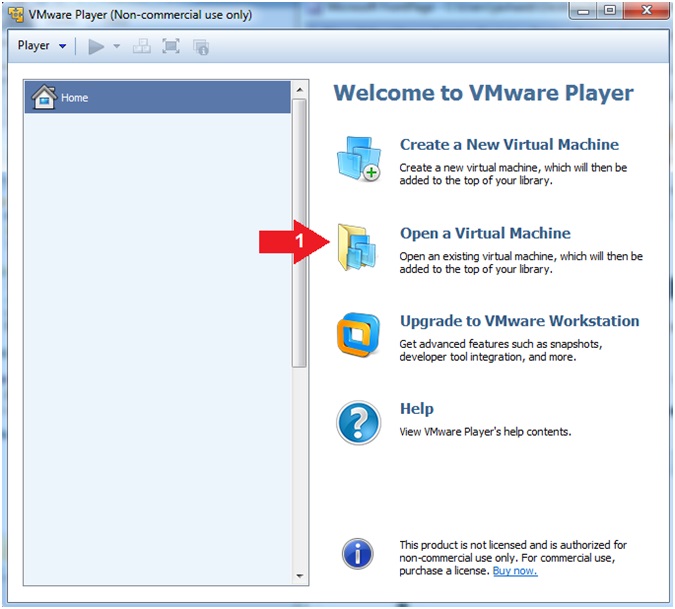
- Create a New Virtual Machine. (See Below)
- Instructions:
- Click on Open a Virtual Machine
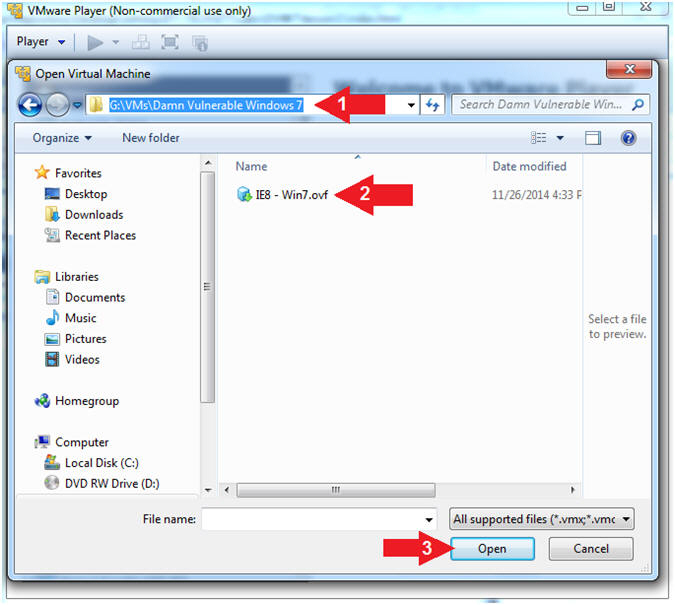
- Open Virtual Machine
- Instructions:
- Navigate To Extracted Virtual Machine
Location
- In my case, the directory was
G:\VMs\Damn Vulnerable Windows 7
- Click IE8 - Win7
- Click the Open Button
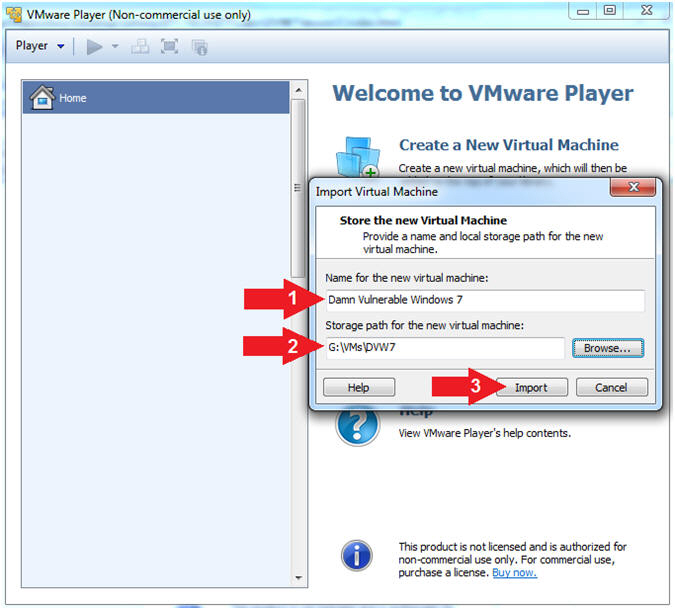
- Import Virtual Machine
- Instructions:
- Name:
Damn Vulnerable Windows 7
- Storage Path: Browse to your desired
storage location
- In my case, the storage directory is
G:\VMs\DVW7
- Click the Import Button
- Don't be alarmed, an error message will
be displayed.
- Continue to the next step.
- Virtual Machine OVF Failure
- Instructions:
- Click the Retry Button
- Note(FYI):
- The import will take between 15 to 45
minutes.
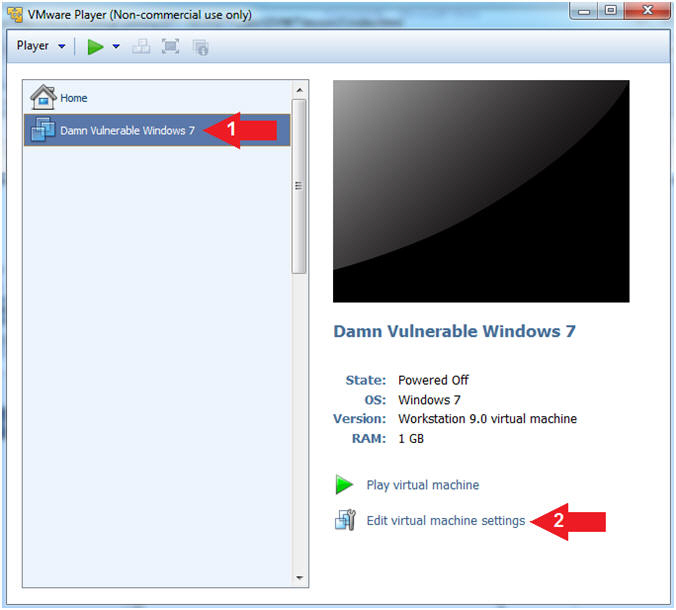
- Edit Virtual Machine
- Instructions:
- Click on Damn Vulnerable Windows 7
- Click on Edit virtual machine settings
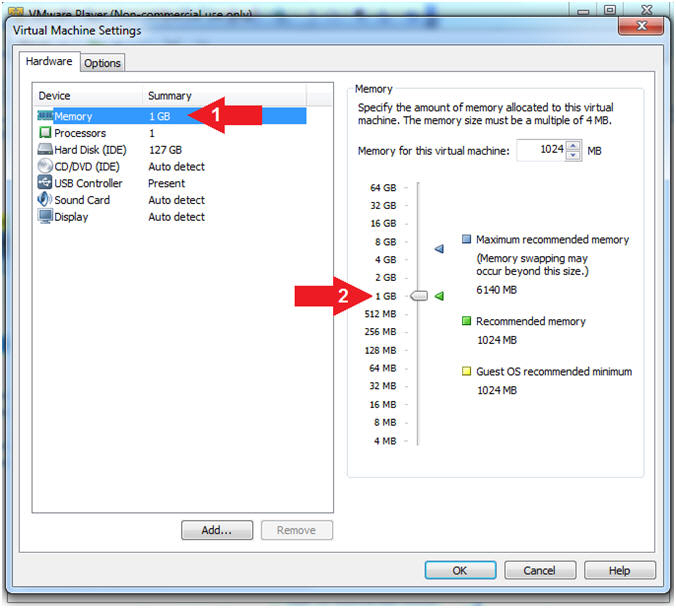
- Configure Memory Setting
- Instructions:
- Click on Memory
- Select 1 GB
- Note(FYI):
-
Do NOT Click
the OK Button,
we still have more to configure.
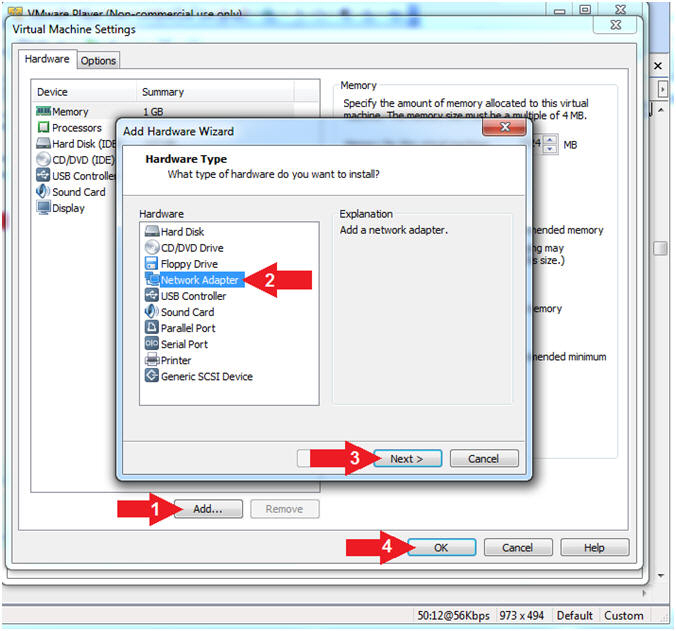
- Add Network Adapter
- Instructions:
- Click the Add... Button
- Note: The Windows UAC message might
appear. If so, click Yes.
- Click on Network Adapter
- Click the Next Button
- Click the OK Button
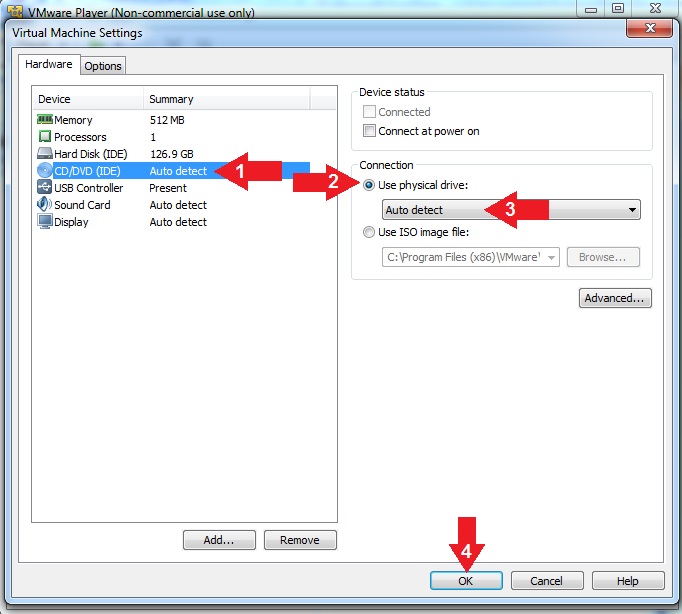
- Configure CD/DVD Settings
- Instructions:
- Click on CD/DVD(IDE)
- Click the Use physical drive radio
button
- Select Auto detect
- Click the OK Button
|
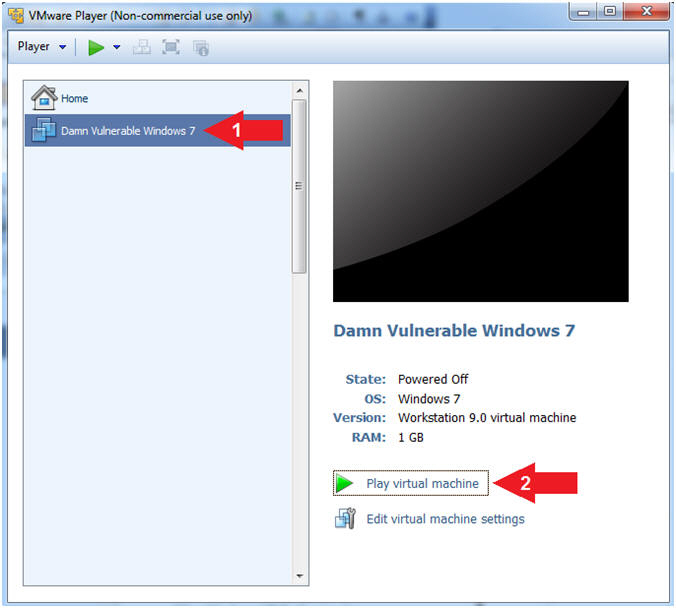
Section 3: Play Damn
Vulnerable Windows 7 |
- Start the Damn Vulnerable Windows 7
- Instructions:
- Click on Damn Vulnerable Windows 7
- Click on Play virtual machine
|
Section 4: Network
Location Setup |
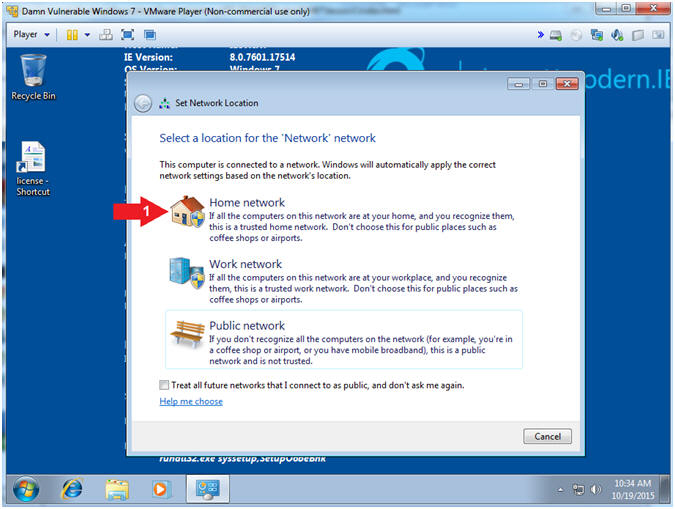
- Set Network Location
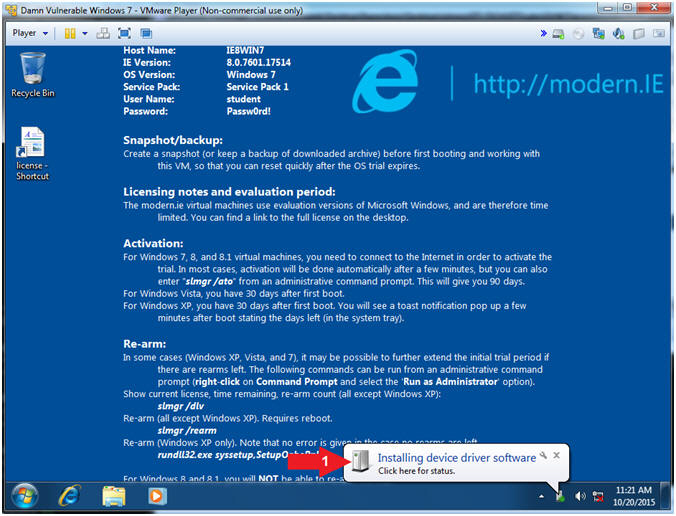
- Note(FYI):
- After the Windows 7 Operating System
loads it will take about 1 to 2 minutes for the Network Adapter
Drivers to install the new device.
- Set Network Location
- Instructions:
- Double Click on Home Network
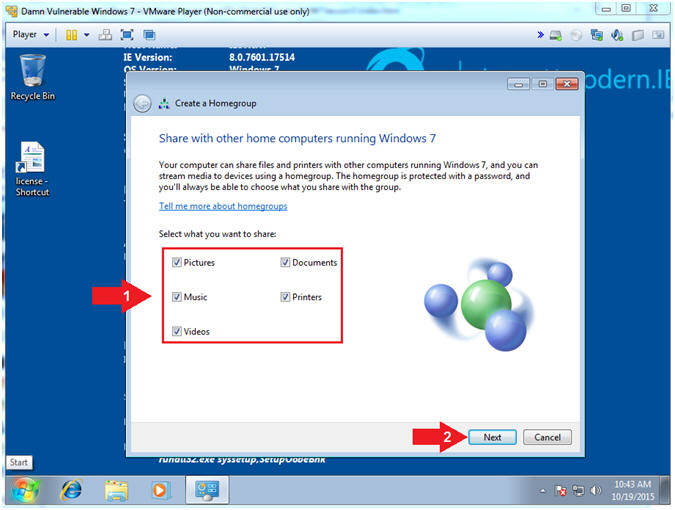
- Create a Homegroup (Part 1)
- Instructions:
- Check all the checkboxes
- Click the Next Button
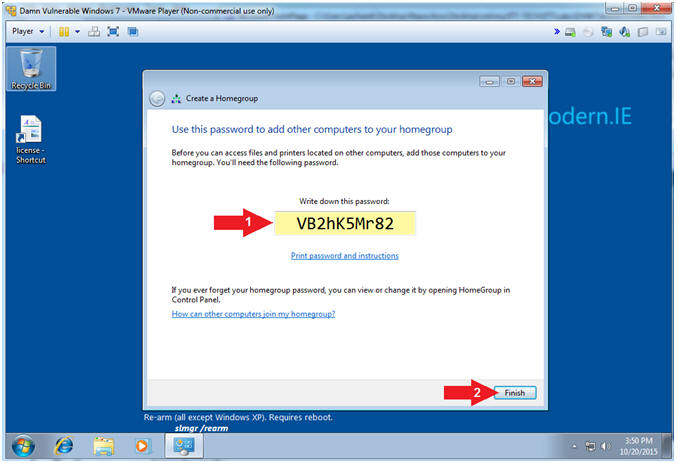
- Create a Homegroup (Part 2)
- Instructions:
- It's your discretion to record your
password.
- Click the Finish Button
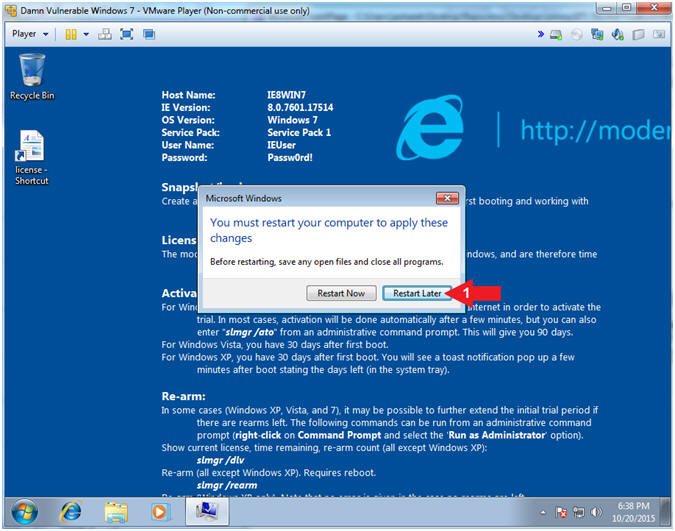
- Restart Message
- Instructions:
- Click Restart Later
|
Section 5: Turn Off
Windows Firewall |
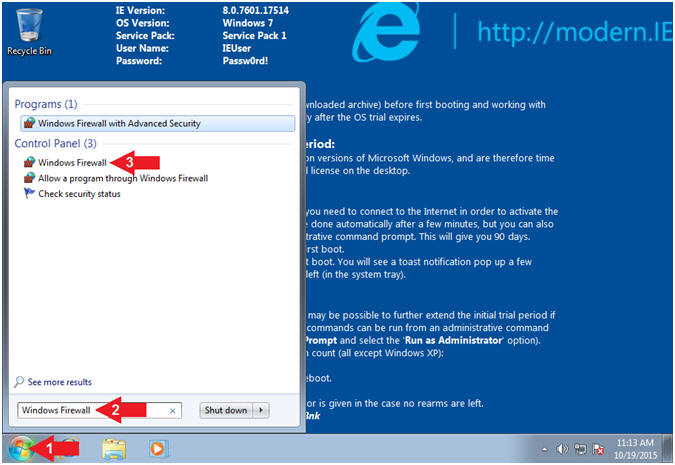
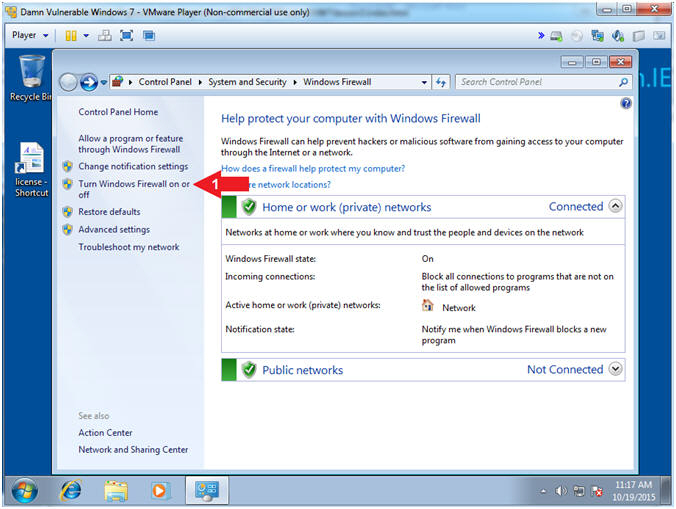
- Open Windows Firewall (Part 1)
- Instructions:
- Click on the Windows Start Button
- Search for
Windows Firewall
- Click on Windows Firewall
- Open Windows Firewall (Part 2)
- Instructions:
- Click on Turn Windows Firewall on or
off
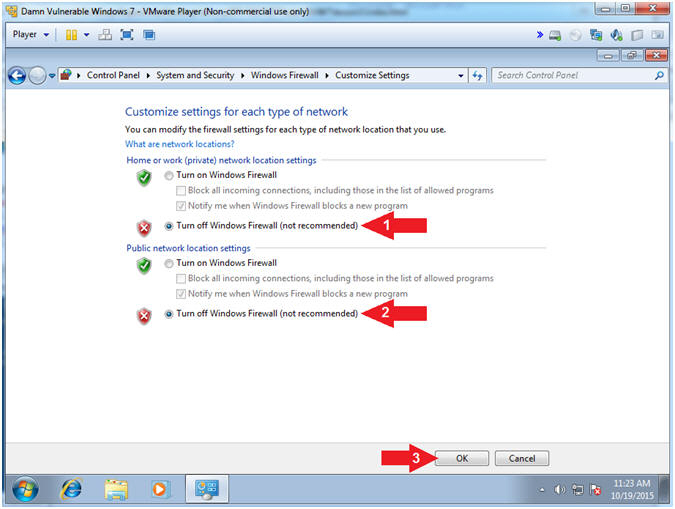
- Turn Off Windows Firewall
- Instructions:
- Home or work (private) network location
settings:
- Click on Turn
off Windows Firewall (not recommended)
- Public network location settings:
- Click on Turn
off Windows Firewall (not recommended)
- Note(FYI):
- Obviously, it is never a good idea to
turn off a host firewall. Accordingly, this VM will later be
used to illustrate that point.
|
Section 6: Turn Off
Windows Update |
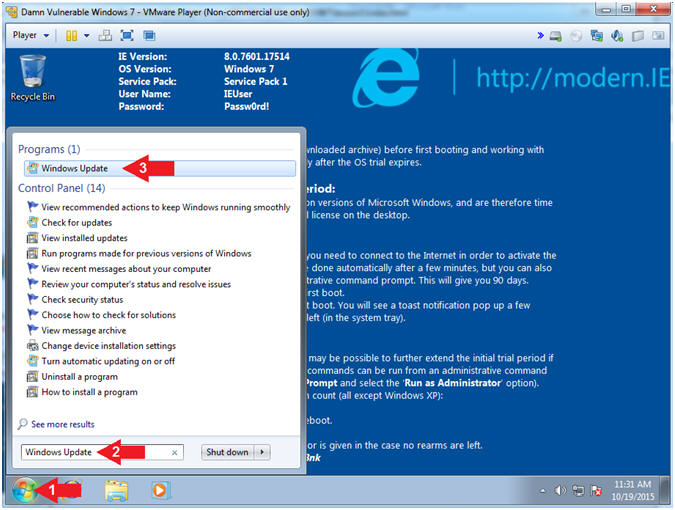
- Open Automatic Update (Part 1)
- Instructions:
- Click the Windows Start Button
- Search for
Windows Update
- Click on Windows Update
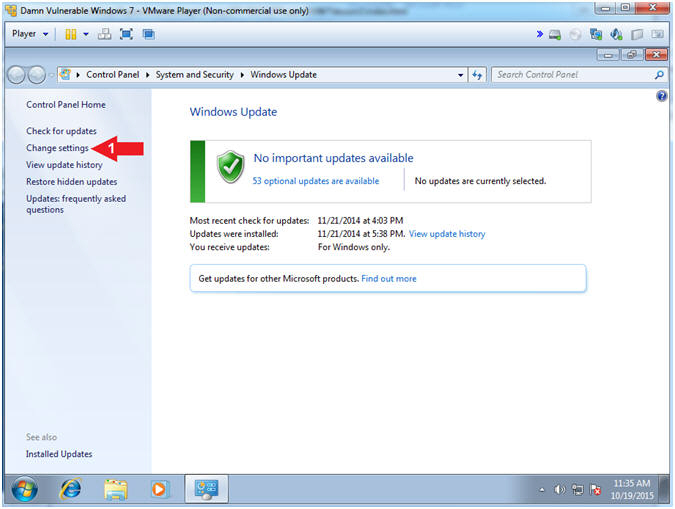
- Open Automatic Update (Part 2)
- Instructions:
- Click Change settings
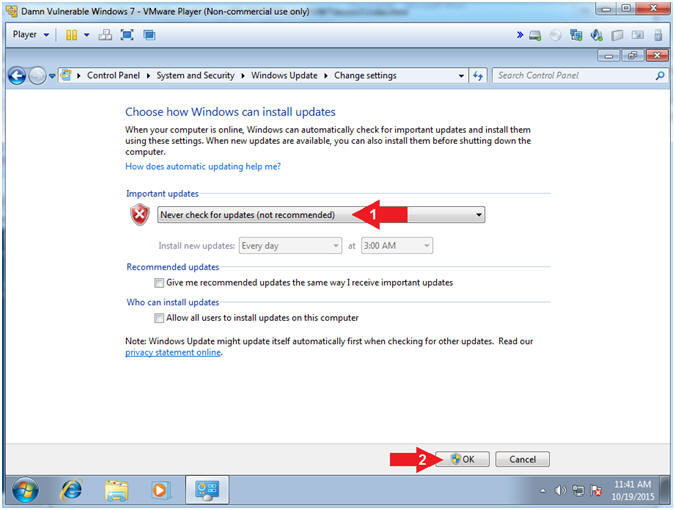
- Turn Automatic Updates Off
- Instructions:
- Select Never check for updates (not
recommended)
- Click the OK button
- Note(FYI):
- Obviously, it is never a good idea to
turn off Automatic Updates. Accordingly, this VM will later be
used to illustrate that point.
|
Section 7: Configure
Internet Options |
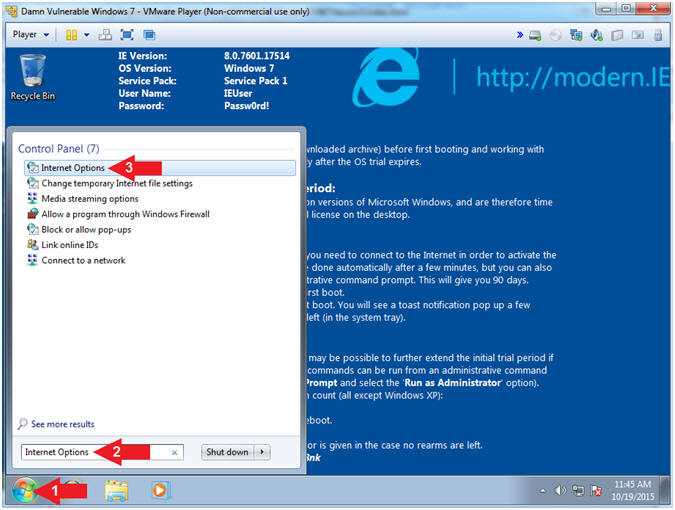
- Open Internet Options
- Instructions:
- Click the Windows Start Button
- Search for
Internet Options
- Click on Internet Options
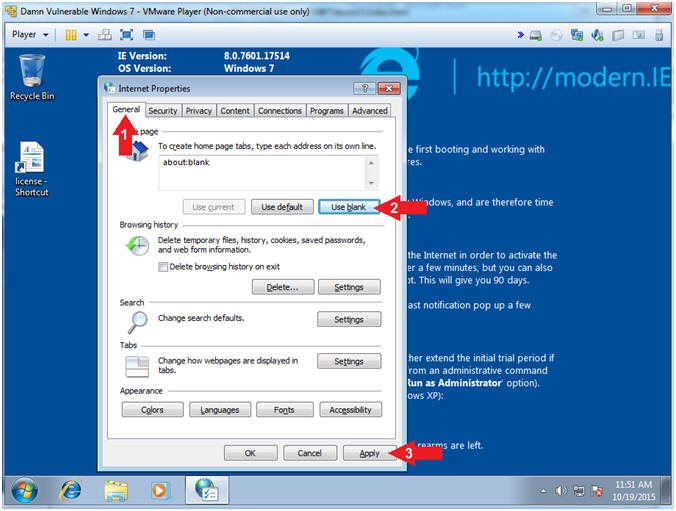
- Default Home Page Configuration
- Instructions:
- Click the General Tab
- Click the Use Blank Button
- Click the Apply Button
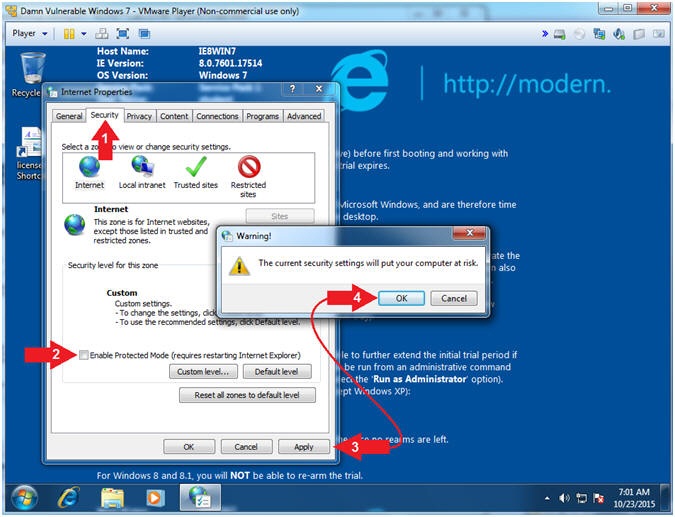
- Default Home Page Configuration
- Instructions:
- Click the Security Tab
- Uncheck Enable Protected Mode
- Click the Apply Button
- Click the Warning! OK button
- Name the server
- Instructions:
- Click the Privacy Tab
- Select lowest setting for the Internet
Zone. (See Picture)
- Uncheck Turn on Pop-up Blocker
- Click the Apply Button
- Click the OK Button.

|
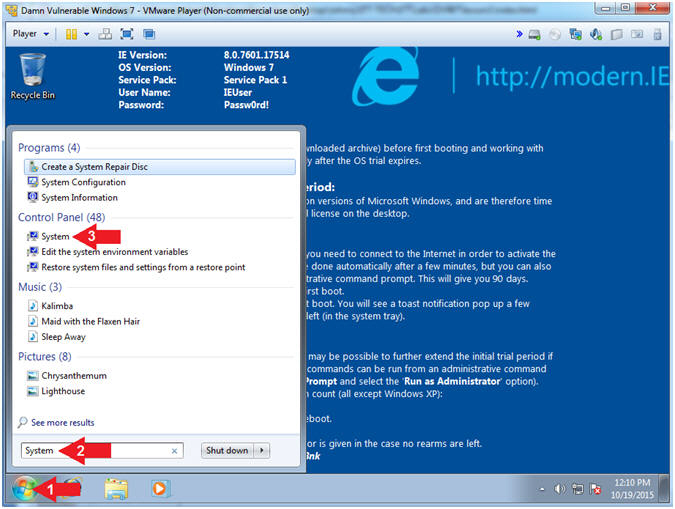
Section 8: Configure Remote Settings |
- Open System Panel
- Instructions:
- Click the Windows Start Button
- Search for
System
- Click System
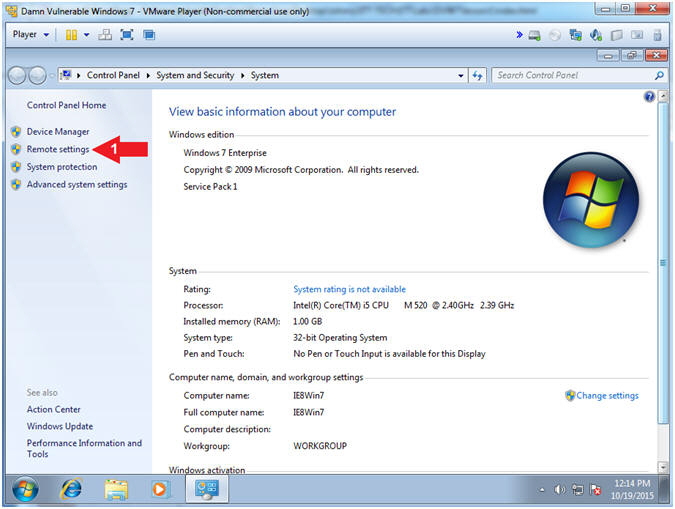
- Open Remote Settings
- Instructions:
- Click on Remote settings
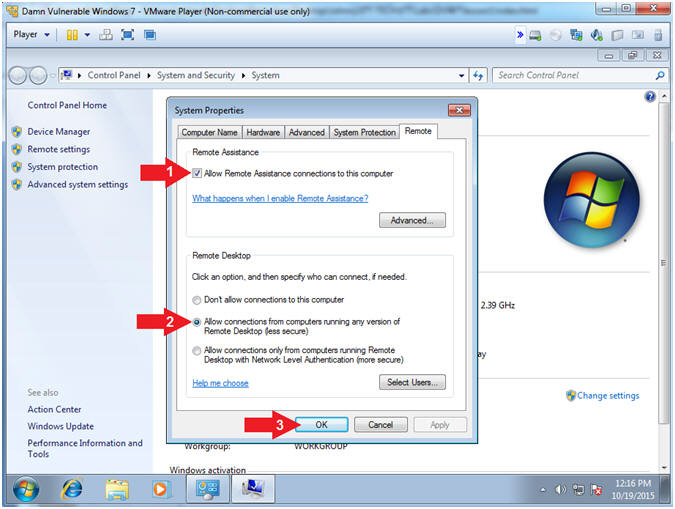
- Configure Remote Settings (Part 1)
- Instructions:
- Remote Assistance:
- Check Allow Remote Assistance
connections to this computer
- Remote Desktop
- Allow connections from computers
running any version of Remote Desktop (less secure)
- Click the OK Button
|
Section 9: Change
Computer Name |
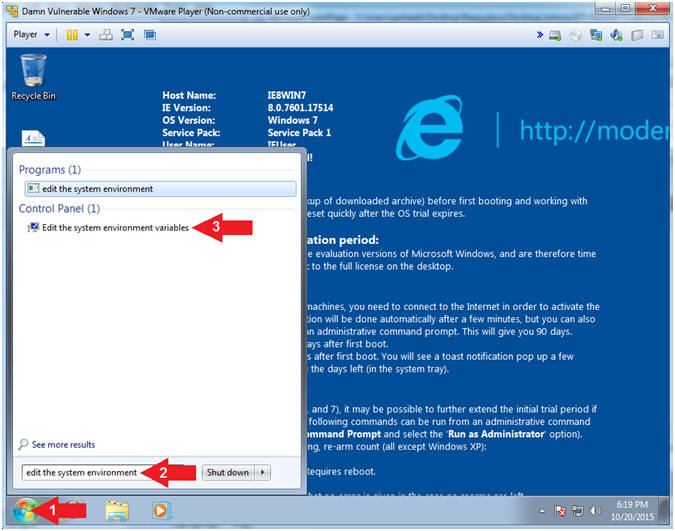
- Edit the System Environment
- Instructions:
- Click the Windows Start Button
- Search for
edit the system environment
- Click the Edit system environment variables
- Change Computer Name
- Instructions:
- Select the Computer Name tab
- Computer description: Damn Vulnerable
Windows 7
- Click the Change... button
- Computer name: DVW7
- Click the OK button
- You must restart your computer message
- Click the Apply button
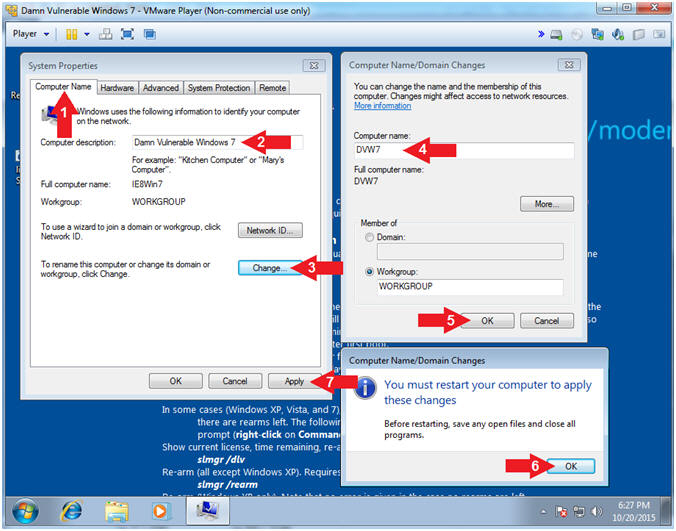
- You must restart your computer
- Instructions:
- Click Restart Later
|
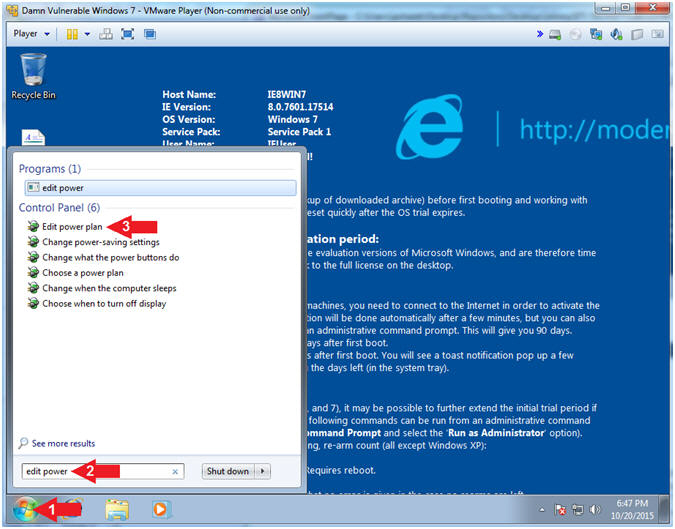
Section 10: Change
Power Options |
- Edit Power Plan (Part 1)
- Instructions:
- Click the Windows Start Button
- Search for
edit power
- Click on edit power plan
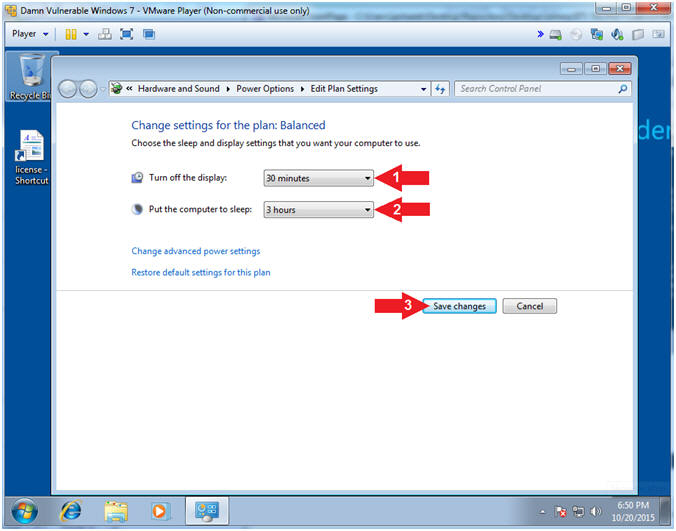
- Edit Power Plan (Part 2)
- Instructions:
- Turn off the display: 30 minutes
- Put the computer to sleep: 3 hours
- Click the Save Changes button
|
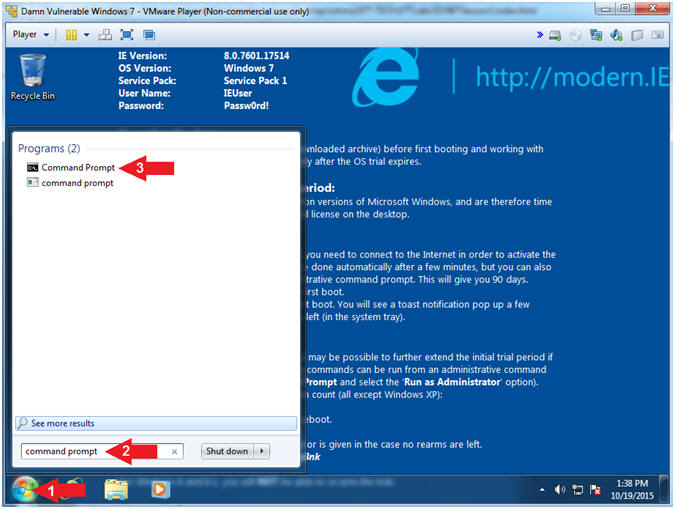
Section 11: Change
Desktop Background |
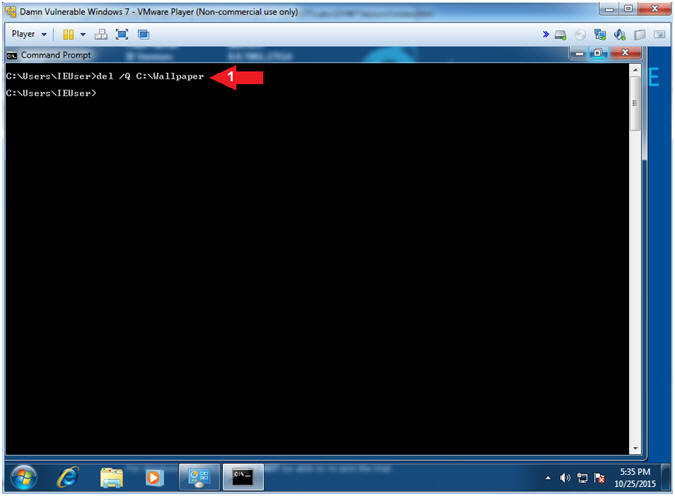
- Open the Command Prompt
- Instructions:
- Click the Start Button
- Search for
command prompt
- Click on
Command Prompt
- Remove BGInfo
- Instructions:
- del /Q C:\Wallpaper
- Note(FYI):
- Command #1, Delete the Wallpaper
directory. Use the flag (/Q) to not ask if it is OK to delete.
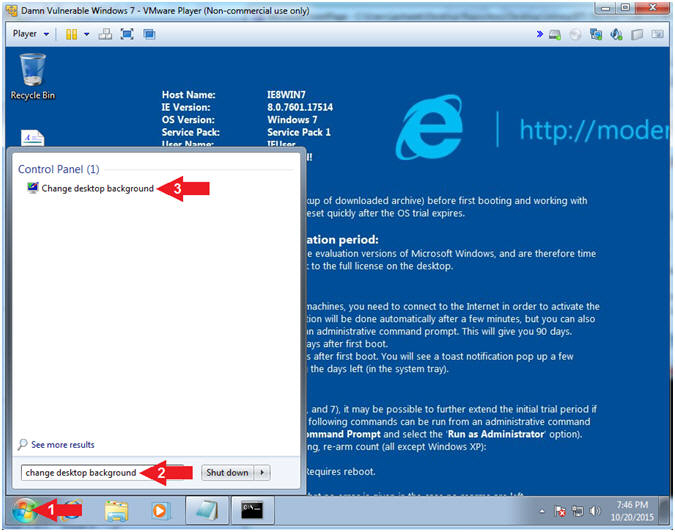
- Change Desktop Background (Part 1)
- Instructions:
- Click the Windows Start Button
- Search for
change desktop background
- Click on
Change desktop backgroud
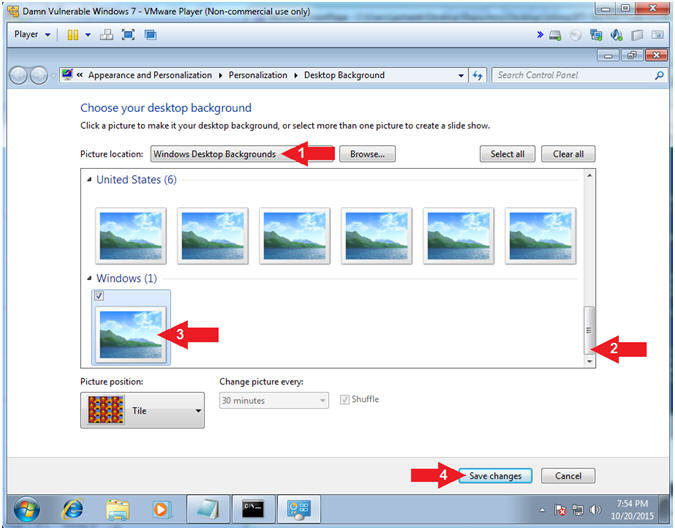
- Change Desktop Background (Part 2)
- Instructions:
- Picture locations: Windows Desktop
Backgrounds
- Scroll all the way down (See Picture)
- Click on the only picture under
Windows(1)
- Click on the Save Changes Button
|
Section 12: Remove
"Most" Windows 7 Patches |
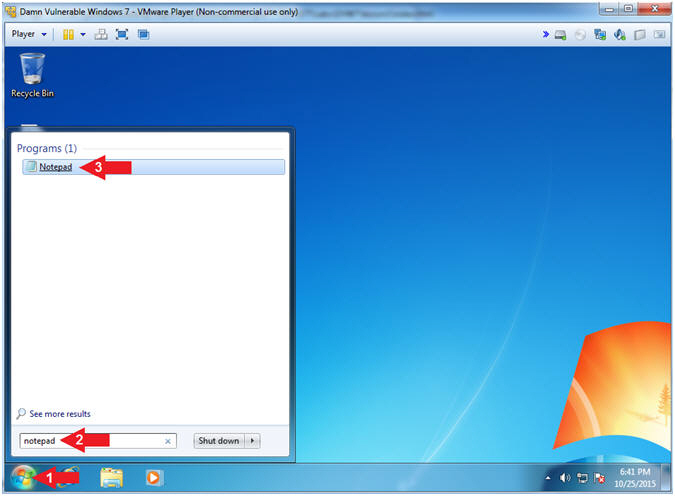
- Open Notepad
- Instructions:
- Click the Windows Start Button
- Search for
Notepad
- Click on Notepad
-
- Copy and Paste Patch Removal Script
- Instructions:
- Copy the below text.
-
@ECHO OFF
Setlocal EnableDelayedExpansion
set cmdopt1=/uninstall /quiet /norestart
set cmdtorun=wusa.exe
for /f %%i in ('wmic qfe get "HotFixID" /format:table') DO call :concat %%i
:concat
set MYVAR=%1
set TESTVAR=!MYVAR!
If NOT "%TESTVAR%"=="%TESTVAR:kb=%" (
set modified=!MYVAR:kb=kb:!
set cmdopt=%cmdtorun% /%modified% %cmdopt1%
echo %cmdopt%
!cmdopt!
)
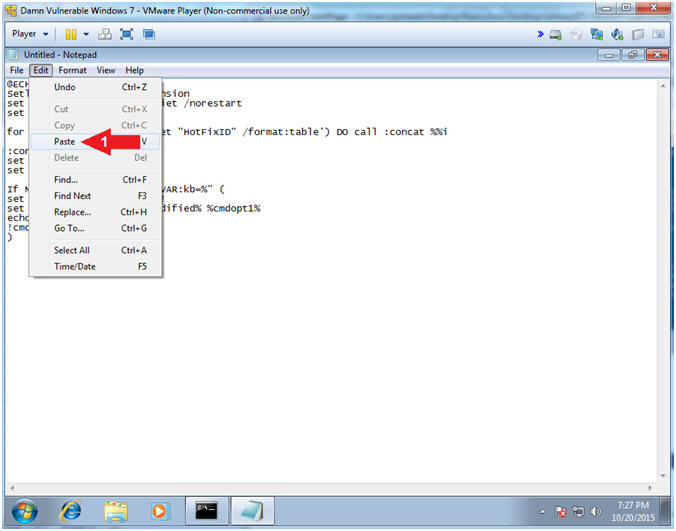
- Paste Text in the Notepad Screen:
Edit --> Paste
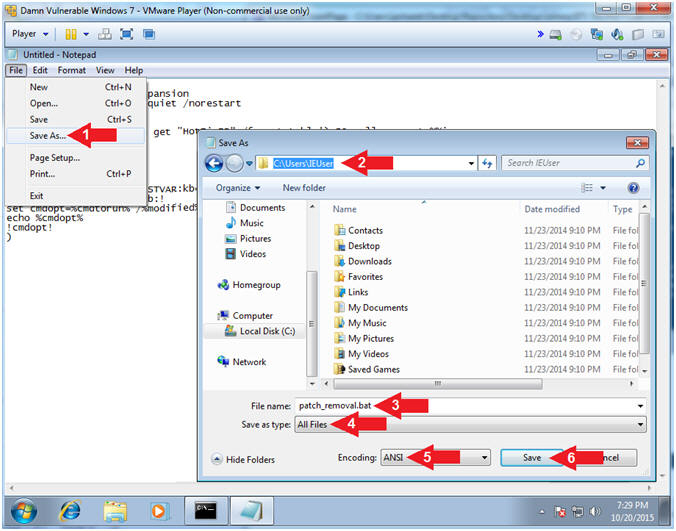
- Save patch_removal.bat file
- Instructions:
- File --> Save As...
- Save in: Local Disk (C:\Users\IEUser)
- File name: patch_removal.bat
- Save as type: All Files
- Encoding: ANSI
- Click the Save Button
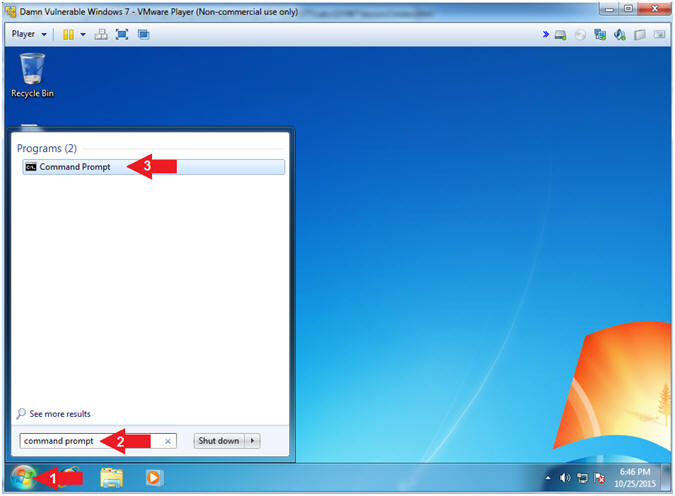
- Open the Command Prompt
- Instructions:
- Click the Start Button
- Search for
command prompt
- Click on Command Prompt
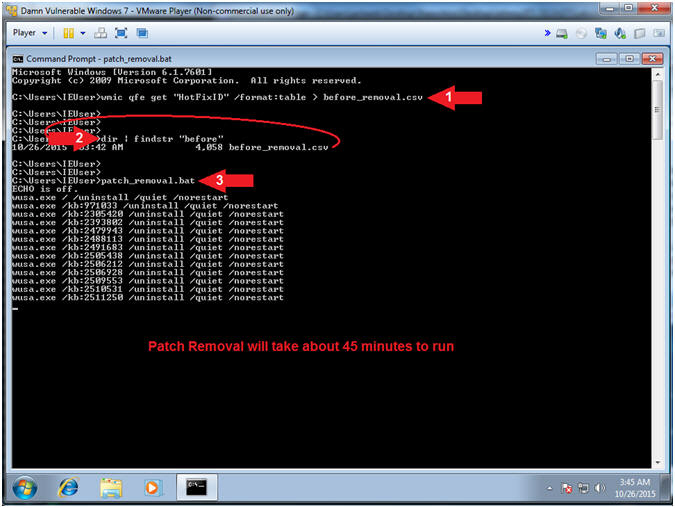
- Remove Patches (Part 1)
- Instructions:
- wmic qfe get "HotFixID" /format:table
> before_removal.csv
- dir | findstr "before"
- patch_removal.bat
- Note(FYI):
- Command #1, output all the HotFix
patches into file before_removal.csv using the greater than (>)
operator.
- Command #2, Use (dir) to list
the contents of the current directory and use (findstr) to
search for the string "before".
- Command #3, use patch_removal.bat to
remove most of the HotFix patches for Windows 7 SP1. Obviously, it is never a good idea to
remove all the patches. Accordingly, this VM will later be
used to illustrate various issues. The patch_removal.bat script will take
around 45 minutes to execute,
so go get some Turkish Coffee and re-charge.
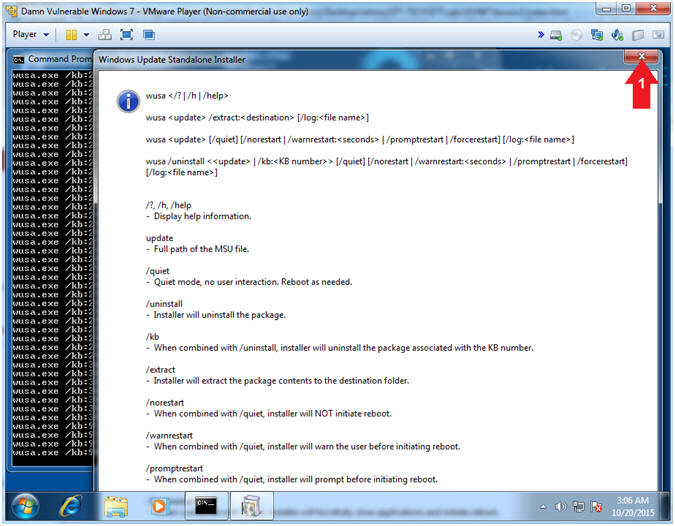
- Remove Patches Failure (Part 1)
- Instructions:
- Click
 to close the
Windows Update Standalone Installer. to close the
Windows Update Standalone Installer.
- Continue to the next step.
- Note(FYI):
- Although the script will exit after you
click
 , the majority of the
HotFixes that are not kernel dependent were removed. , the majority of the
HotFixes that are not kernel dependent were removed.
- Verify Results and Reboot
- Instructions:
- wmic qfe get "HotFixID" /format:table
- wmic qfe get "HotFixID" /format:table
> after_removal.csv
- type before_removal.csv | find /C "K"
- type after_removal.csv | find /C "K"
- shutdown -r -t 3
- Note(FYI):
- Command #1, will display all the
current HotFixes on the system that are still present. These
are the patches that the Operating System would not allow to be
removed.
- Command #2, Output the contents in
Command #1 into the file after_removal.csv using the greater than
operator (>).
- Command #3, Count the number of lines (ie.
the number of patches) in the before_removal.csv file. Notice
the number 155 is returned.
- Command #4, Count the number of lines (ie.
the number of patches) in the after_removal.csv file. Notice
the number 7 is returned.
So, the patch_removal.bat script, removed
148 patches (eg. 155 - 7 = 148).
- Command #5, Now that you have
successfully removed 148 patches, you will have to wait for another
10 to 15 minutes for the Operating System to reboot and reconfigure
itself.

|
Section 13: Disable
IEUser Auto Login |
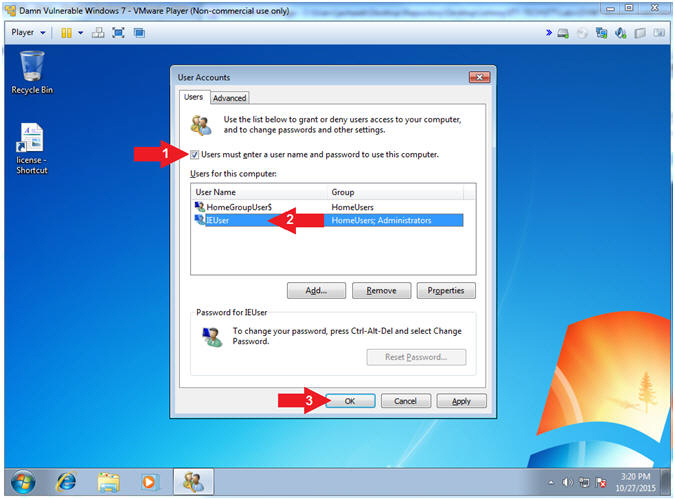
- Open Advanced User Accounts Control Panel (netplwiz)
- Instructions:
- Click on the Window's Start Button
- Search for
netplwiz
- Click on netplwiz
- Note(FYI):
- Command #3, netplwiz is the Advanced
User Accounts Control Panel that we will use to disable auto login.

- Remove Auto Login
- Instructions:
- Check Users must enter a user name
and password to use this computer
- Click on IEUser
- Click the OK Button
- Note(FYI):
- By default, the IEUser for this VM can
auto login without a password.
|
Section 14: Create
Username, Set Weak
Password, Add to Administrators Group |
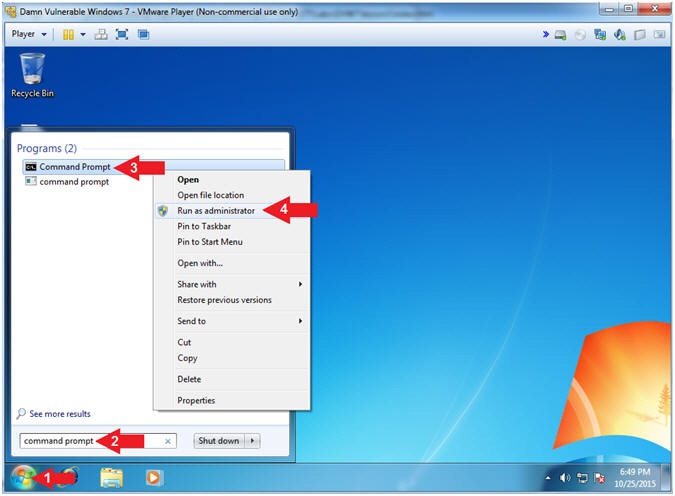
- Run Command Prompt as administrator
- Instructions:
- Click on the Windows Start Button
- Search for the string
command prompt
- Right click on the Command
Prompt
- Click on Run as administrator
- Note(FYI):
- Command #4, Your screen will go gray
prompting you to with a User Access Control message. Continue to
next step.
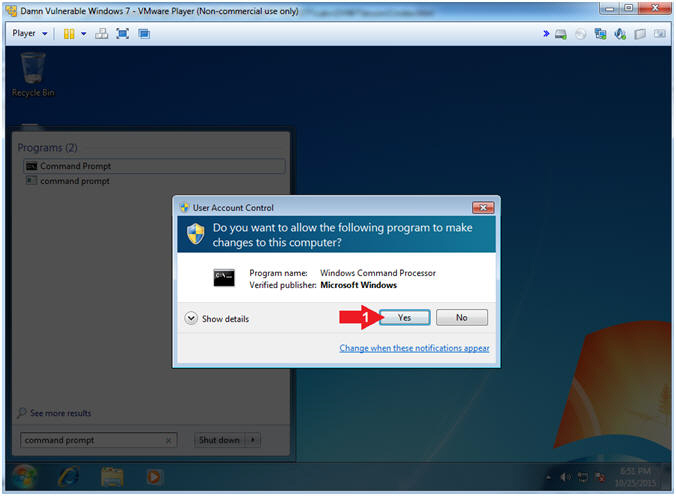
- User Account Control
- Instructions:
- Click the Yes Button
- Change Username, Set and Require Password
- Instructions:
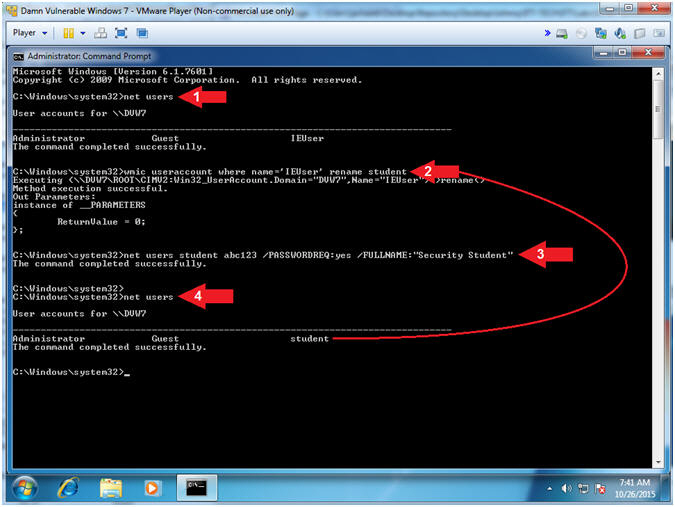
- net users
- wmic useraccount where name='IEUser'
rename
student
- net users student
abc123 /PASSWORDREQ:yes
/FULLNAME:"Security
Student"
- net users
- Note(FYI):
- Command #1, Display all local users.
- Command #2, Windows Management
Instrumentation Command-line (WMIC) is used to rename username (IEUser)
to (student).
- Command #3, Set the username (student)
password to (abc123).
Set the fullname (Security
Student). Require a password using the flag (/PASSWORDREQ:yes).
- Obviously, this is an extremely
weak password. Accordingly, we will illustrated why weak
passwords should never be used in following lessons.
- Command #1, Display all local users.
Notice that the username IEUser was changed to student.
- Enable the Administrator Account, Set Password
- Instructions:
- net users administrator
password /active:yes
- net users administrator
- Note(FYI):
- Command #1, Set the administrator's
password to the string
password. Use flag (/active:yes) to enable the
administrators account.
- Obviously, this is an extremely
weak password. Accordingly, we will illustrated why weak
passwords should never be used in following lessons
- Command #2, display the details of the
administrator account. Notice the account is set to active.

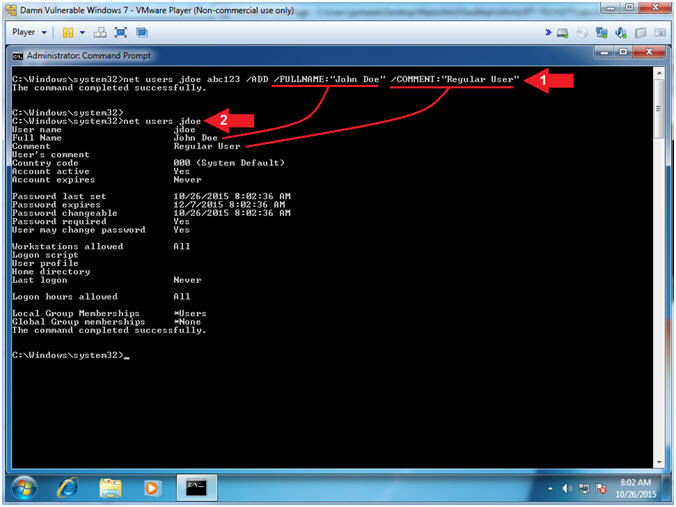
- Create Regular Account, Set Weak Password
- Instructions:
- net users jdoe
abc123 /ADD /FULLNAME:"John
Doe" /COMMENT:"Regular User"
- net users jdoe
- Note(FYI):
- Command #1, Create user (jdoe) using
the flag (/ADD). Set weak password (abc123).
Use flag (/FULLNAME:"John Doe") to set the full name. Use flag
(/COMMENT:"Regular User") to describe the username.
- Obviously, this is an extremely
weak password. Accordingly, we will illustrated why weak
passwords should never be used in following lessons
- Command #2, display the details of the
jdoe account.
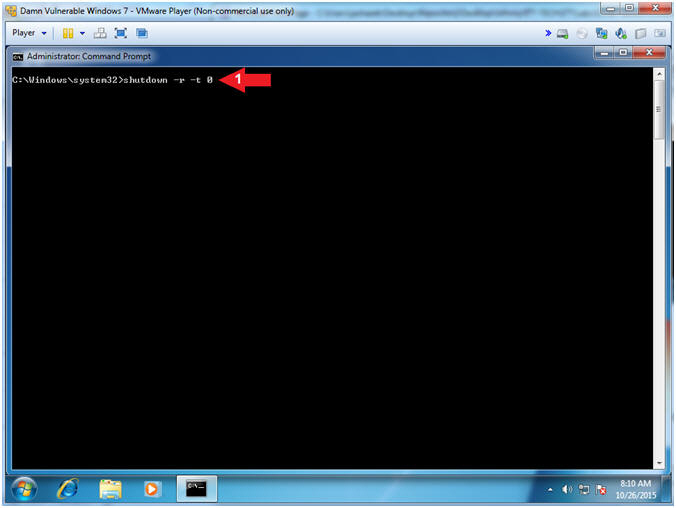
- Reboot Machine
- Instructions:
- shutdown -r -t 0
- Note(FYI):
- Command #1, Use the flag (-r) to reboot
the machine. Use the flag (-t) to specify the number of
seconds before the reboot will occur. We use 0 seconds to
reboot now.
|
Section 15: Login To
Damn Vulnerable Windows 7 |
- Select Login User
- Instructions:
- Click on Security Student
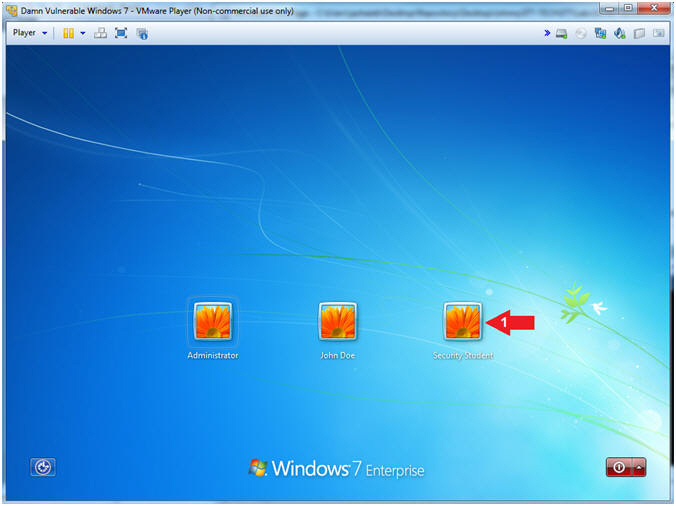
- Switch User
- Instructions:
- Supply the student password (abc123).
- Click on the arrow

|
Section 16: Install Firefox |
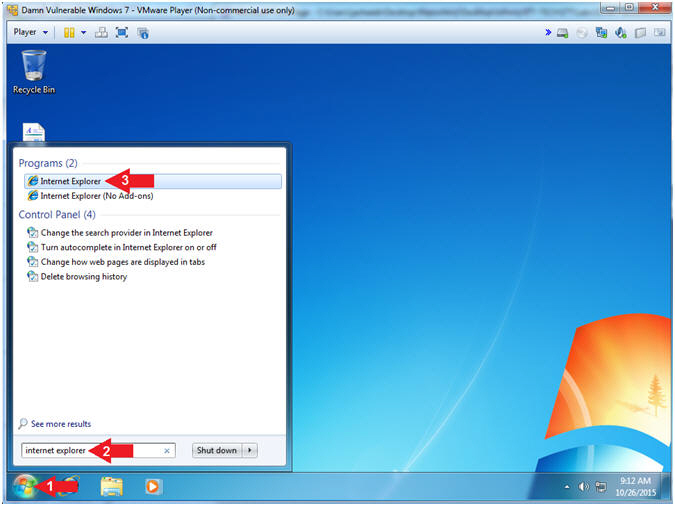
- Open Internet Explorer
- Instructions:
- Click the Windows Start Button
- Search for
internet explorer
- Click on Internet Explorer
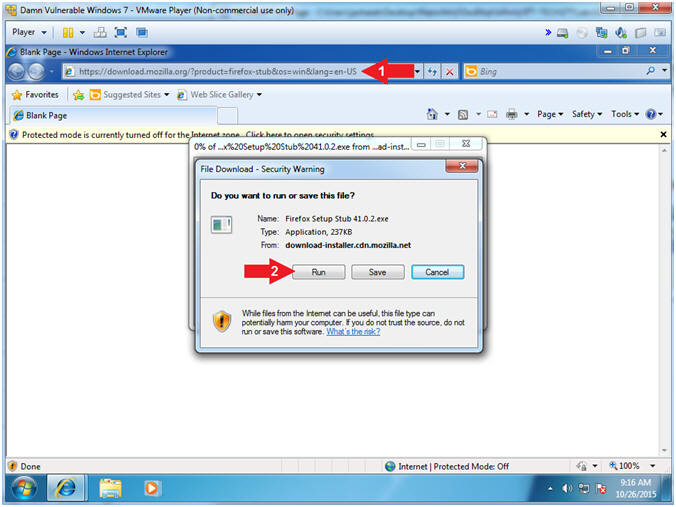
- Firefox Download URL
- Instructions:
- Navigate to the following URL
- https://download.mozilla.org/?product=firefox-stub&os=win&lang=en-US
- Click the Run Button
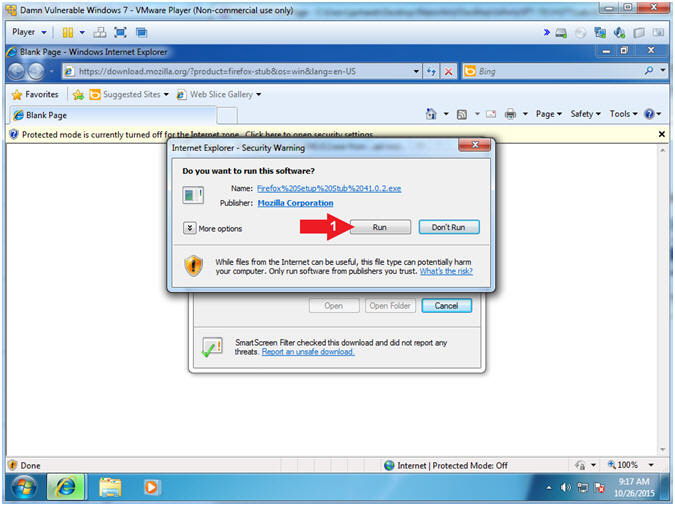
- File Download - Security Warning
- Instructions:
- Click the Run Button
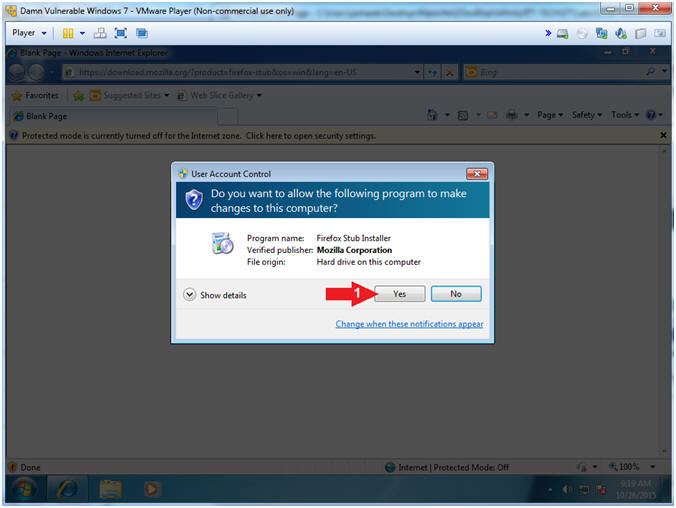
- User Account Control
- Instructions:
- Click the Yes Button
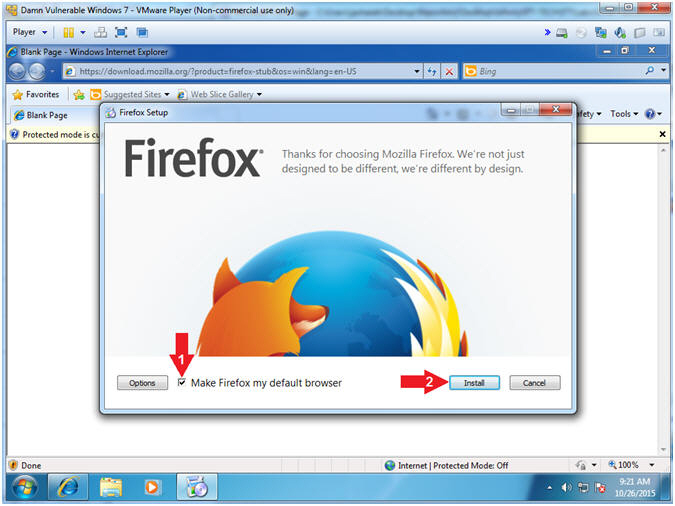
- Firefox Setup (Part 1)
- Instructions:
- Click the Install Button
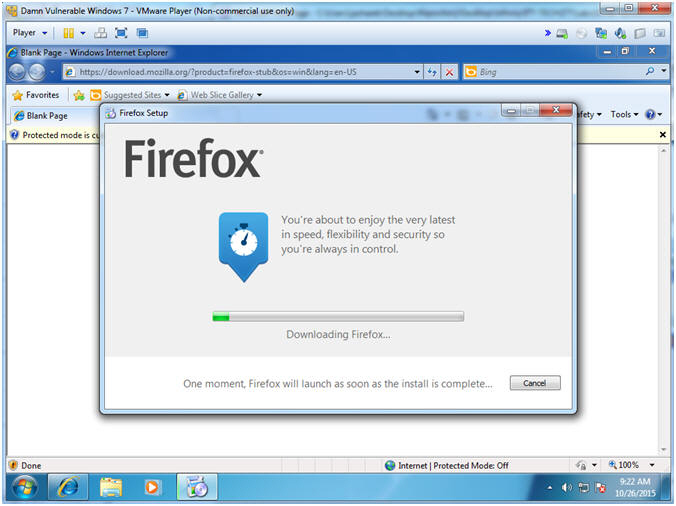
- Firefox Setup (Part 2)
- Note(FYI):
- The Firefox download will take around
15 minutes.
- Once the installation finishes it will
automatically open a Firefox browser.
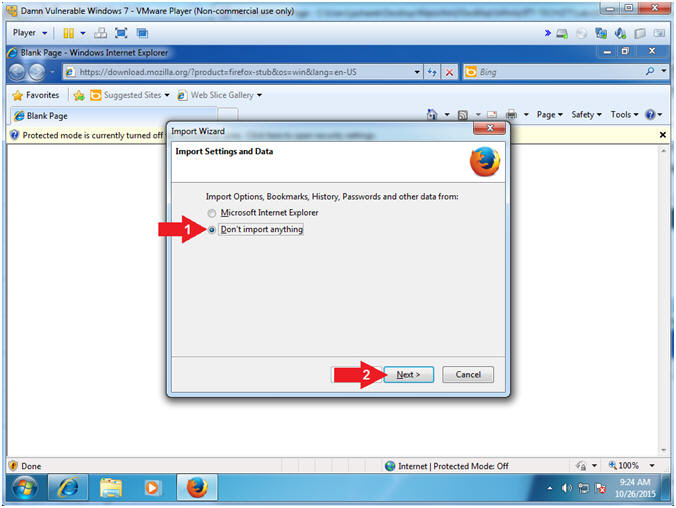
- Import Wizard (Import Settings and Data)
- Instructions:
- Click on Don't import anything
- Click the Next Button
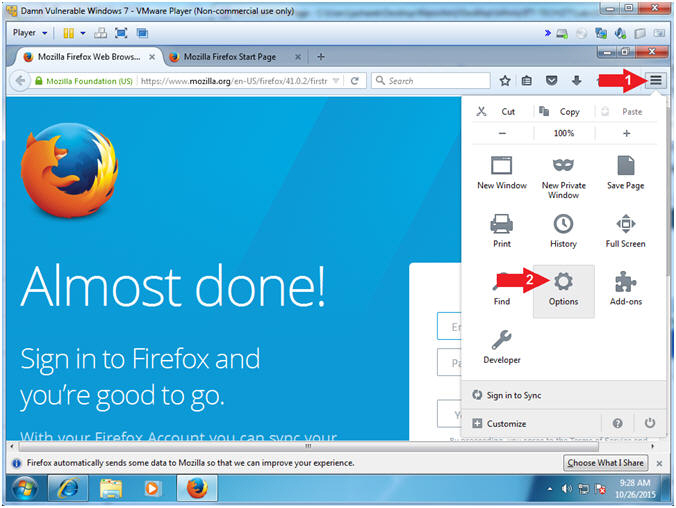
- Firefox Options (Option)
- Instructions:
- Click on the menu icon

- Click on the options icon

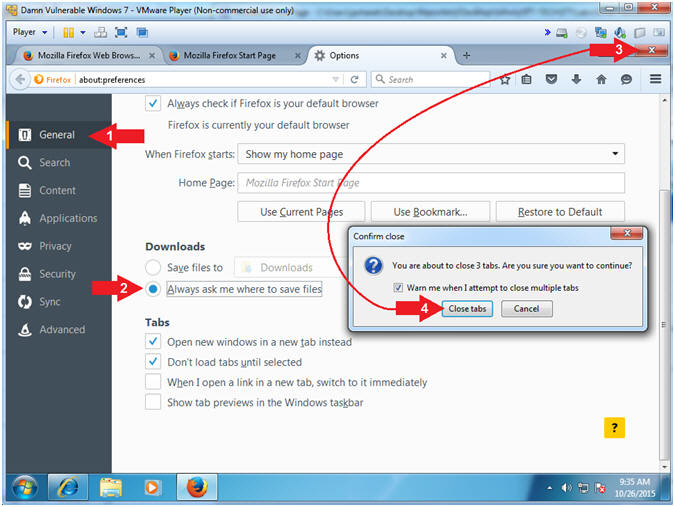
- Firefox Options (General:Downloads)
- Instructions:
- Click the General Tab
- Click the Always ask me where to
save files radio button
- Click the
 to close Firefox
- Click the Close tabs button
|
Section 17: Install
7-zip |
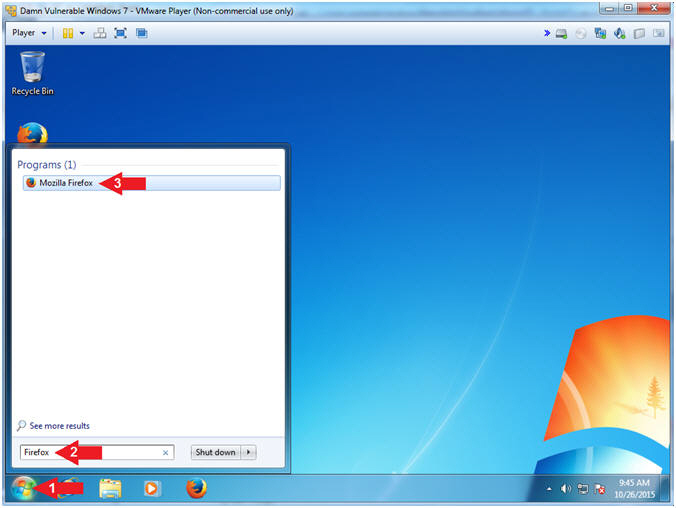
- Open Firefox
- Instructions:
- Click the Windows Start Button
- Search for
Firefox
- Click on Mozilla Firefox
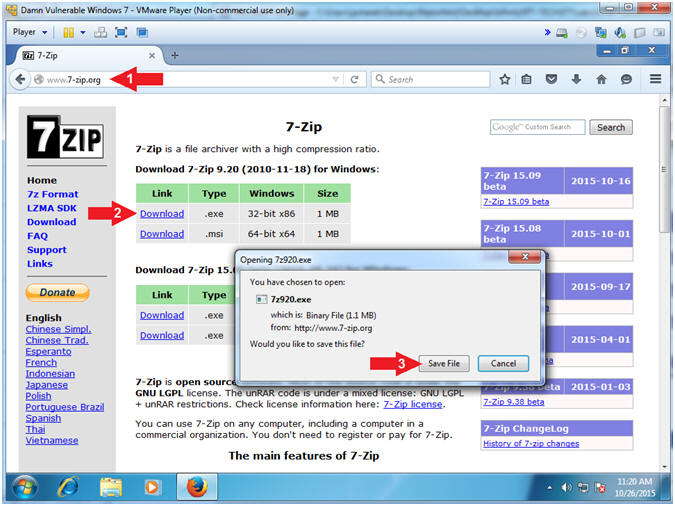
- Start 7-Zip Download
- Instructions:
- http://www.7-zip.org
- Click Download
- Click the Save File Button
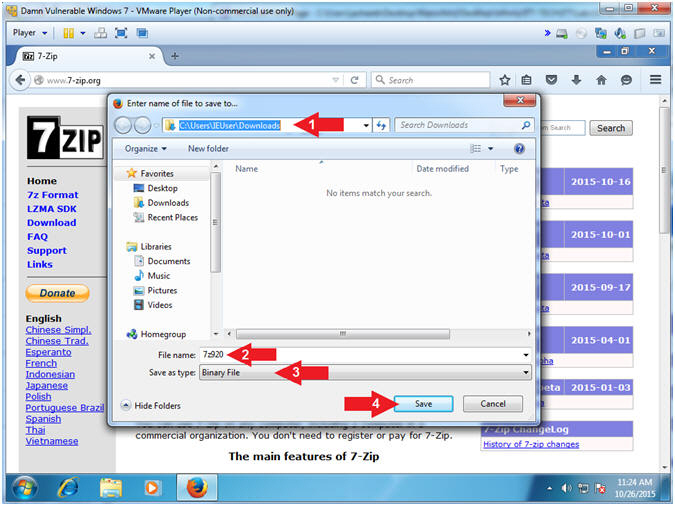
- Save to Destination Folder
- Instructions:
- Navigate to the follow folder
- C:\Users\IEUser\Downloads
- File name: 7z920
- Save as type: Binary File
- Click the Save Button
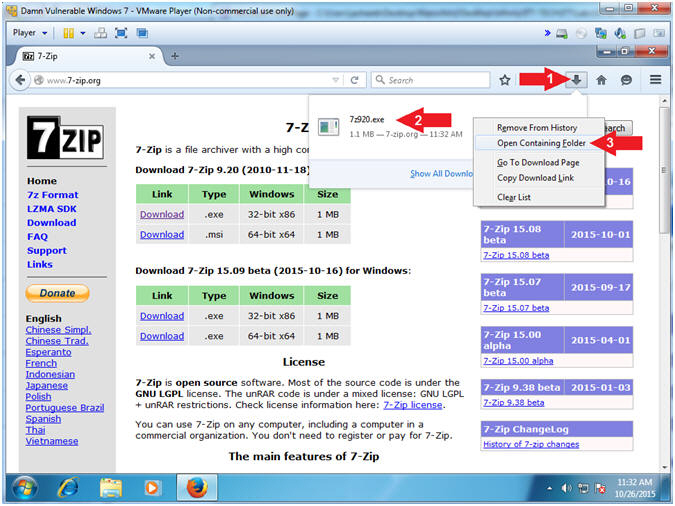
- Open Containing Folder
- Instructions:
- Click on the down arrow

- Right click on 7z920.exe
- Open Containing Folder
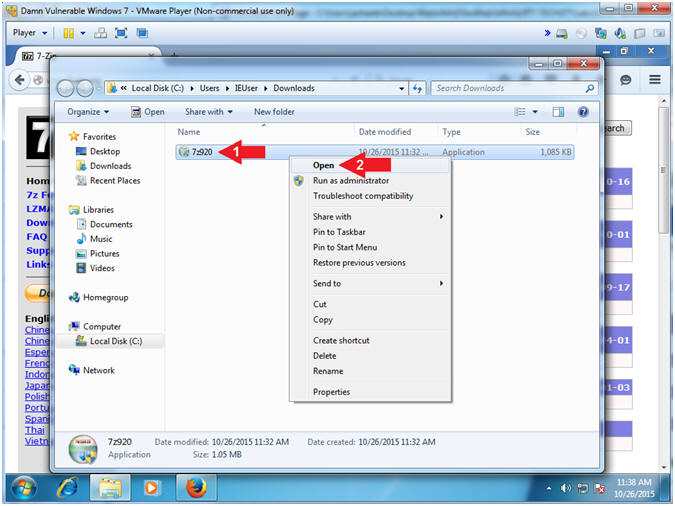
- Open Executable File
- Instructions:
- Right click on 7z920
- Click Open
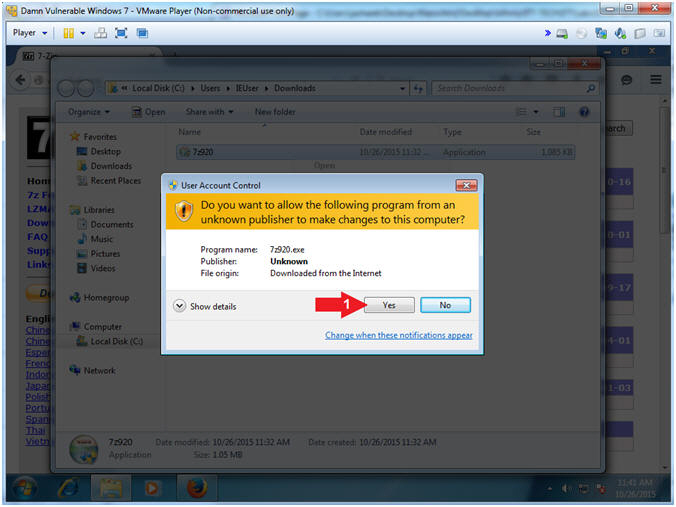
- User Account Control
- Instructions:
- Click the Yes Button
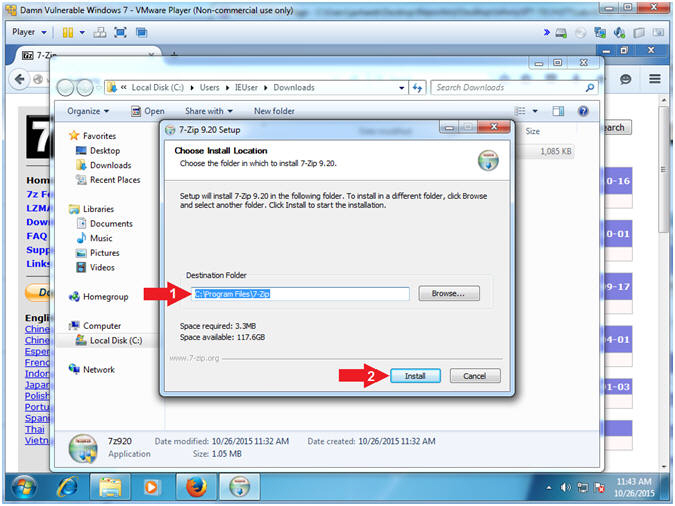
- Choose Install Location
- Instructions:
- Destination: C:\Program Files\7-Zip
- Click the Install Button
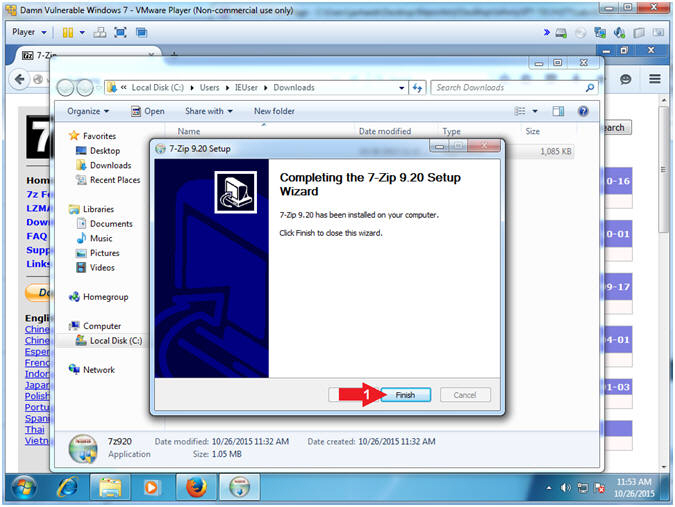
- 7-Zip Completion
- Instructions:
- Click the Finish Button
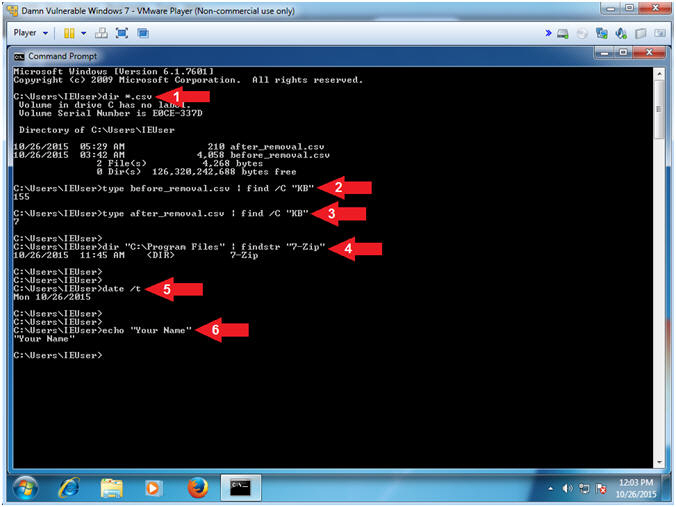
- Proof of Lab
- Instructions:
- dir *.csv
- type before_removal.csv | find /C "KB"
- type after_removal.csv | find /C "KB"
- dir "C:\Program Files" | findstr
"7-Zip"
- date /t
- echo "Your Name"
- Put in your actual name in place of
"Your Name"
- e.g., echo "John Gray"
-
Proof of Lab
Instructions
- Press the <Ctrl> and <Alt> key at the
same time.
- Press the <PrtScn> key.
- Paste into a word document
- Upload to Moodle
|
 
|