(FTK Imager Lite: Lesson 1)
{ Create FTK Imager Lite ISO with DoISO }
| Section 0. Background Information |
- What is the Purpose of this lab?
- In this lab I am showing a student how to create an ISO from FTK Imager Lite.
- Running FTK Imager from a CD or ISO does
not require a forensics investigator to actually install software on the
machine that is being analyzed.
- What is FTK Imager Lite?
- The Forensic Toolkit Imager (FTK Imager) is a commercial forensic imaging software package distributed by AccessData.
- The FTK Imager Lite version can be installed and executed from a CD/DVD or USB media.
- What is DoISO?
- DoISO is a simple and great free ISO creation frontend for mkisofs.
- Pre-Requisite Labs
-
Lab Notes
- In this lab we will do the following:
- Create a VMware Shared Folder
- Download FTK IMAGER LITE
- Burn FTK IMAGER LITE to an ISO/CD
- Test FTK IMAGER LITE ISO/CD
- In this lab we will do the following:
- Legal Disclaimer
- As a condition of your use of this Web site, you warrant to computersecuritystudent.com that you will not use this Web site for any purpose that is unlawful or that is prohibited by these terms, conditions, and notices.
- In accordance with UCC § 2-316, this product is provided with "no warranties, either express or implied." The information contained is provided "as-is", with "no guarantee of merchantability."
- In addition, this is a teaching website that does not condone malicious behavior of any kind.
- Your are on notice, that continuing and/or using this lab outside your "own" test environment is considered malicious and is against the law.
- © 2013 No content replication of any kind is allowed without express written permission.
| Section 1. Log into Damn Vulnerable WXP-SP2 |
- Start Up Damn Vulnerable WXP-SP2.
- Instructions:
- Click on Damn Vulnerable WXP-SP2
- Click on Edit virtual machine Settings
- Note(FYI):
- For those of you not part of my class, this is a Windows XP machine running SP2.
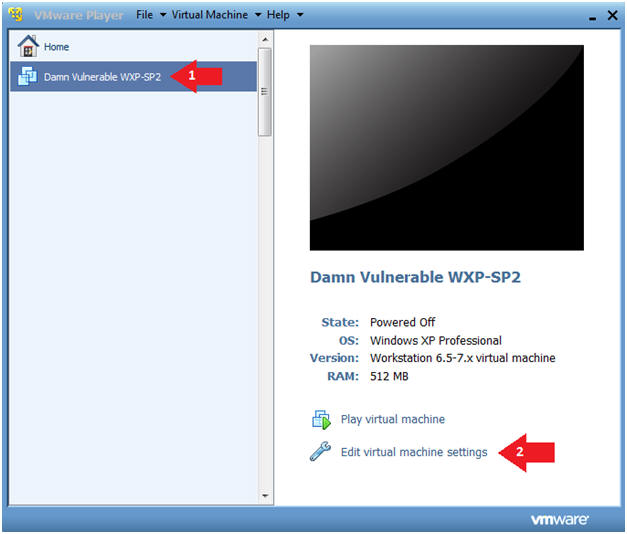
- Instructions:
- Edit Virtual Machine Settings
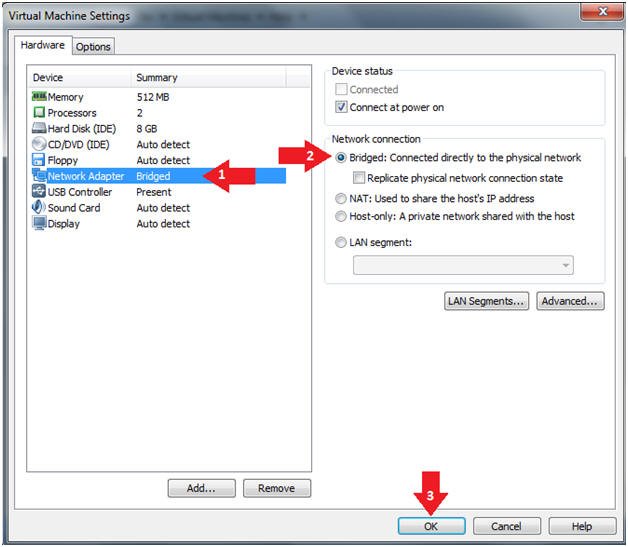
- Instructions:
- Click on Network Adapter
- Click on the Bridged Radio button
- Click on the OK Button
- Instructions:
- Play Virtual Machine
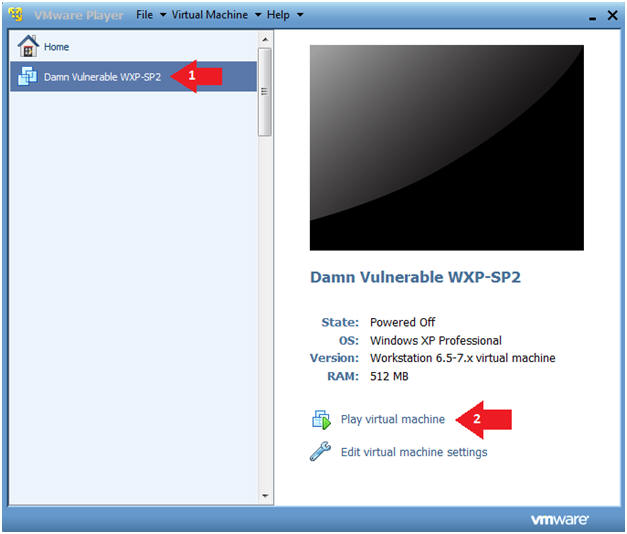
- Instructions:
- Click on Damn Vulnerable WXP-SP2
- Click on Play virtual machine
- Instructions:
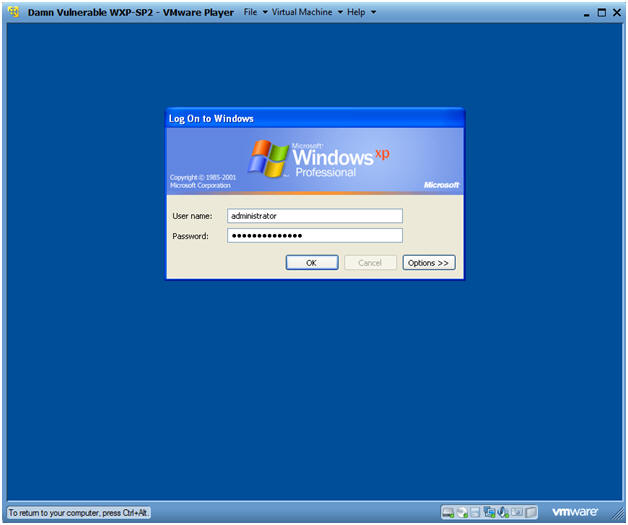
- Logging into Damn Vulnerable WXP-SP2.
- Instructions:
- Username: administrator
- Password: Use the Class Password or whatever you set it.
- Instructions:
| Section 2. Enabled VMware Shared Folder |
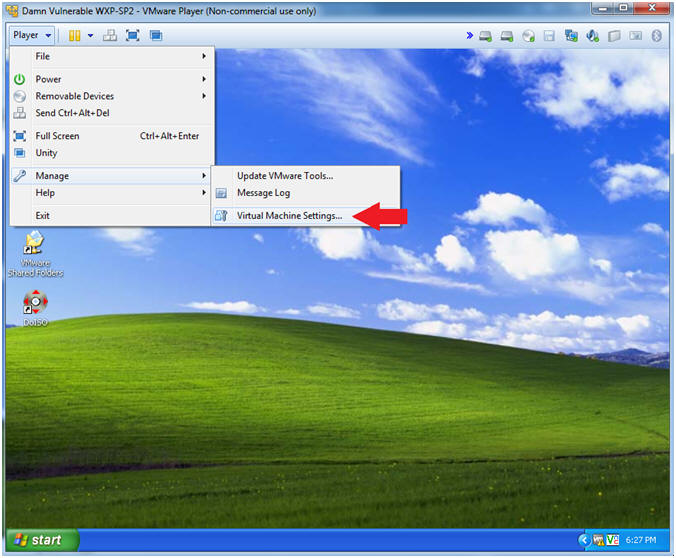
- Virtual Machine Settings...
- Instructions:
- Player --> Manage --> Virtual Machine Settings...
- Instructions:
- Virtual Machine Options
- Instructions:
- Click on the Options Tab

- Instructions:
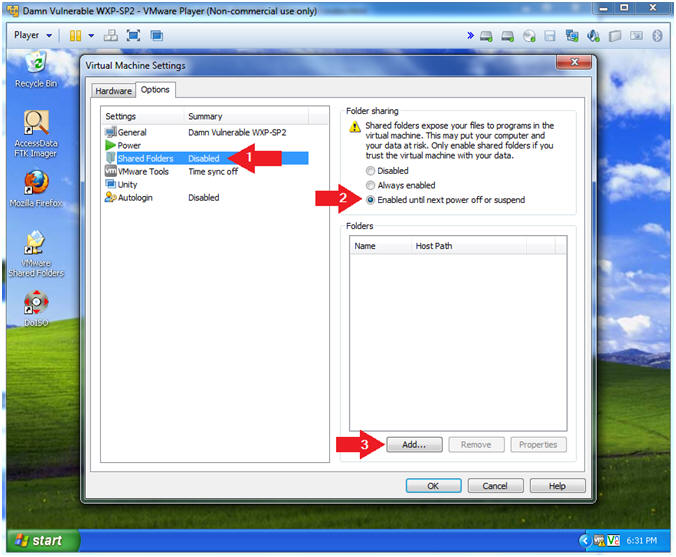
- Folder Sharing
- Instructions:
- Click on Shared Folder
- Click on the Enabled until power off or suspend radio button
- Click on the Add button
- Instructions:
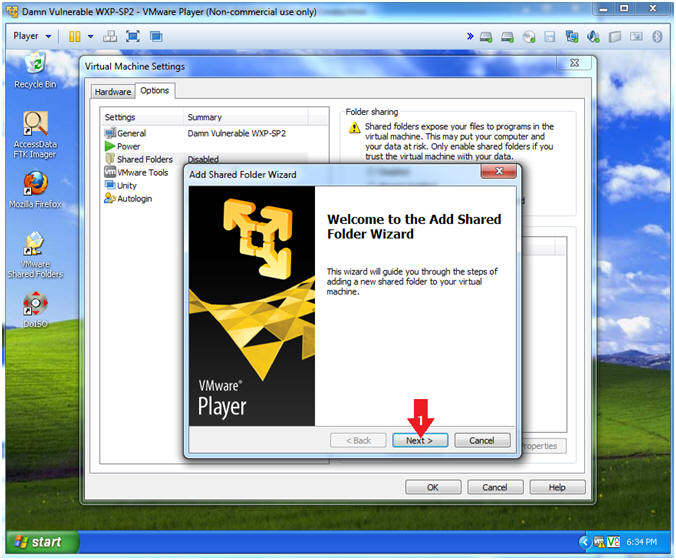
- Add Shared Folder Wizard
- Instructions:
- Click on the Next Button
- Instructions:
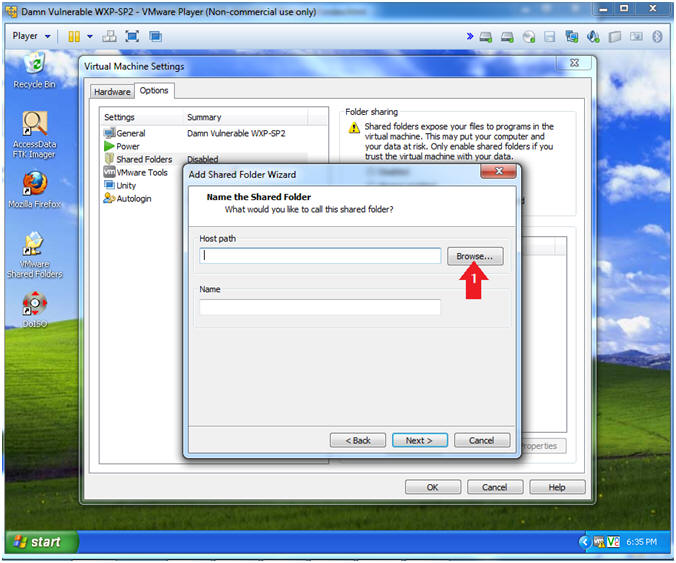
- Browse to Shared Folder
- Instructions:
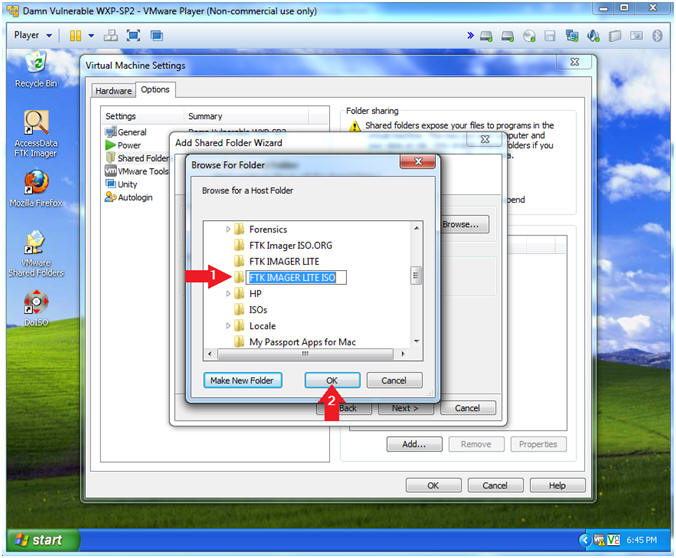
- Click the Browse... button
- Instructions:
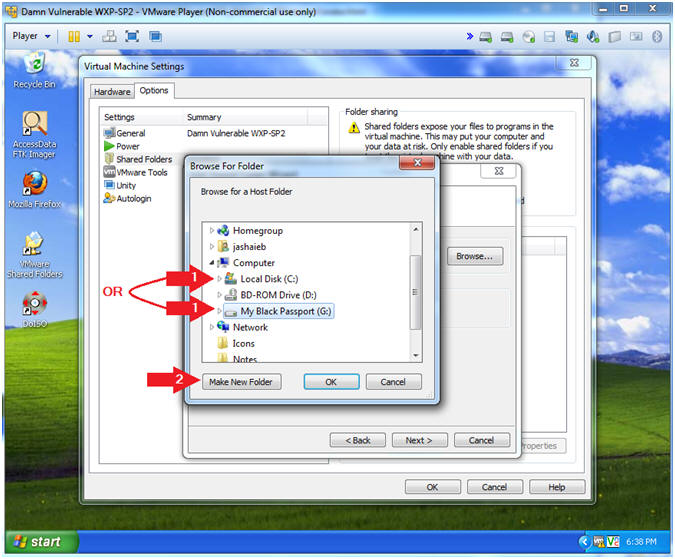
- Browse For Folder
- Instructions:
- Select either your C: Drive or USB:
Drive
- Note: In my case, I am using a USB Drive (G:)
- Click on Make New Folder
- Select either your C: Drive or USB:
Drive
- Instructions:
- Name Folder
- Instructions:
- Name the folder --> "FTK IMAGER LITE ISO"
- Click the OK Button
- Instructions:
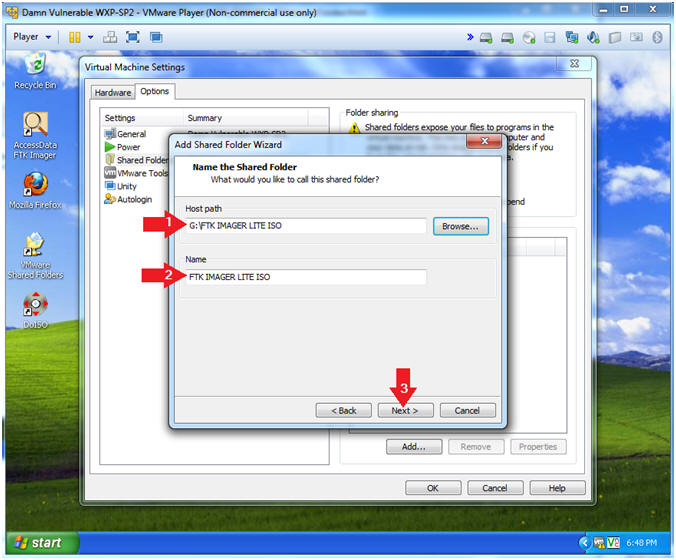
- Name the Shared Folder
- Instructions:
- Host path:
G:\FTK
IMAGER LITE ISO
- Note: In my case, I am using a USB Drive (G:)
- Name: FTK IMAGER LITE ISO
- Click Next
- Host path:
G:\FTK
IMAGER LITE ISO
- Instructions:
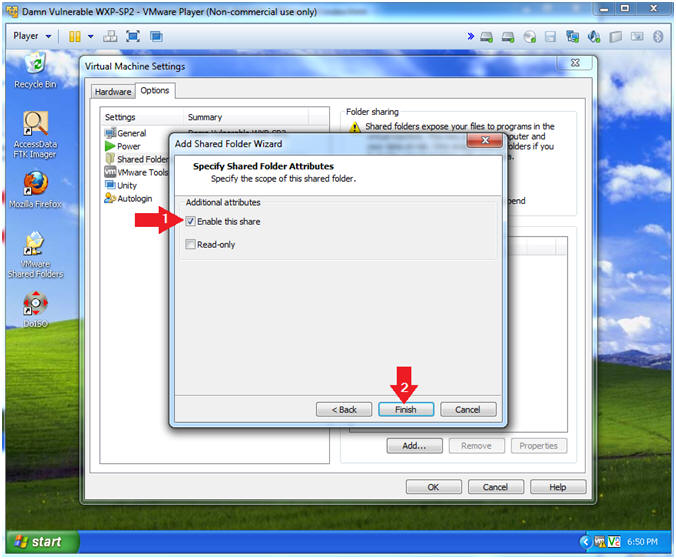
- Specify Shared Folder Attributes
- Instructions:
- Check the Enable this share checkbox
- Click the Finish button
- Instructions:
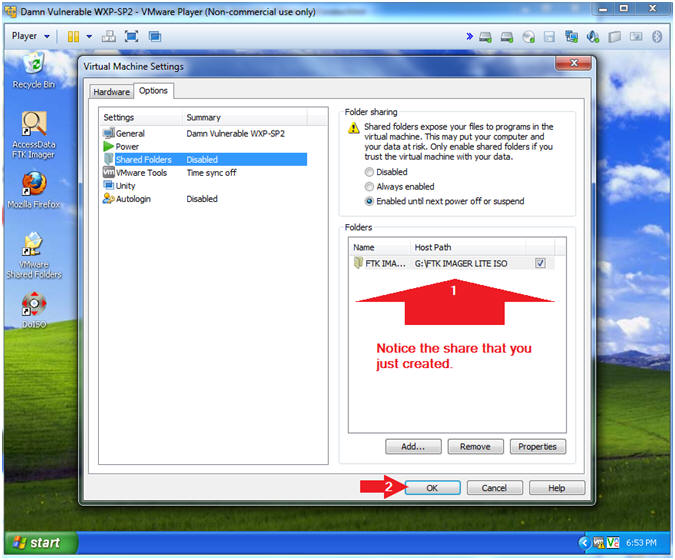
- View Shared Folder Results
- Instructions:
- Notice the share that you just created
- Click the OK Button
- Instructions:
| Section 3. Verify Network Connectivity |
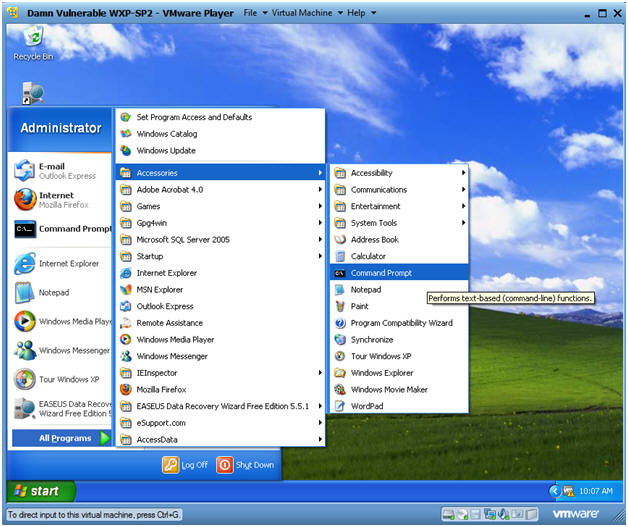
- Open a Command Prompt
- Instructions:
- Start --> All Programs --> Accessories --> Command Prompt
- Instructions:
- Obtain Damn Vulnerable WXP-SP2's IP Address
- Instructions:
- ipconfig
- Note(FYI):
- In my case, Damn Vulnerable WXP-SP2's IP Address 192.168.1.116.
- This is the IP Address of the Victim Machine that will be attacked by Metasploit.
- Record your Damn Vulnerable WXP-SP2's IP Address.
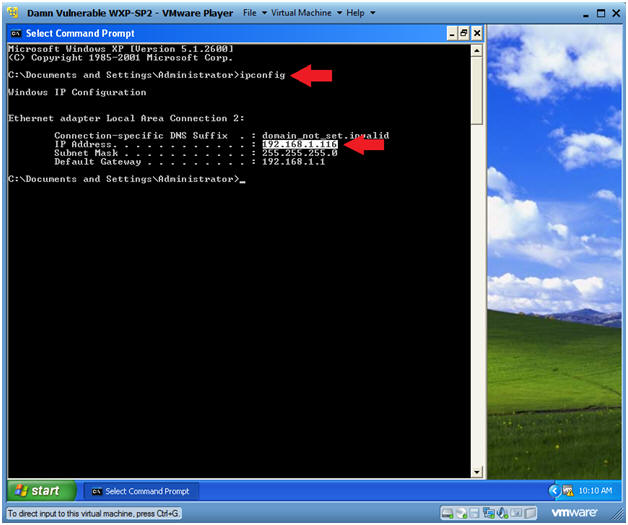
- Instructions:
| Section 4. Download FTK IMAGER LITE |
- Open Firefox
- Instructions:
- Start --> All Programs --> Firefox
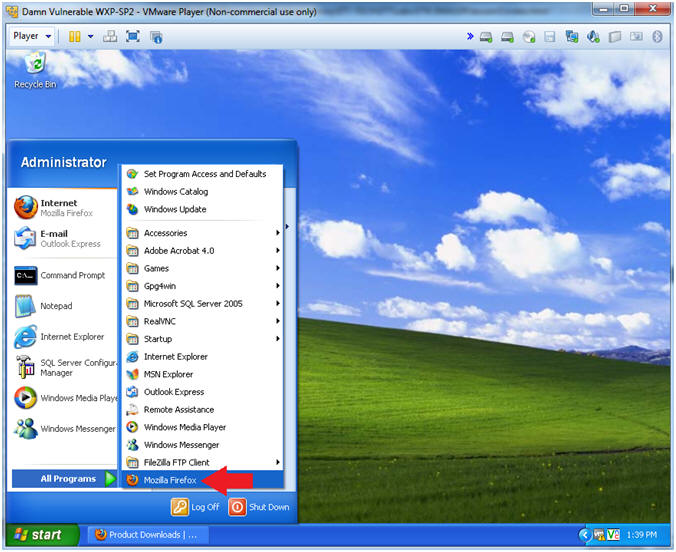
- Instructions:
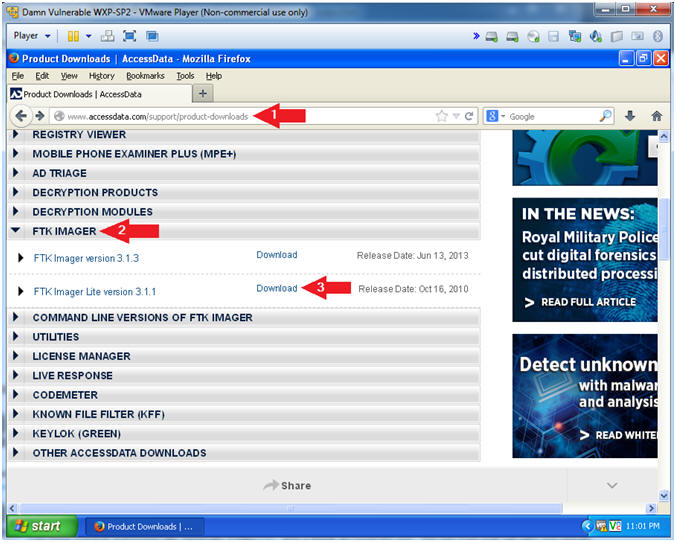
- Navigate to FTK Imager Lite
- Instructions:
- Place the following URL into the
address textbox and press enter (See Picture)
- http://www.accessdata.com/support/product-downloads
- Click on FTK IMAGER
- Click the FTK Imager Lite version 3.1.1 Download Link
- Place the following URL into the
address textbox and press enter (See Picture)
- Instructions:
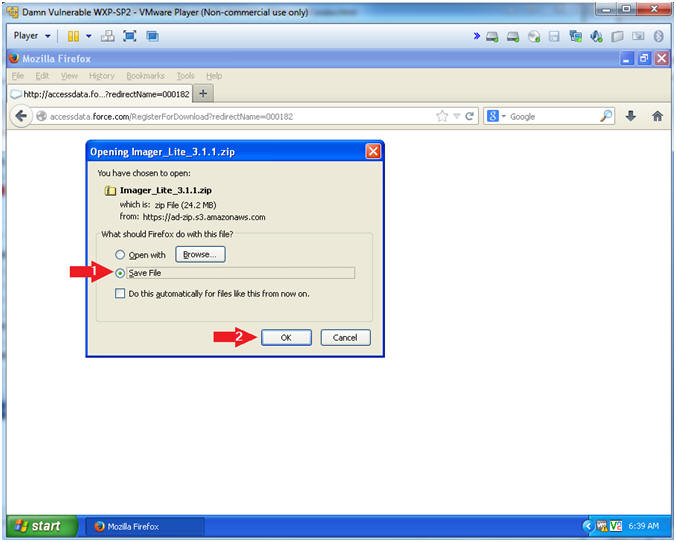
- Save FTK IMAGER LITE
- Instructions:
- Click the Save File radio button
- Click the OK button
- Instructions:
- Go To the Downloads Folder
- Instructions:
- Tools --> Downloads
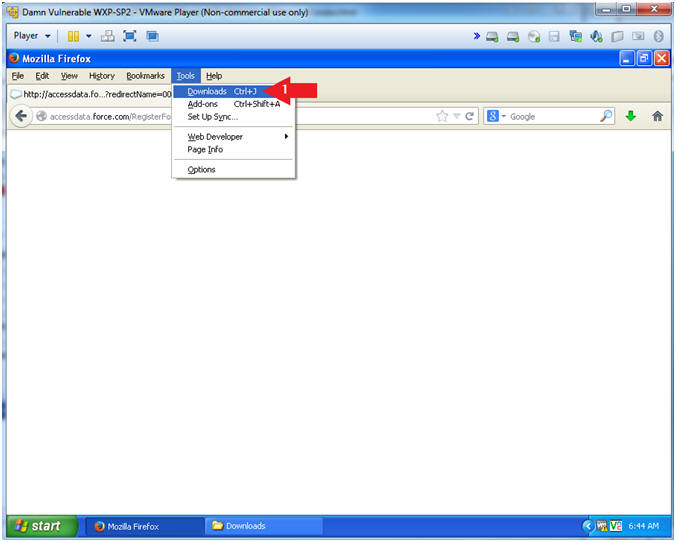
- Instructions:
- Open Containing Folder
- Instructions:
- Right Click on Imager_Lite_3.1.1.zip
- Click Open Containing Folder
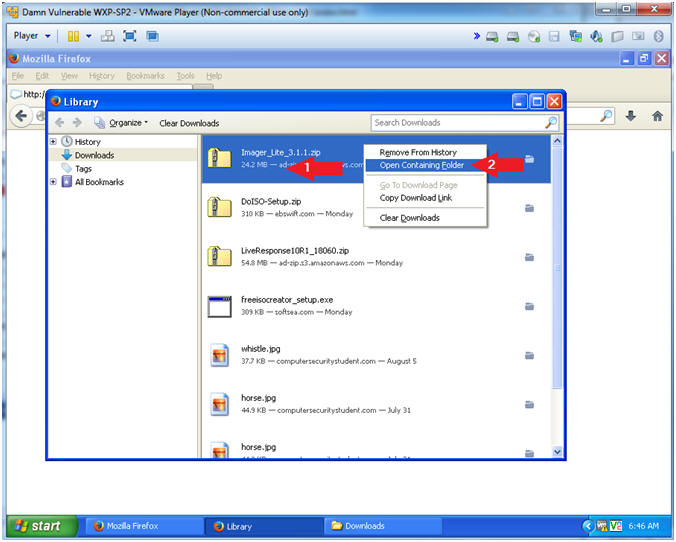
- Instructions:
- Extract Files
- Instructions:
- Right Click on Imager_Lite_3.1.1.zip
- Click on Extract All...
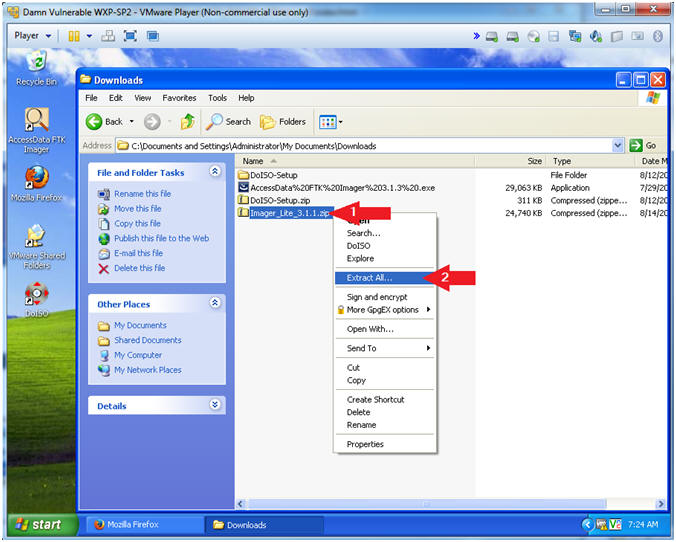
- Instructions:
- Extraction Wizard
- Instructions:
- Click the Next Button
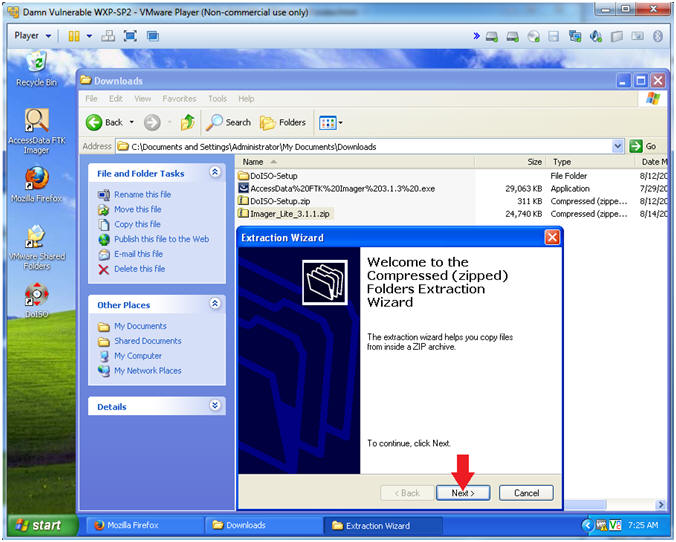
- Instructions:
- Select a Destination
- Instructions:
- Click the Next Button
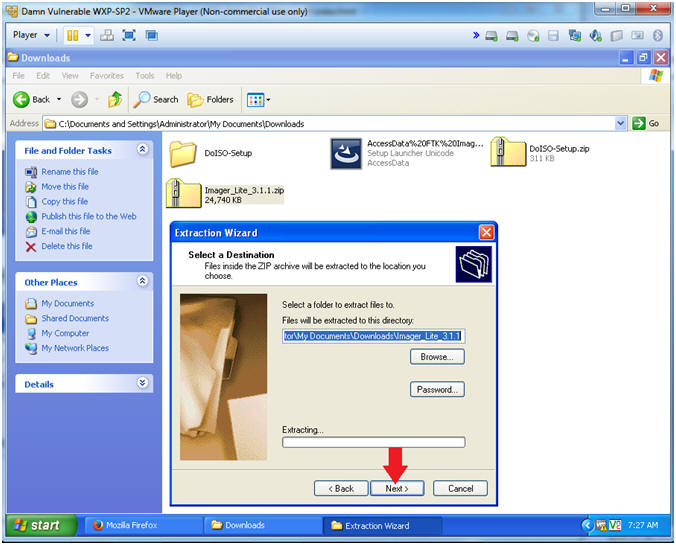
- Instructions:
- Extract Completion
- Instructions:
- Click the Finish Button
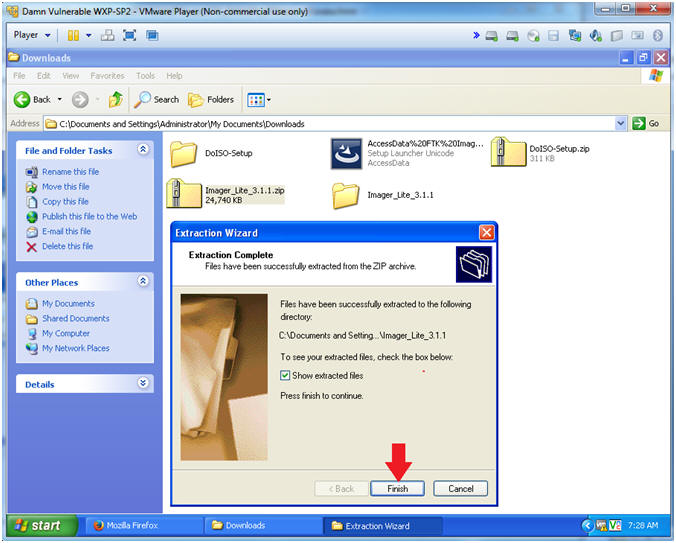
- Instructions:
| Section 5. Create FTK IMAGER LITE ISO |
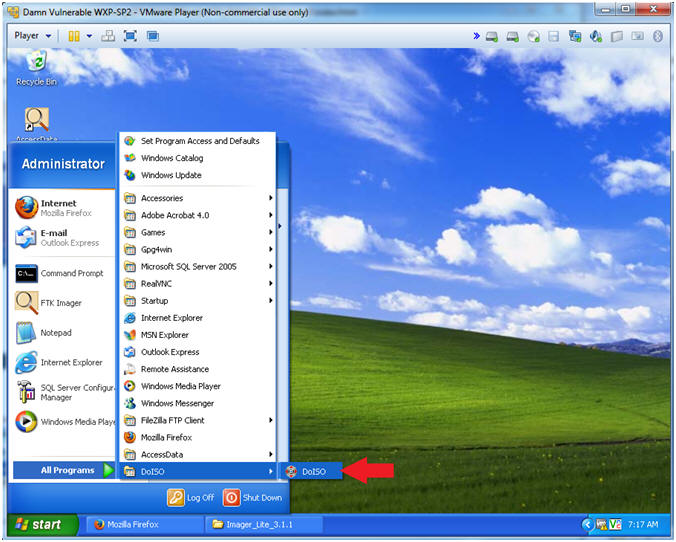
- Start DoISO
- Notes(FYI):
- It is not necessary to use DoISO to burn FTK Imager Lite to an ISO. You can use Nero, Roxio, or whatever. However, DoISO is free and good.
- Instructions:
- Start --> All Programs --> DoISO --> DoISO
- Notes(FYI):
- Browse For Folder
- Instructions:
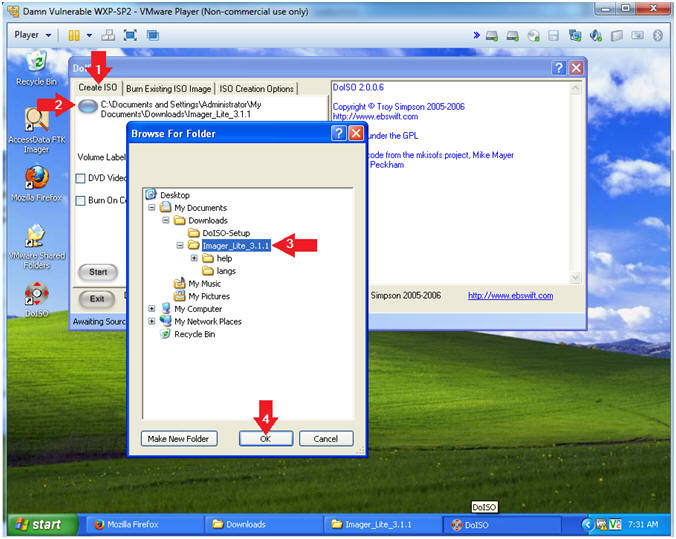
- Select the Create ISO Tab
- Click the Blue Circle
- My Documents --> Downloads --> Imager_Lite_3.1.1
- Click the OK Button
- Instructions:
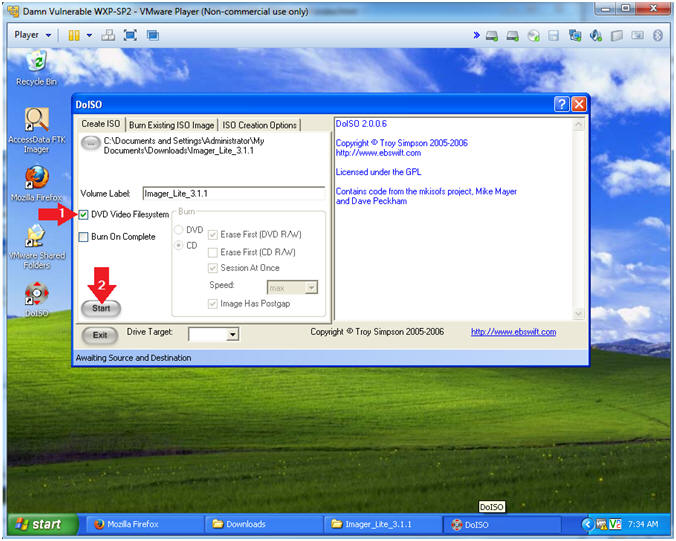
- Start ISO Creation
- Instructions:
- Check the DVD Video Filesystem
- Click the Start Button
- Instructions:
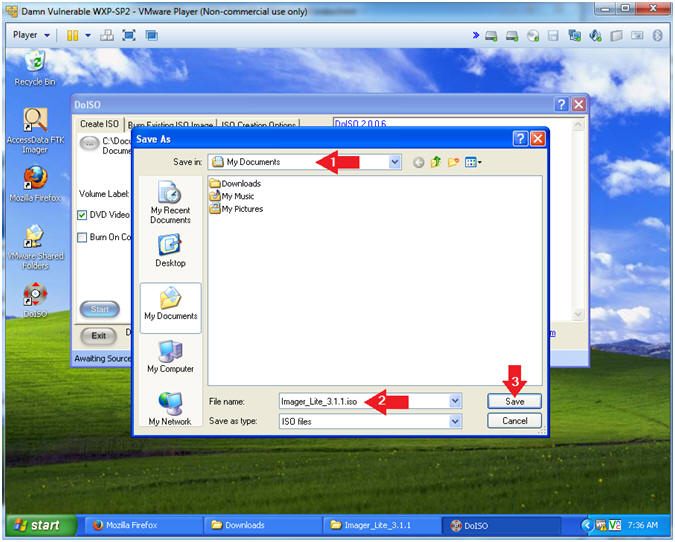
- Save Filename
- Instructions:
- Save in: Select My Documents
- File name: Imager_Lite_3.1.1.iso
- Click the Save Button
- Instructions:
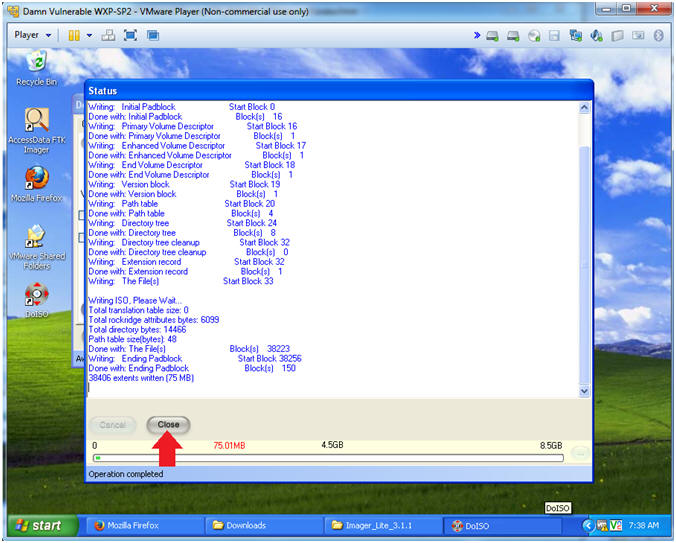
- Operation Completion
- Instructions:
- Click the Close Button
- Instructions:
| Section 6. Copy ISO to VMware Shared Folder |
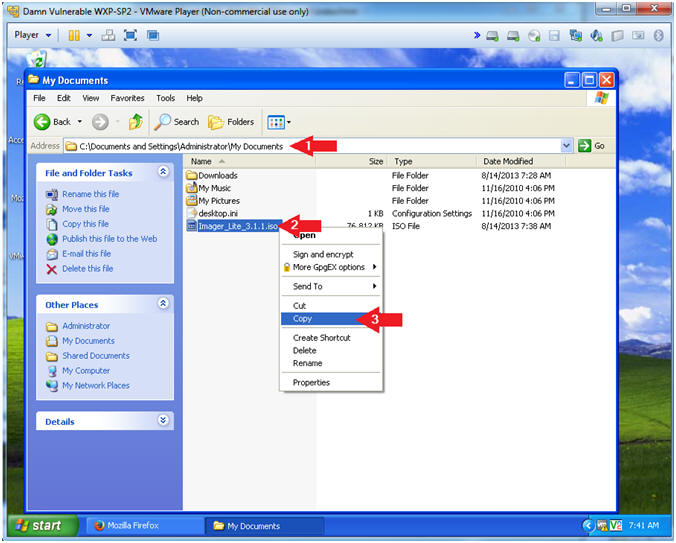
- Copy ISO
- Instructions:
- Navigate to the following directory
- C:\Documents and Settings\Administrator\My Documents
- Right click on Imager_Lite_3.1.1.iso
- Select Copy
- Navigate to the following directory
- Instructions:
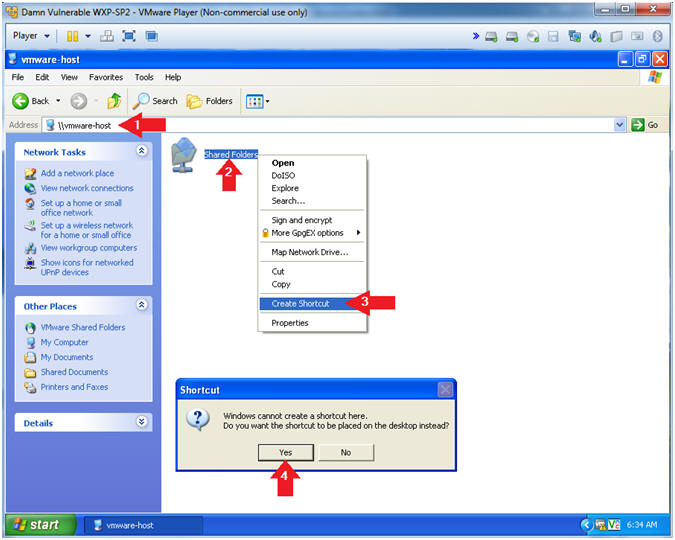
- Create VMware Shared Folders Desktop Shortcut
- Instructions:
- Navigate to \\vmware-host
- Right Click on Shared Folders
- Select Create Shortcut
- Click the Yes Button
- Instructions:
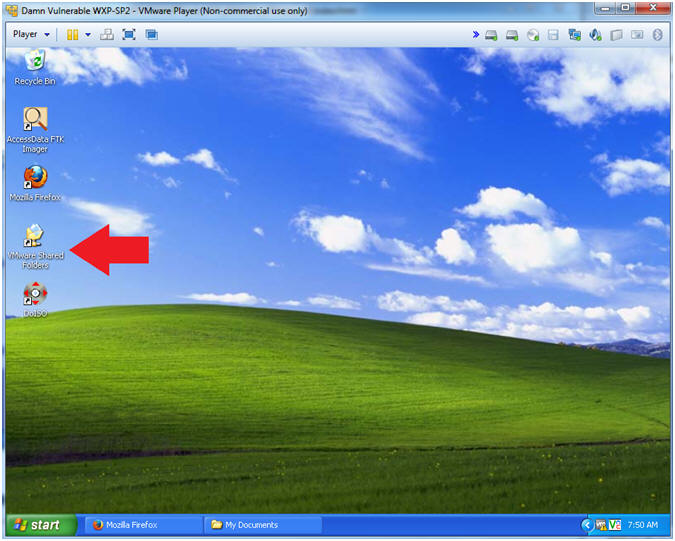
- Navigate to the VMware Shared Folders
- Instructions:
- Double Click on the VMware Shared Folders located on the desktop
- Instructions:
- Paste ISO File
- Instructions:
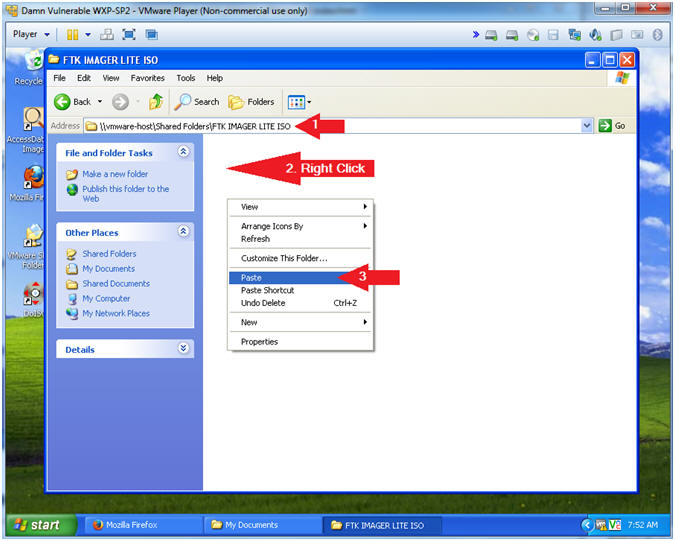
- Navigate to the FTK IMAGER LITE ISO
- \\vmware-host\Shared Folders\FTK IMAGER LITE ISO
- Right Click in the white window pain (See Picture)
- Select Paste
- Navigate to the FTK IMAGER LITE ISO
- Instructions:
| Section 7. Test the ISO/CD Image |
- Virtual Machine Settings...
- Instructions:
- Player --> Manage --> Virtual Machine Settings...
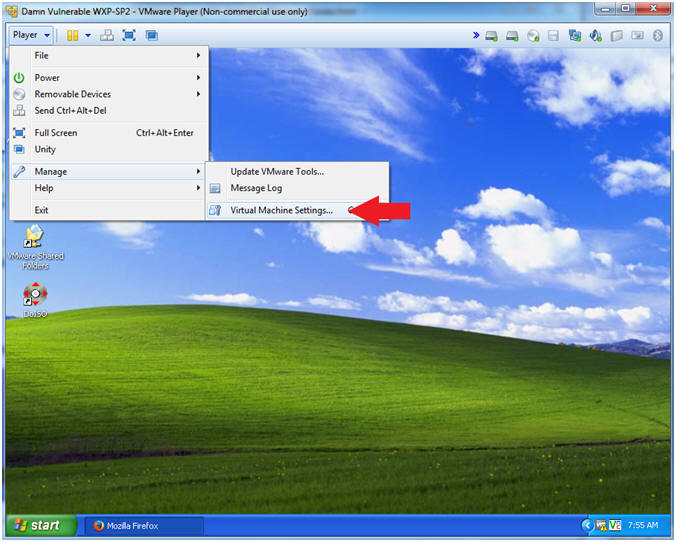
- Instructions:
- Set CD/DVD
- Instructions:
- Highlight CD/DVD
- Click the Use ISO image file radio button
- Click the Browse... button
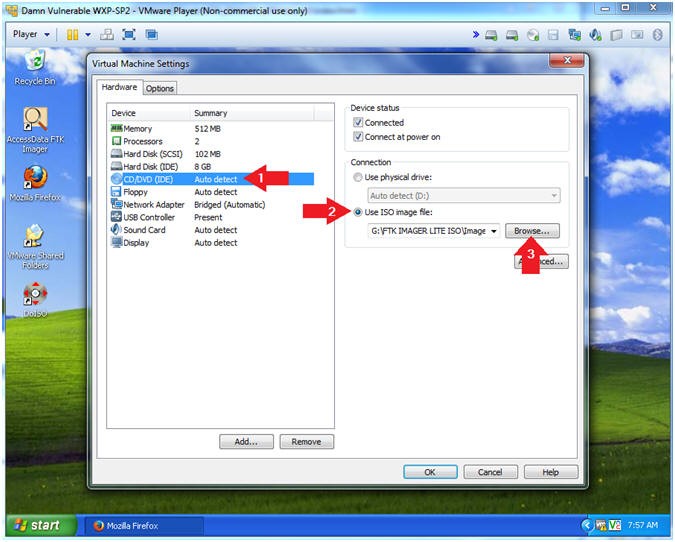
- Instructions:
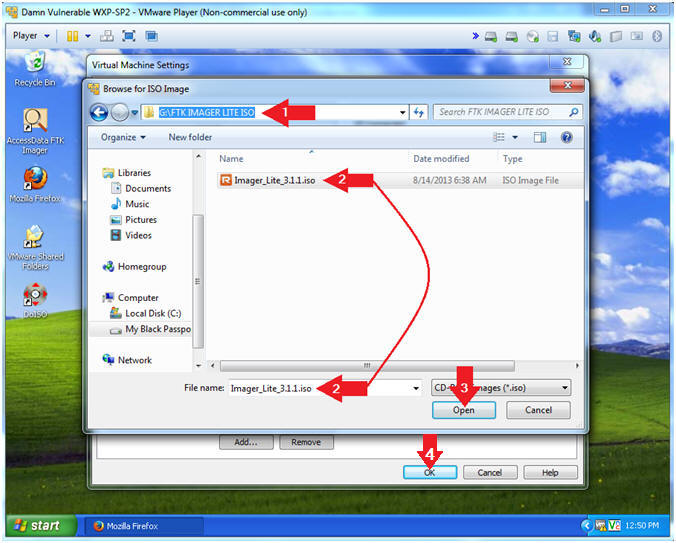
- Browse for ISO Image
- Instructions:
- Navigate to ISO Image Folder
- Click on Imager_Lite_3.1.1.iso
- Click the Open Button
- Click the OK Button
- Instructions:
- Start FTK Imager from CD
- Instructions:
- A Windows Explorer window should have opened up to the D: drive.
- Right Click on FTK Imager.exe
- Select Open
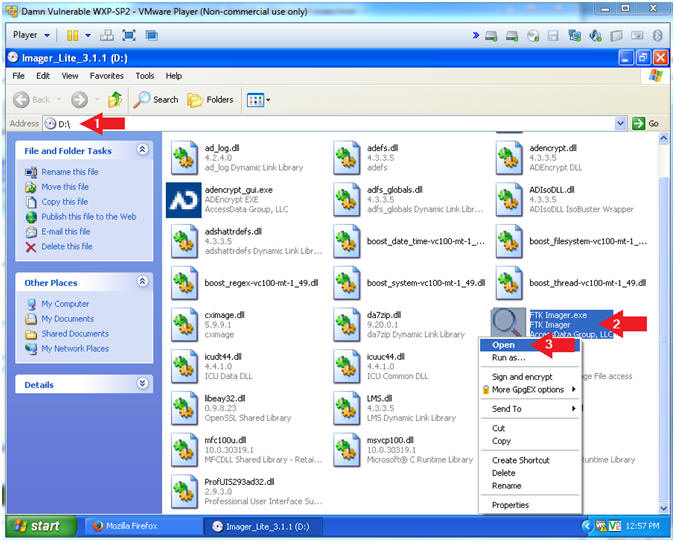
- Instructions:
- Congratuations
- Note(FYI):
- Congratuations you successfully burned FTK IMAGER LITE to a CD and tested it!!!
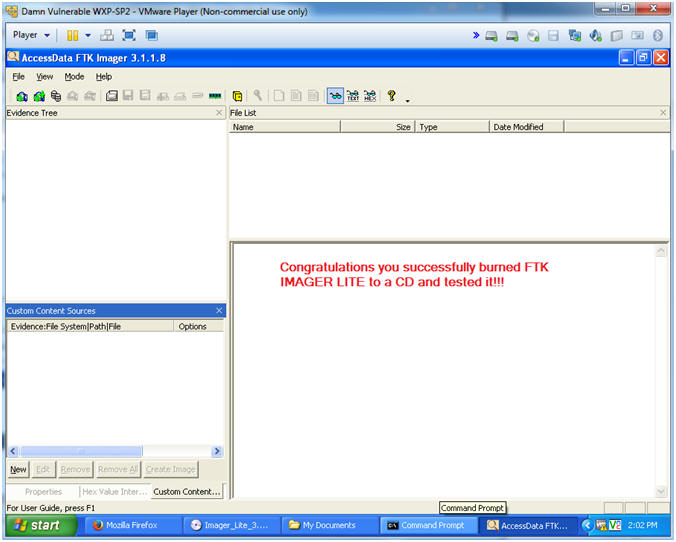
- Note(FYI):
| Section 8. Proof of Lab |
-
Proof of Lab
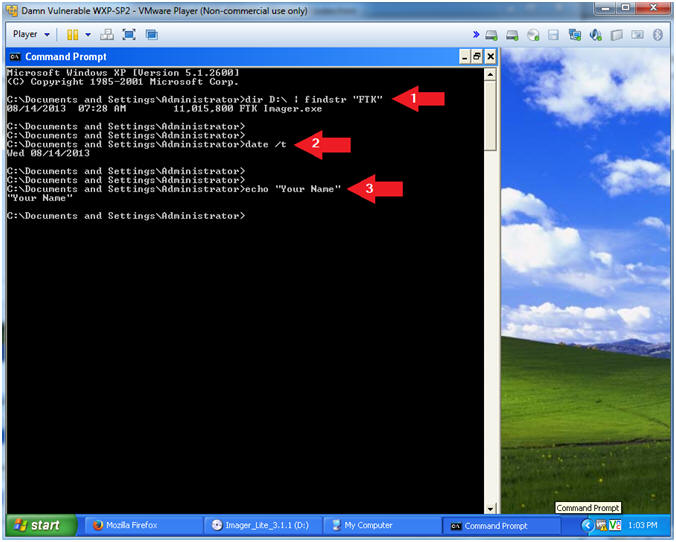
- Instructions:
- dir D:\ | findstr "FTK"
- date /t
- echo "Your Name"
- This should be your actual name.
- e.g., echo "John Gray"
- Proof of Lab
Instructions:
- Do a PrtScn
- Past into a word document
- Upload to Moodle.
-
- Instructions: